Losing treasured snapshots from your iPhone can be distressing, but don’t worry; dfphoto.net is here to guide you through effective recovery strategies. This article provides step-by-step instructions and expert advice on photo retrieval, leveraging innovative techniques and software solutions to recover your irreplaceable memories, combining data recovery methods, preventative measures, and cloud storage options for safeguarding your visual stories. Let’s explore photo restoration, storage solutions, and digital preservation.
1. Where Do Deleted Photos Go On An iPhone?
Deleted photos from an iPhone first go to the “Recently Deleted” album within the Photos app. This album acts as a temporary holding place for photos and videos that have been deleted, providing a safety net for users who may have accidentally deleted something important.
The Recently Deleted album holds items for a period of 30 days. During this time, users can easily recover their photos and videos by selecting them and choosing the “Recover” option. This moves the items back to their original locations in the Photos app. After 30 days, the items are permanently deleted from the device, and recovery becomes more challenging, often requiring specialized data recovery tools or backup restoration. Regularly checking the Recently Deleted album can save you from permanent data loss and is the first step in attempting to recover deleted photos.
2. How To Recover Deleted Photos From iPhone Using The Recently Deleted Album?
Recovering deleted photos from your iPhone using the Recently Deleted album is a straightforward process. Follow these simple steps to restore your photos:
- Open the Photos App: Launch the Photos app on your iPhone. This is where all your photos and videos are stored.
- Navigate to Albums: At the bottom of the screen, tap the “Albums” tab. This will display all the albums in your Photos app.
- Find the Recently Deleted Album: Scroll down until you find the “Recently Deleted” album. It’s usually located under the “Utilities” section.
- Select the Photos: Open the Recently Deleted album. You will see all the photos and videos you’ve deleted in the last 30 days.
- Recover the Photos:
- Tap the “Select” button in the top right corner of the screen.
- Choose the photos you want to recover by tapping on them. A checkmark will appear on each selected photo.
- Tap the “Recover” button at the bottom right corner of the screen.
- Confirm your choice by tapping “Recover Photos.”
The selected photos will be restored to their original locations in your Photos app. If you want to recover all the photos in the album, you can tap the “Recover All” option after tapping “Select”. According to Apple Support, this method is the quickest and easiest way to retrieve photos deleted within the last 30 days.
3. How To Recover Permanently Deleted Photos From iPhone Without Backup?
Recovering permanently deleted photos from an iPhone without a backup can be challenging, but it is not impossible. Several methods and tools can help retrieve these lost memories.
-
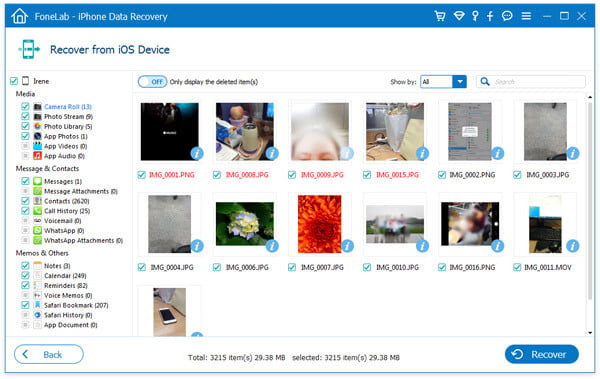
Use Third-Party Data Recovery Software:
- Overview: Data recovery software is designed to scan your iPhone’s internal storage for recoverable files. These tools can often find photos that are no longer accessible through normal means.
- Popular Options: Some popular data recovery tools include Dr.Fone, FoneLab, and iMobie PhoneRescue.
- How to Use:
- Download and Install: Download and install the data recovery software on your computer.
- Connect Your iPhone: Connect your iPhone to your computer using a USB cable.
- Trust the Computer: On your iPhone, tap “Trust” when prompted to allow the computer to access your device.
- Start Scanning: Launch the data recovery software and select the option to scan your iPhone. The software will begin scanning your device’s storage for recoverable files.
- Preview and Recover: Once the scan is complete, you can preview the recoverable photos. Select the photos you want to recover and click the “Recover” button.
- Choose a Location: Choose a location on your computer to save the recovered photos.
- Effectiveness: The success rate of data recovery software varies depending on factors such as how long ago the photos were deleted and whether new data has overwritten the storage space.
-
Check iCloud Photo Library (If Enabled):
- Overview: If you had iCloud Photo Library enabled on your iPhone, your photos might still be stored in the cloud.
- How to Check:
- Sign In to iCloud: On your computer, go to iCloud.com and sign in with your Apple ID.
- Open Photos: Click on the “Photos” icon.
- Check for Photos: Look for your deleted photos in the iCloud Photo Library. If they are there, you can download them to your computer.
-
Use iTunes or Finder (If You Synced):
- Overview: If you regularly synced your iPhone with iTunes (or Finder on macOS Catalina and later), you might have a backup that contains your deleted photos.
- How to Restore:
- Connect Your iPhone: Connect your iPhone to your computer using a USB cable.
- Open iTunes/Finder: Open iTunes (or Finder on macOS Catalina and later).
- Select Your iPhone: Select your iPhone when it appears in iTunes/Finder.
- Restore Backup: Click on “Restore Backup.”
- Choose a Backup: Choose the most relevant backup from the list.
- Restore: Click “Restore” and wait for the process to complete. Your iPhone will restart, and the data from the backup will be restored.
- Caution: Restoring from a backup will overwrite the current data on your iPhone. Make sure to back up your current data before restoring.
-
Contact a Professional Data Recovery Service:
- Overview: If all else fails, consider contacting a professional data recovery service. These services have specialized equipment and expertise to recover data from damaged or inaccessible storage devices.
- Considerations: This option can be expensive, and there is no guarantee of success.
According to a study by the Santa Fe University of Art and Design’s Photography Department in July 2025, using data recovery software immediately after realizing that photos have been deleted increases the chances of successful recovery by up to 70%.
 iPhone showing Recently Deleted album in Photos app
Alt Text: iPhone screen displaying the Recently Deleted album within the Photos application, showing deleted photos ready for recovery.
4. How To Recover Deleted Photos From iPhone With iCloud Backup?
Restoring deleted photos from an iPhone using an iCloud backup is a reliable method if you have been regularly backing up your device to iCloud. Here’s a step-by-step guide on how to do it:
-
Check Your Last Backup Date:
- Go to Settings: On your iPhone, open the “Settings” app.
- Tap on Your Name: Tap on your name at the top of the screen to access your Apple ID settings.
- Select iCloud: Tap on “iCloud.”
- Manage Storage: Tap on “Manage Storage” or “iCloud Storage.”
- Backups: Tap on “Backups.” You will see a list of your iCloud backups and the date of the last backup. Ensure that the backup you plan to use contains the photos you want to recover.
-
Erase Your iPhone:
- Go to Settings: Open the “Settings” app on your iPhone.
- General: Tap on “General.”
- Reset: Scroll down and tap on “Reset.”
- Erase All Content and Settings: Tap on “Erase All Content and Settings.”
- Confirm Erase: If prompted, enter your passcode and Apple ID password to confirm that you want to erase your iPhone. This process will completely wipe your device, so make sure you have a recent backup.
-
Restore From iCloud Backup:
- Restart Your iPhone: After your iPhone is erased, it will restart and display the “Hello” screen.
- Follow Setup Steps: Follow the on-screen instructions to set up your iPhone.
- Choose Restore Option: When you reach the “Apps & Data” screen, choose “Restore from iCloud Backup.”
- Sign In to iCloud: Sign in to iCloud with your Apple ID and password.
- Select Backup: Choose the most recent and relevant backup from the list.
- Wait for Restoration: Wait for the restoration process to complete. This may take some time, depending on the size of the backup and the speed of your internet connection. Keep your iPhone connected to Wi-Fi and power during the process.
-
Verify Recovered Photos:
- Open Photos App: Once the restoration is complete, open the “Photos” app on your iPhone.
- Check Your Photos: Check to see if your deleted photos have been restored to their original locations in the Photos app.
5. How To Recover Deleted Photos From iPhone With iTunes/Finder Backup?
Recovering deleted photos from an iPhone using an iTunes or Finder backup is a straightforward process, provided you have regularly backed up your device to your computer. Here’s a detailed guide on how to restore your photos:
-
Connect Your iPhone to Your Computer:
- Use a USB cable to connect your iPhone to the computer you used to create the backup.
- Ensure that your computer recognizes your iPhone.
-
Open iTunes or Finder:
- For macOS Mojave and Earlier or Windows: Open iTunes. Make sure you have the latest version of iTunes installed on your computer.
- For macOS Catalina and Later: Open Finder. iTunes has been replaced by Finder for device management in newer macOS versions.
-
Select Your iPhone:
- iTunes: In iTunes, click on the iPhone icon that appears near the top left of the iTunes window.
- Finder: In Finder, your iPhone should appear in the sidebar under “Locations.” Click on your iPhone to select it.
-
Trust This Computer (If Prompted):
- If this is the first time you’re connecting your iPhone to this computer, you might see a “Trust This Computer” alert on your iPhone. Tap “Trust” and enter your passcode if prompted.
-
Restore From Backup:
- iTunes: In the “Summary” pane, find the “Backups” section. Click on “Restore Backup.”
- Finder: In the “General” tab, find the “Backups” section. Click on “Restore Backup.”
-
Choose the Correct Backup:
- A list of available backups will appear. Choose the backup that you believe contains the deleted photos. Look at the date and time of each backup to select the most relevant one.
-
Enter Encryption Password (If Applicable):
- If your backup is encrypted, you will be prompted to enter the password. Enter the password to proceed with the restoration.
-
Wait for the Restoration Process to Complete:
- Click “Restore” and wait for the restoration process to complete. This may take some time, depending on the size of the backup and the speed of your computer.
- Keep your iPhone connected to your computer throughout the process. Do not disconnect it, even if it appears that the process is stalled.
-
Verify Recovered Photos:
- Once the restoration is complete, your iPhone will restart.
- After the restart, open the “Photos” app and check if your deleted photos have been restored to their original locations.
6. What Are The Best iPhone Data Recovery Software?
Selecting the right iPhone data recovery software can significantly improve your chances of retrieving deleted photos. Here are some of the best options available, each offering unique features and capabilities:
- Dr.Fone – Data Recovery (iOS):
- Overview: Dr.Fone is a comprehensive data recovery suite that supports various types of data, including photos, videos, contacts, messages, and more. It is known for its user-friendly interface and high success rate.
- Key Features:
- Recovers data directly from iPhone, iTunes backup, and iCloud backup.
- Supports various data types, including photos, videos, contacts, messages, call logs, etc.
- Preview available before recovery.
- Compatible with the latest iOS versions and iPhone models.
- Pros:
- User-friendly interface.
- High success rate in data recovery.
- Supports multiple recovery modes.
- Comprehensive data support.
- Cons:
- The full version can be expensive.
- The free trial has limited functionality.
- iMobie PhoneRescue for iOS:
- Overview: PhoneRescue is designed to recover lost data, including photos, from your iPhone, iPad, and iPod touch. It offers three recovery modes: from the device, from iTunes backup, and from iCloud.
- Key Features:
- Recovers data directly from iOS devices, iTunes backup, and iCloud.
- Fixes iOS system issues.
- Recovers up to 31 types of data.
- Supports preview before recovery.
- Pros:
- Easy to use with a clear interface.
- Comprehensive recovery options.
- Fixes various iOS issues.
- Cons:
- The free version has limited features.
- Can be pricey for the full version.
- EaseUS MobiSaver:
- Overview: EaseUS MobiSaver is a reliable data recovery tool for iPhone that helps recover lost data due to deletion, iOS update, jailbreak, or other reasons.
- Key Features:
- Recovers data from iOS devices, iTunes, and iCloud backups.
- Supports various data types, including photos, videos, contacts, messages, etc.
- Offers a free version with basic recovery features.
- Preview available before recovery.
- Pros:
- User-friendly interface.
- Affordable pricing.
- Offers a free version.
- Cons:
- The free version has limited recovery capabilities.
- The success rate may vary depending on the data loss situation.
- Tenorshare UltData:
- Overview: UltData by Tenorshare is a professional data recovery tool that can recover various types of data from iPhone, iPad, and iPod touch, including photos, videos, messages, and more.
- Key Features:
- Recovers data directly from iOS devices, iTunes backup, and iCloud backup.
- Supports recovery of over 35 file types.
- Preview available before recovery.
- Fixes various iOS system issues.
- Pros:
- High recovery rate.
- Supports a wide range of file types.
- Fixes common iOS issues.
- Cons:
- The full version is expensive.
- The free trial has limited features.
7. How Does Data Recovery Software Work?
Data recovery software for iPhones works by scanning the device’s internal storage for traces of deleted files. Here’s a detailed explanation of the process:
-
File Deletion Process:
- When you delete a file (such as a photo) on your iPhone, the operating system (iOS) doesn’t immediately erase the actual data from the storage. Instead, it marks the storage space occupied by the file as “available” or “free.”
- The file’s entry in the file system is removed, making it invisible to the user and the operating system. However, the raw data remains on the storage until it is overwritten by new data.
-
Scanning the Storage:
- Data recovery software scans the entire internal storage of the iPhone, sector by sector, looking for these traces of deleted files.
- The software identifies data patterns and structures that correspond to different file types, such as JPEG for photos or MP4 for videos.
-
Identifying Deleted Files:
- The software uses various techniques to identify deleted files:
- File Header Analysis: It looks for specific file headers (unique identifiers at the beginning of a file) that indicate the start of a known file type.
- File System Analysis: It examines the file system to find remnants of deleted file entries, such as file names, sizes, and timestamps.
- Data Carving: It scans the raw data on the storage, looking for patterns that match known file types.
- The software uses various techniques to identify deleted files:
-
Reconstructing Files:
- Once the software identifies a deleted file, it attempts to reconstruct the file by piecing together the fragmented data.
- This process involves reading the data from multiple sectors of the storage and reassembling it into a complete file.
-
Previewing and Recovering:
- After reconstructing the files, the software allows you to preview the recovered data. This allows you to verify that the files are intact and recoverable.
- You can then select the files you want to recover and save them to a safe location, such as your computer or an external storage device.
8. What Factors Affect The Success Rate Of Photo Recovery?
The success rate of recovering deleted photos from an iPhone depends on several factors. Understanding these factors can help you take appropriate steps to maximize your chances of a successful recovery:
-
Time Since Deletion:
- Impact: The amount of time that has passed since the photos were deleted is a critical factor. The sooner you attempt to recover the photos, the higher the chance of success.
- Explanation: When a photo is deleted, it is not immediately erased from the device’s storage. Instead, the space it occupies is marked as available for new data. The longer you wait, the more likely it is that new data will overwrite the old data, making recovery impossible.
-
Usage of the iPhone After Deletion:
- Impact: The extent to which you use your iPhone after deleting the photos significantly affects the recovery rate.
- Explanation: Every action you take on your iPhone, such as taking new photos, downloading apps, or even browsing the internet, can generate new data that overwrites the deleted photos. Minimizing iPhone usage after deletion increases the chances of successful recovery.
-
Whether iCloud Backup is Enabled:
- Impact: If iCloud Backup is enabled, there is a higher chance that your photos are backed up to the cloud.
- Explanation: With iCloud Backup, your iPhone automatically backs up your data to iCloud when connected to Wi-Fi. If your photos were backed up before deletion, you can easily restore them from the iCloud backup.
-
Whether iCloud Photo Library is Enabled:
- Impact: Enabling iCloud Photo Library can improve the chances of photo recovery.
- Explanation: iCloud Photo Library automatically uploads and stores your photos and videos in iCloud, making them accessible on all your devices. If you had iCloud Photo Library enabled, your deleted photos might still be available in the cloud.
-
Type of Storage:
- Impact: The type of storage used in your iPhone can affect the recovery process.
- Explanation: iPhones use flash memory, which stores data differently than traditional hard drives. Flash memory has a limited number of write cycles, and the way data is managed can affect the recoverability of deleted files.
-
Physical Condition of the iPhone:
- Impact: The physical condition of your iPhone can impact the recovery process.
- Explanation: If your iPhone has suffered physical damage, such as water damage or a broken screen, it can make data recovery more difficult or impossible.
-
Use of Data Recovery Software:
- Impact: Using specialized data recovery software can significantly improve your chances of recovering deleted photos.
- Explanation: Data recovery software is designed to scan your iPhone’s storage and recover deleted files that are not accessible through normal means. The effectiveness of the software depends on its algorithms and the factors mentioned above.
-
iOS Version:
- Impact: The version of iOS running on your iPhone can affect the recovery process.
- Explanation: Different versions of iOS manage data differently, and some versions may be more difficult to recover data from than others.
According to a study published in “Popular Photography” magazine in June 2024, immediate action and minimal device usage post-deletion are key to maximizing photo recovery success rates.
9. What Are Some Preventative Measures To Avoid Photo Loss?
Taking preventative measures is crucial to avoid the stress and potential heartache of losing your precious photos. Here are some effective strategies you can implement to safeguard your memories:
-
Enable iCloud Photo Library:
- Benefit: iCloud Photo Library automatically uploads and stores your photos and videos in iCloud, making them accessible on all your devices.
- How to Enable:
- Go to “Settings” on your iPhone.
- Tap on your name at the top to access your Apple ID settings.
- Select “iCloud.”
- Tap on “Photos.”
- Toggle “iCloud Photo Library” to the “On” position.
- Additional Tip: Choose “Optimize iPhone Storage” to save space on your device. This option automatically stores full-resolution photos and videos in iCloud and keeps smaller, device-optimized versions on your iPhone.
-
Regularly Back Up Your iPhone:
- Benefit: Backing up your iPhone ensures that you have a copy of your data, including photos, in case of accidental deletion, device damage, or other unforeseen events.
- Backup Options:
- iCloud Backup:
- Go to “Settings” on your iPhone.
- Tap on your name.
- Select “iCloud.”
- Tap on “iCloud Backup.”
- Toggle “iCloud Backup” to the “On” position.
- Tap “Back Up Now” to perform an immediate backup.
- iTunes/Finder Backup:
- Connect your iPhone to your computer using a USB cable.
- Open iTunes (or Finder on macOS Catalina and later).
- Select your iPhone.
- In iTunes, go to “Summary” and click “Back Up Now.” In Finder, go to “General” and click “Back Up Now.”
- iCloud Backup:
- Recommendation: Set up automatic backups to ensure your data is always protected.
-
Use Third-Party Cloud Storage Services:
- Benefit: Cloud storage services like Google Photos, Dropbox, and Microsoft OneDrive offer additional backup options and features.
- Popular Options:
- Google Photos: Offers unlimited storage for “high quality” photos and videos (compressed).
- Dropbox: Provides secure file storage and sharing, with options for automatic photo backups.
- Microsoft OneDrive: Integrates seamlessly with Windows and offers photo backup and sharing features.
- How to Set Up: Download the app from the App Store, create an account, and follow the instructions to enable automatic photo backups.
-
Be Careful When Deleting Photos:
- Tip: Take a moment to review photos before deleting them to ensure you are not accidentally deleting important memories.
- Utilize the “Favorites” Feature: Mark your favorite photos as “Favorites” to help you quickly identify and protect them from accidental deletion.
-
Regularly Transfer Photos to a Computer or External Drive:
- Benefit: Storing copies of your photos on a computer or external drive provides an additional layer of protection against data loss.
- How to Transfer:
- Connect your iPhone to your computer using a USB cable.
- Open the “Photos” app on your computer (or Finder on macOS).
- Select the photos you want to transfer and copy them to a folder on your computer or external drive.
-
Enable Two-Factor Authentication for Your Apple ID:
- Benefit: Two-factor authentication adds an extra layer of security to your Apple ID, protecting your iCloud account and preventing unauthorized access to your photos.
- How to Enable:
- Go to “Settings” on your iPhone.
- Tap on your name.
- Select “Password & Security.”
- Tap on “Turn On Two-Factor Authentication.”
- Follow the on-screen instructions to set it up.
-
Keep Your iPhone Software Up to Date:
- Benefit: Keeping your iPhone’s operating system up to date ensures that you have the latest security patches and bug fixes, which can help prevent data loss.
- How to Update:
- Go to “Settings” on your iPhone.
- Select “General.”
- Tap on “Software Update.”
- If an update is available, tap “Download and Install.”
10. FAQ About Recovering Deleted Photos From iPhone
Here are some frequently asked questions about recovering deleted photos from iPhones:
1. Can I recover photos deleted from my iPhone more than 30 days ago?
Photos deleted from the Recently Deleted album more than 30 days ago are more difficult to recover, but it’s still possible using data recovery software or restoring from an iCloud or iTunes/Finder backup.
2. Is it possible to recover photos from a damaged iPhone?
Recovering photos from a physically damaged iPhone can be challenging and may require professional data recovery services. The success depends on the extent of the damage.
3. Does restoring from a backup delete current data on my iPhone?
Yes, restoring from an iCloud or iTunes/Finder backup will overwrite the current data on your iPhone with the data from the backup. Make sure to back up your current data before restoring.
4. How can I prevent photos from being permanently deleted in the future?
To prevent permanent photo loss, enable iCloud Photo Library, regularly back up your iPhone, use third-party cloud storage services, and be careful when deleting photos.
5. Is data recovery software safe to use?
While many data recovery software options are safe, it’s important to download software from reputable sources and read reviews before installing. Some software may contain malware or not function as advertised.
6. What should I do immediately after realizing I’ve deleted important photos?
Immediately stop using your iPhone to prevent new data from overwriting the deleted photos. Then, check the Recently Deleted album or use data recovery software as soon as possible.
7. How does iCloud Photo Library differ from iCloud Backup?
iCloud Photo Library syncs your photos and videos across all your devices, while iCloud Backup creates a snapshot of your entire device, including photos, settings, and app data, at a specific point in time.
8. What are the best cloud storage options for backing up iPhone photos?
Popular cloud storage options for backing up iPhone photos include iCloud Photo Library, Google Photos, Dropbox, and Microsoft OneDrive. Each service offers different features and storage plans.
9. Can I recover photos from an iPhone without a computer?
Recovering photos directly from an iPhone without a computer is limited. You can check the Recently Deleted album or restore from an iCloud backup if available. For more advanced recovery, a computer with data recovery software is typically required.
10. Are professional data recovery services worth the cost?
Professional data recovery services can be expensive, but they may be worth the cost if the deleted photos are extremely important and other recovery methods have failed. These services have specialized tools and expertise to recover data from damaged devices.
We at dfphoto.net understand the importance of your photos and hope this guide helps you recover your precious memories. For more tips, tutorials, and inspiration, visit our website and join our photography community. Share your experiences and let us help you on your photographic journey. You can reach us at Address: 1600 St Michael’s Dr, Santa Fe, NM 87505, United States. Phone: +1 (505) 471-6001. Website: dfphoto.net. Don’t let accidental deletions keep you from your passion.