Losing precious photo memories can be distressing, but “How To Recover All Deleted Photos” is a question with hopeful answers. At dfphoto.net, we understand the value of your visual stories and offer solutions to retrieve lost images, utilizing various recovery methods and software to restore your photography and visual art. Let’s get started so you can retrieve your memories!
1. What Are The Common Reasons For Photo Loss?
Photo loss can occur due to a variety of reasons, each requiring a specific approach for recovery. Here are some common causes:
- Accidental Deletion: Mistakenly deleting photos from your device or storage media is a frequent issue.
- Hardware Failure: Storage devices like hard drives, SSDs, or memory cards can fail, leading to data loss.
- Software Issues: Bugs or errors in photo management software can sometimes cause photos to disappear.
- Virus or Malware Attacks: Malicious software can corrupt or delete files, including photos.
- Formatting Errors: Incorrectly formatting a storage device can erase all data on it.
- Physical Damage: Damage to devices or storage media due to drops, water, or extreme temperatures can result in photo loss.
- Operating System Errors: Problems with your computer’s operating system can sometimes lead to files becoming inaccessible.
- Theft or Loss of Device: If a device containing photos is stolen or lost, the photos are also lost.
2. What Are The First Steps To Take After Realizing Photos Are Missing?
Immediately after discovering that your photos are missing, taking swift action can significantly improve your chances of a successful recovery. Here’s what you should do:
- Stop Using the Device: Immediately cease using the device (camera, phone, memory card, etc.) where the photos were stored. Continued use can overwrite the deleted files, making recovery more difficult or impossible.
- Check the Recycle Bin/Trash: Before resorting to more complex solutions, check the Recycle Bin (on Windows) or Trash (on macOS). Accidentally deleted files often end up here and can be easily restored.
- Don’t Format the Storage Device: If the photos were on a memory card or external drive, do not format the device. Formatting will erase all data, making recovery much harder.
- Remove the Memory Card: If the photos are missing from a memory card, remove it from the camera or device to prevent further data being written to it.
- Avoid Writing New Data: Do not save any new files to the device or storage media. This reduces the risk of overwriting the deleted photos.
- Consider Professional Help: If the photos are critically important and you’re not comfortable attempting recovery yourself, consider contacting a professional data recovery service. They have specialized tools and expertise to handle complex data loss scenarios.
- Assess the Situation: Determine how the photos were lost (e.g., accidental deletion, formatting, hardware failure). This will help you choose the most appropriate recovery method.
3. How To Recover Deleted Photos From The Recycle Bin Or Trash Folder?
3.1 Understanding The Recycle Bin And Trash Folder
The Recycle Bin (Windows) and Trash (macOS) are temporary storage locations for deleted files. When you delete a file, it’s not immediately erased from your hard drive. Instead, it’s moved to one of these folders, providing a safety net in case you change your mind or accidentally delete something important.
3.2 Step-By-Step Guide To Restoring Photos
Here’s how to recover deleted photos from the Recycle Bin or Trash folder:
3.2.1 On Windows (Recycle Bin)
-
Open the Recycle Bin: Double-click the Recycle Bin icon on your desktop.
-
Locate the Deleted Photos: Browse through the files or use the search bar to find the photos you want to recover. You can sort the files by date deleted to help find them more easily.
-
Restore the Photos:
- Single File: Right-click on the photo and select “Restore.” The photo will be returned to its original location.
- Multiple Files: Select all the photos you want to recover (you can hold down the Ctrl key while clicking to select multiple files), then right-click on any of the selected files and choose “Restore.”
-
Verify the Recovery: Go to the original location of the photos to ensure they have been successfully restored.
3.2.2 On macOS (Trash)
-
Open the Trash: Click on the Trash icon in the Dock.
-
Locate the Deleted Photos: Scroll through the files or use the search bar to find the photos you want to recover. You can also sort the files by date deleted.
-
Restore the Photos:
- Single File: Drag the photo from the Trash to your desktop or any other desired location, or right-click on the photo and select “Put Back.” The photo will be returned to its original location.
- Multiple Files: Select all the photos you want to recover (you can hold down the Command key while clicking to select multiple files), then right-click on any of the selected files and choose “Put Back.”
-
Verify the Recovery: Check the original location of the photos to make sure they have been successfully restored.
3.3 What If The Recycle Bin Or Trash Has Been Emptied?
If you’ve emptied the Recycle Bin or Trash, the files are no longer directly recoverable through these methods. In this case, you’ll need to use data recovery software or consult a professional data recovery service.
4. How To Use Data Recovery Software To Retrieve Lost Photos?
4.1 Overview Of Data Recovery Software
Data recovery software is designed to scan storage devices for deleted files and recover them. These programs work by identifying data patterns that indicate the presence of a file, even if the file’s entry in the file system has been removed. They can often recover files even after the Recycle Bin or Trash has been emptied.
4.2 Popular Data Recovery Software Options
Several reputable data recovery software options are available, each with its strengths and features:
- Recuva: A free and user-friendly option for Windows. It offers both a quick scan and a deep scan mode for more thorough recovery.
- EaseUS Data Recovery Wizard: A powerful tool for both Windows and macOS. It supports various file types and storage devices.
- Stellar Data Recovery: Another robust option for Windows and macOS, known for its ability to recover data from formatted drives and damaged partitions.
- Disk Drill: A macOS-focused tool with a user-friendly interface and advanced scanning algorithms. It can also recover data from iOS and Android devices.
- PhotoRec: A free, open-source data recovery tool that supports a wide range of file systems and operating systems. It’s particularly effective for recovering photos and other media files.
4.3 Step-By-Step Guide To Using Data Recovery Software
Here’s a general guide to using data recovery software, using EaseUS Data Recovery Wizard as an example:
-
Download and Install the Software:
- Visit the official website of EaseUS Data Recovery Wizard and download the software.
- Install the software on your computer. Be sure to install it on a different drive than the one you’re trying to recover files from to avoid overwriting data.
-
Select the Drive to Scan:
- Launch EaseUS Data Recovery Wizard.
- Select the drive or storage device where you lost your photos. This could be your hard drive, SSD, USB drive, or memory card.
-
Scan for Lost Data:
- Click the “Scan” button. The software will start with a quick scan.
- If the quick scan doesn’t find the files you’re looking for, it will automatically start a deep scan, which takes longer but is more thorough.
-
Preview and Select Files:
- After the scan is complete, you’ll see a list of recoverable files.
- Use the filter options to narrow down the results and find your photos more easily. You can filter by file type (e.g., JPEG, PNG, RAW) and date.
- Preview the photos to make sure they are the ones you want to recover.
-
Recover the Files:
- Select the photos you want to recover.
- Click the “Recover” button.
- Choose a location to save the recovered files. Important: Save the files to a different drive or storage device than the one you’re recovering from to avoid overwriting data.
-
Verify the Recovered Files:
- Go to the location where you saved the recovered files and make sure the photos are intact and viewable.
4.4 Tips For Successful Data Recovery
- Act Quickly: The sooner you start the recovery process, the better your chances of success.
- Avoid Overwriting Data: Do not save any new files to the drive or storage device you’re recovering from.
- Install on a Different Drive: Install the data recovery software on a different drive than the one you’re trying to recover files from.
- Use Deep Scan: If the quick scan doesn’t find the files you need, use the deep scan option for a more thorough search.
- Preview Before Recovering: Always preview the files before recovering them to make sure they are the ones you want.
- Save to a Different Drive: Save the recovered files to a different drive or storage device to avoid overwriting data.
5. How To Recover Photos From Cloud Storage Services?
5.1 Overview Of Cloud Storage Recovery
Cloud storage services like iCloud, Google Photos, Dropbox, and OneDrive provide a convenient way to back up and sync your photos. If you’ve accidentally deleted photos from your device, there’s a good chance they might still be available in the cloud.
5.2 Recovering Photos From iCloud
-
Access iCloud Photos:
- Go to iCloud.com and sign in with your Apple ID.
- Click on the “Photos” app.
-
Check the Recently Deleted Album:
-
In the Photos app, look for the “Recently Deleted” album in the sidebar. If you don’t see the sidebar, click the sidebar icon.
-
Select the photos or videos you want to recover, then click “Recover.”
-
If you don’t see the sidebar, click the sidebar icon.
-
-
Restore Photos:
- Select the photos or videos you want to recover, then click “Recover.”
- The recovered photos will be restored to your iCloud Photos library and synced back to your devices.
5.3 Recovering Photos From Google Photos
-
Access Google Photos:
- Go to photos.google.com and sign in with your Google account.
-
Check the Trash:
- Click on “Trash” in the left sidebar.
-
Restore Photos:
- Select the photos you want to recover, then click “Restore.”
- The recovered photos will be restored to your Google Photos library and synced back to your devices.
5.4 Recovering Photos From Dropbox
-
Access Dropbox:
- Go to dropbox.com and sign in with your account.
-
Check Deleted Files:
- Click on “Deleted files” in the left sidebar.
-
Restore Photos:
- Select the photos you want to recover, then click “Restore.”
- The recovered photos will be restored to your Dropbox account and synced back to your devices.
5.5 Recovering Photos From OneDrive
-
Access OneDrive:
- Go to onedrive.live.com and sign in with your Microsoft account.
-
Check the Recycle Bin:
- Click on “Recycle bin” in the left sidebar.
-
Restore Photos:
- Select the photos you want to recover, then click “Restore.”
- The recovered photos will be restored to your OneDrive account and synced back to your devices.
5.6 Tips For Cloud Storage Recovery
- Act Quickly: Cloud storage services typically have a limited time frame for recovering deleted files, often around 30 days.
- Check All Devices: Make sure the deleted photos haven’t been accidentally moved to another device or folder.
- Sync Issues: If you’re having trouble syncing photos between your devices and the cloud, check your internet connection and make sure the cloud storage app is up to date.
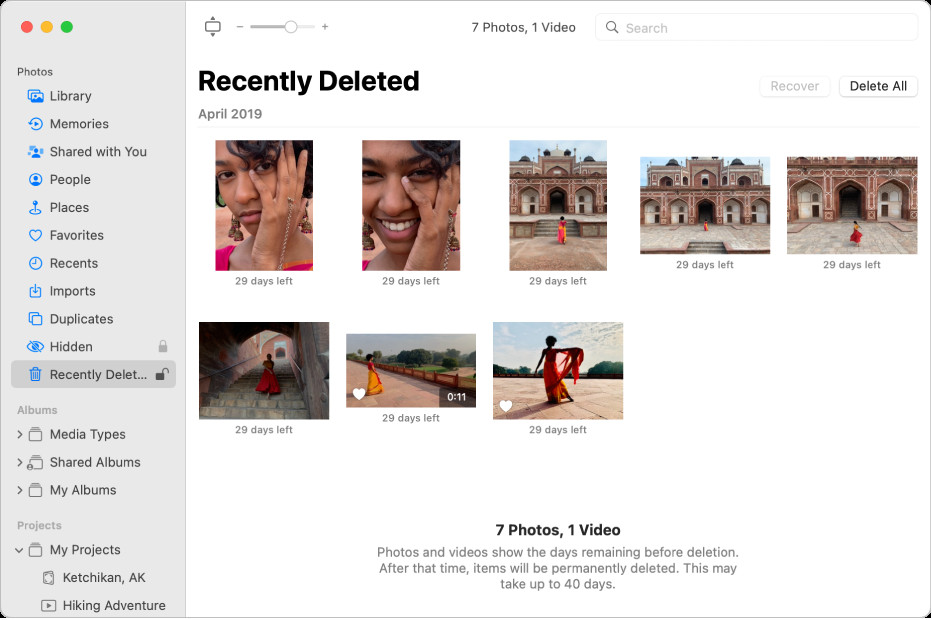 iCloud Recently Deleted album with options to select and recover photos
iCloud interface displaying the Recently Deleted album and the option to recover selected photos.
6. How To Recover Photos From Memory Cards And External Drives?
6.1 Overview Of Memory Card And External Drive Recovery
Memory cards (such as SD cards) and external hard drives are commonly used to store photos from digital cameras and other devices. Recovering photos from these devices requires specialized techniques, as they often use different file systems and storage methods compared to internal computer drives.
6.2 Using Data Recovery Software For Memory Cards And External Drives
Data recovery software can be highly effective for retrieving photos from memory cards and external drives. Here’s how to use it:
-
Connect the Device:
- Connect the memory card or external drive to your computer using a card reader or USB cable.
-
Select the Device in the Software:
- Launch your data recovery software (e.g., Recuva, EaseUS Data Recovery Wizard, Stellar Data Recovery).
- Select the memory card or external drive from the list of available devices.
-
Scan for Lost Data:
- Start a scan. Begin with a quick scan, and if necessary, proceed to a deep scan for more thorough results.
-
Preview and Recover:
- Preview the found photos to ensure they are the ones you want to recover.
- Select the photos and choose a safe location on your computer to save them.
6.3 Specific Considerations For Memory Cards
- Stop Using the Card Immediately: To prevent overwriting, stop using the memory card as soon as you realize photos are missing.
- Use a Card Reader: Connect the memory card to your computer using a card reader instead of directly connecting the camera or device. This can sometimes improve the chances of a successful recovery.
- Avoid Formatting: Do not format the memory card, as this will erase all data and make recovery more difficult.
6.4 Specific Considerations For External Drives
- Check Connections: Ensure the external drive is properly connected to your computer. Try a different USB port or cable if necessary.
- Check Drive Health: Use a disk utility tool to check the health of the external drive. If the drive is failing, it may require professional data recovery services.
- Avoid Writing New Data: Do not save any new files to the external drive until you have attempted to recover the lost photos.
7. How To Deal With Corrupted Photo Files?
7.1 Understanding Photo Corruption
Photo corruption occurs when a photo file becomes damaged or incomplete, making it unreadable or displaying incorrectly. This can happen due to various reasons, such as:
- Incomplete File Transfer: Interruptions during file transfer can result in corrupted files.
- Storage Device Errors: Bad sectors on hard drives or memory cards can corrupt data.
- Software Issues: Bugs in photo editing software or file management tools can damage photo files.
- Virus or Malware Attacks: Malicious software can corrupt or alter files.
7.2 Photo Repair Software Options
Several software tools are designed to repair corrupted photo files:
- Stellar Photo Repair: A dedicated tool for repairing corrupt JPEG, TIFF, and other image file formats.
- EaseUS Fixo Photo Repair: Capable of repairing corrupted photos from various storage devices and cameras.
- Kernel Photo Repair: Supports a wide range of image formats and offers advanced repair options.
7.3 Steps To Repair Corrupted Photos
-
Download and Install Photo Repair Software:
- Choose a photo repair tool and download it from the official website.
- Install the software on your computer.
-
Add Corrupted Photos:
- Launch the photo repair software.
- Add the corrupted photo files to the software.
-
Start the Repair Process:
- Click the “Repair” button to start the repair process. The software will analyze the files and attempt to fix any errors.
-
Preview and Save Repaired Photos:
- After the repair process is complete, preview the repaired photos to ensure they are fixed.
- Save the repaired photos to a safe location on your computer.
7.4 Tips For Dealing With Corrupted Photos
- Back Up Corrupted Files: Before attempting any repairs, create a backup of the corrupted files. This will protect you in case the repair process further damages the files.
- Try Multiple Repair Tools: If one repair tool doesn’t work, try another one. Different tools use different algorithms and may be more successful with certain types of corruption.
- Professional Help: If the photos are critically important and you’re unable to repair them yourself, consider contacting a professional data recovery service.
8. What Are The Preventive Measures To Avoid Photo Loss In The Future?
8.1 Regular Backups
- Importance of Backups: Regularly backing up your photos is the most effective way to protect against data loss.
- Types of Backups:
- Local Backups: Using external hard drives or NAS (Network Attached Storage) devices.
- Cloud Backups: Utilizing cloud storage services like iCloud, Google Photos, Dropbox, and OneDrive.
- Backup Schedule: Create a backup schedule and stick to it. A weekly or monthly backup is a good starting point, but more frequent backups may be necessary for critical data.
8.2 Using Redundant Storage Solutions
- RAID (Redundant Array of Independent Disks): RAID configurations can provide data redundancy, ensuring that your photos are protected even if one drive fails.
- NAS Devices: Many NAS devices support RAID configurations, making them an excellent choice for storing and backing up photos.
8.3 Safe Handling Of Memory Cards And External Drives
- Proper Ejection: Always properly eject memory cards and external drives from your computer before disconnecting them.
- Avoid Physical Damage: Protect memory cards and external drives from physical damage, such as drops, water, and extreme temperatures.
- Use High-Quality Storage Devices: Invest in high-quality memory cards and external drives from reputable brands.
8.4 Implementing A Photo Management Workflow
- Organize Your Photos: Create a consistent folder structure for your photos, making it easier to find and manage them.
- Use Metadata: Add metadata (such as captions, keywords, and location information) to your photos. This can help you search and organize your photos more effectively.
- Regularly Review and Cull: Regularly review your photos and delete any duplicates or unwanted images. This will help keep your photo library organized and reduce the risk of data loss.
8.5 Software And Hardware Maintenance
- Keep Software Updated: Keep your operating system, photo editing software, and data recovery tools up to date.
- Monitor Hardware Health: Regularly monitor the health of your hard drives, SSDs, and memory cards. Use disk utility tools to check for errors and bad sectors.
- Use Antivirus Software: Protect your computer from viruses and malware by using a reputable antivirus program.
9. When Should You Seek Professional Photo Recovery Services?
9.1 Recognizing Complex Data Loss Scenarios
While DIY data recovery methods can be effective in many cases, there are situations where professional help is necessary:
- Physical Damage: If the storage device has suffered physical damage (e.g., water damage, fire damage, broken components), professional recovery is typically required.
- Mechanical Failure: If the hard drive or SSD is making unusual noises or not being recognized by your computer, it may have suffered a mechanical failure.
- Overwritten Data: If data has been overwritten on the storage device, professional recovery may be the only option.
- Complex RAID Configurations: Recovering data from complex RAID configurations can be challenging and often requires specialized expertise.
- Encrypted Storage: If the storage device is encrypted and you’ve lost the encryption key, professional recovery may be necessary.
9.2 Finding A Reputable Data Recovery Service
- Research: Look for data recovery services with a good reputation and positive reviews.
- Experience: Choose a service with extensive experience in photo recovery and a high success rate.
- Cleanroom Environment: Ensure the service has a cleanroom environment for handling physically damaged storage devices.
- Data Privacy: Verify that the service has strict data privacy policies to protect your sensitive information.
- Cost Estimate: Get a cost estimate before proceeding with the recovery process.
9.3 Understanding The Recovery Process
- Initial Assessment: The data recovery service will typically start with an initial assessment to determine the extent of the damage and the feasibility of recovery.
- Recovery Attempt: If recovery is possible, the service will attempt to recover the data using specialized tools and techniques.
- Data Verification: After the recovery process is complete, the service will verify the recovered data to ensure it is intact and usable.
- Data Delivery: The recovered data will be delivered to you on a new storage device or through a secure online transfer.
10. FAQ: How To Recover All Deleted Photos
10.1. Can I recover permanently deleted photos from my iPhone?
Yes, you can recover permanently deleted photos from your iPhone by checking the “Recently Deleted” album in the Photos app or by restoring from an iCloud or iTunes backup.
10.2. How long do photos stay in the “Recently Deleted” album?
Photos typically stay in the “Recently Deleted” album for 30 days before being permanently deleted.
10.3. Is it possible to recover photos from a formatted memory card?
Yes, it is possible to recover photos from a formatted memory card using data recovery software, as long as new data hasn’t overwritten the old data.
10.4. What is the best data recovery software for photos?
Some of the best data recovery software options include Recuva, EaseUS Data Recovery Wizard, Stellar Data Recovery, Disk Drill, and PhotoRec.
10.5. Can I recover photos from a water-damaged phone?
Recovering photos from a water-damaged phone can be challenging and often requires professional data recovery services due to potential hardware damage.
10.6. How do I prevent photo loss in the future?
To prevent photo loss in the future, regularly back up your photos to multiple locations, such as external drives, cloud storage services, and NAS devices.
10.7. What should I do immediately after realizing my photos are missing?
Immediately stop using the device where the photos were stored to prevent overwriting, and check the Recycle Bin or Trash folder for accidentally deleted files.
10.8. Can a professional data recovery service recover photos that I couldn’t recover myself?
Yes, professional data recovery services have specialized tools and expertise to handle complex data loss scenarios, such as physical damage or mechanical failure.
10.9. How much does professional photo recovery cost?
The cost of professional photo recovery varies depending on the complexity of the data loss scenario and the service provider, but it can range from a few hundred to several thousand dollars.
10.10. Is it safe to use free data recovery software?
While some free data recovery software options are reputable, it’s essential to download them from trusted sources to avoid malware or other security risks. Always read reviews and check the software’s reputation before using it.
Conclusion: Regaining Your Lost Visual Treasures
Losing photos can be an emotional experience, but with the right knowledge and tools, you can significantly improve your chances of recovery. By understanding the common causes of photo loss, acting quickly, and utilizing appropriate recovery methods, you can retrieve your cherished memories.
At dfphoto.net, we’re dedicated to providing you with the knowledge and resources you need to protect and recover your valuable visual assets. Visit our website at dfphoto.net to explore a wealth of photography tips, techniques, and tools to enhance your photographic journey. For those in the Santa Fe area, our address is 1600 St Michael’s Dr, Santa Fe, NM 87505, United States, and you can reach us at +1 (505) 471-6001.
Embark on a journey of photographic excellence with dfphoto.net, where you can delve into detailed tutorials, admire stunning photography, and connect with a vibrant community of photographers. Let’s capture and safeguard your visual stories together, ensuring they last a lifetime!