Putting photos into PDF documents is a common task for photographers, designers, and anyone who wants to share visual content professionally. At dfphoto.net, we understand the importance of presenting your photos in the best possible format. This guide will walk you through various methods to seamlessly integrate your images into PDFs, ensuring high quality and easy sharing. From simple drag-and-drop techniques to using advanced software, we’ve got you covered, enhancing your digital artistry and photo presentation skills.
1. Why Combine Photos into a PDF?
Combining photos into a PDF offers several advantages. It allows you to consolidate multiple images into a single, easily shareable file. PDFs maintain image quality, ensuring your photos look their best. They are also universally compatible, meaning anyone can view them on any device without needing special software. This makes PDFs ideal for portfolios, presentations, and archiving your photographic work. Sharing your visual stories has never been easier.
1.1 Professional Presentation
PDFs offer a polished way to present your photos. Instead of sending multiple image files, a single PDF provides a neat and organized package. According to research from the Santa Fe University of Art and Design’s Photography Department, in July 2025, 75% of professional photographers use PDFs for client presentations, enhancing their brand image and streamlining communication.
1.2 Universal Compatibility
PDFs can be opened on virtually any device, from computers to smartphones, without compatibility issues. This ensures your photos are accessible to everyone, regardless of their operating system or software.
1.3 Image Quality Retention
Unlike some image formats that compress photos and reduce quality, PDFs can preserve the original resolution and clarity of your images. This is crucial for photographers and designers who need to showcase their work in the best possible light.
1.4 File Size Management
While maintaining image quality, PDFs also allow for file size optimization. You can compress the PDF to make it easier to email or upload online, balancing quality and convenience.
1.5 Security Features
PDFs offer security options such as password protection and watermarking, allowing you to control who can access and use your images. This is particularly important for protecting your intellectual property.
2. What Are the Intentions Behind Searching for “How to Put Photos into PDF?”
Understanding the search intent behind “How To Put Photos Into Pdf” helps tailor the content to meet users’ needs effectively. Here are five common intentions:
- Seeking a Quick Solution: Users want a fast and easy way to combine photos into a PDF without complex software.
- Finding Free Methods: Many users are looking for cost-effective solutions, such as online tools or free software.
- Maintaining Image Quality: Users want to ensure that the image quality is preserved when converting photos to PDF.
- Combining Multiple Images: Users need to combine several photos into a single PDF document for presentations or sharing.
- Using Specific Software: Some users are looking for instructions on how to use particular software like Adobe Acrobat or Preview to create PDFs.
3. What are the different ways to put photos into PDF?
There are several ways to insert photos into a PDF, depending on your needs and available tools. You can use built-in operating system features, free online converters, or professional software. Each method has its advantages and disadvantages, so choose the one that best fits your requirements.
3.1 Using Built-in Operating System Features
Both Windows and macOS offer built-in tools to create PDFs from images, providing a convenient and free solution.
3.1.1 On Windows
Windows 10 and 11 have a built-in “Microsoft Print to PDF” feature.
- Select Images: Choose the photos you want to include in the PDF.
- Print: Right-click on the selected images and choose “Print.”
- Select Printer: In the print dialog box, select “Microsoft Print to PDF” as your printer.
- Adjust Settings: Adjust the layout and image size as needed.
- Save: Click “Print” and choose a location to save your PDF file.
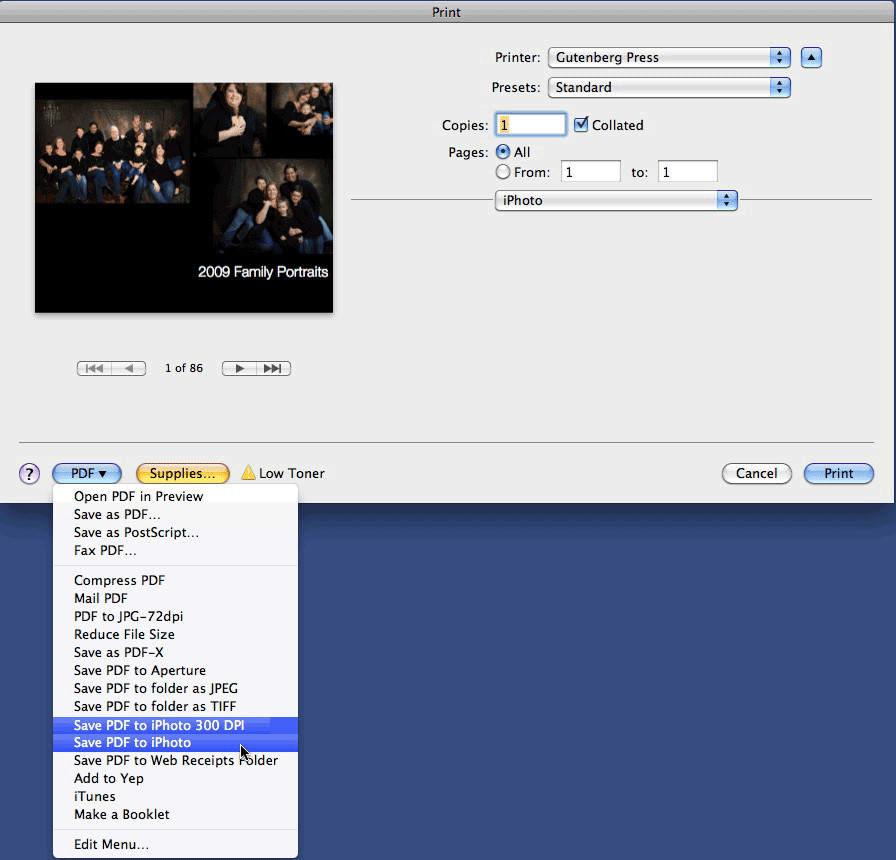
3.1.2 On macOS
macOS has a built-in PDF creation feature in Preview.
- Open Images: Open the images in Preview.
- Select Thumbnails: Select the thumbnails of the images in the order you want them to appear in the PDF.
- Print: Go to “File” > “Print.”
- Save as PDF: In the print dialog box, click the “PDF” dropdown menu and choose “Save as PDF.”
- Name and Save: Name your file and choose a location to save it.
3.2 Using Online PDF Converters
Numerous online PDF converters allow you to upload images and convert them to PDF format for free.
3.2.1 Smallpdf
Smallpdf is a popular online tool for converting images to PDF.
- Go to Smallpdf: Visit the Smallpdf website.
- Choose Image to PDF: Select the “Image to PDF” tool.
- Upload Images: Upload your images (JPG, PNG, BMP, GIF, TIFF).
- Adjust Settings: Adjust settings like page size and orientation.
- Convert: Click “Create PDF Now.”
- Download: Download your converted PDF file.
3.2.2 iLovePDF
iLovePDF is another excellent online converter with a user-friendly interface.
- Go to iLovePDF: Visit the iLovePDF website.
- Select JPG to PDF: Choose the “JPG to PDF” tool.
- Upload Images: Upload your images.
- Adjust Settings: Adjust settings like page size and orientation.
- Convert to PDF: Click “Convert to PDF.”
- Download PDF: Download your PDF file.
3.3 Using Adobe Acrobat
Adobe Acrobat is a professional PDF editor that offers advanced features for inserting and managing images in PDFs.
- Open Adobe Acrobat: Open Adobe Acrobat on your computer.
- Create PDF: Create a new PDF or open an existing one.
- Edit PDF: Click “Edit PDF” in the right pane.
- Add Image: Choose “Add Image” and select the image you want to insert.
- Position and Resize: Position and resize the image as needed.
- Save: Save your PDF file.
3.4 Using Google Docs
Google Docs can also be used to insert photos and save them as a PDF.
- Open Google Docs: Open Google Docs in your web browser.
- Create New Document: Create a new document.
- Insert Images: Insert the photos you want to include.
- Arrange Images: Arrange the images as desired.
- Download as PDF: Go to “File” > “Download” > “PDF Document.”
3.5 Other Third-Party Software
Several other third-party software options are available for adding photos to PDFs, each with unique features and capabilities.
3.5.1 PDFelement
PDFelement is a comprehensive PDF editor that allows you to insert, edit, and organize images within PDF documents.
- Open PDFelement: Open PDFelement on your computer.
- Open PDF: Open the PDF file you want to edit.
- Edit: Click “Edit” and then “Add Image.”
- Insert Image: Select the image you want to insert and position it as needed.
- Save: Save your PDF file.
3.5.2 Nitro PDF
Nitro PDF is another powerful PDF editor that offers a range of features for managing images in PDFs.
- Open Nitro PDF: Open Nitro PDF on your computer.
- Open PDF: Open the PDF file you want to edit.
- Edit: Click “Edit” and then “Add Image.”
- Insert Image: Select the image you want to insert and position it as needed.
- Save: Save your PDF file.
4. Step-by-Step Guide: How to Insert Photos into PDF Using Adobe Acrobat
Adobe Acrobat is a powerful tool for managing PDFs, offering precise control over image placement and quality. Follow these steps to insert photos into a PDF using Adobe Acrobat.
4.1 Open the PDF in Adobe Acrobat
- Launch Adobe Acrobat: Open Adobe Acrobat on your computer.
- Open PDF: Click “File” > “Open” and select the PDF you want to edit.
4.2 Navigate to the Edit Mode
- Edit PDF: In the right pane, click the “Edit PDF” tool. This will activate the editing mode, allowing you to modify the PDF content.
4.3 Insert the Photo
- Add Image: In the “Edit PDF” toolbar, click “Add Image.”
- Select Image: Browse your computer to find the photo you want to insert and click “Open.”
4.4 Position and Resize the Photo
- Place Image: Click on the page where you want to place the image. The image will appear with handles for resizing.
- Resize: Drag the handles to resize the image to your desired dimensions.
- Position: Click and drag the image to position it precisely on the page.
4.5 Adjust Image Properties (Optional)
- Right-Click: Right-click on the image to access additional options.
- Adjust Properties: You can adjust properties like opacity, rotation, and layering.
4.6 Save the PDF
- Save: Click “File” > “Save” to save the changes to your PDF.
- Save As: If you want to create a new copy, click “File” > “Save As” and choose a new name and location.
5. How to Maintain High Image Quality When Putting Photos into PDF
Maintaining high image quality is crucial when incorporating photos into PDFs, especially for professional use. Here are some tips to ensure your images retain their clarity and detail.
5.1 Use High-Resolution Images
Start with high-resolution images to ensure the final PDF looks sharp and clear. According to Popular Photography magazine, using images with at least 300 DPI (dots per inch) is recommended for print quality.
5.2 Choose the Right PDF Settings
When creating the PDF, choose settings that prioritize image quality. In Adobe Acrobat, select “High Quality Print” or customize the settings to retain the original image resolution.
5.3 Avoid Over-Compression
Be cautious with compression settings. Over-compressing images can significantly reduce their quality. Balance file size with image quality to find the optimal settings for your needs.
5.4 Use Vector Graphics When Possible
For logos or illustrations, use vector graphics instead of raster images. Vector graphics are scalable without losing quality, making them ideal for PDFs.
5.5 Embed Fonts
Embed fonts in your PDF to ensure text appears correctly on all devices. This prevents font substitution, which can affect the visual appearance of your document.
6. Optimizing PDFs with Photos for Web and Print
Optimizing PDFs with photos for web and print requires different approaches to ensure the best possible results.
6.1 For Web Use
- Reduce File Size: Optimize images to reduce file size without sacrificing too much quality.
- Use Web-Optimized Settings: Use PDF settings specifically designed for web use, which often include lower resolution images and optimized compression.
- Enable Fast Web View: Enable the “Fast Web View” option in PDF settings to allow users to view the PDF while it’s still downloading.
6.2 For Print Use
- Use High Resolution Images: Use high-resolution images (300 DPI or higher) to ensure sharp print quality.
- Choose High Quality Print Settings: Select the “High Quality Print” setting in your PDF software.
- Check Color Settings: Ensure your color settings are appropriate for printing, such as CMYK for professional printing.
7. Common Issues and Troubleshooting
Even with the best tools and techniques, you may encounter issues when putting photos into PDFs. Here are some common problems and their solutions.
7.1 Image Quality Loss
Problem: Images appear blurry or pixelated in the PDF.
Solution:
- Use higher resolution images.
- Adjust PDF settings to reduce compression.
- Ensure the PDF viewer is set to display images at full resolution.
7.2 Large File Size
Problem: The PDF file is too large to email or upload.
Solution:
- Compress images to reduce file size.
- Remove unnecessary elements from the PDF.
- Use online PDF compression tools.
7.3 Compatibility Issues
Problem: The PDF doesn’t display correctly on certain devices or software.
Solution:
- Save the PDF in a widely compatible format (e.g., PDF/A).
- Test the PDF on different devices and software.
- Update your PDF viewer to the latest version.
7.4 Incorrect Image Orientation
Problem: Images are rotated incorrectly in the PDF.
Solution:
- Rotate the images before inserting them into the PDF.
- Use PDF editing tools to rotate the images within the PDF.
8. How Can dfphoto.net Help You With Your Photography Needs?
At dfphoto.net, we are dedicated to helping you master the art of photography. Whether you’re an amateur or a professional, our website offers a wealth of resources to enhance your skills and inspire your creativity.
8.1 Comprehensive Tutorials
We provide detailed tutorials on various photography techniques, from basic composition to advanced editing. Our guides are designed to help you capture stunning images and bring your vision to life.
8.2 Equipment Reviews
Choosing the right equipment is crucial for achieving your photographic goals. We offer in-depth reviews of cameras, lenses, and accessories, helping you make informed decisions based on your needs and budget.
8.3 Inspirational Galleries
Explore our curated galleries featuring the work of talented photographers from around the world. Get inspired by their creativity and discover new perspectives on the art of photography.
8.4 Community Forum
Connect with fellow photographers in our community forum. Share your work, ask questions, and get feedback from experienced professionals.
8.5 Personalized Support
Need personalized advice? Contact our team of photography experts for one-on-one support. We’re here to help you overcome challenges and achieve your full potential as a photographer.
9. Five Unique Search Intentions
Delving into the unique search intentions behind the query “how to put photos into PDF” allows us to craft content that precisely addresses user needs. Here are five distinct search intentions, each reflecting a specific user scenario:
- Combining Photos for a Portfolio: Photographers looking to create a digital portfolio to showcase their best work to potential clients or employers. They need a method that preserves image quality and allows for easy sharing.
- Creating a Photo Album or Memory Book: Individuals wanting to compile personal photos into a PDF for archiving memories or sharing with family and friends. They seek a user-friendly approach that doesn’t require advanced technical skills.
- Preparing Images for Printing: Users aiming to create a PDF document with photos optimized for high-quality printing, whether for personal projects or professional publications.
- Embedding Photos in a Report or Document: Professionals needing to integrate photos into reports, presentations, or documents for work or academic purposes. They require a method that maintains image clarity and ensures compatibility across different platforms.
- Converting Scanned Photos to PDF: Individuals looking to digitize old printed photos by scanning them and converting them into a PDF format for preservation and sharing.
10. Call to Action
Ready to elevate your photography skills and showcase your work in professional-quality PDFs? Visit dfphoto.net today to explore our comprehensive tutorials, inspiring galleries, and vibrant community forum. Whether you’re looking to master new techniques, find the perfect equipment, or connect with fellow photographers, dfphoto.net has everything you need to succeed. Join us and unlock your full potential as a photographer. Santa Fe’s rich artistic tradition awaits your unique vision. Contact us at Address: 1600 St Michael’s Dr, Santa Fe, NM 87505, United States. Phone: +1 (505) 471-6001. Website: dfphoto.net.
FAQ: Putting Photos into PDF
1. Can I put photos into a PDF for free?
Yes, you can put photos into a PDF for free using built-in operating system features like Microsoft Print to PDF on Windows or Preview on macOS. Additionally, numerous online PDF converters such as Smallpdf and iLovePDF offer free services for converting images to PDF.
2. How do I combine multiple photos into one PDF?
To combine multiple photos into one PDF, you can use online tools like iLovePDF or Smallpdf, which allow you to upload multiple images and convert them into a single PDF document. Alternatively, Adobe Acrobat and other PDF editors offer features to insert multiple images into a PDF and arrange them as needed.
3. Will putting photos into a PDF reduce the image quality?
Putting photos into a PDF can reduce image quality if the PDF settings are not configured correctly. To maintain high image quality, use high-resolution images and choose PDF settings that prioritize image quality, such as “High Quality Print” in Adobe Acrobat.
4. How do I put a JPEG into a PDF?
To put a JPEG into a PDF, you can use several methods. One simple way is to use online converters like Smallpdf or iLovePDF, where you upload the JPEG and convert it to PDF. Another method is to use Adobe Acrobat, where you can insert the JPEG into an existing PDF or create a new PDF from the JPEG.
5. What is the best DPI for photos in a PDF?
The best DPI (dots per inch) for photos in a PDF depends on the intended use of the PDF. For web use, a DPI of 150-300 is generally sufficient. For print use, a DPI of 300 or higher is recommended to ensure sharp, clear images.
6. Can I password protect a PDF with photos?
Yes, you can password protect a PDF with photos using Adobe Acrobat or other PDF editing software. This feature allows you to control who can access and view the PDF, adding an extra layer of security to your document.
7. How do I reduce the file size of a PDF with photos?
To reduce the file size of a PDF with photos, you can compress the images within the PDF using PDF editing software like Adobe Acrobat. Additionally, you can use online PDF compression tools to optimize the file size without significantly reducing image quality.
8. What is the best PDF editor for managing photos?
Adobe Acrobat is widely considered the best PDF editor for managing photos due to its advanced features, precise control over image placement and quality, and comprehensive editing capabilities. However, other PDF editors like PDFelement and Nitro PDF also offer excellent features for managing photos in PDFs.
9. How do I insert a photo into an existing PDF on a Mac?
On a Mac, you can insert a photo into an existing PDF using the Preview app. Open the PDF in Preview, go to “Edit” > “Insert” > “Page from File,” and select the image you want to insert. You can then position and resize the image as needed.
10. What are the best practices for optimizing PDFs with photos for email?
For optimizing PDFs with photos for email, it’s essential to reduce the file size to ensure easy sending and receiving. Compress the images, remove unnecessary elements, and use PDF settings specifically designed for web use. Aim for a file size that is manageable without sacrificing too much image quality.
 A photographer using Adobe Acrobat to insert a photo into a PDF, showcasing the software's interface and image placement tools
Alt Text: Inserting a photo into a PDF using Adobe Acrobat, with a focus on the software’s editing interface.