Putting photos into a hidden folder is a crucial skill for maintaining privacy and organizing your visual content, especially when dealing with sensitive or personal images. This comprehensive guide, brought to you by dfphoto.net, will walk you through various methods to achieve this on different devices and platforms. Whether you’re using an iPhone, Android, Mac, or Windows, understanding these techniques will ensure your photos remain secure and private. This article also explores advanced photo management strategies, creative visual content ideas, and secure image storage solutions.
1. Why Should You Put Photos Into a Hidden Folder?
Hiding photos offers numerous benefits, including enhanced privacy and improved organization.
Putting photos into a hidden folder is a great solution to keep your images private from others who may use your devices. In today’s digital age, where our smartphones and computers contain a vast amount of personal information, including photos, maintaining privacy is more important than ever. Moreover, hidden folders help you keep your photo library organized by separating sensitive or less frequently accessed images from your main collection. This makes it easier to navigate and manage your photos.
Here are some specific reasons why you might want to hide photos:
- Privacy Protection: Sensitive or personal photos are shielded from prying eyes.
- Organization: Keeps your main photo library clean and focused.
- Security: Adds an extra layer of protection against unauthorized access.
- Confidentiality: Ideal for photos with sensitive information or content.
- Peace of Mind: Knowing your private photos are secure provides reassurance.
2. How to Hide Photos on iPhone or iPad
Apple provides a built-in feature to hide photos on iOS devices.
Hiding photos on your iPhone or iPad is a straightforward process using the built-in Photos app. This feature allows you to move selected photos to a “Hidden” album, which can be further secured in more recent iOS versions.
2.1. Steps to Hide Photos
- Open the Photos App: Launch the Photos app on your iPhone or iPad.
- Select Photos: Tap on the photo or video you want to hide. For multiple selections, tap “Select” in the upper-right corner and choose all the photos/videos.
- Tap the Share Button: This is the square icon with an arrow pointing upwards, located in the bottom-left corner.
- Scroll Down and Tap Hide: In the share sheet, scroll down until you see the “Hide” option. Tap it.
- Confirm: A pop-up will ask if you want to hide the photo(s). Confirm your choice.
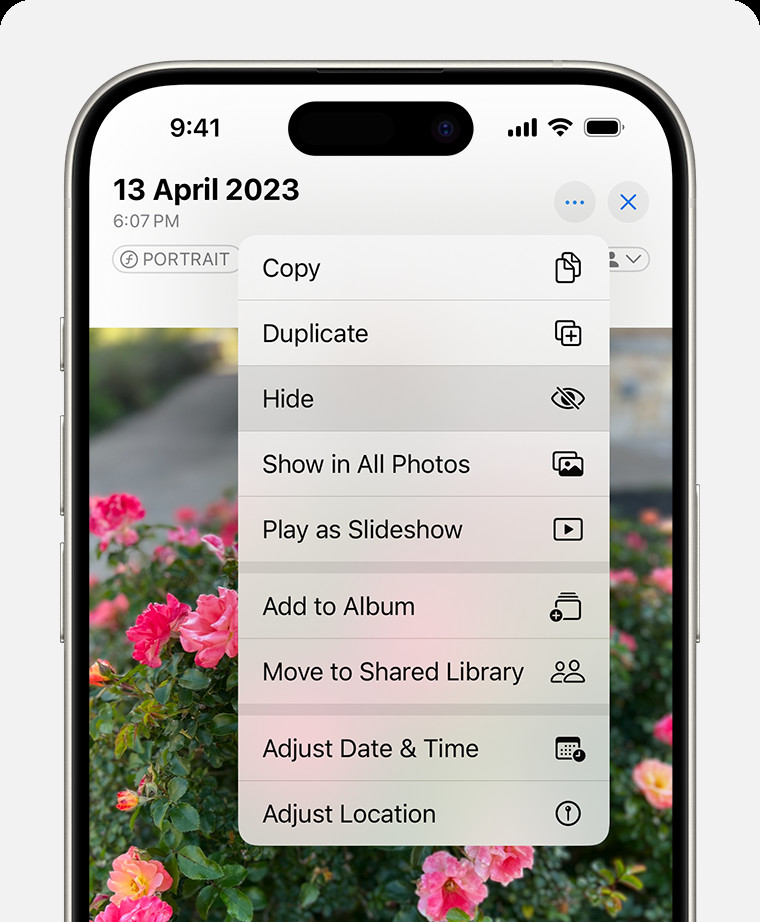 Dropdown menu highlighting the Hide feature feature for a photo.
2.2. Accessing the Hidden Album
- Open Photos: Launch the Photos app.
- Go to Albums: Tap on the “Albums” tab at the bottom. On iPad, you might need to tap the sidebar icon in the upper-left corner first to see your albums.
- Scroll Down to Utilities: Look for the “Utilities” section.
- Tap Hidden: Access the Hidden album. You may need to authenticate with Face ID, Touch ID, or your passcode.
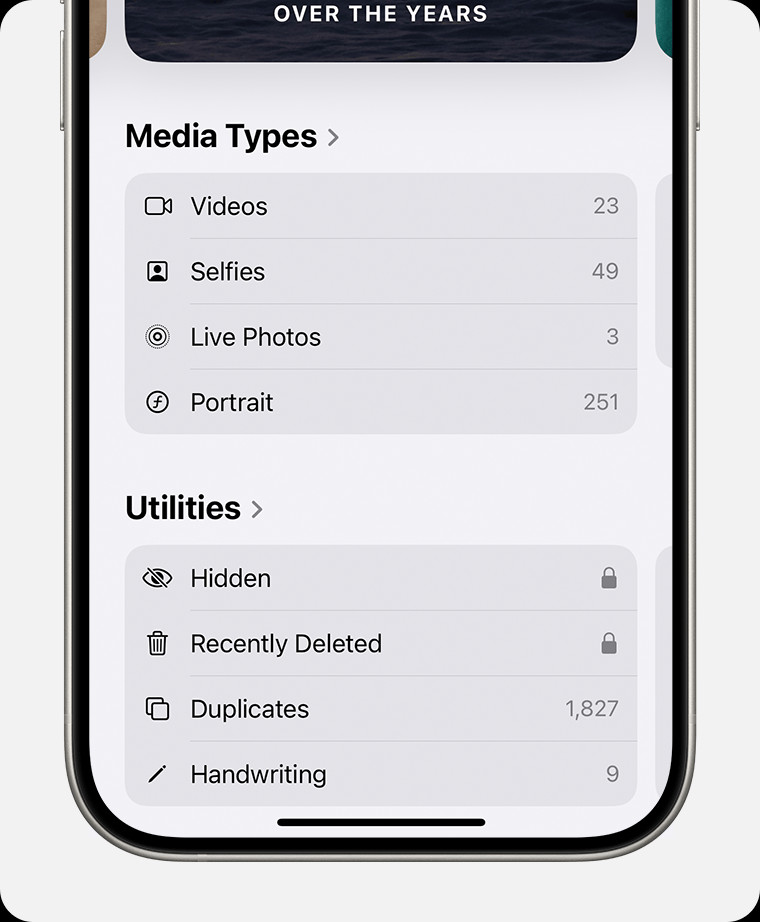 Hidden album highlighted under Utilities.
2.3. Unhiding Photos
- Open the Hidden Album: Follow the steps above to access the Hidden album.
- Select the Photo: Tap on the photo or video you want to unhide.
- Tap the Share Button: The square icon with an arrow pointing upwards.
- Tap Unhide: In the share sheet, tap the “Unhide” option. The photo will be moved back to your main library.
2.4. Additional Security Measures
In iOS 14 and later, you can hide the Hidden album itself.
- Open Settings: Go to the Settings app on your iPhone or iPad.
- Scroll Down and Tap Photos: Find and tap “Photos” in the settings menu.
- Toggle “Show Hidden Album”: Scroll down and toggle the “Show Hidden Album” option to off. This will hide the Hidden album from the Albums view.
2.5. Third-Party Apps for Enhanced Security
For those seeking additional security, third-party apps offer features like password protection and encryption.
While the built-in Hidden album provides basic privacy, it might not be sufficient for highly sensitive photos. Apps like “Secret Photo Vault” or “Keepsafe” offer password protection, encryption, and decoy albums to enhance security. According to a review by Popular Photography, these apps provide a more robust solution for protecting your private photos.
3. How to Hide Photos on Android
Android offers multiple methods for hiding photos, including built-in features and third-party apps.
Android devices provide several ways to hide photos, depending on the manufacturer and version of Android. Common methods include using built-in file manager features, third-party apps, and secure folder options.
3.1. Using Built-In File Manager
Many Android devices have a built-in file manager that allows you to hide files by renaming them.
- Open File Manager: Launch the file manager app on your Android device. This might be called “Files,” “File Manager,” or something similar, depending on your device.
- Navigate to the Photo: Find the folder containing the photos you want to hide.
- Rename the Photo: Long-press on the photo to select it, then tap the “Rename” option. Add a period (.) at the beginning of the file name. For example, rename “photo.jpg” to “.photo.jpg”.
- Hidden File: Files with a period at the beginning are treated as hidden files by Android.
3.2. Accessing Hidden Files
- Open File Manager: Launch the file manager app.
- Show Hidden Files: Tap the menu button (usually three dots or lines) and look for a “Settings” or “View” option. Enable the “Show hidden files” option.
- Find Hidden Photos: Navigate to the folder where you hid the photos. They should now be visible.
3.3. Using Secure Folder (Samsung)
Samsung devices offer a “Secure Folder” feature for enhanced privacy.
Samsung’s Secure Folder provides a private, encrypted space to store photos and other files. This feature is available on most Samsung Galaxy devices.
- Enable Secure Folder: Go to Settings > Biometrics and security > Secure Folder. Follow the prompts to set up your Secure Folder, which may involve creating a Samsung account and setting a PIN, pattern, or password.
- Move Photos to Secure Folder: Open the Gallery app, select the photos you want to hide, tap “More,” and choose “Move to Secure Folder.”
- Access Secure Folder: Open the Secure Folder app and authenticate with your PIN, pattern, or password to view your hidden photos.
3.4. Third-Party Apps for Android
Apps like “Keepsafe Photo Vault” offer secure, password-protected storage.
Several third-party apps on the Google Play Store provide robust photo hiding capabilities, including encryption and password protection.
- Keepsafe Photo Vault: This app allows you to create password-protected albums and offers features like break-in alerts.
- Hide Pictures – Hide Photos & Videos: This app provides a secure vault for your photos and videos with password protection.
- Private Photo Vault: This app offers encryption and decoy passwords for added security.
3.5. Creating a “.nomedia” File
Another method to hide photos from gallery apps is by creating a “.nomedia” file in the folder containing the photos.
- Open File Manager: Launch the file manager app.
- Navigate to the Folder: Find the folder containing the photos you want to hide.
- Create a New File: Tap the menu button and choose “New File.” Name the file “.nomedia” (without the quotes).
- Photos Hidden: This file tells the Android media scanner to ignore the folder, effectively hiding the photos from gallery apps.
4. How to Hide Photos on Mac
macOS provides built-in features and advanced methods for securing your photos.
Hiding photos on a Mac can be achieved through several methods, including using the built-in Photos app, creating encrypted disk images, and utilizing hidden folders. These techniques provide varying levels of security and convenience.
4.1. Using the Photos App
The Photos app on macOS allows you to hide photos within the app itself.
- Open Photos: Launch the Photos app on your Mac.
- Select Photos: Select the photo or video you want to hide. You can select multiple items by holding the Command key while clicking.
- Hide Photo: Control-click (right-click) on the selected photo(s) and choose “Hide Photo.” Alternatively, you can go to the “Image” menu in the menu bar and select “Hide Photo,” or press Command-L.
- Confirm: A dialog box will ask if you want to hide the photo(s). Confirm your choice.
4.2. Accessing the Hidden Album
- Open Photos: Launch the Photos app.
- Show Hidden Photo Album: In the menu bar, go to “View” and select “Show Hidden Photo Album.”
- Hidden Album: The Hidden album will appear in the sidebar. Click on it to view your hidden photos. You may need to authenticate with Touch ID or your login password.
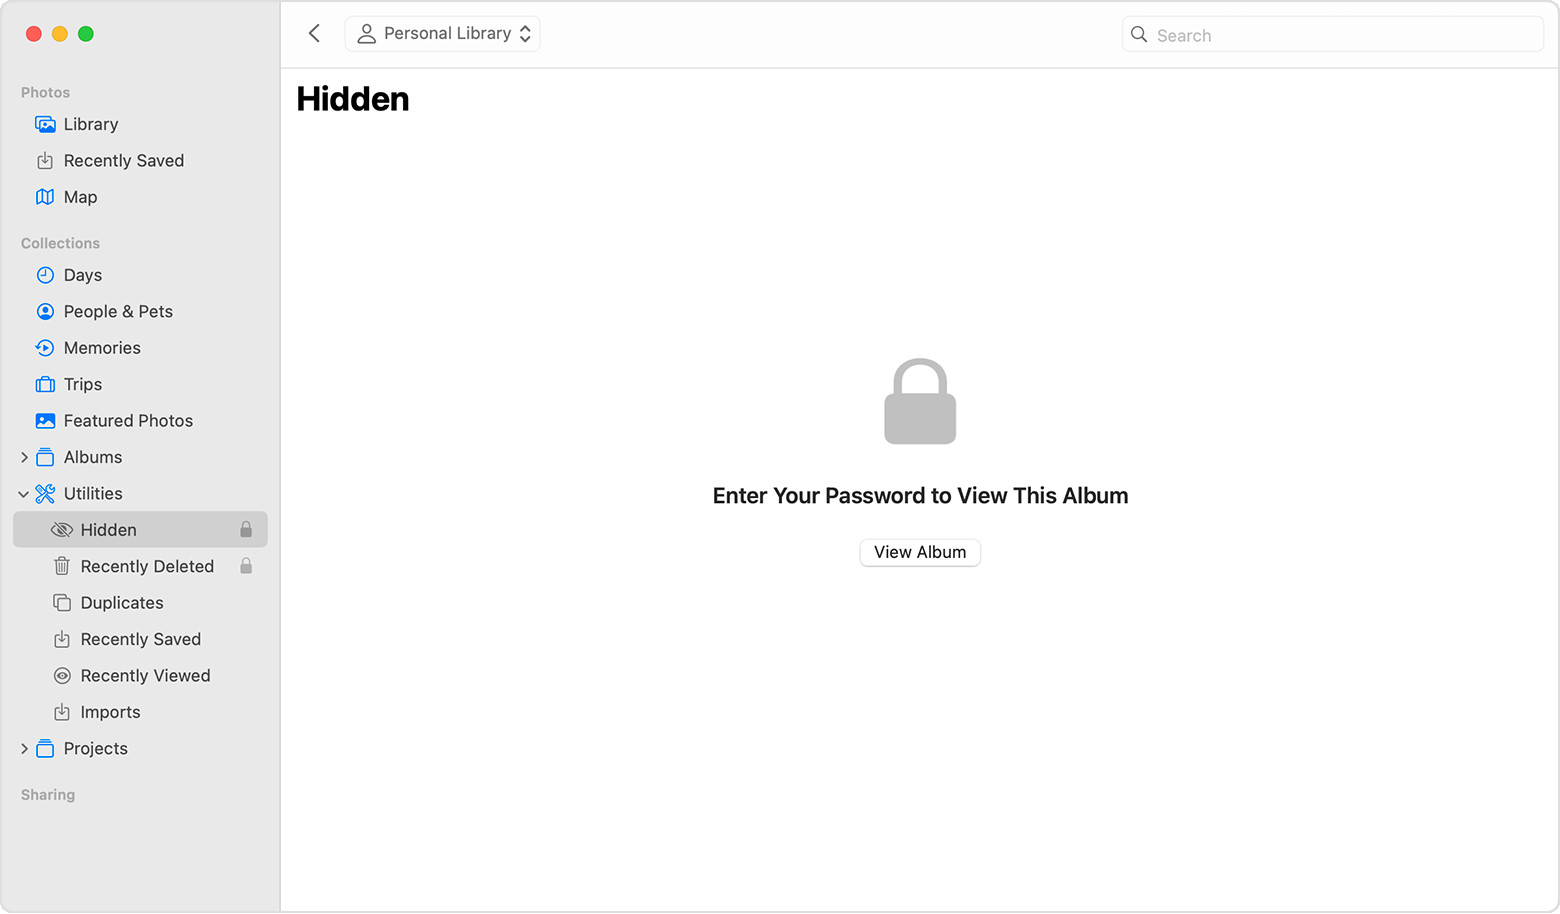 Hidden album highlighted in MacOS Photos app.
4.3. Unhiding Photos
- Open the Hidden Album: Follow the steps above to access the Hidden album.
- Select the Photo: Select the photo or video you want to unhide.
- Unhide Photo: Control-click (right-click) on the selected photo(s) and choose “Unhide Photo.” Alternatively, you can go to the “Image” menu in the menu bar and select “Unhide Photo,” or press Command-L. The photo will be moved back to your main library.
4.4. Creating an Encrypted Disk Image
For more secure storage, create an encrypted disk image using Disk Utility.
Creating an encrypted disk image provides a secure way to store sensitive photos. This method involves creating a password-protected virtual drive on your Mac.
- Open Disk Utility: Launch Disk Utility, located in /Applications/Utilities/.
- Create New Image: Go to File > New Image > Blank Image.
- Configure Settings:
- Save As: Choose a name for your disk image.
- Where: Select a location to save the disk image file.
- Name: Enter a name for the volume (the virtual drive).
- Size: Choose the size of the disk image.
- Format: Select “APFS (Encrypted)” or “Mac OS Extended (Journaled, Encrypted).”
- Encryption: Choose a password for the disk image.
- Partitions: Select “Single Partition – GUID Partition Map.”
- Image Format: Select “sparse bundle disk image” or “sparse disk image.”
- Create: Click “Create.” You will be prompted to enter a password. Choose a strong password and remember it.
- Mount the Disk Image: Double-click the disk image file to mount it. Enter the password when prompted.
- Move Photos: Drag and drop your photos into the mounted disk image.
- Unmount the Disk Image: When you’re done, drag the volume icon from the desktop to the Trash to unmount the disk image.
4.5. Hiding Folders in macOS
You can hide folders by renaming them with a period (.) at the beginning.
Similar to Android, macOS treats files and folders with a period (.) at the beginning of their names as hidden.
- Open Finder: Launch Finder.
- Select the Folder: Find the folder containing the photos you want to hide.
- Rename the Folder: Right-click on the folder and choose “Rename.” Add a period (.) at the beginning of the folder name. For example, rename “PrivatePhotos” to “.PrivatePhotos”.
- Hidden Folder: The folder will disappear from view.
4.6. Accessing Hidden Folders
- Open Terminal: Launch Terminal, located in /Applications/Utilities/.
- Show Hidden Files: Type the following command and press Enter:
defaults write com.apple.finder AppleShowAllFiles YES - Restart Finder: Type
killall Finderand press Enter to restart Finder. - Find Hidden Folder: The hidden folder will now be visible in Finder.
- Hide Files Again: To hide the files again, use the command
defaults write com.apple.finder AppleShowAllFiles NOand restart Finder.
5. How to Hide Photos on Windows
Windows offers several methods for hiding photos, including built-in features and third-party software.
Hiding photos on Windows can be achieved using built-in features like hidden attributes and encrypted folders, as well as third-party software for enhanced security.
5.1. Using the Hidden Attribute
Windows allows you to hide files and folders by setting the hidden attribute.
- Open File Explorer: Launch File Explorer.
- Select the Folder or File: Find the folder or file you want to hide.
- Properties: Right-click on the folder or file and choose “Properties.”
- General Tab: In the Properties window, go to the “General” tab.
- Attributes: Under the “Attributes” section, check the “Hidden” box.
- Apply: Click “Apply.” If you’re hiding a folder, you’ll be asked if you want to apply the change to all subfolders and files. Choose the option that suits your needs.
- OK: Click “OK” to close the Properties window.
5.2. Showing Hidden Files and Folders
- Open File Explorer: Launch File Explorer.
- View Tab: Click on the “View” tab in the ribbon.
- Show/hide Section: In the “Show/hide” section, check the “Hidden items” box.
- Hidden Items Visible: Hidden files and folders will now be visible, but they will appear slightly faded.
5.3. Creating an Encrypted Folder with BitLocker
For more secure storage, use BitLocker to encrypt a folder or drive.
BitLocker is a full disk encryption feature included with Windows Pro, Enterprise, and Education editions. It can also be used to encrypt removable drives, providing a secure way to store sensitive photos.
- Open File Explorer: Launch File Explorer.
- Select the Drive: Right-click on the drive where you want to create the encrypted folder. If you’re using a removable drive, make sure it’s connected to your computer.
- Turn on BitLocker: Choose “Turn on BitLocker.”
- Choose Unlock Method: Follow the prompts to choose how you want to unlock the drive. You can use a password or a smart card.
- Back Up Recovery Key: It’s important to back up your recovery key in case you forget your password or have problems unlocking the drive. You can save the recovery key to a file, print it, or save it to your Microsoft account.
- Encrypt Drive: Choose whether to encrypt the entire drive or only the used space.
- Start Encryption: Click “Start encrypting.” The encryption process may take some time, depending on the size of the drive and the amount of data.
- Create Folder: Once the drive is encrypted, create a new folder on the encrypted drive and move your photos into it.
5.4. Third-Party Software
Software like “VeraCrypt” provides advanced encryption options.
Several third-party software options offer advanced encryption and security features for hiding photos on Windows.
- VeraCrypt: This is a free, open-source encryption tool that allows you to create encrypted containers and virtual disks.
- Folder Lock: This software allows you to password-protect folders and encrypt files.
- Wise Folder Hider: This tool provides a simple way to hide files and folders with a password.
5.5. Using Archiving Software
Archiving software like 7-Zip can create password-protected archives.
Archiving software can be used to create password-protected archives, providing a secure way to store and hide photos.
- Download and Install 7-Zip: Download and install 7-Zip from the official website.
- Select Photos: Select the photos you want to hide.
- Add to Archive: Right-click on the selected photos and choose “7-Zip” > “Add to archive.”
- Configure Settings:
- Archive Format: Choose “zip” or “7z.”
- Encryption: Enter a password in the “Encryption” section.
- Encrypt File Names: Check the “Encrypt file names” box for added security.
- OK: Click “OK” to create the password-protected archive.
- Delete Original Photos: After creating the archive, delete the original photos to ensure they are not accessible.
6. Best Practices for Secure Photo Storage
Maintaining the security of your hidden photos requires consistent practices.
Securing your photos involves more than just hiding them. It requires a comprehensive approach that includes strong passwords, regular backups, and awareness of potential security threats.
6.1. Strong Passwords
Use strong, unique passwords for all your accounts and encrypted storage.
- Length: Use a password that is at least 12 characters long.
- Complexity: Include a mix of uppercase and lowercase letters, numbers, and symbols.
- Uniqueness: Don’t reuse passwords across multiple accounts.
- Password Manager: Consider using a password manager like LastPass or 1Password to generate and store strong passwords securely.
6.2. Regular Backups
Back up your hidden photos to a secure, off-site location.
- Cloud Backup: Use a secure cloud storage service like Google Drive, Dropbox, or iCloud to back up your hidden photos.
- External Hard Drive: Back up your photos to an external hard drive and store it in a secure location.
- Off-Site Backup: Consider using an off-site backup service to protect against physical damage or theft.
6.3. Two-Factor Authentication
Enable two-factor authentication (2FA) for all your accounts.
- Enable 2FA: Enable 2FA for your email, cloud storage, and any other accounts that contain sensitive information.
- Authenticator App: Use an authenticator app like Google Authenticator or Authy to generate 2FA codes.
- SMS Authentication: Avoid using SMS authentication, as it is less secure than authenticator apps.
6.4. Software Updates
Keep your operating system and security software up to date.
- Automatic Updates: Enable automatic updates for your operating system and security software to ensure you have the latest security patches.
- Antivirus Software: Use a reputable antivirus program and keep it up to date.
- Firewall: Enable your firewall to protect against unauthorized access to your computer.
6.5. Physical Security
Protect your devices from physical access.
- Lock Your Devices: Use a strong password, PIN, or biometric authentication to lock your devices.
- Secure Your Home Network: Use a strong password for your Wi-Fi network and enable WPA3 encryption.
- Be Careful in Public: Be aware of your surroundings when using your devices in public places.
7. Creative Uses for Hidden Folders
Hidden folders can be used for more than just security; they can also enhance your creativity.
Beyond security, hidden folders can be creatively used to organize and manage your visual content.
7.1. Mood Boards
Create hidden mood boards for creative projects.
- Collect Inspiration: Gather inspirational images and store them in a hidden folder.
- Private Inspiration: Keep your mood boards private and protected from prying eyes.
- Organize by Project: Create separate hidden folders for different projects.
7.2. Before and After Photos
Store before and after photos in a hidden folder for personal projects.
- Track Progress: Keep track of your progress on personal projects like weight loss, home renovations, or gardening.
- Private Comparison: Keep your before and after photos private and secure.
- Motivate Yourself: Use the photos to motivate yourself and track your achievements.
7.3. Work in Progress
Store work-in-progress photos in a hidden folder to maintain privacy.
- Protect Confidential Work: Keep your work-in-progress photos private and protected from unauthorized access.
- Organize by Project: Create separate hidden folders for different projects.
- Share When Ready: Share your work when it’s complete and you’re ready to show it to the world.
7.4. Personal Journal
Use a hidden folder to store photos for a personal visual journal.
- Document Your Life: Use photos to document your daily life and store them in a hidden folder.
- Private Reflection: Keep your personal journal private and secure.
- Review Your Memories: Review your journal entries and reflect on your memories.
8. Legal Considerations
Understand the legal implications of hiding photos, especially regarding privacy and consent.
Hiding photos can have legal implications, especially when it comes to privacy and consent. It’s important to understand your rights and responsibilities when handling sensitive images.
8.1. Privacy Laws
Be aware of privacy laws in your jurisdiction.
- GDPR: The General Data Protection Regulation (GDPR) in the European Union protects the privacy of personal data.
- CCPA: The California Consumer Privacy Act (CCPA) gives California residents the right to know what personal information is being collected about them and the right to opt out of the sale of their personal information.
- Other Laws: Be aware of other privacy laws in your jurisdiction that may apply to the handling of sensitive images.
8.2. Consent
Obtain consent before taking or storing photos of other people.
- Informed Consent: Obtain informed consent before taking or storing photos of other people, especially if the photos are sensitive or private.
- Explicit Consent: Obtain explicit consent if you plan to share the photos with others or use them for commercial purposes.
- Respect Privacy: Respect the privacy of others and avoid taking or storing photos without their consent.
8.3. Child Protection
Be aware of laws regarding child pornography and exploitation.
- Child Pornography: It is illegal to possess, distribute, or create child pornography.
- Child Exploitation: Be aware of laws regarding child exploitation and report any suspected cases to the authorities.
- Protect Children: Protect children from online predators and exploitation by monitoring their online activity and educating them about online safety.
9. Common Mistakes to Avoid
Avoid these common mistakes when hiding photos to ensure security.
Hiding photos can be tricky, and it’s easy to make mistakes that compromise your security. Here are some common mistakes to avoid.
9.1. Weak Passwords
Using weak or easily guessable passwords.
- Use Strong Passwords: Use strong, unique passwords for all your accounts and encrypted storage.
- Avoid Common Words: Avoid using common words, names, or dates in your passwords.
- Password Manager: Use a password manager to generate and store strong passwords securely.
9.2. Forgetting Passwords
Forgetting the password to your encrypted storage.
- Store Passwords Securely: Store your passwords in a secure location, such as a password manager.
- Backup Recovery Key: Back up your recovery key for encrypted storage in case you forget your password.
- Test Your Passwords: Test your passwords regularly to make sure you can remember them.
9.3. Not Backing Up
Not backing up your hidden photos.
- Regular Backups: Back up your hidden photos to a secure, off-site location.
- Cloud Backup: Use a secure cloud storage service to back up your photos.
- External Hard Drive: Back up your photos to an external hard drive and store it in a secure location.
9.4. Sharing Devices
Sharing devices with others without proper security measures.
- Use Separate Accounts: Use separate user accounts for each person who uses your devices.
- Lock Your Devices: Use a strong password, PIN, or biometric authentication to lock your devices.
- Log Out of Accounts: Log out of your accounts when you’re finished using them.
9.5. Downloading Malware
Downloading malware or visiting malicious websites.
- Antivirus Software: Use a reputable antivirus program and keep it up to date.
- Firewall: Enable your firewall to protect against unauthorized access to your computer.
- Be Careful Online: Be careful when clicking on links or downloading files from the internet.
10. The Future of Photo Security
Explore emerging technologies and trends in photo security.
The future of photo security is constantly evolving, with new technologies and trends emerging to protect your privacy and security.
10.1. Blockchain Technology
Blockchain technology for secure photo storage and authentication.
- Decentralized Storage: Blockchain technology can be used to create decentralized photo storage solutions that are more secure and resistant to hacking.
- Authentication: Blockchain can be used to authenticate the ownership and authenticity of photos.
- NFTs: Non-fungible tokens (NFTs) can be used to represent ownership of digital photos and ensure their authenticity.
10.2. Artificial Intelligence
AI for enhanced photo security and privacy.
- Facial Recognition: AI can be used to identify and protect sensitive photos from being shared without consent.
- Content Analysis: AI can be used to analyze the content of photos and identify potential security risks.
- Automatic Encryption: AI can be used to automatically encrypt photos based on their content and sensitivity.
10.3. Biometric Authentication
Biometric authentication for secure access to hidden photos.
- Fingerprint Scanning: Use fingerprint scanning to unlock your devices and access your hidden photos.
- Facial Recognition: Use facial recognition to unlock your devices and access your hidden photos.
- Voice Recognition: Use voice recognition to unlock your devices and access your hidden photos.
10.4. Quantum Encryption
Quantum encryption for unbreakable photo security.
- Quantum Key Distribution: Quantum key distribution (QKD) can be used to create unbreakable encryption keys for secure photo storage and transmission.
- Quantum-Resistant Algorithms: Develop quantum-resistant algorithms to protect against future quantum computing attacks.
- Long-Term Security: Ensure the long-term security of your photos by using quantum encryption technologies.
FAQ: How to Put Photos into a Hidden Folder
1. How do I hide photos on my iPhone?
Open the Photos app, select the photo(s) you want to hide, tap the share button, and choose “Hide.” The photos will be moved to the Hidden album.
2. How do I find the Hidden album on my iPhone?
Open the Photos app, go to the Albums tab, scroll down to the Utilities section, and tap “Hidden.” You may need to authenticate with Face ID, Touch ID, or your passcode.
3. Can I hide the Hidden album itself on my iPhone?
Yes, go to Settings > Photos and toggle off “Show Hidden Album.” This will hide the Hidden album from the Albums view.
4. How do I hide photos on my Android device?
You can use the built-in file manager to rename the photo by adding a period (.) at the beginning of the file name, use a secure folder feature (if available on your device), or use a third-party app like Keepsafe.
5. How do I create a “.nomedia” file to hide photos on Android?
Open the file manager, navigate to the folder containing the photos, create a new file named “.nomedia” (without the quotes). This will prevent gallery apps from displaying the photos in that folder.
6. How do I hide photos on my Mac?
Open the Photos app, select the photo(s) you want to hide, right-click, and choose “Hide Photo.” Alternatively, you can create an encrypted disk image using Disk Utility.
7. How do I create an encrypted disk image on my Mac?
Open Disk Utility, go to File > New Image > Blank Image, configure the settings (including encryption and password), and click “Create.”
8. How do I hide photos on my Windows computer?
Right-click the folder or file, choose “Properties,” go to the “General” tab, check the “Hidden” box, and click “Apply” and “OK.” You can also use BitLocker to encrypt a folder or drive.
9. What is BitLocker, and how do I use it to encrypt a folder?
BitLocker is a full disk encryption feature included with Windows Pro, Enterprise, and Education editions. Right-click on the drive, choose “Turn on BitLocker,” and follow the prompts to set up encryption.
10. What are some best practices for secure photo storage?
Use strong passwords, regularly back up your photos, enable two-factor authentication, keep your software up to date, and protect your devices from physical access.
By following these methods and best practices, you can effectively put your photos into a hidden folder and maintain your privacy and security across various devices and platforms. Remember to visit dfphoto.net for more tips and resources on photography and image management. Join our community to share your experiences and learn from other photography enthusiasts.
Ready to take control of your photo privacy? Visit dfphoto.net today for more tips, tricks, and in-depth guides on secure photo storage and organization. Explore our comprehensive resources and connect with a vibrant community of photographers. Elevate your photo management skills and discover new creative possibilities! Address: 1600 St Michael’s Dr, Santa Fe, NM 87505, United States. Phone: +1 (505) 471-6001. Website: dfphoto.net.