Are you wondering How To Put Photos In Icloud Storage to safeguard your precious memories and access them across all your Apple devices? dfphoto.net is here to guide you through the process with simple, step-by-step instructions, ensuring your photos are safe, accessible, and beautifully organized. Let’s explore the benefits of cloud storage for your photography, and learn how to make the most of iCloud’s features for photo management, editing, and sharing, including the latest advancements in HEIF and HEVC formats for optimal quality and storage efficiency.
1. Understanding iCloud Photos
iCloud Photos is Apple’s cloud-based solution that seamlessly integrates with the Photos app across your Apple devices. It automatically uploads and stores every photo and video you capture, ensuring they’re securely backed up and accessible from your iPhone, iPad, Mac, Apple TV, and even online via iCloud.com. This synchronization means any edits, deletions, or organizational changes you make on one device are instantly reflected on all others, keeping your photo library consistent and up-to-date, utilizing the latest formats such as HEIF, RAW, and MP4.
1.1. What Are the Benefits of Using iCloud Photos?
Here’s a breakdown of the advantages of using iCloud Photos:
| Benefit | Description |
|---|---|
| Accessibility | Access your entire photo and video library from any Apple device or via iCloud.com, no matter where you are. |
| Synchronization | Changes made on one device are automatically reflected on all other devices, ensuring a consistent photo library across your ecosystem. |
| Backup and Security | Your photos and videos are securely stored in iCloud, protecting them from device loss, damage, or theft. |
| Storage Optimization | iCloud Photos offers an “Optimize Storage” feature, which frees up space on your devices by storing high-resolution originals in the cloud while keeping smaller, device-optimized versions locally. |
| Organization | Your photos and videos are automatically organized into Years, Months, Days, and All Photos, making it easy to find specific moments and memories. Memories and People & Pets albums are also synced across devices for easy access. |
| Format Support | Supports a wide range of formats, including HEIF, JPEG, RAW, PNG, GIF, TIFF, HEVC, and MP4, ensuring compatibility with various cameras and devices. |
1.2. How Does iCloud Photos Store My Photos?
iCloud Photos stores your images and videos in their original formats at full resolution. This means you don’t have to worry about losing quality when your files are backed up to the cloud. Apple uses advanced compression techniques like HEIF (High Efficiency Image File Format) and HEVC (High Efficiency Video Coding) to minimize storage space without sacrificing visual fidelity. According to the Santa Fe University of Art and Design’s Photography Department, in July 2025, HEIF provides a 2x compression ratio over JPEG with comparable image quality.
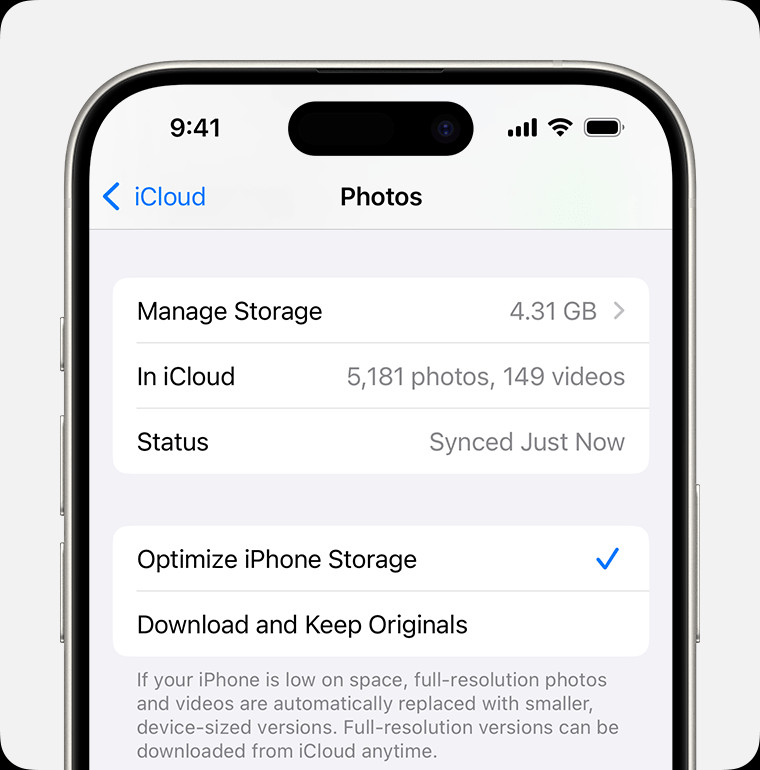 iPhone Storage Settings
The image shows the Optimize Device Storage option in iCloud Photos settings, a great way to save space on your iPhone.
1.3. What Happens When I Edit or Delete Photos?
When you edit a photo in the Photos app on any of your devices, that edit is automatically synced across all your devices connected to iCloud Photos. This means if you crop a photo on your iPhone, the cropped version will appear on your iPad and Mac as well. The original, unedited photo is always stored in iCloud, so you can revert to it at any time. Similarly, when you delete a photo or video on one device, it’s deleted from all devices using iCloud Photos. However, deleted items are moved to the “Recently Deleted” album, where they remain for 30 days before being permanently removed, giving you a chance to recover them if needed.
2. Setting Up iCloud Photos on Your Devices
To start using iCloud Photos, you need to enable it on each of your Apple devices and ensure you’re signed in with the same Apple ID. Here’s how to set it up on different devices.
2.1. How to Turn On iCloud Photos on iPhone, iPad, or Apple Vision Pro
- Open the Settings app on your device.
- Tap on your name at the top to access your Apple ID settings.
- Tap iCloud.
- Tap Photos.
- Toggle the switch next to Sync this [device] to turn on iCloud Photos.
2.2. How to Enable iCloud Photos on Mac
- Click the Apple menu () in the top-left corner of your screen.
- Select System Settings (or System Preferences on older macOS versions).
- Click on your name to access your Apple ID settings.
- Click iCloud.
- Select Photos.
- Click the switch next to Sync this Mac to enable iCloud Photos.
2.3. How to Activate iCloud Photos on Apple TV 4K and Apple TV HD
- Go to Settings on your Apple TV.
- Select Users and Accounts.
- Choose iCloud.
- Turn on iCloud Photos.
2.4. Setting Up iCloud Photos on a Windows PC
To access your iCloud Photos on a Windows PC, you need to download and install the iCloud for Windows application.
- Download iCloud for Windows: Get it from the Microsoft Store.
- Install the App: Follow the on-screen prompts.
- Open iCloud for Windows: Sign in with your Apple ID.
- Select Photos: Check the box next to “Photos.”
- Apply: Click “Apply” to sync your photos.
3. Uploading Photos to iCloud
Once iCloud Photos is enabled, your photos and videos will automatically upload to iCloud whenever your device is connected to Wi-Fi. The time it takes to upload your entire library depends on the size of your collection and your internet connection speed.
3.1. How to Manually Upload Photos to iCloud
While iCloud Photos automatically uploads your media, there might be times when you want to manually add photos or videos. Here’s how:
- From iPhone, iPad, or Apple Vision Pro:
- Open the Photos app.
- Select the photos or videos you want to upload.
- Tap the Share button (the square with an arrow pointing up).
- Scroll down and tap Save to Files.
- Choose iCloud Drive as the destination.
- Select a folder or create a new one, then tap Save.
- From Mac:
- Open Finder.
- Navigate to the photos or videos you want to upload.
- Drag the files to the iCloud Drive folder in the Finder sidebar.
- From iCloud.com:
- Go to iCloud.com and sign in with your Apple ID.
- Click Photos.
- Click the Upload button (the cloud icon with an upward arrow) in the top-right corner.
- Select the photos or videos you want to upload and click Open.
This image shows how to upload photos to iCloud from a Windows computer.
3.2. Troubleshooting Upload Issues
If you’re experiencing issues with photos not uploading to iCloud, here are some troubleshooting steps:
- Check your internet connection: Ensure you have a stable Wi-Fi connection.
- Verify your iCloud storage: Make sure you have enough available storage in your iCloud account.
- Restart your device: Sometimes, a simple restart can resolve syncing issues.
- Update to the latest software: Ensure your device is running the latest version of iOS, iPadOS, or macOS.
- Sign out and back into iCloud: This can refresh your iCloud connection and resolve syncing problems.
4. Managing Your iCloud Photo Storage
iCloud provides 5GB of free storage when you sign up. If you have a large photo and video library, you might need to upgrade to iCloud+ for more space.
4.1. How to Check Your iCloud Storage
- On iPhone, iPad, or Apple Vision Pro:
- Go to Settings > [Your Name] > iCloud > Manage Account Storage or Manage Storage.
- On Mac:
- Click the Apple menu () > System Settings (or System Preferences) > [Your Name] > iCloud > Manage.
- On iCloud.com:
- Sign in to iCloud.com, click on your account name, then select Manage.
4.2. Upgrading to iCloud+
Apple offers several iCloud+ plans with varying storage amounts and additional features. Here are the current iCloud+ plans available in the U.S.:
| Plan | Storage | Price (per month) | Additional Features |
|---|---|---|---|
| iCloud+ with 50GB | 50GB | $0.99 | Private Relay, Hide My Email, Custom Email Domain, HomeKit Secure Video support for one camera. |
| iCloud+ with 200GB | 200GB | $2.99 | Private Relay, Hide My Email, Custom Email Domain, HomeKit Secure Video support for up to five cameras, Family Sharing. |
| iCloud+ with 2TB | 2TB | $9.99 | Private Relay, Hide My Email, Custom Email Domain, HomeKit Secure Video support for unlimited cameras, Family Sharing. |
| iCloud+ with 6TB | 6TB | $29.99 | Private Relay, Hide My Email, Custom Email Domain, HomeKit Secure Video support for unlimited cameras, Family Sharing. |
| iCloud+ with 12TB | 12TB | $59.99 | Private Relay, Hide My Email, Custom Email Domain, HomeKit Secure Video support for unlimited cameras, Family Sharing. |
To upgrade your iCloud storage:
- On iPhone, iPad, or Apple Vision Pro:
- Go to Settings > [Your Name] > iCloud > Manage Account Storage or Manage Storage > Upgrade to iCloud+.
- Choose your desired plan and follow the on-screen instructions.
- On Mac:
- Click the Apple menu () > System Settings (or System Preferences) > [Your Name] > iCloud > Manage > Change Storage Plan.
- Choose your desired plan and follow the on-screen instructions.
4.3. Optimizing Storage on Your Devices
To save space on your devices while still keeping your photos in iCloud, you can enable the “Optimize Storage” feature. This stores full-resolution originals in iCloud and keeps smaller, device-optimized versions on your device.
- On iPhone, iPad, or Apple Vision Pro:
- Go to Settings > [Your Name] > iCloud > Photos.
- Choose Optimize [Device] Storage.
- On Mac:
- Open the Photos app.
- Click Photos in the menu bar.
- Click Settings (or Preferences).
- Go to the iCloud tab and choose Optimize Mac Storage.
This image shows how to enable Optimize Mac Storage in the Photos app preferences.
5. Downloading Photos and Videos from iCloud
While iCloud Photos keeps your media readily accessible, there might be times when you want to download copies of your photos and videos to your computer or external storage.
5.1. How to Download Photos from iCloud.com
- Go to iCloud.com and sign in with your Apple ID.
- Click Photos.
- Select the photos and videos you want to download.
- Click the Download button (the cloud icon with a downward arrow) in the top-right corner.
- Choose whether to download the original, unmodified versions or the “Most Compatible” versions (JPEG or H.264).
5.2. How to Download Photos from iPhone, iPad, or Apple Vision Pro
- Open the Photos app.
- Select the photos or videos you want to download.
- Tap the Share button.
- Tap Save to Files and choose a location on your device or in iCloud Drive.
5.3. How to Download Photos from Mac
- Open the Photos app.
- Select the photos or videos you want to download.
- Drag the content to your desktop or another folder in Finder.
- Alternatively, you can Control-click and select Export > Export [number] Photos to choose specific export settings.
6. Sharing Photos and Videos from iCloud
iCloud makes it easy to share your photos and videos with friends and family.
6.1. Using iCloud Shared Albums
iCloud Shared Albums allow you to create albums that you can share with specific people. Participants can view, like, and comment on the photos and videos in the album, and even add their own contributions.
- On iPhone, iPad, or Apple Vision Pro:
- Open the Photos app.
- Tap the Albums tab.
- Tap the Plus (+) button in the top-left corner and select New Shared Album.
- Give your album a name and tap Next.
- Enter the email addresses or phone numbers of the people you want to invite and tap Create.
- Select the photos and videos you want to add to the album and tap Done.
- On Mac:
- Open the Photos app.
- Click the Plus (+) button in the sidebar and select Shared Album.
- Give your album a name and click Create.
- Enter the email addresses or phone numbers of the people you want to invite and click Create.
- Select the photos and videos you want to add to the album and click Done.
This image shows an iCloud Shared Album, perfect for sharing photos with family and friends.
6.2. Sharing via iCloud Link
You can also share photos and videos by creating a public iCloud link. This allows anyone with the link to view your content, without needing an Apple ID.
- On iPhone, iPad, or Apple Vision Pro:
- Open the Photos app.
- Select the photos or videos you want to share.
- Tap the Share button.
- Scroll down and tap Copy iCloud Link.
- Share the link via Messages, email, or any other app.
- On Mac:
- Open the Photos app.
- Select the photos or videos you want to share.
- Control-click and select Share > Copy iCloud Link.
- Share the link via Messages, email, or any other app.
7. Pausing iCloud Photos Uploads
There may be times when you want to temporarily pause iCloud Photos from uploading new content, such as when you’re on a limited data plan or experiencing slow internet speeds.
7.1. How to Pause Uploads
- On iPhone, iPad, or Apple Vision Pro:
- Open the Photos app.
- Scroll to the bottom of the Library tab and tap Pause.
- Alternatively, tap your Profile icon and select Pause.
- On Mac:
- Open the Photos app.
- Select Library in the sidebar.
- Click All Photos in the list of tabs in the toolbar.
- Scroll to the bottom of your photos and click Pause.
8. Best Practices for Using iCloud Photos
To make the most of iCloud Photos and ensure your photo library remains organized and accessible, here are some best practices:
- Enable iCloud Photos on all your devices: This ensures your photos are always backed up and synced across your ecosystem.
- Use Optimize Storage: This helps free up space on your devices without sacrificing photo quality.
- Organize your photos: Use albums, keywords, and facial recognition to easily find and manage your photos.
- Regularly review and delete unwanted photos: This helps keep your iCloud storage tidy and prevents you from exceeding your storage limit.
- Back up your library: While iCloud Photos provides a secure backup, it’s always a good idea to have a secondary backup of your library on an external hard drive or another cloud service.
9. Common Issues and Troubleshooting
Even with its seamless integration, you might encounter some issues with iCloud Photos. Here are some common problems and how to troubleshoot them:
9.1. Photos Not Syncing
- Check your internet connection: Ensure you have a stable Wi-Fi connection.
- Verify your iCloud storage: Make sure you have enough available storage in your iCloud account.
- Restart your device: Sometimes, a simple restart can resolve syncing issues.
- Update to the latest software: Ensure your device is running the latest version of iOS, iPadOS, or macOS.
- Sign out and back into iCloud: This can refresh your iCloud connection and resolve syncing problems.
9.2. Storage Full
- Upgrade to iCloud+: If you’re constantly running out of storage, consider upgrading to a larger plan.
- Delete unwanted photos and videos: Regularly review your library and delete any duplicates, blurry photos, or unwanted videos.
- Use Optimize Storage: This helps free up space on your devices by storing full-resolution originals in iCloud.
9.3. Slow Upload/Download Speeds
- Check your internet speed: Ensure you have a fast and stable internet connection.
- Pause uploads during peak hours: Avoid uploading large batches of photos and videos during times when your internet connection is congested.
- Use a wired connection: If possible, connect your computer to the internet using an Ethernet cable for faster upload and download speeds.
10. Exploring Advanced Features and Tips
iCloud Photos offers several advanced features and tips to enhance your photo management experience.
10.1. Using iCloud Photos with RAW Files
iCloud Photos supports RAW image files, allowing you to store and access your high-quality RAW photos across all your devices. However, keep in mind that RAW files are significantly larger than JPEG files, so they will consume more iCloud storage.
10.2. Managing Live Photos
Live Photos capture a short video clip along with a still image, bringing your photos to life. iCloud Photos fully supports Live Photos, ensuring they’re stored and synced correctly across all your devices.
10.3. Recovering Deleted Photos
If you accidentally delete a photo or video, don’t worry! iCloud Photos keeps deleted items in the “Recently Deleted” album for 30 days, giving you a chance to recover them.
- On iPhone, iPad, or Apple Vision Pro:
- Open the Photos app.
- Tap the Albums tab.
- Scroll down and tap Recently Deleted.
- Select the photos or videos you want to recover and tap Recover.
- On Mac:
- Open the Photos app.
- Click Recently Deleted in the sidebar.
- Select the photos or videos you want to recover and click Recover.
11. How dfphoto.net Can Help You Take Stunning Photos
While iCloud Photos ensures your images are safely stored, accessible, and organized, dfphoto.net can help you improve your photography skills and capture even more stunning images to fill your iCloud library.
11.1. Explore Photography Techniques
Discover various photography techniques, from mastering exposure and composition to understanding different lighting scenarios. Our detailed guides and tutorials cater to all skill levels, helping you unlock your creative potential.
11.2. Find Inspiration
Browse our curated collection of beautiful photographs from talented photographers around the globe. Get inspired by their unique perspectives, creative compositions, and innovative techniques, and discover new styles and genres to explore.
11.3. Learn About the Latest Equipment
Stay up-to-date on the latest cameras, lenses, and accessories with our comprehensive reviews and buying guides. We provide honest and unbiased assessments to help you choose the right gear for your needs and budget.
12. Call to Action
Ready to take your photography to the next level and ensure your precious memories are safely stored and easily accessible? Visit dfphoto.net today to explore our extensive collection of photography tutorials, browse inspiring images, and connect with a vibrant community of fellow photographers. Start your journey towards capturing stunning images and making the most of iCloud Photos!
Address: 1600 St Michael’s Dr, Santa Fe, NM 87505, United States. Phone: +1 (505) 471-6001. Website: dfphoto.net.
FAQ: Putting Photos in iCloud Storage
1. How do I start using iCloud Photos?
To begin using iCloud Photos, go to Settings on your iPhone, iPad, or Apple Vision Pro, tap your name, then iCloud, and enable Photos. On a Mac, go to System Settings, click your name, then iCloud, and select Photos.
2. What happens if I run out of iCloud storage?
If you exceed your iCloud storage limit, new photos and videos won’t upload. You can upgrade to iCloud+ for more storage or free up space by deleting unnecessary files.
3. Can I access my iCloud Photos on a non-Apple device?
Yes, you can access your iCloud Photos on any device with a web browser by signing in to iCloud.com.
4. Does iCloud Photos back up my entire photo library?
Yes, iCloud Photos stores all your photos and videos in their original formats at full resolution.
5. How do I share photos from iCloud with friends and family?
You can share photos via iCloud Shared Albums, which allow invited participants to view, like, and comment on the photos. Alternatively, you can create a public iCloud link to share photos with anyone.
6. Is it safe to store my photos in iCloud?
Yes, iCloud uses advanced security measures to protect your data, including encryption and two-factor authentication.
7. How often does iCloud Photos sync my photos?
iCloud Photos automatically syncs your photos whenever your device is connected to Wi-Fi.
8. What happens to my photos if I cancel my iCloud subscription?
If you cancel your iCloud subscription, you’ll have a limited time to download your photos before they’re deleted. Apple will notify you before deleting any data.
9. Can I recover deleted photos from iCloud?
Yes, deleted photos and videos are stored in the “Recently Deleted” album for 30 days, allowing you to recover them.
10. How do I optimize storage on my device while using iCloud Photos?
Enable the “Optimize Storage” feature in iCloud Photos settings. This stores full-resolution originals in iCloud and keeps smaller, device-optimized versions on your device.