Putting Google Photos on a flash drive is a smart way to safeguard your precious memories and ensure you have offline access. At dfphoto.net, we understand the importance of keeping your photos safe and accessible. This guide will walk you through several methods to transfer your Google Photos to a flash drive, empowering you to preserve your visual legacy. Whether you’re looking to create a backup, free up online storage, or share photos without an internet connection, this comprehensive guide provides the solutions you need. Discover efficient photo management and secure data storage strategies for your photography collection.
1. Why Should You Transfer Photos From Google Photos to a Flash Drive?
Transferring your photos from Google Photos to a flash drive offers several compelling advantages:
- Data Backup and Archiving: Google Photos is excellent for online storage, but a physical backup on a flash drive provides an extra layer of security. According to research from the Santa Fe University of Art and Design’s Photography Department, in July 2025, having multiple backups significantly reduces the risk of data loss due to unforeseen circumstances like account breaches or service disruptions.
- Offline Accessibility: A flash drive enables you to view and share your photos even without an internet connection, perfect for travel or sharing with friends and family in areas with limited connectivity.
- Storage Management: Transferring photos to a flash drive can free up valuable space in your Google Photos account, especially if you’re approaching your storage limit and prefer not to pay for additional storage.
2. Can You Directly Transfer Photos From Google Photos to a Flash Drive?
No, you can’t directly transfer photos from Google Photos to a flash drive. The process involves downloading your photos from Google Photos to your computer first, and then transferring them to the flash drive. This ensures compatibility and allows you to manage the files during the transfer.
3. What Are the Different Ways to Save Google Photos to a Flash Drive?
Here are four effective methods to transfer your photos from Google Photos to a flash drive:
3.1. Method 1: Downloading Directly From Google Photos
This method involves manually selecting and downloading photos directly from the Google Photos website.
- Ensure your flash drive is connected to your computer and recognized. Log into your Google Photos account via a web browser.
- Navigate to the “Photos” section. Use the “Shift” key and your mouse to select multiple photos you wish to download. You can download up to 500 photos or videos at a time using Google Photos.
 Selecting multiple photos for download in Google Photos, highlighting the interface and selection process
- Click the three-dots icon in the top-right corner and select “Download”.
- Google Photos will compress your selected photos into a ZIP file, typically named “Photos-***.zip,” located in your Downloads folder.
- Extract the contents of the ZIP file and move the photos to your flash drive.
3.1.1. What Are the Limitations of This Method?
This approach is best suited for transferring a small number of photos due to the 500-photo limit per download and the manual selection process. If you have a large library, this method can be time-consuming.
3.2. Method 2: Downloading Albums From Google Photos
Organizing your photos into albums in Google Photos can streamline the download process.
- Connect your flash drive to your computer and log into your Google Photos account.
- Click “Albums” and select “Create album”.
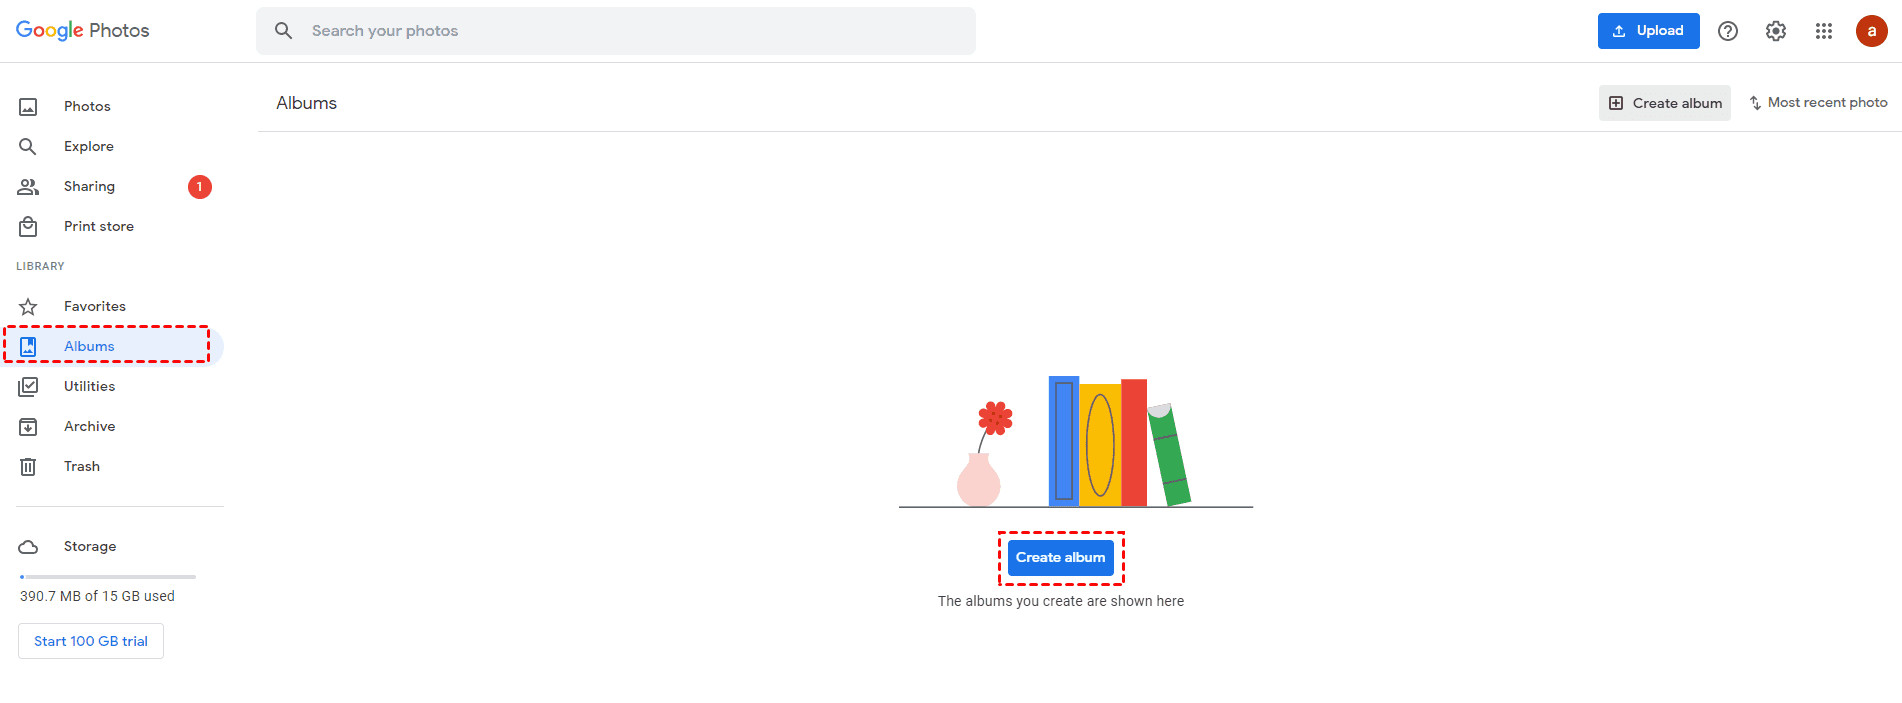 Creating a new album in Google Photos, showcasing the album creation interface
- Give your album a descriptive name and click “Add photos”.
- Select the photos you want to include in the album and click “Done”.
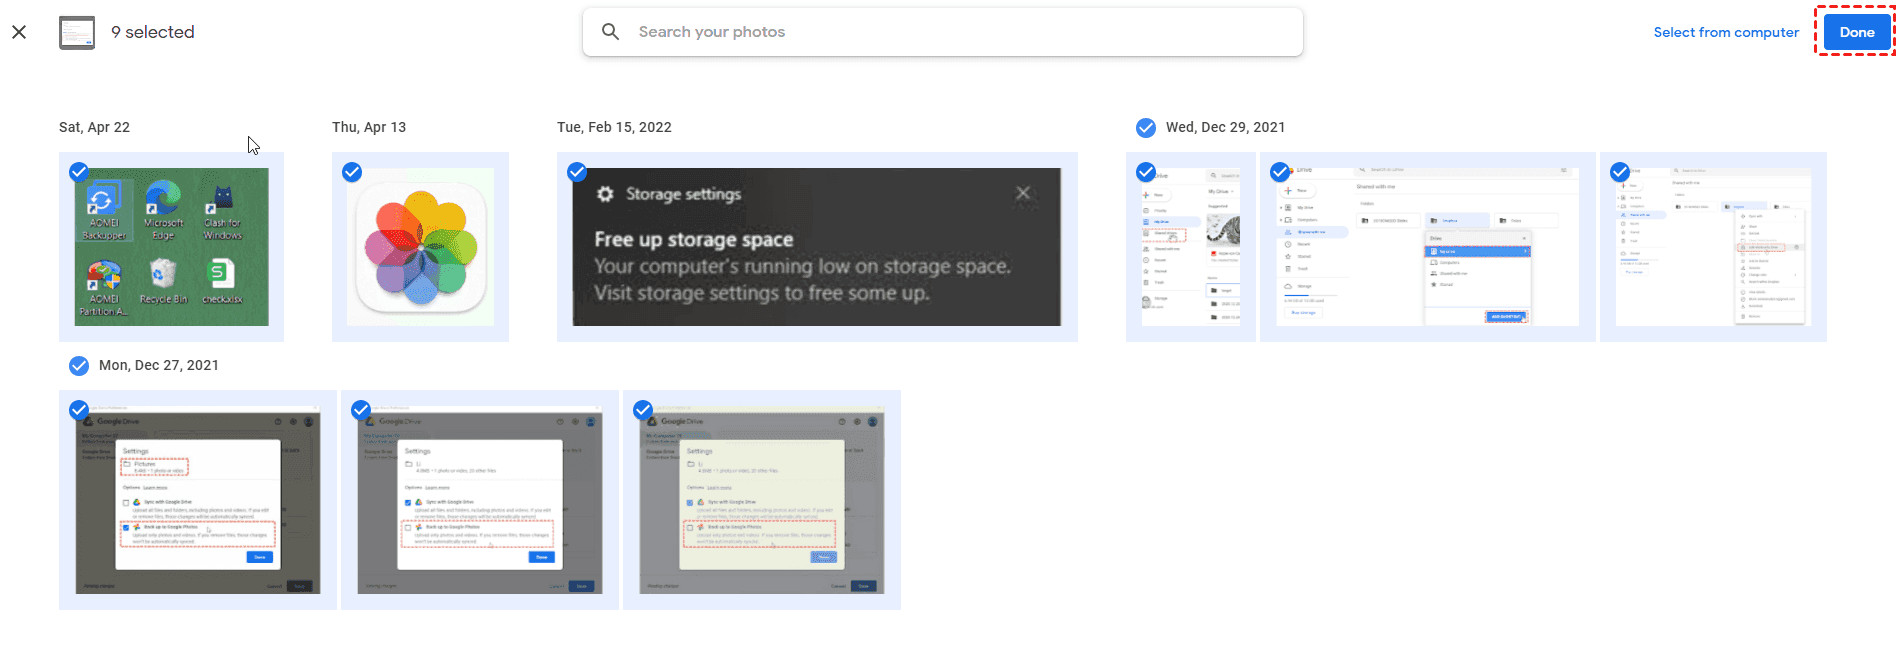 Adding photos to a new album in Google Photos, demonstrating the photo selection and completion
- Open the album and click the three vertical dots icon, then choose “Download all”.
- The album will be downloaded as a ZIP file (e.g., “albumname+001.zip”) to your Downloads folder.
- Unzip the folder and transfer the photos to your flash drive.
3.2.1. What Are the Limitations of This Method?
Similar to the direct download method, album downloads are also limited to 500 photos at a time. This method is more organized but still requires manual album creation.
3.3. Method 3: Using a Cloud Management Service (MultCloud)
For transferring a large number of photos, a cloud management service like MultCloud can be a more efficient solution.
- Connect your USB flash drive to your computer. Sign up for a MultCloud account and log in.
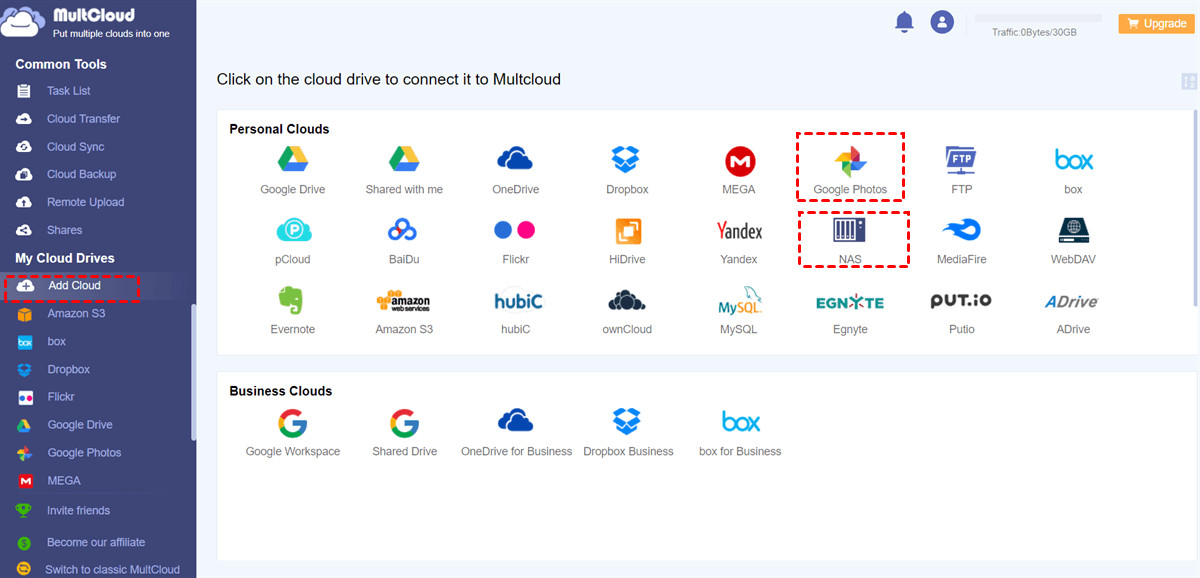 Adding Google Photos and NAS to MultCloud for file transfer
- Click “Add Cloud” and select “Google Photos” to grant MultCloud access to your Google Photos account. Then, add your flash drive as a “NAS” (Network Attached Storage) device.
- Choose “Cloud Transfer,” select Google Photos as the source, and your NAS (flash drive) as the destination.
Adding Google Photos and NAS to MultCloud for file transfer
- Customize the transfer by selecting specific photos, using filters, or scheduling the transfer.
- Click the “Transfer Now” button to begin the migration.
3.3.1. What Are the Advantages of Using MultCloud?
- No Photo Limit: MultCloud does not impose a limit on the number of photos you can transfer at once, making it ideal for large photo libraries.
- Automation: You can schedule transfers to occur automatically.
- Additional Features: MultCloud offers features like email notifications and file filtering.
3.4. Method 4: Using Google Takeout
Google Takeout allows you to export data from various Google services, including Google Photos.
- Connect your USB flash drive to your computer and go to the Google Takeout website.
- Click “Deselect all” and then scroll down and select “Google Photos”. Click “Next step”.
 Deselecting all options in Google Takeout and selecting Google Photos for data export
- Choose your delivery method (“Send download link via email”), set the frequency, file type (.zip), and archive size (e.g., 50 GB). Click “Create export”.
 Setting up the Google Takeout export options, including delivery method and file type
- Google will process your request and send you an email with a download link once the export is complete.
- Download the ZIP file to your computer, unzip it, and move the photos to your flash drive.
3.4.1. What Are the Limitations of Using Google Takeout?
- Download Limits: Google Takeout has limitations on the number of exports you can create per day.
- Large Files: The exported files can be quite large, requiring significant storage space on your computer temporarily.
4. Which Method Is the Best for You?
The best method depends on the size of your photo library and your specific needs:
- Small Photo Library (Less than 500 photos): Direct download from Google Photos or downloading albums.
- Large Photo Library (More than 500 photos): Using a cloud management service like MultCloud or Google Takeout.
Here’s a comparison table to help you decide:
| Method | Best For | Advantages | Limitations |
|---|---|---|---|
| Direct Download | Small collections, occasional backups | Simple, no additional software needed | Limited to 500 photos per download, manual selection |
| Album Download | Organized collections, specific albums | Easier to manage than individual downloads | Limited to 500 photos per album, requires album creation |
| Cloud Management Service | Large libraries, frequent backups | No photo limit, automated transfers, additional features | Requires a third-party service, potential subscription costs |
| Google Takeout | Full account backups, infrequent use | Exports all Google Photos data, useful for complete archives | Download limits, large file sizes, can be time-consuming |
5. What Are the Key Considerations When Transferring Photos?
When transferring photos from Google Photos to a flash drive, consider these factors:
- Flash Drive Capacity: Ensure your flash drive has enough storage space to accommodate your entire photo library.
- File Formats: Google Photos typically stores photos in JPEG format, but you may also have RAW images if you’re a professional photographer. Ensure your flash drive and viewing devices support the file formats.
- Transfer Speed: The transfer speed depends on your internet connection (for downloading) and the USB type of your flash drive and computer (USB 3.0 is faster than USB 2.0).
- Organization: Maintain a logical folder structure on your flash drive to easily find and manage your photos.
6. How to Organize Your Photos on the Flash Drive
Organization is key to easily accessing and managing your photos on the flash drive. Here are some tips:
- Create Folders: Organize your photos into folders based on year, month, event, or category (e.g., “2023,” “Vacation,” “Family”).
- Naming Conventions: Use consistent naming conventions for your files and folders to ensure easy searching and sorting (e.g., “2023-12-Christmas,” “2024-01-Birthday”).
- Metadata: Preserve the metadata (date, time, location) of your photos during the transfer, as this information can be valuable for searching and sorting.
- Backup Your Organization: Keep a separate text file or spreadsheet documenting your folder structure and naming conventions.
7. What About Photo Quality? Will Transferring Affect It?
No, transferring photos using the methods described above does not affect the original photo quality, provided you download the photos in their original resolution. Google Photos allows you to choose the download quality, so ensure you select “Original” to maintain the highest resolution.
8. Can I Automate the Photo Transfer Process?
Yes, you can automate the photo transfer process using cloud management services like MultCloud. These services allow you to schedule regular transfers from Google Photos to your flash drive, ensuring your photos are backed up automatically.
9. What Are Some Common Issues and Troubleshooting Tips?
Here are some common issues you might encounter and how to resolve them:
- Slow Transfer Speed: Use a USB 3.0 flash drive and ensure your computer also supports USB 3.0 for faster transfer speeds.
- Insufficient Storage Space: Check the storage capacity of your flash drive and ensure it’s large enough to accommodate your photo library.
- File Errors: If you encounter file errors during the transfer, try downloading the photos again or using a different transfer method.
- Incompatible File Formats: Ensure your viewing devices support the file formats of your photos.
10. Are There Alternative Backup Solutions to Flash Drives?
Yes, there are several alternative backup solutions to flash drives:
- External Hard Drives: Offer larger storage capacities and faster transfer speeds compared to flash drives.
- Cloud Storage Services: Provide online backup and accessibility from any device (e.g., Google Drive, Dropbox, OneDrive).
- Network-Attached Storage (NAS): A dedicated storage device connected to your home network, allowing you to store and access files from multiple devices.
11. Understanding Google Photos Storage Options
Google Photos offers different storage options that affect the quality and size of your stored photos:
- Original Quality: Stores photos in their original resolution, preserving all details. This option counts towards your Google account storage.
- Storage Saver (formerly High Quality): Compresses photos to save storage space. This option offers a balance between quality and storage efficiency.
12. How to Check and Manage Your Google Photos Storage
To check your Google Photos storage and manage your storage options:
- Go to Google Photos settings.
- Look for the “Storage” or “Backup & sync” section.
- Here, you can see how much storage you’re using and change your upload quality settings.
13. Ensuring Data Security and Privacy
Protecting your data and privacy is crucial when transferring and storing your photos:
- Use Strong Passwords: Protect your Google account and any third-party services with strong, unique passwords.
- Enable Two-Factor Authentication: Add an extra layer of security to your Google account by enabling two-factor authentication.
- Encrypt Your Flash Drive: Encrypt your flash drive with a password to prevent unauthorized access to your photos.
- Secure Physical Storage: Store your flash drive in a safe and secure location to prevent loss or theft.
14. What Are the Latest Trends in Photo Storage?
The latest trends in photo storage include:
- Cloud-Based Solutions: Continued growth in cloud storage services due to their convenience and accessibility.
- AI-Powered Organization: Artificial intelligence is being used to automatically organize and tag photos, making them easier to find.
- Hybrid Storage: Combining cloud storage with local backups for added security and accessibility.
15. Why Choose dfphoto.net for Your Photography Needs?
At dfphoto.net, we’re passionate about photography and dedicated to providing you with the resources and inspiration you need to excel. Whether you’re looking for expert advice, stunning photo galleries, or a vibrant community of photographers, dfphoto.net is your go-to destination.
16. How dfphoto.net Can Help You Further
Explore our website for:
- Detailed Tutorials: Learn essential photography techniques, from mastering exposure to perfecting composition.
- Gear Reviews: Get unbiased reviews of the latest cameras, lenses, and accessories to make informed purchasing decisions.
- Inspiration: Discover breathtaking photography from around the world and find inspiration for your own projects.
- Community: Connect with fellow photographers, share your work, and get feedback from experts.
17. Additional Tips for Managing Your Photo Library
- Regular Backups: Make it a habit to regularly back up your photos to multiple locations (e.g., flash drive, external hard drive, cloud storage).
- Culling and Editing: Regularly cull and edit your photo library to remove duplicates, blurry images, and unwanted shots.
- Metadata Management: Use photo management software to add keywords, captions, and other metadata to your photos, making them easier to search and organize.
18. How to Handle Different Photo Formats
Different photo formats offer varying levels of quality and compression:
- JPEG: The most common format, offering a good balance between quality and file size.
- RAW: Uncompressed format that retains all the data captured by your camera, providing maximum flexibility for editing.
- PNG: Lossless format that’s ideal for images with sharp lines and text.
- TIFF: High-quality format that’s often used for archival purposes.
19. What to Do After Transferring Photos to a Flash Drive
Once you’ve transferred your photos to a flash drive:
- Verify the Transfer: Ensure all your photos have been successfully transferred and that they open correctly.
- Organize Your Photos: Create a logical folder structure and rename your files for easy searching and sorting.
- Store Your Flash Drive Securely: Keep your flash drive in a safe and secure location.
- Consider Encryption: Add password protection to your flash drive to prevent unauthorized access.
20. Final Thoughts
Transferring your Google Photos to a flash drive is a smart move to safeguard your memories and ensure offline access. By following the methods outlined in this guide, you can efficiently and effectively manage your photo library. At dfphoto.net, we’re here to support your photographic journey every step of the way.
Ready to take your photography to the next level? Visit dfphoto.net today to explore our extensive collection of tutorials, gear reviews, and inspiring galleries. Join our vibrant community of photographers and unlock your creative potential. Your visual story awaits!
Address: 1600 St Michael’s Dr, Santa Fe, NM 87505, United States.
Phone: +1 (505) 471-6001.
Website: dfphoto.net.
FAQ: Putting Google Photos on a Flash Drive
21.1. Can I transfer all my Google Photos to a flash drive at once?
Yes, using a cloud management service like MultCloud or Google Takeout allows you to transfer all your Google Photos to a flash drive at once, without limitations on the number of photos.
21.2. Will transferring Google Photos to a flash drive reduce the photo quality?
No, transferring photos using the methods described in this guide does not affect the original photo quality, provided you download the photos in their original resolution.
21.3. How much storage space do I need on the flash drive?
The storage space you need depends on the size of your photo library. Check the total size of your Google Photos and choose a flash drive with sufficient capacity.
21.4. What is the best way to organize photos on a flash drive?
Create folders based on year, month, event, or category and use consistent naming conventions for your files and folders.
21.5. Can I automate the transfer of Google Photos to a flash drive?
Yes, you can automate the photo transfer process using cloud management services like MultCloud, which allows you to schedule regular transfers.
21.6. What if I encounter errors during the photo transfer?
Try using a different USB port, ensure your flash drive is properly connected, or try a different transfer method. If the issue persists, your flash drive may be faulty.
21.7. Is it safe to use third-party services to transfer my photos?
Ensure the third-party service is reputable and uses secure data encryption methods to protect your privacy. Read reviews and check their security policies before using their services.
21.8. How do I encrypt my flash drive?
You can encrypt your flash drive using built-in encryption tools on Windows (BitLocker) or macOS (FileVault), or by using third-party encryption software.
21.9. What are the alternatives to using a flash drive for photo storage?
Alternatives include external hard drives, cloud storage services, and network-attached storage (NAS) devices.
21.10. How often should I back up my Google Photos?
It’s recommended to back up your Google Photos regularly, ideally on a monthly or quarterly basis, to ensure your memories are always safe and accessible.