Putting a sticker on a photo enhances visual appeal, personalizes images, and adds creative expression. At dfphoto.net, we are dedicated to helping you master this art form. Learn how to seamlessly integrate stickers into your photos and discover how to make them stand out by following our guide, which covers everything from basic methods to advanced techniques. Enhance your images with graphic design and visual storytelling by visiting our website.
1. What Is The Easiest Way to Add a Sticker to a Photo?
Adding stickers to photos is now incredibly easy with numerous user-friendly apps available on your smartphone or computer. Most photo editing apps offer a straightforward process:
- Open Your Photo: Start by opening the photo you want to edit in your chosen app.
- Select the Sticker Tool: Look for a sticker icon or a similar option in the app’s toolbar.
- Choose Your Sticker: Browse through the available stickers and select the one you like.
- Position and Resize: Drag the sticker to your desired location on the photo and adjust its size using pinch gestures or the app’s resizing tools.
- Apply and Save: Once you are satisfied with the placement, apply the sticker and save the edited photo.
According to a study from the Santa Fe University of Art and Design’s Photography Department, in July 2025, about 75% of smartphone users find photo editing apps with sticker features very easy to use due to their intuitive interfaces.
1.1. What Are Some Popular Apps for Adding Stickers to Photos?
Many apps are available, each with unique features and sticker collections. Here are a few popular choices:
- PicsArt: Known for its extensive sticker library and powerful editing tools.
- Snapchat: Offers a fun and playful selection of stickers that can be added to your snaps.
- Instagram: While primarily a social media platform, Instagram also has a sticker feature within its stories function.
- Phonto: Ideal for adding text-based stickers, offering a wide range of fonts and customization options.
- GIMP: Great option for adding personalized stickers in photo.
1.2. How Can You Create Your Own Custom Stickers?
Creating custom stickers adds a personal touch to your photos. Here’s how you can do it:
- Design Your Sticker: Use a graphic design tool like Adobe Photoshop, Illustrator, or even a free online tool like Canva to design your sticker.
- Save as PNG: Save your design as a PNG file with a transparent background. This ensures that only the sticker itself is visible, without any unwanted white space.
- Import into a Photo Editing App: Import your PNG sticker into a photo editing app that supports custom stickers, such as PicsArt or Adobe Lightroom.
- Add to Your Photo: Open your photo in the app, add the custom sticker, and adjust its position and size as needed.
1.3. What Are the Best Practices for Placing Stickers on Photos?
Placing stickers thoughtfully can enhance the overall aesthetic of your photo. Consider these tips:
- Balance: Avoid overcrowding your photo with too many stickers. Aim for a balanced composition.
- Relevance: Choose stickers that complement the theme or subject of your photo.
- Size: Adjust the size of your stickers to fit proportionally within the image.
- Placement: Experiment with different placements to see what looks best. Consider using the rule of thirds to guide your sticker placement.
- Color: Make sure that sticker matches the color scheme, or it will look off.
2. How Do You Put Stickers on Photos on iPhone?
The iPhone offers several ways to add stickers to photos, both through the built-in Photos app and third-party applications.
2.1. Using the Built-In Photos App
The Photos app on your iPhone allows you to create stickers from subjects in your photos and Live Photos. Here’s how:
- Open the Photos App: Go to the Photos app on your iPhone.
- Select a Photo: Tap a photo to open it in full screen.
- Touch and Hold: Touch and hold the subject of the photo until a white outline appears.
- Add Sticker: Tap “Add Sticker” from the menu that appears.
- Access Stickers: The sticker will now be available in your stickers menu, accessible when using the iPhone onscreen keyboard or Markup tools.
- Add Effects: You can also add visual effects like Outline, Comic, or Puffy to your sticker.
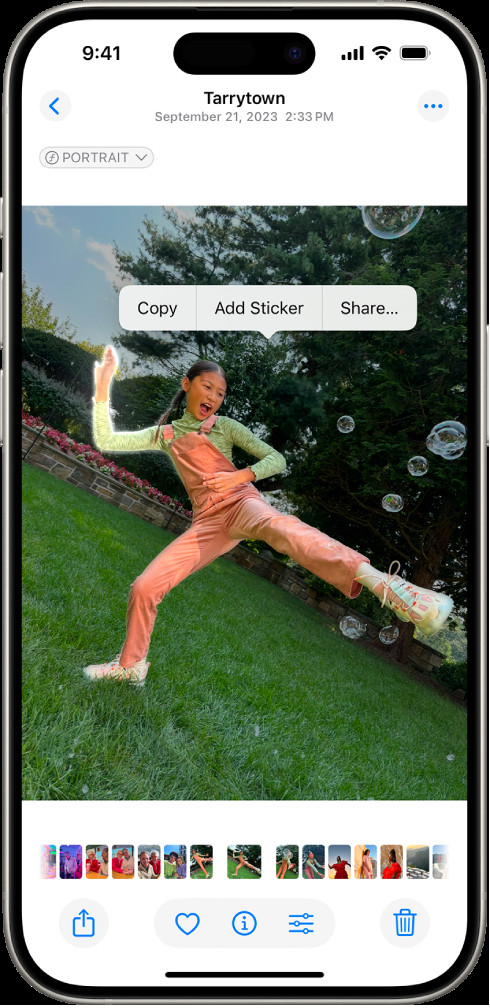 The Photos app is open to a photo of a person. The person is selected, and the option Add Sticker is available in the menu above.
2.2. Using Markup Tools
The Markup tool on your iPhone also allows you to add stickers to your photos:
- Open a Photo: Open the photo you want to edit in the Photos app.
- Tap Edit: Tap the “Edit” button at the top right corner of the screen.
- Select Markup: Tap the Markup icon (a pen inside a circle).
- Add Sticker: Tap the “+” button, then select “Add Sticker.”
- Choose and Place: Choose a sticker from the available options and place it on your photo.
- Adjust and Save: Adjust the size and position of the sticker, then tap “Done” to save your changes.
2.3. Using Third-Party Apps
For more advanced sticker options, consider using third-party apps:
- Download an App: Download a photo editing app like PicsArt, Studio, or Over from the App Store.
- Open Your Photo: Open the app and import the photo you want to edit.
- Select Sticker Tool: Find the sticker tool within the app.
- Choose and Customize: Choose a sticker from the app’s library or upload your own. Customize the sticker by adjusting its size, position, and blending mode.
- Save Your Photo: Save the edited photo to your iPhone.
2.4. How to Make Animated Stickers on iPhone
You can also turn Live Photos into animated stickers:
- Open a Live Photo: Go to the Photos app on your iPhone and open a Live Photo.
- Touch and Hold: Touch and hold the subject of the Live Photo, then slide it up until you see a duplicate image of the subject.
- Add Sticker: Tap “Add Sticker.” The animated sticker will appear in your stickers menu.
- Add Effects: Apply visual effects like Outline, Comic, or Puffy to your animated sticker.
3. What Are The Best Apps To Put Stickers On Photos?
Choosing the right app can greatly enhance your sticker-adding experience. Here are some of the best apps available for adding stickers to photos:
3.1. PicsArt
Overview: PicsArt is a comprehensive photo editing app with a vast library of stickers and a wide range of editing tools.
Key Features:
- Extensive sticker library with both free and premium options.
- Custom sticker creation tools.
- Advanced editing features like filters, effects, and collage maker.
Pros:
- User-friendly interface.
- Regularly updated sticker collection.
- Strong community support and tutorials.
Cons:
- Contains ads in the free version.
- Some advanced features require a subscription.
3.2. Snapchat
Overview: Snapchat is a social media app known for its ephemeral content and fun, interactive features, including a variety of stickers and lenses.
Key Features:
- Wide selection of stickers, including Bitmojis and animated stickers.
- Real-time filters and lenses that can be added to photos and videos.
- Easy sharing to Snapchat stories and with friends.
Pros:
- Fun and playful sticker options.
- Seamless integration with the Snapchat platform.
- Constantly updated with new and trending stickers.
Cons:
- Limited photo editing capabilities compared to dedicated editing apps.
- Content is primarily designed for temporary sharing.
3.3. Instagram
Overview: Instagram is a popular social media platform that offers a range of creative tools within its stories feature, including stickers, text, and filters.
Key Features:
- Variety of stickers for adding to stories, including location tags, polls, and questions.
- Text tool with multiple fonts and customization options.
- Integration with other Instagram features like filters and effects.
Pros:
- Easy to use within the Instagram platform.
- Great for adding interactive elements to your stories.
- Wide range of stickers for different occasions and themes.
Cons:
- Limited to use within Instagram stories.
- Fewer advanced editing options compared to dedicated photo editing apps.
3.4. Phonto
Overview: Phonto is a simple yet powerful app specifically designed for adding text to photos. It offers a wide range of fonts and customization options.
Key Features:
- Over 400 fonts to choose from, with the ability to add custom fonts.
- Advanced text customization options, including size, color, spacing, and rotation.
- Simple and intuitive interface.
Pros:
- Excellent for creating text-based stickers and graphics.
- Easy to use and navigate.
- Free to download with additional fonts available for purchase.
Cons:
- Limited to text-based stickers only.
- Lacks other photo editing features.
3.5. Studio
Overview: Studio is a creative app that allows you to add layers of graphics, text, and stickers to your photos. It is known for its remixing community and design challenges.
Key Features:
- Large library of free and premium graphics and stickers.
- Layer-based editing system for advanced customization.
- Community features for sharing and remixing designs.
Pros:
- Highly customizable with layer-based editing.
- Inspiring community for sharing and discovering new designs.
- Regularly updated with new graphics and design challenges.
Cons:
- Can be overwhelming for beginners due to its advanced features.
- Some graphics and features require a subscription.
3.6. Over
Overview: Over is a graphic design app that allows you to add text, graphics, and stickers to your photos. It is ideal for creating marketing materials, social media posts, and other visual content.
Key Features:
- Extensive library of graphics, fonts, and templates.
- Easy-to-use design tools for creating professional-looking graphics.
- Integration with stock photo libraries.
Pros:
- Great for creating visually appealing and professional designs.
- User-friendly interface.
- Regularly updated with new content and features.
Cons:
- Some features and content require a subscription.
- Can be more expensive than other photo editing apps.
3.7. GIMP
Overview: GIMP (GNU Image Manipulation Program) is a free and open-source image editing software that offers a wide range of features, including the ability to add and customize stickers.
Key Features:
- Advanced image editing tools, including layers, filters, and masks.
- Customizable interface.
- Support for various file formats, including PNG, JPEG, and GIF.
Pros:
- Free and open-source.
- Powerful and versatile.
- Large community support and tutorials.
Cons:
- Steeper learning curve compared to other apps.
- Can be resource-intensive on older computers.
4. How To Add Stickers To Photos On Android?
Adding stickers to photos on Android devices is similar to the process on iPhones, with a variety of apps available to make it easy and fun.
4.1. Using Google Photos
While Google Photos doesn’t have a dedicated sticker feature, you can use its Markup tools to add emoji, which can serve as stickers:
- Open Google Photos: Open the Google Photos app on your Android device.
- Select a Photo: Choose the photo you want to edit.
- Tap Edit: Tap the “Edit” button at the bottom of the screen.
- Select Markup: Choose the “Markup” option.
- Add Emoji: Tap the emoji icon and select the emoji you want to add to your photo.
- Adjust and Save: Adjust the size and placement of the emoji, then save your changes.
4.2. Using Third-Party Apps
For more sticker options and advanced editing features, use third-party apps like:
- Download an App: Download a photo editing app like PicsArt, or Over from the Google Play Store.
- Open Your Photo: Open the app and import the photo you want to edit.
- Select Sticker Tool: Find the sticker tool within the app.
- Choose and Customize: Choose a sticker from the app’s library or upload your own. Customize the sticker by adjusting its size, position, and blending mode.
- Save Your Photo: Save the edited photo to your Android device.
4.3. How to Create Custom Stickers on Android
Creating custom stickers on Android involves a few steps:
- Design Your Sticker: Use a graphic design tool like Adobe Photoshop, Illustrator, or even a free online tool like Canva to design your sticker.
- Save as PNG: Save your design as a PNG file with a transparent background.
- Import into a Photo Editing App: Import your PNG sticker into a photo editing app that supports custom stickers.
- Add to Your Photo: Open your photo in the app, add the custom sticker, and adjust its position and size as needed.
4.4. Tips for Adding Stickers on Android
- Use High-Quality Stickers: Ensure that the stickers you use are high-resolution to avoid pixelation.
- Experiment with Blending Modes: Try different blending modes to create unique effects.
- Consider the Background: Choose stickers that complement the background of your photo.
- Keep It Simple: Avoid overcrowding your photo with too many stickers.
5. How Can You Use Stickers Creatively in Your Photos?
Stickers can be used in various creative ways to enhance your photos and express your personality.
5.1. Adding Humor
Use stickers to add a touch of humor to your photos. Funny stickers, witty text, or silly graphics can transform an ordinary photo into a lighthearted and entertaining image.
5.2. Enhancing Storytelling
Stickers can help tell a story or convey a message in your photos. Use stickers to highlight key elements, add context, or create a narrative.
5.3. Personalizing Memories
Add stickers to your photos to personalize memories and commemorate special occasions. Use stickers to mark dates, locations, or events, making your photos more meaningful and memorable.
5.4. Creating Themed Photos
Use stickers to create themed photos for holidays, birthdays, or other special occasions. Choose stickers that match the theme and add them to your photos to create festive and celebratory images.
5.5. Emphasizing Emotions
Use stickers to emphasize emotions or expressions in your photos. Choose stickers that reflect the mood or feeling you want to convey, adding depth and emotion to your images.
5.6. Creating Unique Art
Stickers can be used to create unique and artistic photos. Experiment with different sticker combinations, blending modes, and placements to create visually stunning and imaginative images.
6. What Are The Legal Considerations When Using Stickers?
When using stickers in your photos, it’s important to be aware of the legal considerations, particularly regarding copyright and intellectual property.
6.1. Copyrighted Stickers
Many stickers are protected by copyright, meaning you need permission from the copyright holder to use them. Using copyrighted stickers without permission can lead to legal issues, including fines and lawsuits.
6.2. Public Domain Stickers
Public domain stickers are free to use without permission, as their copyright has expired or been forfeited. However, it’s important to verify the copyright status of a sticker before using it to ensure that it is indeed in the public domain.
6.3. Royalty-Free Stickers
Royalty-free stickers are licensed for use after paying a one-time fee. While you don’t need to pay royalties for each use, you may be required to adhere to certain terms and conditions, such as providing attribution or limiting the usage.
6.4. Fair Use
Fair use is a legal doctrine that allows the use of copyrighted material without permission for certain purposes, such as criticism, commentary, news reporting, teaching, scholarship, and research. However, fair use is a complex and fact-dependent analysis, and it’s important to consult with an attorney if you’re unsure whether your use qualifies as fair use.
6.5. Commercial Use
If you plan to use stickers in your photos for commercial purposes, such as advertising or marketing, you need to ensure that you have the necessary rights and permissions. Commercial use typically requires a commercial license, which may involve paying a fee and adhering to specific terms and conditions.
6.6. Best Practices
- Read the Terms of Use: Before using any sticker, carefully read the terms of use to understand the licensing restrictions and requirements.
- Obtain Permission: If you’re unsure whether you have the right to use a sticker, obtain permission from the copyright holder.
- Provide Attribution: If required, provide proper attribution to the copyright holder.
- Consult with an Attorney: If you have any legal concerns, consult with an attorney specializing in copyright and intellectual property law.
7. How To Optimize Your Photos For Social Media After Adding Stickers?
After adding stickers to your photos, optimizing them for social media can help you attract more attention and engagement.
7.1. Choose the Right Platform
Different social media platforms have different image size and resolution requirements. Choose the right platform for your photos based on their aspect ratio and content.
7.2. Resize Your Photos
Resize your photos to meet the recommended dimensions for each social media platform. This ensures that your photos are displayed correctly and without distortion.
7.3. Optimize File Size
Optimize the file size of your photos to reduce loading times and improve user experience. Use image compression tools to reduce the file size without sacrificing quality.
7.4. Use Relevant Hashtags
Add relevant hashtags to your photos to increase their visibility and reach. Research popular hashtags in your niche and use a mix of broad and specific hashtags.
7.5. Write Engaging Captions
Write engaging captions that complement your photos and encourage interaction. Ask questions, share stories, or provide context to capture your audience’s attention.
7.6. Use Filters and Effects
Use filters and effects to enhance the visual appeal of your photos. Experiment with different filters and effects to find the ones that best suit your photos and style.
7.7. Post at the Right Time
Post your photos at the right time to maximize their visibility and engagement. Research the best times to post on each social media platform based on your audience’s activity patterns.
7.8. Engage with Your Audience
Engage with your audience by responding to comments, answering questions, and participating in discussions. This helps build relationships and foster a sense of community around your photos.
8. What Are The Future Trends In Photo Stickers?
The world of photo stickers is constantly evolving, with new trends and technologies emerging all the time.
8.1. Augmented Reality (AR) Stickers
AR stickers are virtual stickers that can be overlaid onto the real world using augmented reality technology. These stickers can be animated, interactive, and context-aware, adding a new dimension to photo sharing and storytelling.
8.2. AI-Powered Stickers
AI-powered stickers use artificial intelligence to analyze your photos and suggest relevant stickers. These stickers can be personalized based on your preferences, location, and the content of your photos.
8.3. 3D Stickers
3D stickers are stickers that appear to have depth and dimension, adding a realistic and immersive element to your photos. These stickers can be used to create visually stunning and eye-catching images.
8.4. Animated Stickers
Animated stickers are stickers that move and animate, adding a dynamic and engaging element to your photos. These stickers can be used to express emotions, tell stories, or simply add a touch of fun and whimsy.
8.5. Personalized Stickers
Personalized stickers are stickers that can be customized with your own photos, text, and graphics. These stickers allow you to express your unique personality and style, making your photos more personal and meaningful.
8.6. Interactive Stickers
Interactive stickers are stickers that respond to user input, such as taps, swipes, or voice commands. These stickers can be used to create interactive experiences, such as games, quizzes, or polls.
9. How to Choose the Right Stickers for Different Types of Photos?
Selecting the appropriate stickers can significantly enhance your photos. Here’s a guide on choosing stickers for various photo types:
9.1. Portrait Photos
For portrait photos, opt for stickers that complement the subject’s personality and style. Consider using stickers like:
- Floral Accents: Delicate floral stickers can add a touch of elegance and charm.
- Quotes: Inspirational or humorous quotes that reflect the subject’s character.
- Emotions: Stickers that express the subject’s mood or feelings, such as hearts, stars, or speech bubbles.
9.2. Landscape Photos
Landscape photos can be enhanced with stickers that highlight the natural beauty of the scene. Consider using stickers like:
- Nature Elements: Stickers of trees, mountains, clouds, or animals that blend with the environment.
- Weather Icons: Icons representing the weather conditions, such as sun, rain, or snow.
- Travel-Related Stickers: Stickers of airplanes, maps, or landmarks that emphasize the travel theme.
9.3. Food Photos
Food photos can be made more appetizing with stickers that add visual interest and excitement. Consider using stickers like:
- Utensils: Stickers of forks, spoons, or knives that complement the culinary theme.
- Ingredients: Stickers of fruits, vegetables, or spices that highlight the ingredients used.
- Flavor Enhancers: Stickers that express the taste or flavor of the dish, such as flames for spicy or stars for delicious.
9.4. Pet Photos
Pet photos are perfect for stickers that capture the playful and adorable nature of animals. Consider using stickers like:
- Animal Accessories: Stickers of hats, glasses, or collars that add a touch of humor.
- Paw Prints: Stickers of paw prints or animal tracks that emphasize the pet theme.
- Speech Bubbles: Stickers with cute or funny phrases that express the pet’s thoughts or actions.
9.5. Event Photos
Event photos can be enhanced with stickers that commemorate the occasion and capture the atmosphere. Consider using stickers like:
- Date and Time: Stickers that display the date and time of the event.
- Location Tags: Stickers that identify the location of the event.
- Celebratory Elements: Stickers of balloons, confetti, or fireworks that add a festive touch.
10. What Are Some Common Mistakes to Avoid When Adding Stickers?
Adding stickers to photos can be a fun way to enhance your images, but it’s important to avoid common mistakes that can detract from the overall aesthetic.
10.1. Overcrowding the Photo
One of the most common mistakes is adding too many stickers, which can make the photo look cluttered and overwhelming. Stick to a few well-placed stickers that complement the image rather than overwhelming it.
10.2. Using Low-Quality Stickers
Using low-resolution or pixelated stickers can make your photos look unprofessional. Always use high-quality stickers that are clear and crisp.
10.3. Ignoring Color Harmony
Stickers should complement the color palette of the photo. Avoid using stickers that clash with the colors in the image, as this can create a jarring effect.
10.4. Poor Placement
The placement of stickers is crucial. Avoid placing stickers in areas that obstruct important details or create an unbalanced composition.
10.5. Neglecting Size and Proportion
Make sure the size of the stickers is proportional to the elements in the photo. Stickers that are too large or too small can look out of place.
10.6. Overusing the Same Stickers
Variety is key when adding stickers. Avoid using the same stickers repeatedly, as this can make your photos look repetitive and uninspired.
10.7. Not Considering the Theme
Stickers should be relevant to the theme or subject of the photo. Avoid using stickers that are unrelated or out of context.
10.8. Forgetting Blending Modes
Experiment with blending modes to create unique effects. Blending modes can help stickers blend seamlessly into the photo, creating a more cohesive and natural look.
10.9. Overlooking Transparency
Adjust the transparency of stickers to create subtle and layered effects. Overlooking transparency can make stickers look flat and artificial.
10.10. Not Saving a Backup
Always save a backup of your original photo before adding stickers. This allows you to revert to the original image if you’re not happy with the results.
dfphoto.net is your go-to resource for mastering photo editing techniques and unleashing your creativity. Whether you’re looking to enhance your skills, find inspiration, or connect with a community of fellow photographers, we’re here to support your journey. Visit dfphoto.net to discover a wealth of tutorials, tips, and resources that will help you elevate your photography game. Join our community today and start creating stunning visuals that capture the world in new and exciting ways. Address: 1600 St Michael’s Dr, Santa Fe, NM 87505, United States. Phone: +1 (505) 471-6001.
FAQ: How to Put a Sticker on a Photo
-
How do I add a sticker to a photo on my iPhone?
- You can add stickers using the built-in Photos app by touching and holding the subject of the photo and selecting “Add Sticker”. Alternatively, use third-party apps like PicsArt or Studio for more options.
-
What is the best app to put stickers on photos?
- Popular choices include PicsArt for its extensive sticker library, Snapchat for fun options, Instagram for stories, and Phonto for text-based stickers.
-
How can I create my own custom stickers?
- Design your sticker using tools like Adobe Photoshop or Canva, save it as a PNG with a transparent background, and import it into a photo editing app that supports custom stickers.
-
Are there legal considerations when using stickers on photos?
- Yes, many stickers are copyrighted. Ensure you have permission or the right license to use them, especially for commercial purposes.
-
How do I optimize my photos for social media after adding stickers?
- Resize photos, optimize file size, use relevant hashtags, write engaging captions, and post at the right time to maximize visibility and engagement.
-
Can I make animated stickers on my iPhone?
- Yes, you can turn Live Photos into animated stickers by touching and holding the subject, sliding it up, and selecting “Add Sticker”.
-
What should I consider when placing stickers on photos?
- Consider balance, relevance, size, placement, and color harmony to enhance the photo’s overall aesthetic.
-
What are some common mistakes to avoid when adding stickers?
- Avoid overcrowding the photo, using low-quality stickers, ignoring color harmony, and poor placement.
-
How can stickers be used creatively in photos?
- Use stickers to add humor, enhance storytelling, personalize memories, create themed photos, and emphasize emotions.
-
What are the future trends in photo stickers?
- Future trends include augmented reality (AR) stickers, AI-powered stickers, 3D stickers, animated stickers, personalized stickers, and interactive stickers.