Putting one photo on top of another, also known as photo overlay or superimposing, is a popular editing technique for creating unique visuals. While photo editing apps offer this feature, you can achieve the same result directly on your iPhone using the built-in Shortcuts app. This guide provides a step-by-step walkthrough on how to overlay images on your iPhone without needing third-party software.
Leveraging the Shortcuts App for Image Overlay
iPhones offer a powerful operating system with the Shortcuts app, enabling users to automate complex tasks, including image overlay. This feature eliminates the need for dedicated photo editing apps for simple superimposing tasks. Combined with iOS features like “Lift Subject from Background,” creating quick social media posts, memes, and edits becomes incredibly efficient.
Setting Up the Shortcut
Before overlaying photos, you need to set up a custom shortcut. While this requires a few initial steps, once configured, the shortcut will be readily available for future use.
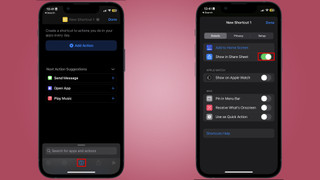
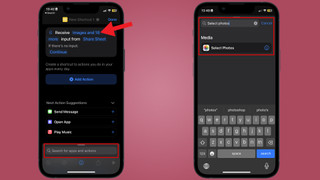
Step 1: Create a New Shortcut
Open the Shortcuts app (pre-installed on iOS 13 and later) and tap the “+” icon in the top right corner to create a new shortcut.
 Opening Shortcuts app and adding a new shortcut
(Image: © Future)
Step 2: Enable Share Sheet Access
Tap the “i” icon in the toolbar of your new shortcut. Toggle on “Show in Share Sheet” to enable quick access to the overlay function directly from your photo library. Click “Done.”
 Enabling Share Sheet access for the new shortcut
(Image: © Future)
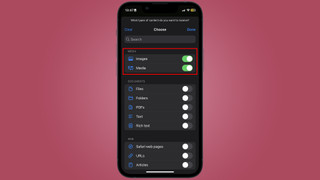
Step 3: Specify Input File Format
In the shortcut details, tap “Any” or “Images and more” under “Receive Any.” Deselect all formats except “Images” ensuring the shortcut only accepts image files. Click “Done.”
 Selecting image file format as input for the shortcut
(Image: © Future)
Step 4: Add “Select Photos” Actions
Add two “Select Photos” actions by tapping “Add Action” and searching for “Select Photos.” This allows you to choose both the base image and the overlay image.
 Adding two 'Select Photos' actions to the shortcut
(Image: © Future)
Step 5: Incorporate the “Overlay Image” Action
Search for and add the “Overlay Image” action. This action performs the actual overlaying of the selected images.
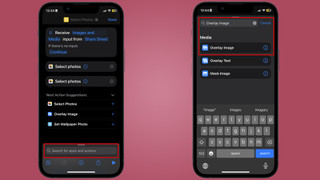 Adding the 'Overlay Image' action to the shortcut.
(Image: © Future)
Step 6: Define Image Variables
Tap the first “Images” variable within the “Overlay Image” action and choose “Select Variable.” Select the “Photos” variable associated with your first “Select Photos” action (this will be your top image). Repeat this for the second “Images” variable, selecting the second “Photos” variable (your bottom image).
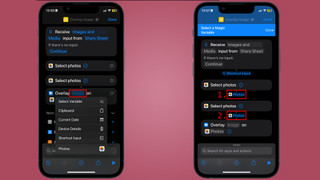 Selecting the variables for the overlay action
(Image: © Future)
Step 7: Add “Save to Photo Album” Action
Add the “Save to Photo Album” action to automatically save the overlaid image to your camera roll.
 Adding the 'Save to Photo Album' action
(Image: © Future)
Step 8: Rename Your Shortcut
Rename your shortcut to something descriptive like “Overlay Images” for easy identification in the Share Sheet.
 Renaming the shortcut
(Image: © Future)
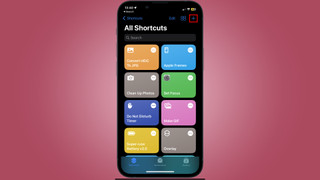
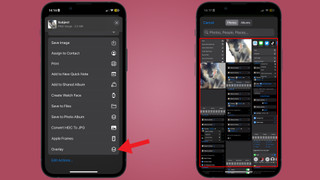
Using the Shortcut
Open the Photos app, select the two images you want to overlay, tap the Share button, and choose your newly created “Overlay Images” shortcut. You can then adjust the position and size of the top image. Finally, tap “Done” to save the composite image to your camera roll.
 Using the shortcut to overlay images
(Image: © Future)
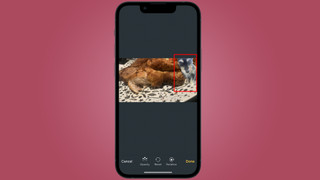 Adjusting the position and size of the overlaid image
(Image: © Future)
Conclusion
Using the Shortcuts app provides a convenient way to overlay photos directly on your iPhone. While the initial setup might seem involved, it offers a quick and efficient solution for basic image editing tasks. This method allows for creative photo manipulation without relying on external applications.