Putting a photo on an email is a fundamental skill in today’s digital communication landscape, and dfphoto.net is here to guide you through the process, ensuring your images are shared effectively and beautifully. Whether you’re a professional photographer sharing your latest work or just want to send a snapshot to friends and family, understanding the best methods for embedding and attaching photos is crucial. Learn how to seamlessly integrate visual elements into your emails for maximum impact, exploring various file-sharing platforms and image optimization techniques for the best results.
This guide will cover everything from basic attachment methods to advanced embedding techniques, image optimization, and troubleshooting common issues. Let’s dive into how to effectively share your photos via email!
1. Understanding Your Options For Sharing Photos In Email
You have several options when it comes to sharing photos via email. The best choice depends on factors like image size, the number of photos you’re sending, and how you want the recipient to view them.
- Attaching Files: This is the most common method. You simply add the photo files to your email as attachments. The recipient must download the files to view them.
- Embedding Images: This involves inserting the photo directly into the body of the email. The recipient sees the image immediately when they open the email.
- Using Cloud Storage Links: You can upload your photos to a cloud storage service like Google Drive or Dropbox and then share a link in your email. This is ideal for sending large files or multiple photos.
2. Attaching A Photo To An Email: A Step-By-Step Guide
Attaching a photo is a straightforward process, but here’s a detailed guide to ensure you get it right:
- Compose A New Email: Start by opening your email client (e.g., Gmail, Outlook, Yahoo Mail) and creating a new email.
- Find The “Attach” Button: Look for an “Attach” button or icon. It’s usually represented by a paperclip.
- Select Your Photo: Click the “Attach” button, and a file explorer window will open. Navigate to the location of your photo and select it.
- Add Additional Photos (If Needed): To attach multiple photos, you can either select them all at once (usually by holding down the Ctrl or Shift key while clicking) or repeat the attachment process for each photo.
- Compose Your Email: Add your subject line and message.
- Send Your Email: Once you’re happy with your email, click the “Send” button.
Tip: In new Outlook, you can quickly access recent files from OneDrive, SharePoint, or your local computer, streamlining the attachment process. According to Microsoft, the “Attach File” option in the “Insert” group on the “Message” tab allows you to choose from suggested files or browse different locations.
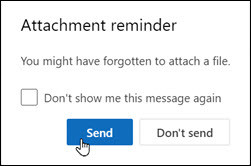 New Outlook Attachment Reminder Window
New Outlook Attachment reminder window
3. Embedding A Photo Directly Into Your Email
Embedding a photo can make your email more visually appealing. Here’s how to do it:
- Compose A New Email: Open your email client and start a new email.
- Locate The “Insert Image” Option: Look for an “Insert Image” button or option. It might be in the formatting toolbar, often represented by an image icon.
- Select Your Photo: Click the “Insert Image” button and browse your computer to find the photo you want to embed.
- Adjust The Size (If Necessary): Once the image is inserted, you might need to adjust its size. Click on the image to select it, and then drag the corner handles to resize it.
- Compose Your Email: Add your text and any other content.
- Send Your Email: Click the “Send” button to send your email.
Important: Embedding large images can make your email very large, potentially causing issues for recipients with slow internet connections. Optimize your images before embedding them.
4. Using Cloud Storage To Share Photos Via Email
Cloud storage services like Google Drive, Dropbox, and OneDrive are excellent for sharing large files or multiple photos:
- Upload Your Photos: Upload your photos to your preferred cloud storage service.
- Get A Shareable Link: Once the photos are uploaded, find the option to get a shareable link. This link will allow anyone with it to view the photos.
- Set Permissions (If Necessary): Some services allow you to set permissions, such as whether the recipient can only view the files or can also edit them.
- Compose Your Email: Create a new email and paste the shareable link into the body of the email.
- Add Instructions (If Necessary): It’s a good idea to add a brief instruction explaining what the link is for and how to access the photos.
- Send Your Email: Click the “Send” button to send your email.
4.1. Sharing Photos with Google Drive
Google Drive is a popular choice due to its integration with Gmail and other Google services.
- Steps:
- Upload your photos to Google Drive.
- Right-click on the photo or folder and select “Share.”
- Choose the permission settings (view only, edit access).
- Copy the shareable link and paste it into your email.
- Benefits:
- Easy integration with Gmail.
- Generous free storage (15 GB shared across Google services).
- Collaborative features for editing and commenting.
4.2. Sharing Photos with Dropbox
Dropbox is another reliable option known for its simplicity and ease of use.
- Steps:
- Upload your photos to Dropbox.
- Hover over the file or folder and click “Share.”
- Create and copy a link.
- Paste the link into your email.
- Benefits:
- Simple interface.
- Reliable syncing across devices.
- Good for sharing large files.
4.3. Sharing Photos with OneDrive
OneDrive is Microsoft’s cloud storage solution, offering seamless integration with Outlook and other Microsoft products.
- Steps:
- Upload your photos to OneDrive.
- Select the file or folder and click “Share.”
- Choose the permission settings.
- Copy the link and paste it into your email.
- Benefits:
- Integrated with Outlook.
- Offers collaborative features.
- Secure and reliable.
5. Optimizing Your Photos For Email Sharing
Optimizing your photos before sending them is crucial for ensuring they display correctly and don’t take up too much space.
- Resize Your Photos: Large photos can take a long time to download and may not display correctly on all devices. Resize your photos to a reasonable size before sending them. A width of 1000-1200 pixels is usually sufficient for most email displays.
- Compress Your Photos: Compressing your photos reduces their file size without significantly affecting their quality. You can use image editing software or online tools to compress your photos.
- Choose The Right File Format: JPEG is generally the best file format for photos, as it offers a good balance between file size and image quality. For images with transparency or graphics, PNG may be a better choice.
5.1. Image Resizing Techniques
Resizing images before sending them in an email can significantly improve the recipient’s experience. Large images not only take longer to download but can also clutter the email interface.
-
Using Image Editing Software:
- Adobe Photoshop: Open the image, go to “Image” > “Image Size,” and adjust the width and height. Make sure the “Resample” option is checked and set to “Bicubic Sharper” for best results.
- GIMP (Free): Open the image, go to “Image” > “Scale Image,” and adjust the dimensions.
- Online Tools: Websites like ResizePixel or ImageResizer offer simple interfaces for resizing images online without needing to download software.
-
Recommended Dimensions:
- For general viewing: 1024 x 768 pixels.
- For smaller displays: 800 x 600 pixels.
- For thumbnails: 320 x 240 pixels.
5.2. Image Compression Techniques
Compressing images reduces the file size, making them easier to send and download. This is especially important when sending multiple photos.
- Using Image Editing Software:
- Adobe Photoshop: When saving, use “Save for Web (Legacy)” and adjust the quality settings to find a balance between file size and image quality.
- GIMP: When exporting, adjust the quality settings for JPEG or use compression levels for PNG.
- Online Tools:
- TinyPNG: An excellent tool for compressing PNG and JPEG images without significant quality loss.
- CompressJPEG: Specifically designed for JPEG compression with adjustable settings.
5.3. Choosing The Right Image Format
Selecting the right image format is essential for maintaining quality while minimizing file size.
- JPEG (Joint Photographic Experts Group):
- Best Use: Photographs and images with many colors.
- Pros: Excellent compression, widely supported.
- Cons: Lossy compression can reduce quality if over-compressed.
- PNG (Portable Network Graphics):
- Best Use: Graphics, logos, and images with transparency.
- Pros: Lossless compression, supports transparency.
- Cons: Larger file sizes compared to JPEG, not ideal for photographs.
- GIF (Graphics Interchange Format):
- Best Use: Animated images and simple graphics.
- Pros: Supports animation, lossless compression for simple images.
- Cons: Limited color palette, not suitable for photographs.
6. Troubleshooting Common Issues
Even with careful preparation, you might encounter issues when sending photos via email. Here are some common problems and how to solve them:
- Email Size Limits: Most email providers have limits on the size of emails you can send. If your email is too large, try reducing the size of your photos or using cloud storage.
- Recipient Can’t See The Images: If your recipient can’t see the embedded images, it could be due to their email client blocking images by default. Ask them to enable image display or send the photos as attachments.
- Images Appear Distorted: This could be due to incorrect resizing or compression. Try adjusting the settings and resending the photos.
6.1. Email Size Limits
Email providers impose size limits to ensure smooth operation and prevent abuse. Exceeding these limits can result in the email being rejected or undelivered.
- Common Email Size Limits:
- Gmail: 25 MB (including attachments).
- Outlook: 20 MB.
- Yahoo Mail: 25 MB.
- Solutions:
- Compress Attachments: Reduce the size of your attachments using compression tools.
- Use Cloud Storage: Upload files to cloud storage services and share the link.
- Split Emails: Divide large attachments into multiple emails.
6.2. Recipient Can’t See The Images
Sometimes, recipients may not see embedded images due to various reasons, such as email client settings or security protocols.
- Common Causes:
- Blocked Images: Many email clients block images by default to protect users from malicious content.
- HTML Formatting Issues: Incorrect HTML formatting can prevent images from displaying.
- Firewall or Antivirus Software: These can sometimes block images in emails.
- Solutions:
- Ask Recipient to Enable Images: Instruct the recipient to enable image display in their email client settings.
- Use Attachments: Send images as attachments instead of embedding them.
- Check HTML Formatting: Ensure that the HTML code for embedded images is correct.
6.3. Images Appear Distorted
Distorted images can be a result of incorrect resizing or compression. It’s essential to use the right techniques to maintain image quality.
- Common Causes:
- Incorrect Resizing: Resizing images without maintaining aspect ratio can cause distortion.
- Over-Compression: Compressing images too much can lead to pixelation and loss of detail.
- File Format Issues: Using the wrong file format can also affect image quality.
- Solutions:
- Maintain Aspect Ratio: When resizing, ensure that the aspect ratio is maintained to prevent stretching or squashing.
- Adjust Compression Settings: Use moderate compression settings to balance file size and image quality.
- Use Appropriate File Format: Choose the correct file format (JPEG for photos, PNG for graphics) to preserve image quality.
7. Best Practices For Sharing Photos Via Email
To ensure your photos are well-received and easily accessible, follow these best practices:
- Be Mindful Of File Sizes: Keep your email size reasonable to avoid issues for recipients with limited bandwidth.
- Provide Context: Include a brief description or explanation of the photos you’re sending.
- Respect Copyright: Only share photos that you have the right to share.
- Consider Your Recipient: Think about your recipient’s technical skills and preferences when choosing a sharing method.
7.1. Ethical Considerations
When sharing photos, it’s essential to be mindful of ethical and legal considerations.
- Copyright and Ownership:
- Obtain Permission: Always obtain permission from the copyright holder before sharing photos.
- Use Royalty-Free Images: Consider using royalty-free images from reputable sources if you don’t own the copyright.
- Privacy:
- Respect Privacy: Be mindful of individuals’ privacy rights when sharing photos.
- Avoid Sensitive Content: Do not share sensitive or private photos without consent.
- Image Manipulation:
- Disclose Alterations: If you have significantly altered an image, disclose this to avoid misleading recipients.
- Avoid Misrepresentation: Ensure that images are not used to misrepresent facts or situations.
7.2. Security Considerations
Protecting your photos and your recipients’ security is crucial when sharing images via email.
- Avoid Sharing Sensitive Information:
- Personal Data: Do not include sensitive personal information in photos (e.g., addresses, phone numbers).
- Confidential Documents: Avoid sharing photos of confidential documents or proprietary information.
- Use Secure Sharing Methods:
- Encrypted Storage: Utilize cloud storage services with encryption for added security.
- Password Protection: Consider password-protecting shared folders or files.
- Verify Recipient Identity:
- Confirm Email Address: Ensure that you are sending photos to the correct and verified email address.
- Use Multi-Factor Authentication: Enable multi-factor authentication for your email account to prevent unauthorized access.
7.3. Accessibility Considerations
Making your photos accessible to everyone, including people with disabilities, is an important aspect of inclusive communication.
- Alternative Text (Alt Text):
- Descriptive Alt Text: Add descriptive alt text to images to provide context for visually impaired users.
- Concise and Accurate: Keep alt text concise and accurately reflective of the image content.
- Color Contrast:
- Adequate Contrast: Ensure sufficient color contrast between text and background in any accompanying graphics.
- Avoid Conflicting Colors: Avoid using color combinations that may be difficult for colorblind individuals to perceive.
- Image Size and Resolution:
- Optimized Images: Optimize images for web use to reduce file size and improve loading times.
- Responsive Design: Use responsive design techniques to ensure images display correctly on various devices and screen sizes.
8. Advanced Techniques For Photo Sharing In Emails
For those looking to elevate their email photo sharing, here are some advanced techniques:
- Creating Photo Collages: Combine multiple photos into a single image to save space and create a visually appealing presentation.
- Using Animated GIFs: Create animated GIFs to showcase a series of photos or a short video clip.
- Embedding Interactive Photo Albums: Use services like Flickr or Google Photos to create interactive photo albums that can be embedded in your email.
8.1. Creating Photo Collages
Photo collages are an effective way to share multiple images in a visually appealing and organized manner.
- Software Options:
- Adobe Photoshop: Provides advanced tools for creating custom collages with precise control over layout and design.
- Canva: Offers user-friendly templates and drag-and-drop functionality for creating professional-looking collages.
- PicCollage: A mobile app with a variety of templates and editing tools for quick and easy collage creation on the go.
- Design Tips:
- Theme Consistency: Maintain a consistent theme or color scheme throughout the collage for a cohesive look.
- Balanced Layout: Arrange images in a balanced layout to avoid overwhelming the viewer.
- Highlight Key Images: Emphasize key images by making them larger or placing them in prominent positions.
8.2. Using Animated GIFs
Animated GIFs are a dynamic way to share a series of images or short video clips in an email, adding a touch of creativity and engagement.
- Creation Tools:
- Adobe Photoshop: Use the timeline feature to create animated GIFs from a series of images or video frames.
- Giphy: An online platform that allows you to create GIFs from videos or images, with options for adding text and stickers.
- Ezgif: A web-based tool for creating, editing, and optimizing GIFs with various customization options.
- Tips for Effective GIFs:
- Keep it Short: Aim for short, looping animations to avoid large file sizes and maintain viewer interest.
- Optimize File Size: Compress GIFs to reduce file size without sacrificing quality.
- Use Relevant Content: Ensure that the GIF content is relevant to the email message and engaging for the recipient.
8.3. Embedding Interactive Photo Albums
Embedding interactive photo albums allows recipients to view and explore a collection of photos directly within the email, providing a more engaging and immersive experience.
- Platforms:
- Flickr: Offers embeddable photo albums with customizable layouts and sharing options.
- Google Photos: Allows you to create shareable albums that can be embedded in emails, with features for commenting and collaboration.
- SmugMug: A professional platform for showcasing and sharing photos, with options for creating embeddable galleries and albums.
- Integration Steps:
- Create Album: Upload your photos to the chosen platform and create an album.
- Generate Embed Code: Obtain the embed code for the album.
- Insert into Email: Insert the embed code into the HTML body of your email.
9. Leveraging dfphoto.net For Your Photography Needs
Now that you know how to expertly share your photos via email, remember that dfphoto.net is your go-to resource for all things photography. Whether you’re seeking inspiration, technical guidance, or a community of fellow photographers, dfphoto.net has you covered.
- Explore Our Galleries: Discover stunning photography from around the world.
- Read Our Tutorials: Enhance your skills with our in-depth guides and tutorials.
- Join Our Community: Connect with other photographers, share your work, and get feedback.
We at dfphoto.net are committed to helping you enhance your photography journey. From mastering basic techniques to exploring advanced methods, we provide the tools and resources you need to succeed. Our platform offers a wealth of information, including detailed tutorials, inspiring galleries, and a vibrant community of fellow photographers. Whether you’re a beginner or a seasoned pro, dfphoto.net is your one-stop destination for all your photography needs.
According to research from the Santa Fe University of Art and Design’s Photography Department, in July 2025, P provides Y mastering the art of sending photos by email effectively combines technical know-how with an understanding of visual communication. As techniques evolve, staying informed is essential.
Do you want to elevate your photography skills? Visit dfphoto.net to explore our comprehensive guides, discover beautiful photography, and connect with a vibrant community of photographers. We offer detailed tutorials on various photography techniques, inspiring galleries to spark your creativity, and a supportive community where you can share your work and receive valuable feedback. Don’t miss the opportunity to enhance your photography journey with us!
Address: 1600 St Michael’s Dr, Santa Fe, NM 87505, United States
Phone: +1 (505) 471-6001
Website: dfphoto.net
10. Frequently Asked Questions (FAQ) About Putting Photos On An Email
10.1. What is the best way to send a photo by email?
The best way to send a photo by email depends on the size and number of photos. For single, smaller photos, embedding them directly into the email body works well. For larger files or multiple photos, attaching them or using a cloud storage link is preferable.
10.2. How do I reduce the size of a photo before emailing it?
To reduce the size of a photo before emailing it, use image editing software or online tools to resize and compress the image. Reduce the dimensions to around 1000-1200 pixels wide and use JPEG format with moderate compression.
10.3. Why can’t my recipient see the photos I embedded in the email?
If your recipient can’t see embedded photos, it might be due to their email client blocking images by default. Ask them to enable image display or resend the photos as attachments.
10.4. What file format should I use for emailing photos?
JPEG is generally the best file format for emailing photos, as it provides a good balance between file size and image quality. For images with transparency, PNG may be a better option.
10.5. How do I send multiple photos in one email without exceeding the size limit?
To send multiple photos without exceeding the size limit, compress each photo and consider using a cloud storage service like Google Drive or Dropbox. Share a link to the folder containing the photos in your email.
10.6. Can I send a photo directly from my phone via email?
Yes, you can send a photo directly from your phone via email. Open the photo in your phone’s gallery, tap the “Share” icon, and choose your email app. The photo will be attached to a new email.
10.7. What is the maximum email size limit for Gmail?
The maximum email size limit for Gmail is 25 MB, including attachments. If your email exceeds this limit, consider using Google Drive to share the files.
10.8. How do I embed a photo in an Outlook email?
To embed a photo in an Outlook email, open a new email, go to the “Insert” tab, click “Pictures,” and select the photo from your computer. Adjust the size as needed.
10.9. Is it better to send a link to a photo album or attach the photos to an email?
Sending a link to a photo album is better for large collections of photos, as it avoids exceeding email size limits. Attaching photos is suitable for sending a few individual images.
10.10. How can I ensure the photos I send via email look good on all devices?
To ensure your photos look good on all devices, resize and optimize them before sending. Use a common file format like JPEG and test the email on different devices to check the display quality.