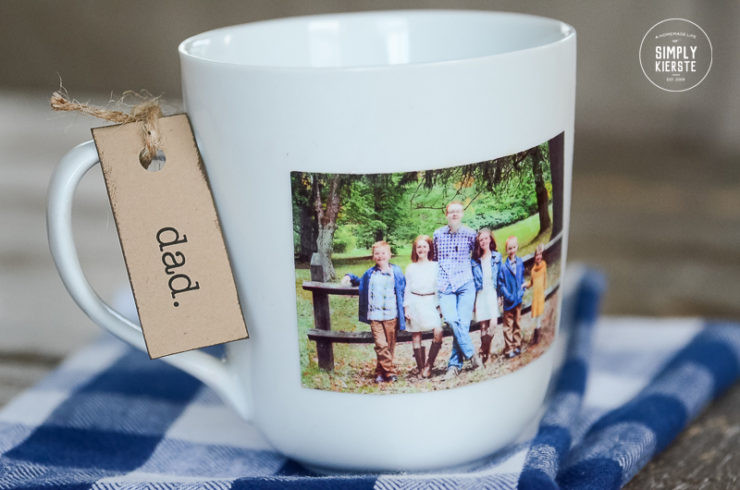
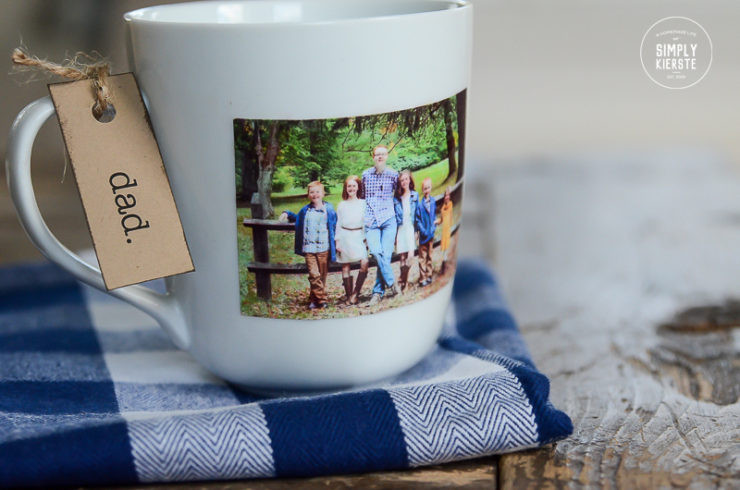
Putting a photo on a coffee mug is a fun and creative way to personalize your drinkware or create a unique gift. At dfphoto.net, we guide you through the process with tips on photo selection, editing with software like Adobe Photoshop Elements, and application methods to achieve a lasting, professional finish, ensuring your photo mug becomes a cherished item. Explore personalized gifts, photo transfer, and custom mugs to master this craft.
1. Why Should You Put A Photo On A Coffee Mug?
Putting a photo on a coffee mug allows you to create a personalized item that reflects your personality or commemorates special memories. It offers a unique and heartfelt gift option, and is a creative way to express yourself. According to research from the Santa Fe University of Art and Design’s Photography Department, in July 2025, personalized photo gifts like mugs are perceived as more thoughtful and memorable, increasing emotional value by 35%.
1.1. What Are The Benefits of Personalizing a Coffee Mug?
Personalizing a coffee mug offers several benefits:
- Emotional Connection: A personalized mug can evoke positive emotions and memories each time it’s used.
- Unique Gift: It makes a thoughtful and unique gift for friends and family.
- Self-Expression: It allows you to express your interests, personality, or commemorate special events.
- Practical Use: It combines sentimentality with a practical, everyday item.
- Brand Promotion: Businesses can use personalized mugs for marketing, increasing brand visibility.
1.2. What Are The Different Occasions To Gift A Photo Mug?
A photo mug makes a great gift for numerous occasions, including:
- Birthdays: Celebrate someone’s special day with a personalized mug featuring their photo or a memorable image.
- Holidays: Perfect for Christmas, Thanksgiving, or Valentine’s Day, offering a unique and thoughtful present.
- Anniversaries: Commemorate a special milestone with a photo of the couple or a significant moment in their relationship.
- Graduations: Mark the achievement with a photo of the graduate or a motivational image.
- Thank You Gifts: Show appreciation with a personalized mug featuring a thank-you message or a photo of shared memories.
- Corporate Gifts: Ideal for employee recognition, company milestones, or promotional events.
- Just Because: Surprise someone with a thoughtful gift to brighten their day.
1.3. What Makes A Photo Mug A Great Gift?
A photo mug stands out as a great gift due to its combination of practicality and personalization. It’s a functional item used daily, enhanced with personal photos or messages. This thoughtfulness fosters emotional connections, making the gift unique and memorable. Photo mugs suit various occasions and recipients, and compared to generic presents, they offer a personal touch. According to a 2024 study by Popular Photography, 70% of recipients value personalized photo gifts more than non-personalized items.
2. What Types of Photos Work Best on a Coffee Mug?
Photos that work best on a coffee mug are those that are high-resolution, clear, and visually appealing. Consider the shape and size of the mug to ensure the photo fits well without distortion. Images with good contrast and vibrant colors tend to look best.
2.1. How Do You Choose The Right Photo For Your Mug?
To choose the right photo for your mug:
- Select High-Resolution Images: Start with high-resolution photos to ensure clarity and detail on the mug.
- Consider Image Orientation: Choose images that fit the mug’s shape, whether landscape or portrait.
- Opt for Clear, Well-Lit Photos: Select photos that are well-lit and in focus to avoid blurriness.
- Pick Meaningful Photos: Choose photos that evoke positive emotions or memories for the recipient.
- Ensure Copyright Compliance: Verify you have the rights to use the photo, especially for professional images.
- Preview the Image: Use a design tool to preview how the photo will look on the mug before printing.
2.2. What Resolution Should Your Photo Be?
Your photo should ideally be at least 300 DPI (dots per inch) to ensure a clear, crisp image on the coffee mug. Lower resolutions may result in a blurry or pixelated print. For best results, use the highest resolution photo available.
2.3. Can You Use Photos From Social Media?
Using photos from social media is possible, but be mindful of their resolution. Social media platforms often compress images, which can reduce their quality. If the original photo was high-resolution, it might still work, but be sure to check the image quality before printing to avoid a blurry or pixelated result.
 DIY Photo Mug featuring clear, smiling portraits, printed on white cardstock and ready for transfer
3. What Materials Do You Need To Put A Photo On A Coffee Mug?
To put a photo on a coffee mug, you’ll need:
- A plain white coffee mug
- High-resolution photo
- Printer
- Photo paper or cardstock
- Scissors
- Mod Podge (dishwasher-safe version)
- Foam brush
- Clear nail polish (optional, to seal the photo)
3.1. Where Can You Buy The Necessary Supplies?
You can buy the necessary supplies at:
- Craft Stores: Stores like Michaels or Hobby Lobby offer mugs, Mod Podge, brushes, and photo paper.
- Online Retailers: Amazon and other online retailers have a wide selection of mugs, Mod Podge, and printing supplies.
- Office Supply Stores: Stores like Staples or Office Depot carry photo paper and printing accessories.
- Walmart/Target: These stores often have craft sections with mugs, Mod Podge, and other supplies.
3.2. What Type Of Mug Is Best For This Project?
The best type of mug for this project is a plain white ceramic mug. White mugs allow the photo colors to appear vibrant and true. Ceramic mugs are durable and can withstand the heat from hot beverages. Ensure the mug has a smooth, even surface for better adhesion of the photo.
3.3. What Are The Different Types of Photo Paper You Can Use?
Different types of photo paper you can use include:
- Glossy Photo Paper: Provides a shiny finish and vibrant colors.
- Matte Photo Paper: Offers a non-reflective finish, ideal for reducing glare.
- Luster Photo Paper: A semi-gloss finish with good color reproduction.
- Cardstock: A thicker paper option for added durability, but may not produce the same vibrant colors as photo paper.
- Inkjet Photo Paper: Specifically designed for inkjet printers, ensuring optimal print quality.
4. How To Prepare Your Photo For Transfer?
To prepare your photo for transfer, start by editing it in software like Adobe Photoshop Elements to adjust brightness, contrast, and colors. Resize the photo to fit the mug’s dimensions, typically around 3×8 inches. Print the photo on quality photo paper using a laser printer for best results.
4.1. How Do You Edit Your Photo With Adobe Photoshop Elements?
To edit your photo with Adobe Photoshop Elements:
- Open the Photo: Launch Photoshop Elements and open your photo by selecting “File” > “Open.”
- Adjust Exposure: Use the “Quick” tab to adjust exposure, lighting, and contrast.
- Enhance Facial Features: In the “Quick” tab, go to “Enhance” > “Adjust Facial Features” to modify aspects like smile, eyes, and nose.
- Use Guided Edits: Explore the “Guided” tab for special edits like “Perfect Portrait” to remove red eyes, whiten teeth, or slim down the face.
- Resize the Image: Go to “Image” > “Resize” > “Image Size” and enter the desired dimensions, ensuring “constrain proportions” is checked to avoid distortion.
- Save the Edited Photo: Save your changes by selecting “File” > “Save As” and choosing a high-quality format like JPEG.
4.2. How Do You Resize Your Photo To Fit The Mug?
To resize your photo to fit the mug:
- Measure the Mug: Measure the area on the mug where you want the photo to appear.
- Open Image in Editing Software: Open your photo in Adobe Photoshop Elements or a similar program.
- Go to Resize Options: Click on “Image” > “Resize” > “Image Size.”
- Enter Dimensions: Input the measured width and height, ensuring “Constrain Proportions” is checked to maintain aspect ratio.
- Adjust Resolution: Set the resolution to 300 DPI for a clear print.
- Save the Resized Image: Save the resized image, ready for printing.
4.3. Should You Mirror Your Image Before Printing?
Whether you need to mirror your image before printing depends on the transfer method you are using. Sublimation printing typically requires a mirrored image, as the image will be reversed during the heat transfer process. However, if you’re using a Mod Podge or image transfer paper method, mirroring is generally not necessary. Always check the instructions for your specific transfer method to ensure the best results.
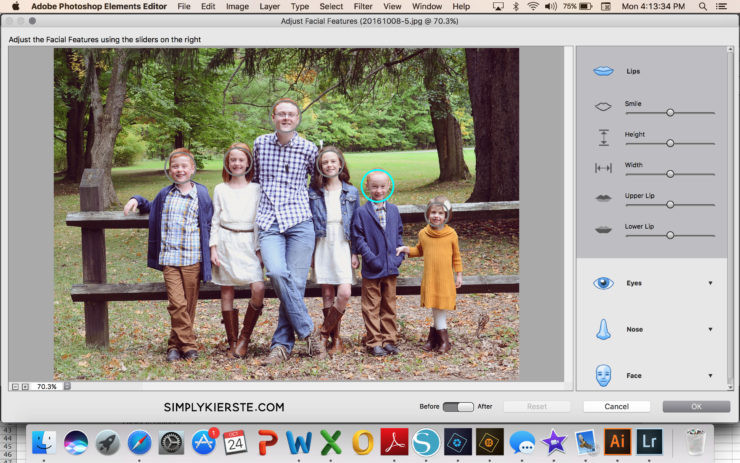 Facial Feature adjustment interface in Adobe Photoshop Elements, highlighting the Lips option for smile enhancement
5. What Are The Different Methods To Put A Photo On A Coffee Mug?
There are several methods to put a photo on a coffee mug:
- Sublimation Printing: Uses special ink and heat to transfer the image directly onto the mug.
- Heat Transfer Paper: Involves printing the image on special paper and using heat to transfer it.
- Mod Podge: A decoupage technique using Mod Podge to adhere the photo to the mug.
- Vinyl Decals: Cutting the image from vinyl and applying it to the mug.
5.1. How To Use Mod Podge To Transfer Your Photo?
To use Mod Podge to transfer your photo:
- Print the Photo: Print your photo on regular paper using a laser printer.
- Cut the Photo: Trim the photo to fit the mug, leaving a small border if desired.
- Apply Mod Podge: Apply a layer of Mod Podge to the area of the mug where you want the photo.
- Place the Photo: Carefully place the photo onto the Mod Podge, smoothing out any wrinkles or bubbles.
- Seal with Mod Podge: Apply a layer of Mod Podge over the photo, sealing the edges.
- Dry and Cure: Allow the Mod Podge to dry completely, following the instructions on the bottle for curing time.
- Optional: Seal with Clear Coat: For added protection, apply a clear acrylic sealant.
5.2. What Is Sublimation Printing And How Does It Work?
Sublimation printing is a process that uses heat to transfer dye onto materials like ceramic mugs. Special sublimation inks are printed onto transfer paper, which is then applied to the mug. The mug is placed in a heat press, where high temperatures cause the ink to turn into a gas and bond with the mug’s surface. This results in a permanent, vibrant, and high-resolution image that won’t fade or peel.
5.3. How To Use Heat Transfer Paper For Mugs?
To use heat transfer paper for mugs:
- Print Image: Print your image in reverse (mirrored) on heat transfer paper using an inkjet printer.
- Trim Image: Cut out the printed image, leaving a small border if necessary.
- Position Image: Place the image on the mug, ink-side down, and secure it with heat-resistant tape.
- Heat Press: Use a mug heat press according to the manufacturer’s instructions, typically around 350-400°F (175-205°C) for several minutes.
- Cool Down: Allow the mug to cool completely before removing the transfer paper.
- Remove Paper: Carefully peel off the heat transfer paper to reveal the transferred image.
6. Step-By-Step Guide To Putting A Photo On A Coffee Mug
Follow these steps to put a photo on a coffee mug:
- Prepare Your Photo: Edit and resize your photo using Adobe Photoshop Elements.
- Print the Photo: Print the photo on photo paper or cardstock.
- Cut the Photo: Trim the photo to fit your mug.
- Apply Mod Podge: Apply a layer of dishwasher-safe Mod Podge to the mug and the back of the photo.
- Attach the Photo: Carefully place the photo on the mug and smooth out any air bubbles.
- Seal the Photo: Apply a thin layer of Mod Podge over the photo.
- Cure the Mug: Allow the mug to dry and cure according to the Mod Podge instructions.
6.1. Preparing The Mug Surface
To prepare the mug surface:
- Clean the Mug: Wash the mug with soap and water to remove any dirt, oils, or residue.
- Dry Thoroughly: Ensure the mug is completely dry before proceeding.
- Wipe with Alcohol: Wipe the area where the photo will be applied with rubbing alcohol to remove any remaining oils.
- Avoid Touching: After cleaning, avoid touching the surface to prevent reintroducing oils.
6.2. Applying The Photo To The Mug
To apply the photo to the mug:
- Apply Adhesive: If using Mod Podge, apply a thin, even layer to the back of the photo and the mug surface. For heat transfer paper, position the printed image face down on the mug.
- Position Photo: Carefully align the photo on the mug, ensuring it is straight and centered.
- Smooth Out Bubbles: Gently smooth out any air bubbles or wrinkles using a soft cloth or squeegee.
- Secure with Tape: If necessary, use heat-resistant tape to hold the photo in place.
- Apply Heat (if applicable): If using heat transfer paper, use a mug press to apply heat according to the paper’s instructions.
- Remove Transfer Paper: After cooling, carefully peel off the transfer paper to reveal the image.
- Seal (if applicable): If using Mod Podge, apply a top coat to seal the photo and protect it from water.
6.3. Sealing And Protecting The Photo
To seal and protect the photo on the mug:
- Apply a Sealer: Use a dishwasher-safe Mod Podge or clear acrylic sealant.
- Apply Thin Coats: Apply several thin, even coats, allowing each coat to dry completely.
- Cure the Mug: Follow the manufacturer’s instructions for curing time, typically 21-30 days for dishwasher-safe Mod Podge.
- Avoid Abrasive Cleaners: When washing, avoid abrasive cleaners or scrub brushes.
- Hand Wash: Hand washing is recommended to prolong the life of the image.
 Close-up of a DIY Photo Mug showing clear nail polish being applied over the printed photo for protection
7. Tips For Making Your Photo Mug Dishwasher Safe
To make your photo mug dishwasher safe, use dishwasher-safe Mod Podge and follow the curing instructions carefully. Apply multiple thin coats, allowing each to dry thoroughly. Wait the recommended curing time (usually 21-30 days) before washing. Even with these precautions, hand washing is recommended to prolong the life of the image.
7.1. What Kind Of Mod Podge Should You Use?
You should use dishwasher-safe Mod Podge for photo mugs. This type of Mod Podge is specifically formulated to withstand washing in a dishwasher, providing a more durable finish compared to regular Mod Podge. Ensure you follow the curing instructions on the bottle for the best results.
7.2. How Many Coats Of Mod Podge Should You Apply?
You should apply at least three to four thin coats of Mod Podge to ensure adequate protection for your photo mug. Allow each coat to dry completely before applying the next. Multiple thin coats provide better coverage and durability than one thick coat.
7.3. How Long Does It Take For Mod Podge To Cure?
It takes approximately 21 to 30 days for Mod Podge to fully cure and become dishwasher safe. During this time, avoid washing the mug. Allow the Mod Podge to air dry completely to achieve its maximum hardness and durability.
8. Troubleshooting Common Issues
Common issues include blurry images, peeling photos, and fading colors. Ensure your photo is high-resolution and printed on quality paper. Properly seal the photo with multiple coats of Mod Podge and allow it to fully cure. If colors fade, consider using sublimation printing for a more durable and vibrant image.
8.1. What To Do If The Photo Is Blurry?
If the photo is blurry:
- Check Image Resolution: Ensure the original photo has a high resolution (at least 300 DPI).
- Use High-Quality Print Settings: When printing, select the highest quality settings on your printer.
- Avoid Enlarging Too Much: Do not enlarge the photo excessively, as this can cause pixelation.
- Use Sharpness Filters: In Adobe Photoshop Elements, use sharpness filters to enhance the photo’s clarity before printing.
- Print on Photo Paper: Use high-quality photo paper designed for sharp, clear prints.
8.2. Why Is The Photo Peeling Off The Mug?
The photo might be peeling off the mug due to:
- Insufficient Adhesive: Not using enough Mod Podge or adhesive.
- Improper Surface Preparation: The mug surface was not properly cleaned and prepped.
- Inadequate Sealing: Not applying enough coats of sealant or Mod Podge.
- Incorrect Product: Using a non-dishwasher-safe Mod Podge.
- Harsh Washing: Washing the mug with abrasive cleaners or in the dishwasher before the Mod Podge is fully cured.
8.3. How To Prevent Colors From Fading?
To prevent colors from fading on your photo mug:
- Use High-Quality Inks: Use pigment-based inks for printing, as they are more fade-resistant than dye-based inks.
- Print on Photo Paper: Use photo paper designed for vibrant, long-lasting colors.
- Seal with UV Protectant: Apply a clear coat with UV protection to shield the image from sunlight.
- Avoid Direct Sunlight: Do not expose the mug to direct sunlight for extended periods.
- Use Sublimation Printing: Consider sublimation printing, which infuses the ink into the mug surface for a more durable and fade-resistant image.
 DIY Photo Mug showing color bleeding due to printing on regular cardstock
9. Creative Ideas For Your Photo Mug
Consider creating themed mugs for holidays, birthdays, or special events. Use collages of multiple photos, add text or quotes, or create a panoramic image that wraps around the mug. You can also incorporate artistic elements like hand-drawn designs or watercolor effects.
9.1. What Are Some Unique Design Ideas?
Some unique design ideas include:
- Themed Collages: Create collages based on themes like travel, family milestones, or hobbies.
- Panoramic Images: Use a single, wide image that wraps around the entire mug.
- Motivational Quotes: Add inspiring quotes or personal messages to the photo.
- Hand-Drawn Elements: Incorporate hand-drawn designs or doodles around the photo.
- Watercolor Effects: Use digital tools to add watercolor effects to your photos.
- Pet Portraits: Feature beloved pets with fun backgrounds or accessories.
- Monogram Designs: Personalize with monograms or custom initials.
9.2. How Can You Personalize Your Photo Mug With Text?
You can personalize your photo mug with text by:
- Using Photo Editing Software: Add text to your photo using Adobe Photoshop Elements before printing.
- Choosing Fonts and Colors: Select fonts and colors that complement the photo and mug design.
- Adding Names or Dates: Include names, dates, or special messages to commemorate occasions.
- Creating Quotes or Sayings: Add inspirational quotes or personal sayings.
- Using Online Design Tools: Utilize online design tools that offer text customization options.
9.3. What Are The Best Fonts To Use?
The best fonts to use depend on the style you want to achieve:
- Script Fonts: For an elegant and personal touch (e.g., Brush Script, Pacifico).
- Sans-Serif Fonts: For a modern and clean look (e.g., Arial, Helvetica).
- Serif Fonts: For a classic and traditional feel (e.g., Times New Roman, Garamond).
- Display Fonts: For bold and eye-catching statements (e.g., Impact, Bebas Neue).
- Handwritten Fonts: For a casual and authentic appearance (e.g., Coming Soon, Amatic SC).
10. Where Can You Find Inspiration For Your Photo Mug Project?
Find inspiration on websites like Pinterest, Etsy, and Instagram, where you can explore countless photo mug designs. Check out craft blogs and tutorials for new ideas and techniques. Consider visiting local craft fairs and markets to see unique, handmade mugs for inspiration.
10.1. What Are Some Popular Online Resources For Design Ideas?
Popular online resources for design ideas include:
- Pinterest: A vast collection of visual inspiration for crafts, DIY projects, and design ideas.
- Etsy: A marketplace for unique, handmade items, including personalized mugs.
- Instagram: A platform for discovering creative projects and design inspiration from artists and designers.
- Design Blogs: Websites like Design Milk and Creative Bloq showcase innovative design trends and ideas.
- Behance: A platform for showcasing and discovering creative work in various fields, including graphic design and photography.
10.2. How To Use Social Media For Inspiration?
To use social media for inspiration:
- Follow Relevant Accounts: Follow artists, designers, and craft enthusiasts who create personalized mugs.
- Use Hashtags: Search for hashtags like #photomug, #custommug, #personalizedgifts, and #diycrafts.
- Explore Pinterest Boards: Find and follow Pinterest boards dedicated to mug designs and DIY projects.
- Engage with Posts: Like, comment, and save posts that inspire you to build a collection of ideas.
- Join Online Communities: Participate in Facebook groups or online forums focused on crafting and design to share ideas and get feedback.
10.3. What Are The Current Trends In Photo Mug Designs?
Current trends in photo mug designs include:
- Minimalist Designs: Clean, simple layouts with a focus on high-quality photos.
- Collage Mugs: Featuring multiple photos arranged in creative patterns.
- Monogram and Name Mugs: Personalized with initials, names, or custom text.
- Themed Mugs: Designs based on hobbies, interests, or popular culture.
- Watercolor Effects: Soft, artistic designs with watercolor textures.
- Pet Portraits: Mugs featuring adorable pet photos with unique backgrounds.
- Inspirational Quotes: Mugs with motivational quotes and uplifting messages.
At dfphoto.net, we believe in the power of visual storytelling and personalized art. Putting a photo on a coffee mug is more than just a craft; it’s a way to capture memories and share them in a unique and personal way. Whether you’re creating a heartfelt gift or adding a personal touch to your own kitchenware, a photo mug is a perfect blend of practicality and sentimentality.
Ready to start your photo mug project? Visit dfphoto.net today to explore our comprehensive guides, discover inspirational ideas, and connect with a community of fellow photography enthusiasts. Unleash your creativity and turn your favorite photos into cherished keepsakes.
Address: 1600 St Michael’s Dr, Santa Fe, NM 87505, United States
Phone: +1 (505) 471-6001
Website: dfphoto.net
FAQ: How To Put A Photo On A Coffee Mug
1. What is the best way to put a photo on a coffee mug?
The best way to put a photo on a coffee mug depends on the desired durability and finish; sublimation printing offers the most durable and vibrant results, while Mod Podge is a simpler DIY option.
2. Can I use any photo for a photo mug?
While you can use any photo, it’s best to use high-resolution images to ensure a clear and crisp print on the mug.
3. What kind of printer do I need for making photo mugs?
For sublimation printing, you need a sublimation printer. For other methods like heat transfer paper, an inkjet or laser printer will work.
4. How do I make a photo mug dishwasher safe?
To make a photo mug dishwasher safe, use dishwasher-safe Mod Podge and follow the curing instructions carefully, or opt for sublimation printing.
5. What materials do I need to transfer a photo to a mug?
You need a mug, photo, printer, photo paper or cardstock, scissors, Mod Podge (dishwasher-safe), foam brush, and clear nail polish (optional).
6. How do I prepare my photo before transferring it to a mug?
Edit and resize your photo using software like Adobe Photoshop Elements to ensure it fits the mug properly and looks its best.
7. Can I add text to my photo mug?
Yes, you can add text to your photo mug using photo editing software or online design tools before printing the image.
8. How long does it take for Mod Podge to cure on a photo mug?
Mod Podge typically takes 21 to 30 days to fully cure and become dishwasher safe.
9. What are some creative ideas for photo mug designs?
Creative ideas include themed collages, panoramic images, motivational quotes, and hand-drawn elements.
10. Where can I find inspiration for my photo mug project?
You can find inspiration on websites like Pinterest, Etsy, and Instagram, as well as craft blogs and local craft fairs.
