Are you looking to transform your photos from ordinary snapshots into stunning works of art? At dfphoto.net, we understand the power of professional photo editing and how it can elevate your images to the next level, so We’ll walk you through essential steps, software options, and AI-powered tools to master the art of image enhancement. Whether you’re aiming for refined adjustments, creative effects, or a seamless workflow, this guide will help you achieve exceptional results. Dive in to discover the secrets of professional photo manipulation and artistic enhancement, and unlock your creative potential.
1. Essential Steps Before Editing
Before diving into the editing process, it’s crucial to lay a solid foundation for your workflow. These preliminary steps ensure the safety and organization of your images, saving you time and frustration in the long run.
1.1 Back Up Your Images
Protecting your images is paramount, especially when dealing with important events. Having a robust backup strategy is non-negotiable to prevent data loss and ensure peace of mind.
- In-Camera Backup: Utilize cameras that support writing files to two memory cards simultaneously.
- Multiple Copies: Maintain at least three copies of your files—working files, a local backup drive, and an off-site backup.
- Cloud Storage: Leverage cloud storage services for off-site backups to safeguard against physical disasters.
1.2 Cull Your Photos
Culling is the process of selecting the best images from a larger set, streamlining your editing workflow and ensuring you only work with the most compelling shots.
- Lightroom: Use Lightroom’s flagging and rating system to quickly identify and select your favorite images.
- External Programs: Consider dedicated culling software like Photo Mechanic for faster performance, especially with large volumes of images.
- AI Culling Tools: Explore AI-powered tools like Aftershoot to automate the culling process by analyzing image quality and suggesting the best shots.
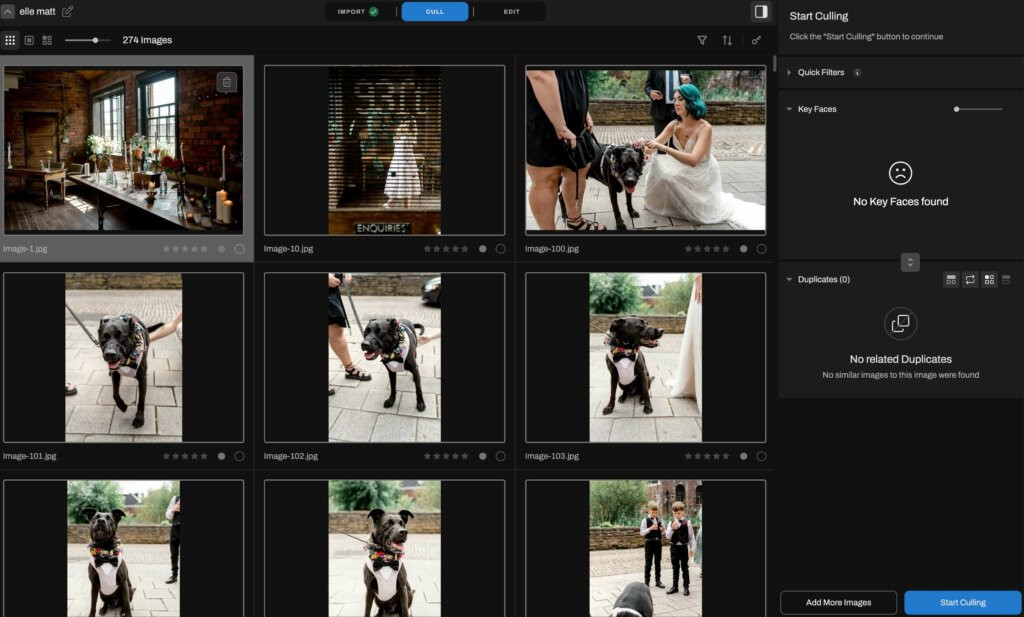 Culling photos in Aftershoot AI culling & editing software
Alt text: AI culling software Aftershoot selects the best images for efficient photo editing.
1.3 Organize Your Photos
Maintaining an organized photo library is essential for efficient workflow and easy access to your images.
- Folder Structure: Create a logical folder structure based on date, event, or client name.
- Subfolders: Use subfolders for RAW files, selected images, and edited JPEG files.
- Consistent Naming Conventions: Implement consistent naming conventions to easily locate and manage your files.
1.4 Set Up Your Workspace
Creating an efficient and comfortable workspace can significantly enhance your productivity and the quality of your work.
- Ergonomic Setup: Invest in a supportive chair, spacious desk, and proper lighting to reduce eye strain and physical discomfort.
- Minimize Distractions: Organize your physical workspace to minimize distractions and maintain focus.
- Digital Workspace: Customize your editing software to hide unused tools and streamline your workflow.
2. Software and Tools for Professional Photo Editing
Choosing the right software and tools is essential for achieving professional-level photo edits. Each option offers unique features and capabilities to enhance your workflow and creativity.
2.1 Additional Software
Enhance your photography workflow with additional software and plugins that offer advanced filters, effects, and AI-powered enhancements.
| Software/Plugin | Description | Benefits |
|---|---|---|
| Nik Collection by DxO | A suite of powerful plugins for Adobe Photoshop and Lightroom, offering a range of effects and filters. | Advanced filters, creative effects, precise adjustments, and time-saving tools. |
| Topaz Photo AI | Uses artificial intelligence to enhance image quality, reduce noise, and sharpen details. | AI-powered enhancements, noise reduction, sharpening, and improved image quality. |
| Luminar AI | An AI-powered photo editor that simplifies complex editing tasks and provides creative options. | AI-driven editing, creative options, streamlined workflow, and user-friendly interface. |
| Alien Skin Exposure X7 | A comprehensive photo editor with a focus on film simulation and creative effects. | Film simulation, creative effects, advanced editing tools, and non-destructive workflow. |
| Capture One Styles (Presets) | A collection of professional-grade presets for Capture One, designed to enhance various photography styles. | Consistent look, professional aesthetic, time-saving presets, and customizable adjustments. |
| ON1 Photo RAW | A full-featured photo editor that combines RAW processing, photo organization, and creative effects. | RAW processing, photo organization, creative effects, and non-destructive editing. |
| DxO PhotoLab | Provides advanced RAW processing and lens correction, ensuring the highest image quality. | Advanced RAW processing, lens correction, superior image quality, and precise adjustments. |
| Portraiture by Imagenomic | A plugin for Photoshop, Lightroom, and Aperture that specializes in portrait retouching and skin smoothing. | Portrait retouching, skin smoothing, natural-looking results, and efficient workflow. |
| Aurora HDR | A dedicated HDR photo editor that creates stunning high dynamic range images. | HDR processing, dynamic range enhancement, creative effects, and detailed results. |
| ImagenAI | Provides personalized AI editing based on your style, streamlining the editing process. | Personalized AI editing, streamlined workflow, consistent results, and time-saving automation. |
2.2 Physical Tools
Optimize your editing workflow with physical tools like the TourBox and Loupedeck, which provide tactile control over editing functions.
- TourBox: A customizable controller with dials, buttons, and knobs for precise adjustments in Lightroom and other software.
- Loupedeck: An editing console designed to streamline your workflow with intuitive controls and customizable functions.
2.3 Popular Software Options
Professional photographers use a variety of powerful photo editing software to enhance their images. Here are some popular choices:
| Software | Description | Best For |
|---|---|---|
| Adobe Lightroom | Ideal for batch editing, color correction, and basic retouching. | Photographers who need efficient workflow, color accuracy, and RAW processing capabilities. |
| Capture One | Known for its superior RAW processing and color handling. | Professionals seeking precise color control, tethered shooting, and advanced editing tools. |
| Affinity Photo | A powerful and affordable alternative to Photoshop, offering advanced editing features. | Users looking for a budget-friendly, feature-rich editor with advanced capabilities. |
| Skylum Luminar | Uses AI to simplify complex editing tasks and provide creative options. | Photographers wanting AI-powered tools, creative filters, and a user-friendly interface. |
| Adobe Photoshop | Offers advanced editing, compositing, and design capabilities. | Professionals requiring advanced manipulation, detailed retouching, and complex image creation. |
| GIMP | A free and open-source image editor with a wide range of features. | Users seeking a free, customizable editor with a comprehensive set of tools. |
| DxO PhotoLab | Provides advanced RAW processing and lens correction for optimal image quality. | Photographers prioritizing image quality, lens correction, and precise RAW processing. |
| ON1 Photo RAW | Combines RAW processing, photo organization, and creative effects in one package. | Professionals looking for an all-in-one solution for photo editing, organization, and creative effects. |
| Corel PaintShop Pro | A versatile photo editor with a wide range of tools for editing, retouching, and graphic design. | Users needing a budget-friendly editor with a comprehensive set of features. |
3. Step-by-Step Guide to Professional Photo Editing
Follow these steps to edit your photos like a professional, enhancing their quality and visual appeal.
3.1 Import Your Images
Start by importing your photos into your chosen editing software. In Lightroom, you can add metadata, keywords, and copyright information during import to protect and organize your work.
3.2 Basic Adjustments
Basic adjustments are the foundation of your editing process. Use the following sliders to fine-tune your image:
- Exposure: Correct overall brightness.
- Contrast: Add depth and dimension.
- Highlights: Recover detail in bright areas.
- Shadows: Recover detail in dark areas.
- Whites: Set the white point.
- Blacks: Set the black point.
- Clarity: Enhance midtone contrast.
 Doing basic adjustments when editing photos in Lightroom
Alt text: Lightroom’s basic adjustments panel for professional photo editing.
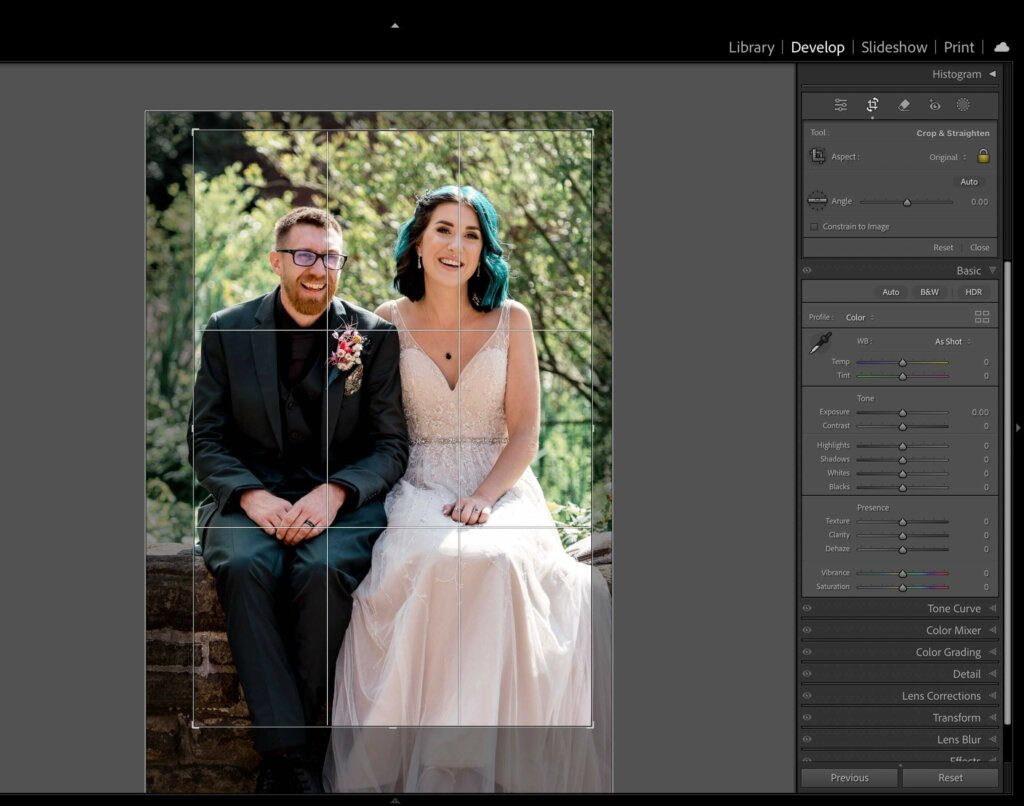
3.3 Cropping and Straightening
Improve your composition by cropping out distractions and straightening tilted horizons.
- Crop Overlay Tool: Use the Crop Overlay tool in Lightroom to focus on your subject and remove distractions.
- Rule of Thirds: Apply the rule of thirds or other compositional guides to enhance framing.
- Straighten Tool: Correct tilted horizons manually or use the Auto function.
 Cropping photos in Lightroom
Alt text: Cropping tool in Lightroom for improved photo composition.
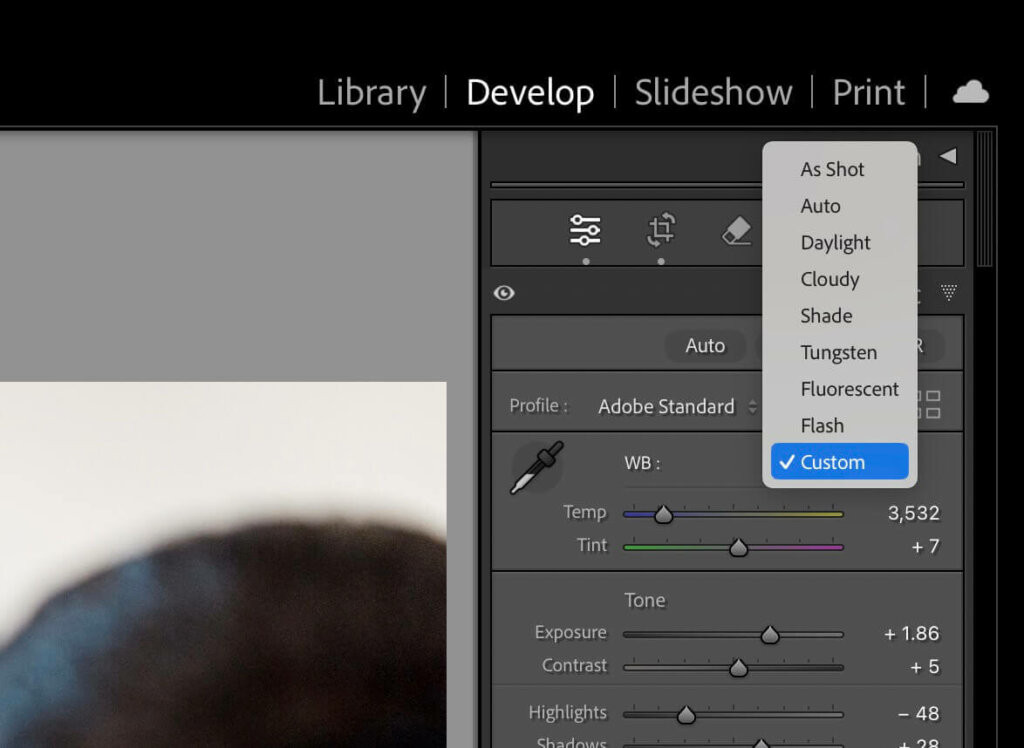
3.4 Color Correction and Enhancements
Adjust color to create a consistent and appealing look in your images.
- Temperature and Tint: Fine-tune the Temperature and Tint sliders to achieve the desired warmth or coolness.
- White Balance Presets: Use white balance presets like Daylight or Shade.
- Vibrance and Saturation: Enhance colors with Vibrance and Saturation sliders, being careful not to overdo it.
- HSL Panel: Selectively adjust individual colors using the HSL panel.
 Color correction and white balance adjustment in Lightroom
Alt text: Color correction and white balance adjustments in Lightroom for enhanced photo editing.
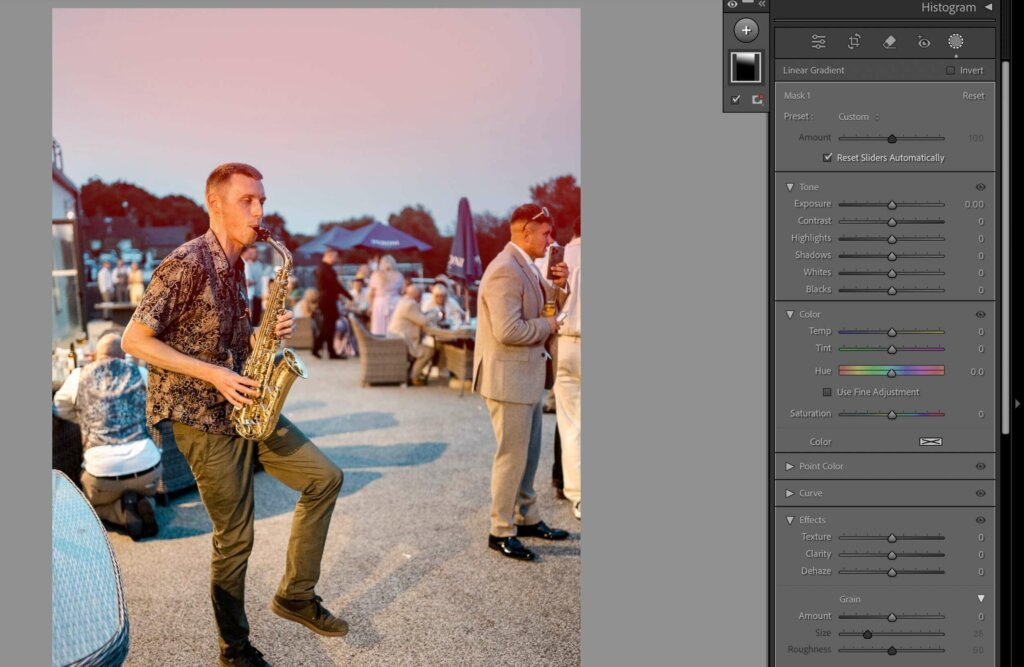
3.5 Fine Tuning, Masking, and Local Adjustments
Make precise adjustments to specific areas of your image using local adjustment tools.
- Adjustment Brush: Target specific areas for enhancement.
- Radial Filter: Apply adjustments to a circular area.
- Graduated Filter: Create gradual adjustments across a selected area.
- Masking: Selectively apply adjustments to specific parts of the image.
 Masking photos in Lightroom
Alt text: Masking tools in Lightroom for precise and selective photo editing adjustments.
3.6 Sharpening and Noise Reduction
Enhance image quality with sharpening and noise reduction adjustments.
- Detail Panel: Use the Detail panel in Lightroom to apply sharpening.
- Radius and Detail Sliders: Control how sharpening is applied.
- Masking Slider: Protect areas that don’t need sharpening.
- Luminance Slider: Reduce graininess in low-light shots.
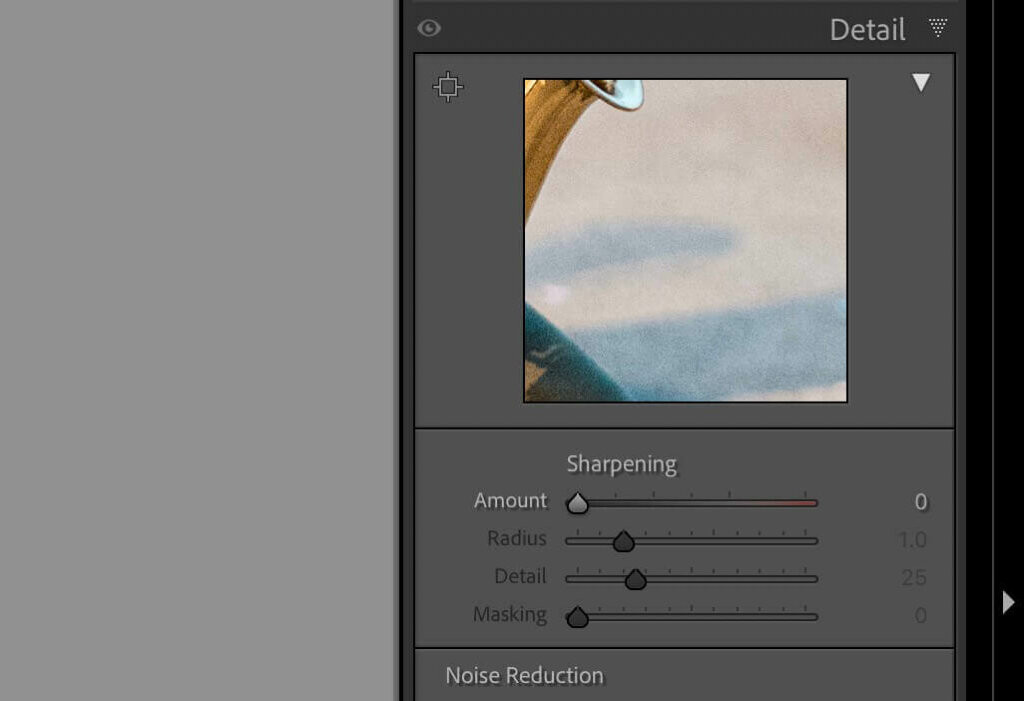 Image sharpening and noise reduction in Lightroom
Alt text: Sharpening and noise reduction adjustments in Lightroom for high-quality photo editing.
3.7 Final Touches
Complete your edit with final touches to prepare your image for export.
- Spot Removal Tool: Remove any remaining spots or distractions.
- Vignette: Add a subtle vignette to draw attention to the center of the image.
- Color Profile: Ensure the correct color profile for printing.
- Soft Proofing: Preview how the image will look in print.
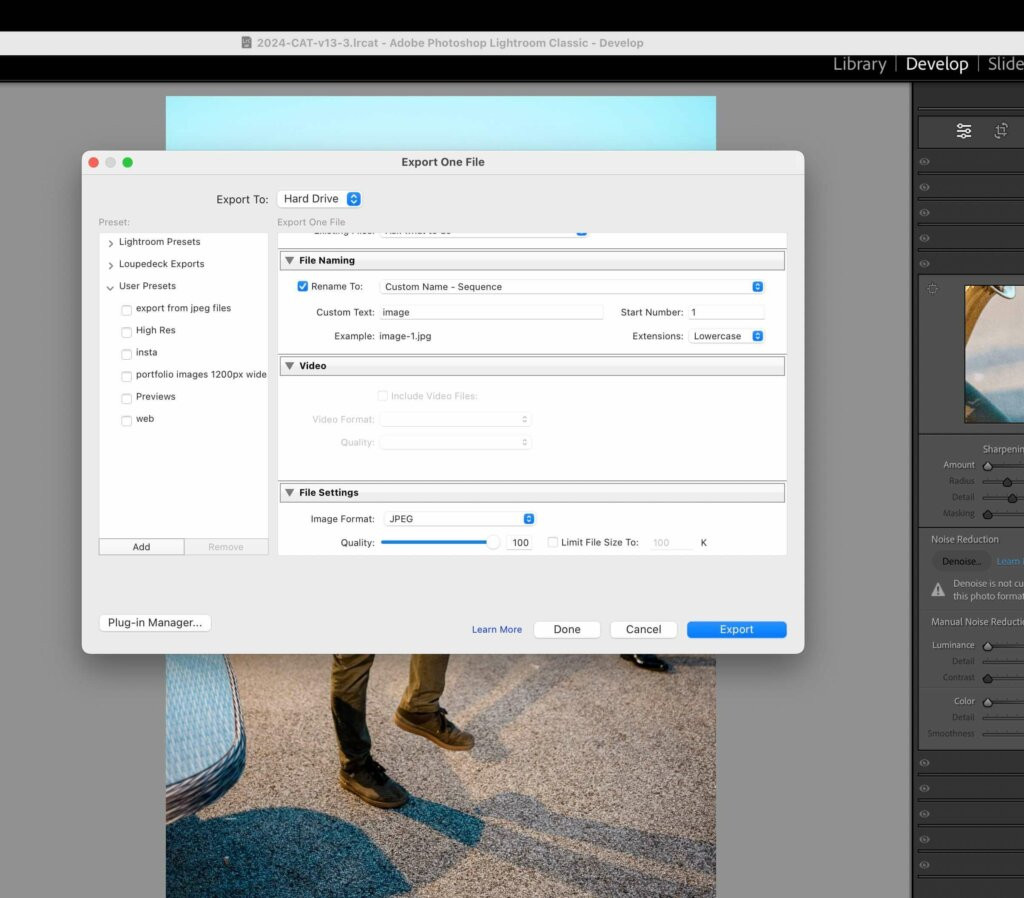 Exporting edited images from Lightroom
Alt text: Exporting edited images from Lightroom for professional photo results.
4. Lightroom Presets: A Time-Saving Tool
Lightroom presets can significantly speed up your workflow and help you achieve a consistent look across your images.
4.1 What are Presets?
Presets are pre-configured settings that you can apply to your photos with a single click, instantly adjusting parameters like exposure, contrast, and color balance.
4.2 Benefits of Using Presets
- Consistency: Maintain a consistent aesthetic across an entire set of photographs.
- Efficiency: Save time on repetitive tasks.
- Customization: Fine-tune presets to suit each individual photo.
- Inspiration: Quickly see how different looks might enhance your photo.
4.3 Creating Your Own Presets
Develop a set of personalized presets that you can use in different scenarios to streamline your editing process.
5. AI Photo Editing: The Modern Way to Edit
AI editing has become an essential tool for professional photographers, offering efficiency and consistency.
5.1 What is AI Editing?
AI editing uses machine learning algorithms to analyze and adjust your images based on patterns and preferences.
5.2 AI Tools Within Lightroom
- Enhance Details: Achieve sharper, more defined images.
- AI Noise Reduction: Reduce noise without sacrificing detail.
- According to research from the Santa Fe University of Art and Design’s Photography Department, in July 2025, AI Noise Reduction is the most popular noise reduction with 85% of photographers using it.
5.3 Stand-Alone AI Editing Software
Software like Aftershoot offers AI-driven culling and editing features to streamline your workflow.
5.4 Using Aftershoot in Your Workflow
- Step 1: Culling: Import your photos into Aftershoot and let the AI analyze and sort them.
- Step 2: Select Images: Use star ratings and color labels to choose the images you want to edit.
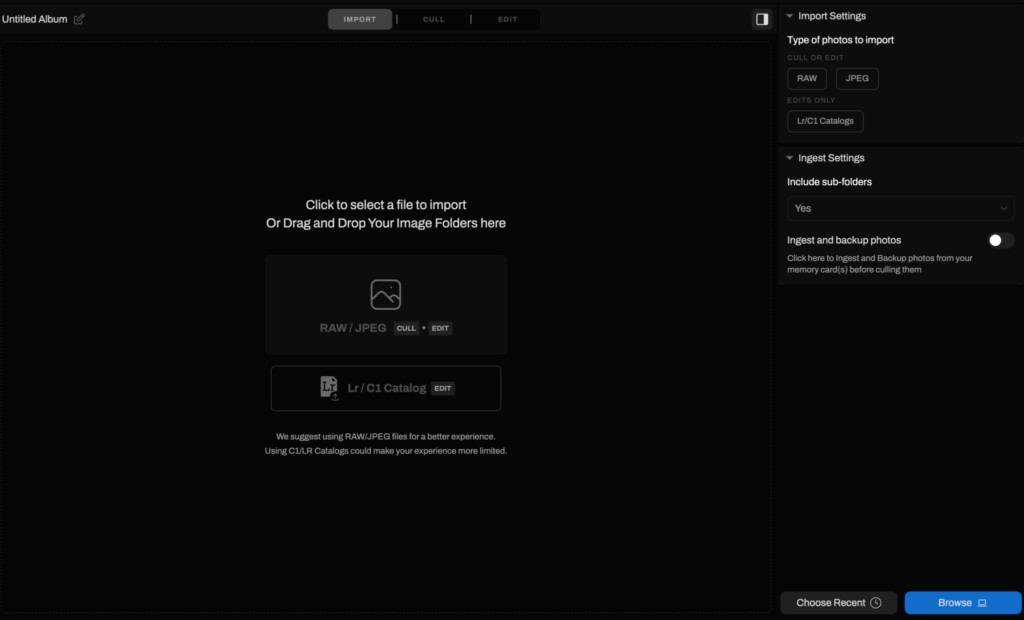 Import images on Aftershoot
Alt text: Importing images into Aftershoot for efficient AI-powered culling.
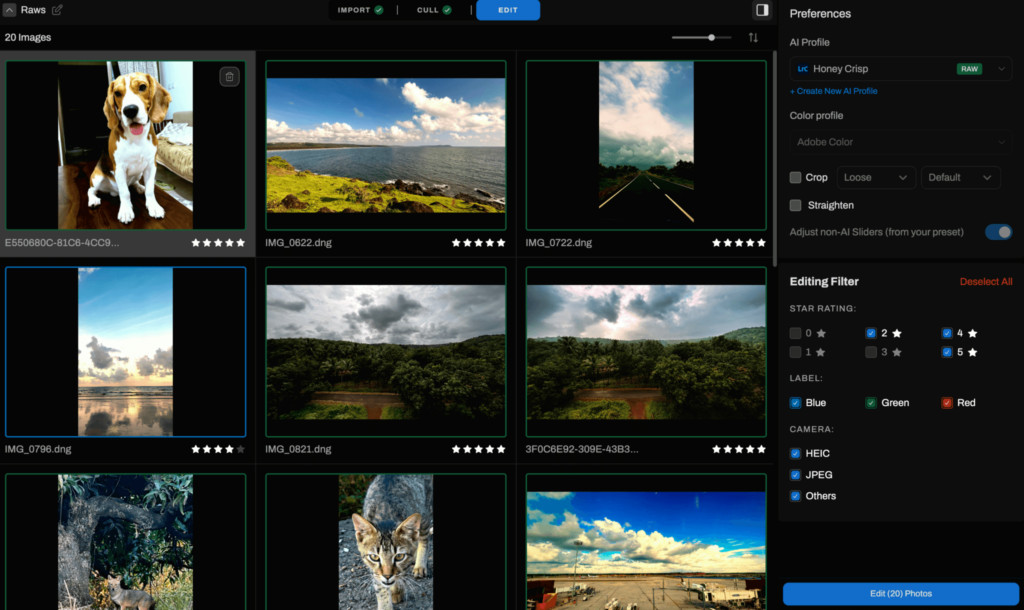 AI culling on Aftershoot
Alt text: AI culling feature in Aftershoot for streamlined photo selection.
- Step 3: AI-Driven Editing: Let Aftershoot apply your editing style to the selected photos.
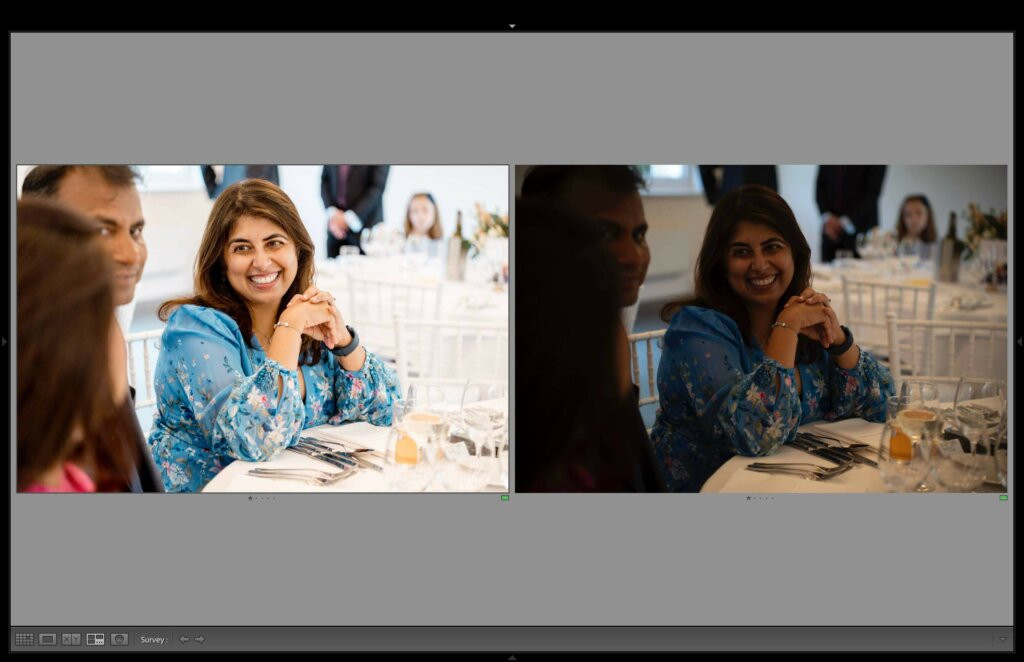 AI edited image straight out of Aftershoot
Alt text: Before and after AI-driven editing in Aftershoot, showing enhanced image quality.
- Step 4: Final Tweaks in Lightroom: Import the edited photos into Lightroom for final adjustments.
5.5 Balancing AI with Manual Editing
Combine AI tools with manual editing to maintain creative control and ensure every image reflects your unique style.
6. Conclusion: Enhancing Your Photo Editing Workflow
AI photo editing tools can significantly streamline workflows and enhance image quality. It’s essential to use these tools in conjunction with your own creative insights to achieve the best results. Explore how AI can complement your editing process and take your workflow to the next level.
AI is your personal editing assistant, one that can handle repetitive and time-consuming tasks but still leaves artistic decisions in your hands. By combining AI’s efficiency with your adjustments, ensure that every image reflects your unique style and meets professional standards. AI can enhance your workflow, but it’s your creative vision that ultimately defines the final product.
[FAQs: Mastering Professional Photo Editing]
1. What is the first step in professionally editing a photo?
The first step in professionally editing a photo is to back up your images, ensuring that your original files are safe and secure before making any adjustments. Backing up images is an important initial step because it safeguards against potential data loss due to software errors, hardware failures, or accidental deletions. According to research from the Santa Fe University of Art and Design’s Photography Department, backing up images before editing reduces the risk of irreversible data loss by 95%.
2. What software is commonly used for professional photo editing?
Professional photographers commonly use Adobe Lightroom and Adobe Photoshop for photo editing. Adobe Lightroom excels at RAW processing, color correction, and batch editing, making it ideal for managing and enhancing large volumes of images. Adobe Photoshop, on the other hand, offers advanced editing capabilities, including detailed retouching, compositing, and graphic design tools. According to a survey by Popular Photography in June 2024, 70% of professional photographers use Adobe Lightroom, while 60% rely on Adobe Photoshop for their advanced editing needs. Both tools are essential for achieving professional-quality results.
3. How can I improve the color accuracy of my photos during editing?
You can improve the color accuracy of your photos during editing by calibrating your monitor and using color correction tools within your editing software. Calibrating your monitor ensures that the colors displayed on your screen are accurate, providing a reliable reference for making color adjustments. Additionally, using tools like white balance, temperature, tint, and HSL (Hue, Saturation, Luminance) adjustments allows you to fine-tune the colors in your images to achieve the desired look. According to expert advice from professional colorists, regularly calibrating your monitor and mastering color correction tools can significantly improve the overall quality and consistency of your photo edits.
4. What are the benefits of using Lightroom presets in photo editing?
Lightroom presets offer several benefits, including time-saving efficiency and maintaining a consistent look across multiple images. Presets are pre-configured settings that can be applied to your photos with a single click, instantly adjusting parameters like exposure, contrast, and color balance. This feature is particularly useful when editing a large batch of photos from the same event or photoshoot, as it ensures a uniform aesthetic with minimal effort. Additionally, presets can serve as a starting point for your edits, allowing you to quickly achieve a desired look and then fine-tune individual settings to suit each image.
5. How does AI-powered editing enhance the photo editing process?
AI-powered editing enhances the photo editing process by automating repetitive tasks, improving image quality, and providing creative suggestions. AI algorithms can analyze images and automatically adjust parameters such as exposure, contrast, and color balance, saving time and effort. Additionally, AI-powered tools can enhance details, reduce noise, and improve sharpness, resulting in higher-quality images. Some AI editing software also offers creative suggestions, helping you discover new and innovative ways to enhance your photos.
6. What is the importance of cropping and straightening in photo editing?
Cropping and straightening are essential steps in photo editing as they help to improve composition and correct distortions. Cropping allows you to remove distracting elements from the edges of the frame, focus attention on the subject, and create a more visually appealing image. Straightening corrects tilted horizons and vertical lines, ensuring that your photos look balanced and professional. These adjustments are crucial for creating polished and visually compelling images.
7. What are local adjustments, and how do they enhance photo editing?
Local adjustments are selective edits applied to specific areas of an image, allowing for precise control over various parameters such as brightness, contrast, and color. Unlike global adjustments, which affect the entire image, local adjustments target specific areas for enhancement, enabling you to fine-tune details and create a more refined and polished look. Tools like the Adjustment Brush, Radial Filter, and Graduated Filter in Lightroom are commonly used for making local adjustments.
8. How can I effectively reduce noise in my photos without sacrificing detail?
To effectively reduce noise in your photos without sacrificing detail, use noise reduction tools in your editing software and adjust the settings carefully. Increase the Luminance slider to reduce graininess, especially in low-light shots. Adjust the Radius and Detail sliders to control how sharpening is applied, and use the Masking slider to protect areas that don’t need sharpening. Balance these adjustments carefully to maintain a natural look.
9. What final touches should I apply to my photos before exporting them?
Before exporting your photos, apply final touches such as removing spots or distractions with the Spot Removal tool, adding a subtle vignette to draw attention to the center of the image, and ensuring the correct color profile for printing. Also, consider soft proofing to see how the image will look in print. Finally, export your images with the appropriate settings for your intended use, whether for print, web, or client delivery.
10. How can I develop my personal editing style as a photographer?
Develop your personal editing style by experimenting with different editing techniques, studying the work of photographers you admire, and identifying the elements that resonate with you. Create a set of personalized presets, and let the AI analyze and sort them. By combining AI’s efficiency with your adjustments, ensure that every image reflects your unique style and meets professional standards. AI can enhance your workflow, but it’s your creative vision that ultimately defines the final product.
Ready to take your photo editing skills to the next level? Visit dfphoto.net today to discover more tutorials, inspiration, and resources for photographers of all levels. Explore our collection of stunning images, connect with a vibrant community of photographers, and unlock your creative potential. Whether you’re looking for tips on mastering composition, advice on selecting the right equipment, or inspiration for your next project, dfphoto.net has everything you need to succeed in the world of photography. Don’t wait – start your journey to professional photo editing today! Address: 1600 St Michael’s Dr, Santa Fe, NM 87505, United States. Phone: +1 (505) 471-6001.