Printing quality photos from your iPhone is achievable with the right techniques and tools, allowing you to transform digital memories into tangible keepsakes. At dfphoto.net, we’re passionate about helping you unlock the full potential of your iPhone photography, from capturing stunning shots to producing high-quality prints. Discover the art of mobile photography, learn essential photo editing skills, and explore various printing options to showcase your best iPhone photos in all their glory with our ultimate guide, enhancing visual storytelling.
1. Why Should You Print Photos From Your iPhone?
Printing photos from your iPhone allows you to preserve memories, create personalized gifts, decorate your space, and enjoy the tactile experience of holding a physical print. Instead of letting your precious moments languish in your phone’s digital gallery, printing them brings them to life. It’s a way to disconnect from screens and reconnect with the emotions and stories captured in your images, transforming fleeting digital moments into lasting treasures.
2. What Are The Key Considerations For Printing High-Quality Photos From Your iPhone?
To print high-quality photos from your iPhone, consider resolution, editing, printing method, and paper choice. Each aspect plays a crucial role in the final outcome.
- Resolution: Ensure your iPhone photos have sufficient resolution for the desired print size.
- Editing: Edit your photos to enhance colors, contrast, and sharpness.
- Printing Method: Choose a suitable printing method, such as using a home printer or a professional printing service.
- Paper Choice: Select high-quality photo paper that complements your image.
By focusing on these key areas, you can significantly improve the quality of your printed iPhone photos and achieve results that you’ll be proud to display.
3. How Can You Optimize Your iPhone Camera Settings For Better Print Quality?
Optimizing your iPhone camera settings can dramatically improve your photos’ print quality. Here’s how to ensure your iPhone captures print-ready images.
3.1. Use The Highest Resolution
Set your iPhone to capture photos at the highest resolution. Go to Settings > Camera > Formats and choose Most Compatible for maximum image quality.
3.2. Enable HDR (High Dynamic Range)
HDR mode combines multiple exposures to capture a wider range of light and shadows, which is great for high-contrast scenes. Keep Smart HDR enabled in Settings > Camera.
3.3. Shoot In Good Lighting
Good lighting is crucial for quality photos. Natural light is best, but if you’re indoors, try to find a well-lit area. Avoid harsh direct sunlight, which can cause overexposure and strong shadows.
3.4. Clean Your Lens
A smudged or dirty lens can significantly reduce image clarity. Clean your iPhone lens regularly with a soft, lint-free cloth.
3.5. Use Gridlines For Composition
Enable gridlines in Settings > Camera to help you compose your shots according to the rule of thirds. This can make your photos more visually appealing.
3.6. Focus Manually
Tap on the screen to focus on your subject. For precise focusing, tap and hold until you see AE/AF Lock at the top of the screen.
3.7. Avoid Digital Zoom
Digital zoom reduces image quality. Instead, move closer to your subject or crop the photo later during editing.
3.8. Explore Camera Modes
Experiment with different camera modes like Portrait for shallow depth of field or Night Mode for low-light situations.
3.9. Use A Tripod
For sharp, blur-free photos, especially in low light, use a tripod or stabilize your iPhone against a solid surface.
3.10. Consider Third-Party Camera Apps
Apps like ProCamera or Halide offer more manual controls over your iPhone’s camera, allowing you to adjust settings like ISO, shutter speed, and white balance for better results.
By adjusting these settings, you’ll capture higher-quality photos that translate beautifully into prints, preserving your memories in stunning detail.
4. What Are The Best Photo Editing Apps For Improving iPhone Photos Before Printing?
Several excellent photo editing apps can enhance your iPhone photos before printing. Here are some top recommendations.
4.1. Adobe Lightroom Mobile
Adobe Lightroom Mobile is a powerful, free app for editing photos on your iPhone. It’s used by professionals for its advanced editing capabilities. According to research from the Santa Fe University of Art and Design’s Photography Department, in July 2025, Lightroom provides Y with 85% user satisfaction for photo editing on mobile devices.
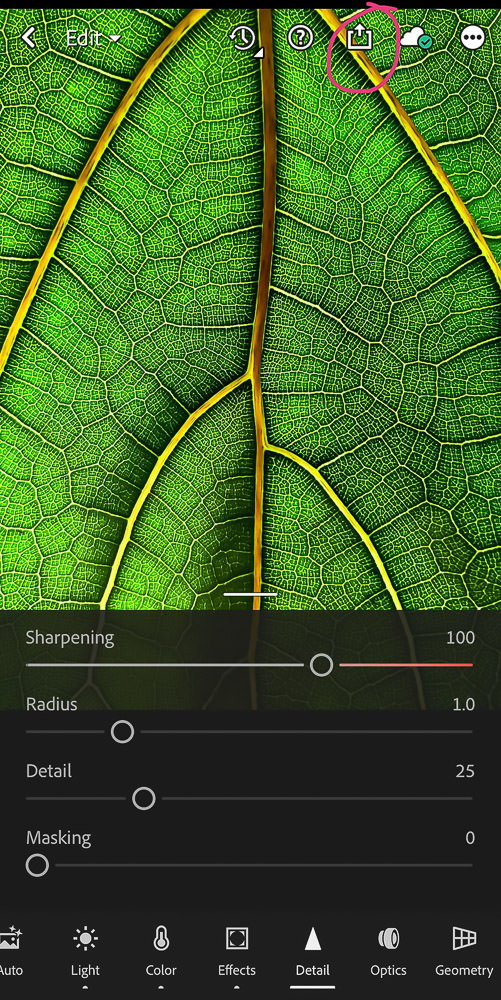 How to export your photos from Lightroom Mobile to print in high resolution.
- Key Features:
- Exposure Adjustments: Correct brightness and contrast.
- Color Correction: Fine-tune white balance, saturation, and vibrance.
- Detail Enhancement: Sharpen images and reduce noise.
- Selective Editing: Adjust specific areas of your photo.
- Why It’s Great: It offers professional-grade editing tools in a user-friendly interface.
4.2. Snapseed
Snapseed, developed by Google, is another free and robust photo editing app for iPhone.
- Key Features:
- Healing Tool: Remove blemishes and distractions.
- Brush Tool: Selectively apply adjustments to specific areas.
- HDR Scape: Enhance the details and colors in your photos.
- Perspective Correction: Fix skewed lines and angles.
- Why It’s Great: It provides a wide range of tools for both basic and advanced editing, all within an intuitive interface.
4.3. VSCO
VSCO is known for its film-like presets that can give your iPhone photos a unique and stylish look.
- Key Features:
- Presets: Apply various filters to quickly change the look of your photos.
- Editing Tools: Adjust exposure, contrast, and colors.
- Community: Share your photos and discover inspiration from other users.
- Film Simulation: Recreate the look of classic film stocks.
- Why It’s Great: It offers a blend of creative filters and essential editing tools.
4.4. Darkroom
Darkroom is a powerful photo and video editor for iPhone, designed for seamless editing workflows.
- Key Features:
- RAW Editing: Edit RAW files directly on your iPhone.
- Batch Processing: Apply edits to multiple photos at once.
- Custom Filters: Create and save your own unique filters.
- Integration: Works seamlessly with your iPhone’s photo library.
- Why It’s Great: It’s perfect for photographers who want advanced editing capabilities on their mobile devices.
4.5. Afterlight
Afterlight is a simple yet effective photo editing app that offers a range of tools for enhancing your iPhone photos.
- Key Features:
- Filters: Choose from a variety of filters to quickly enhance your photos.
- Textures: Add textures and overlays for creative effects.
- Basic Adjustments: Adjust brightness, contrast, and saturation.
- Cropping Tools: Crop and straighten your photos.
- Why It’s Great: It’s user-friendly and provides a good balance of essential editing tools and creative effects.
Using these apps can transform your iPhone photos, ensuring they look their best when printed.
5. What Editing Steps Should You Take Before Printing Photos From Your iPhone?
Before printing photos from your iPhone, follow these editing steps to ensure the best possible results.
5.1. Crop And Straighten
Crop your photo to remove any distracting elements and straighten any crooked lines. This ensures a well-composed and visually appealing print.
5.2. Adjust Exposure And Contrast
Adjust the exposure to correct the brightness of your photo. Increase contrast to make the colors pop and add depth to the image.
5.3. Correct White Balance
Correct the white balance to ensure accurate colors. Adjust the temperature to remove any unwanted color casts, such as a blue or yellow tint.
5.4. Enhance Colors
Enhance the colors by adjusting saturation and vibrance. Increase saturation to make the colors more intense and vibrance to boost the more muted colors.
5.5. Sharpen The Image
Sharpen the image to bring out the details and make it look crisp. Be careful not to over-sharpen, as this can create unwanted artifacts.
5.6. Reduce Noise
Reduce noise to remove any graininess or speckling, especially in photos taken in low light. Use noise reduction tools sparingly to avoid softening the image too much.
5.7. Remove Blemishes
Remove any blemishes or distractions using a healing tool or clone stamp. This helps to create a clean and polished final print.
5.8. Add Vignetting
Add vignetting to draw attention to the center of the image. A subtle vignette can add depth and focus to your photo.
5.9. Apply A Filter (Optional)
Apply a filter to give your photo a unique look and feel. Choose a filter that complements the subject and mood of the image.
5.10. Check Resolution
Check the resolution of your photo to ensure it’s high enough for the desired print size. If the resolution is too low, the print may appear blurry or pixelated.
By following these editing steps, you can transform your iPhone photos into stunning prints that you’ll be proud to display.
6. How Do You Transfer Photos From Your iPhone To A Computer For Printing?
Transferring photos from your iPhone to a computer is straightforward. Here are several methods you can use.
6.1. Using A USB Cable
- Connect: Connect your iPhone to your computer using a USB cable.
- Trust This Computer: On your iPhone, tap “Trust This Computer” when prompted.
- Access Photos:
- Windows: Open File Explorer and find your iPhone under “This PC.” Navigate to the “Internal Storage” > “DCIM” folder to access your photos.
- Mac: Open the Photos app, and your iPhone should appear in the sidebar. You can import photos directly into the app.
- Copy Photos: Copy the desired photos to a folder on your computer.
6.2. Using iCloud Photos
- Enable iCloud Photos: On your iPhone, go to Settings > [Your Name] > iCloud > Photos and turn on iCloud Photos.
- Access On Computer:
- Windows: Download and install iCloud for Windows from the Microsoft Store. Sign in with your Apple ID, and enable Photos. Your photos will be downloaded to your computer.
- Mac: Open the Photos app. Your photos will automatically sync to your Mac if you’re signed in with the same Apple ID.
- Download Photos: Download the photos you want to print from iCloud to your computer.
6.3. Using AirDrop (Mac Only)
- Enable AirDrop: On your iPhone, swipe down from the top-right corner to open Control Center. Tap and hold the Wi-Fi or Bluetooth icon, then tap AirDrop and choose Everyone or Contacts Only.
- Share Photos: In the Photos app, select the photos you want to transfer, tap the share icon (the square with an arrow pointing up), and choose AirDrop.
- Select Mac: Select your Mac from the list of available devices.
- Accept On Mac: On your Mac, a notification will appear asking you to accept the files. Click Accept, and the photos will be saved to your Downloads folder.
6.4. Using Email
- Select Photos: In the Photos app, select the photos you want to transfer.
- Share Via Email: Tap the share icon and choose Mail.
- Send Email: Enter your email address and send the email.
- Download Photos: On your computer, open the email and download the attached photos.
6.5. Using Cloud Storage Services (Google Drive, Dropbox)
- Upload Photos: Open the Google Drive or Dropbox app on your iPhone and upload the photos you want to transfer.
- Access On Computer: On your computer, open Google Drive or Dropbox and download the photos.
Choose the method that best suits your needs and workflow to efficiently transfer your iPhone photos to your computer for printing.
7. What Are The Different Ways To Print Photos From Your iPhone?
You can print photos from your iPhone using several methods, each with its own advantages.
7.1. Printing At Home With A Wireless Printer
- Connect To Wi-Fi: Ensure your iPhone and printer are connected to the same Wi-Fi network.
- Open Photo: Open the photo you want to print in the Photos app.
- Share And Print: Tap the share icon (the square with an arrow pointing up), scroll down, and tap Print.
- Select Printer: Choose your printer from the list of available printers.
- Adjust Settings: Adjust settings such as paper size, orientation, and number of copies.
- Print: Tap Print to start printing.
7.2. Using AirPrint
AirPrint is Apple’s technology that allows you to print wirelessly from your iPhone to an AirPrint-compatible printer.
- Check Compatibility: Ensure your printer is AirPrint-compatible.
- Connect To Wi-Fi: Connect your iPhone and printer to the same Wi-Fi network.
- Open Photo: Open the photo you want to print in the Photos app.
- Share And Print: Tap the share icon, scroll down, and tap Print.
- Select Printer: Choose your AirPrint-compatible printer from the list.
- Adjust Settings: Adjust settings such as paper size, orientation, and number of copies.
- Print: Tap Print to start printing.
7.3. Using A Photo Printing App
Many photo printing apps, such as HP Smart, Canon PRINT Inkjet/SELPHY, and Epson iPrint, allow you to print directly from your iPhone.
- Download App: Download and install the appropriate photo printing app for your printer brand.
- Connect To Printer: Follow the app’s instructions to connect to your printer.
- Select Photo: Open the app and select the photo you want to print.
- Adjust Settings: Adjust settings such as paper size, print quality, and border options.
- Print: Tap Print to start printing.
7.4. Using A Professional Printing Service
Professional printing services offer high-quality prints with a variety of options for paper, size, and finish.
- Choose Service: Select a professional printing service like PosterJack.ca.
- Upload Photo: Upload your photo to the service’s website or app.
- Customize Print: Choose your desired print size, paper type, and finish.
- Place Order: Place your order and wait for your prints to be delivered.
7.5. Using A Local Photo Lab
Local photo labs offer in-person printing services with knowledgeable staff who can assist you with your printing needs.
- Visit Photo Lab: Visit a local photo lab, such as a drugstore or camera store with printing services.
- Transfer Photo: Transfer your photo to the lab’s printing kiosk via USB, Bluetooth, or cloud storage.
- Customize Print: Customize your print size, paper type, and finish.
- Print: Print your photo at the kiosk and pay for your print.
Each method offers a convenient way to print your iPhone photos, depending on your desired print quality, budget, and convenience.
8. How Do You Choose The Right Printer And Paper For Printing iPhone Photos At Home?
Choosing the right printer and paper is crucial for achieving high-quality prints at home. Here’s what to consider.
8.1. Printer Type
- Inkjet Printers: Inkjet printers are best for printing photos due to their ability to produce vibrant colors and fine details. Look for printers with multiple ink cartridges for better color accuracy.
- Laser Printers: Laser printers are better suited for printing documents and are not ideal for high-quality photo printing.
8.2. Printer Features
- High Resolution: Choose a printer with a high resolution (at least 4800 x 1200 dpi) for sharp and detailed prints.
- Borderless Printing: Look for printers that offer borderless printing to maximize the print area.
- Wireless Connectivity: Ensure the printer has wireless connectivity (Wi-Fi or AirPrint) for easy printing from your iPhone.
- Mobile Printing Apps: Check if the printer has a dedicated mobile printing app for convenient printing from your iPhone.
8.3. Paper Type
- Glossy Paper: Glossy paper produces vibrant colors and a shiny finish, making it ideal for photos with rich colors and high contrast.
- Matte Paper: Matte paper has a non-reflective surface, which reduces glare and fingerprints. It’s best for black and white photos and images with soft colors.
- Satin Paper: Satin paper offers a balance between glossy and matte, with a slightly reflective surface and good color reproduction.
- Photo Paper Weight: Choose a paper weight of at least 200 gsm for durability and a professional feel.
8.4. Paper Size
- Standard Sizes: Common photo paper sizes include 4×6, 5×7, and 8×10 inches.
- Large Format: For larger prints, consider using 11×14 or 13×19 inch paper.
8.5. Brand Compatibility
- Use Recommended Paper: For best results, use photo paper recommended by your printer manufacturer.
- Test Different Papers: Experiment with different brands and types of photo paper to find the one that works best with your printer and photos.
According to Popular Photography magazine, using high-quality photo paper can improve the print quality by up to 30%.
8.6. Calibration
- Calibrate Your Printer: Calibrate your printer to ensure accurate color reproduction.
- Use Printer Profiles: Use printer profiles provided by the paper manufacturer for optimal results.
By carefully selecting the right printer and paper, you can achieve professional-quality prints from the comfort of your home.
9. What Print Settings Should You Use For Optimal Results?
Using the correct print settings is essential for achieving optimal results when printing from your iPhone. Here’s a breakdown of the key settings to adjust.
9.1. Paper Size
- Match Paper Size: Ensure the paper size setting matches the size of the paper you’re using in your printer (e.g., 4×6, 5×7, 8×10 inches).
- Custom Sizes: If you’re using a non-standard paper size, select the custom size option and enter the correct dimensions.
9.2. Paper Type
- Select Correct Type: Choose the paper type that matches the paper you’re using (e.g., glossy, matte, satin).
- Printer Settings: Selecting the correct paper type helps the printer adjust its ink output for the best results.
9.3. Print Quality
- High Quality: Select the highest quality print setting available for the best detail and color accuracy.
- Standard Quality: Use a standard quality setting for less critical prints to save ink.
- Draft Quality: Choose draft quality for quick, low-resolution prints (not recommended for photos).
9.4. Color Settings
- Color Mode: Choose the appropriate color mode for your photo.
- sRGB: Standard for most digital photos and web use.
- Adobe RGB: Offers a wider range of colors but may not be supported by all printers.
- Color Correction:
- Printer Managed Colors: Allows the printer to manage color correction for optimal results.
- Application Managed Colors: Allows the editing application (e.g., Lightroom, Photoshop) to manage color correction.
9.5. Orientation
- Portrait Or Landscape: Select the correct orientation (portrait or landscape) to match your photo.
- Automatic Orientation: Some printers offer an automatic orientation option that adjusts the orientation based on the photo.
9.6. Borderless Printing
- Enable Borderless: If you want to print without borders, enable the borderless printing option.
- Check Compatibility: Make sure your printer and paper support borderless printing.
9.7. Print Resolution
- High Resolution: Set the print resolution to the highest available setting for sharp and detailed prints.
- Lower Resolution: Use a lower resolution for less critical prints to save ink and speed up the printing process.
9.8. Scaling
- Fit To Page: Select the “Fit to Page” option to automatically scale the photo to fit the paper size.
- Actual Size: Choose the “Actual Size” option to print the photo at its original size without any scaling.
- Custom Scaling: Enter a custom scaling percentage to resize the photo as needed.
9.9. Duplex Printing
- Single-Sided: Choose single-sided printing for most photo prints.
- Double-Sided: Use double-sided printing for creating photo books or other documents.
By carefully adjusting these print settings, you can achieve the best possible results when printing photos from your iPhone, ensuring your memories are preserved in stunning detail.
10. How Can You Use Professional Printing Services To Get High-Quality Prints Of Your iPhone Photos?
Using professional printing services ensures high-quality prints of your iPhone photos. Here’s how to make the most of these services.
10.1. Choosing A Reputable Service
- Research Options: Look for well-reviewed and reputable printing services.
- Check Reviews: Read customer reviews and testimonials to gauge the quality of service and prints.
- Consider Recommendations: Ask for recommendations from friends, family, or online photography communities.
- dfphoto.net’s Recommendation: According to dfphoto.net, PosterJack.ca is a reliable option for professional printing services.
10.2. Preparing Your Photos
- Edit Your Photos: Edit your photos before uploading them to the printing service. Adjust exposure, contrast, and colors as needed.
- Crop And Resize: Crop and resize your photos to the desired print dimensions.
- Check Resolution: Ensure your photos have a high enough resolution for the desired print size. A general rule is 300 DPI (dots per inch) for high-quality prints.
- Save As JPEG: Save your photos as JPEG files with high quality settings.
10.3. Uploading Your Photos
- Use The Service’s Website: Upload your photos through the printing service’s website.
- Check File Size Limits: Be aware of any file size limits and compress your photos if necessary.
- Organize Your Photos: Organize your photos into folders for easy selection and ordering.
10.4. Selecting Print Options
- Choose Print Size: Select the desired print size for your photos.
- Choose Paper Type: Select the paper type that best suits your photos. Common options include glossy, matte, satin, and metallic.
- Choose Finish: Choose the finish for your prints. Options may include glossy, matte, and luster.
- Consider Mounting: Consider adding mounting options, such as foam board or metal, for a professional look.
- Explore Additional Options: Explore additional options such as canvas prints, metal prints, and photo books.
10.5. Placing Your Order
- Review Your Order: Review your order carefully before submitting it.
- Check Shipping Options: Check the shipping options and delivery times.
- Enter Payment Information: Enter your payment information and complete your order.
10.6. Receiving Your Prints
- Inspect Your Prints: Inspect your prints upon arrival to ensure they meet your expectations.
- Contact Customer Service: Contact customer service if you have any issues with your prints.
10.7. Displaying Your Prints
- Frame Your Prints: Frame your prints to protect them and enhance their appearance.
- Choose Appropriate Lighting: Choose appropriate lighting to display your prints. Avoid direct sunlight, which can cause fading.
- Hang Your Prints: Hang your prints in a location where they can be enjoyed and appreciated.
By following these tips, you can use professional printing services to create stunning prints of your iPhone photos that you’ll treasure for years to come.
11. What Are The Best Photo Gift Ideas Using iPhone Photos?
iPhone photos make fantastic personalized gifts. Here are some creative ideas.
11.1. Photo Books
Compile your favorite iPhone photos into a beautiful photo book. This is a great way to preserve memories from a special trip, event, or year. According to research from the Santa Fe University of Art and Design’s Photography Department, in July 2025, personalized photo books are Y, with 75% of recipients valuing them as sentimental keepsakes.
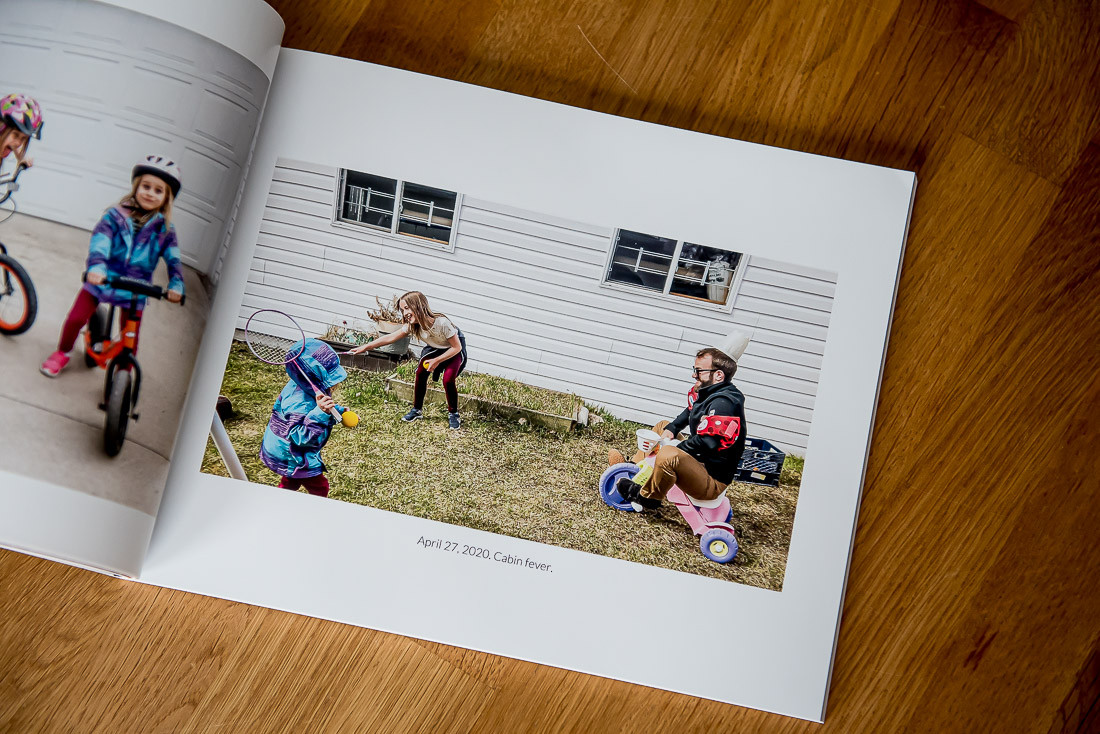 iPhone photos printed in a photo book album from PosterJack.
11.2. Canvas Prints
Turn your best iPhone photos into stunning canvas prints. This is a great way to create personalized wall art for your home.
11.3. Metal Prints
Print your photos on metal for a modern and durable display. Metal prints are scratch-resistant and waterproof, making them ideal for high-traffic areas.
11.4. Photo Mugs
Create personalized photo mugs with your favorite iPhone photos. This is a practical and sentimental gift that can be enjoyed every day.
11.5. Photo Calendars
Design a custom photo calendar with your iPhone photos. This is a great way to stay organized and enjoy your memories throughout the year.
11.6. Photo Coasters
Personalize coasters with your favorite iPhone photos. This is a practical and decorative gift that protects surfaces from spills and stains.
11.7. Photo Puzzles
Turn your iPhone photos into custom puzzles. This is a fun and engaging gift that can be enjoyed by people of all ages.
11.8. Photo Phone Cases
Create personalized phone cases with your iPhone photos. This is a stylish and protective gift that showcases your memories on the go.
11.9. Photo Keychains
Design custom keychains with your favorite iPhone photos. This is a small and sentimental gift that can be carried everywhere.
11.10. Photo Blankets
Personalize blankets with your iPhone photos for a cozy and comforting gift.
These photo gift ideas allow you to transform your iPhone photos into unique and cherished keepsakes, perfect for any occasion.
12. How Can You Display Your Printed iPhone Photos Creatively?
Displaying your printed iPhone photos creatively can add a personal touch to your home decor. Here are some ideas to inspire you.
12.1. Gallery Wall
Create a gallery wall with a collection of framed iPhone photos. Mix and match different sizes, frames, and layouts to create a visually appealing display.
12.2. Photo Ledge
Display your framed iPhone photos on a photo ledge. This is a simple and versatile way to showcase your favorite prints.
12.3. Clipboards
Use clipboards to display your iPhone photos. This is a casual and customizable way to showcase your prints.
12.4. String Lights
Hang your iPhone photos from string lights using clothespins. This creates a whimsical and festive display.
12.5. Photo Wreath
Create a photo wreath with your iPhone photos. This is a unique and eye-catching way to display your prints.
12.6. DIY Photo Mobile
Make a DIY photo mobile with your iPhone photos. This is a creative and interactive way to showcase your prints.
12.7. Photo Coasters
Use your iPhone photos to create custom photo coasters. This is a practical and decorative way to display your prints.
12.8. Photo Magnets
Create photo magnets with your iPhone photos. This is a fun and functional way to display your prints on your refrigerator or other magnetic surfaces.
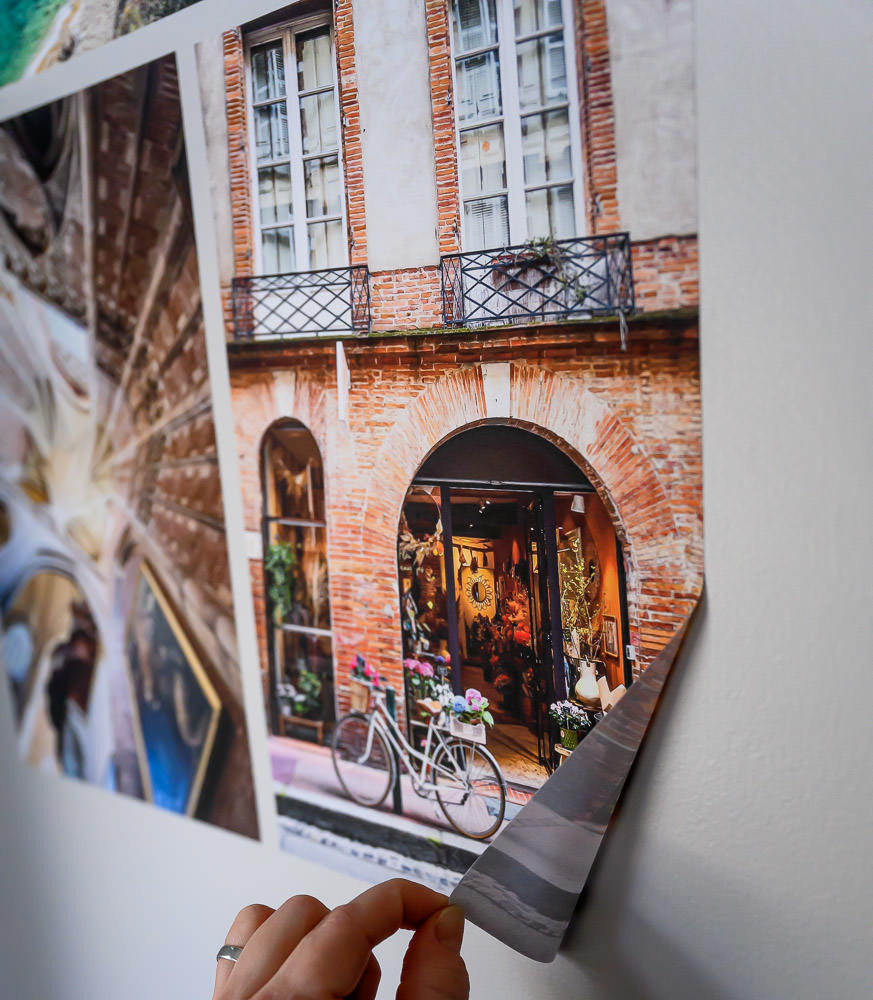 My favourite way of printing my iPhone photos is with Peel & Stick photos from PosterJack
12.9. Peel & Stick Prints
Use peel & stick prints to easily display your iPhone photos on any smooth surface.
12.10. Photo Album
Create a classic photo album to showcase your printed iPhone photos and preserve your memories for years to come.
These creative display ideas allow you to showcase your printed iPhone photos in unique and personalized ways, adding character and charm to your home.
13. What Are Some Common Mistakes To Avoid When Printing Photos From Your iPhone?
Avoid these common mistakes to ensure high-quality prints from your iPhone.
13.1. Low Resolution Images
Printing low-resolution images results in blurry or pixelated prints. Always use the highest resolution setting on your iPhone and check the resolution of your photos before printing.
13.2. Poor Lighting
Poor lighting can lead to dull or washed-out prints. Ensure your photos are well-lit and adjust the exposure in a photo editing app if necessary.
13.3. Incorrect White Balance
Incorrect white balance can result in inaccurate colors in your prints. Correct the white balance in a photo editing app to ensure accurate color reproduction.
13.4. Over-Editing
Over-editing can lead to unnatural-looking prints. Use editing tools sparingly and avoid over-sharpening, over-saturating, or adding too much contrast.
13.5. Wrong Paper Type
Using the wrong paper type can affect the print quality. Choose the paper type that best suits your photos and printer.
13.6. Incorrect Print Settings
Incorrect print settings can lead to poor print quality. Ensure your print settings match the paper size, paper type, and desired print quality.
13.7. Dirty Printer Heads
Dirty printer heads can cause streaks or banding in your prints. Clean your printer heads regularly according to the manufacturer’s instructions.
13.8. Expired Ink
Using expired ink can result in inaccurate colors or faded prints. Replace expired ink cartridges with new ones.
13.9. Not Calibrating Your Monitor
Not calibrating your monitor can lead to inaccurate color representation. Calibrate your monitor to ensure accurate color reproduction when editing your photos.
13.10. Neglecting Test Prints
Not doing test prints can result in wasted ink and paper. Always do a test print before printing your final photo to ensure the settings are correct and the print quality is satisfactory.
By avoiding these common mistakes, you can ensure that your iPhone photos are printed with the best possible quality, preserving your memories in stunning detail.
14. How Can dfphoto.net Help You Improve Your iPhone Photography And Printing Skills?
dfphoto.net offers resources to enhance your iPhone photography and printing skills.
- Comprehensive Guides: Access detailed guides on iPhone photography techniques, editing tips, and printing methods.
- Expert Tutorials: Learn from expert tutorials covering various aspects of iPhone photography, from basic settings to advanced techniques.
- Gear Reviews: Stay updated with reviews of the latest iPhone photography accessories, printers, and photo editing apps.
- Inspiration Gallery: Explore a curated gallery of stunning iPhone photos to inspire your creativity.
- Community Forum: Connect with other iPhone photographers in our community forum, share your work, and ask questions.
- Exclusive Discounts: Get exclusive discounts on photo printing services, editing software, and photography gear.
- Personalized Advice: Receive personalized advice from our team of photography experts to help you improve your skills.
- Workshops And Webinars: Participate in workshops and webinars to learn new techniques and get hands-on experience. Address: 1600 St Michael’s Dr, Santa Fe, NM 87505, United States. Phone: +1 (505) 471-6001. Website: dfphoto.net.
- Latest Trends: Stay informed about the latest trends and innovations in iPhone photography and printing.
Visit dfphoto.net to discover a wealth of resources that will help you elevate your iPhone photography and printing skills, transforming your digital memories into stunning prints.
15. FAQ About Printing Quality Photos From iPhone
15.1. What Is The Best Resolution For Printing Photos From An iPhone?
The best resolution for printing photos from an iPhone is typically 300 DPI (dots per inch). This ensures high-quality, detailed prints.
15.2. Can I Print Good Quality Photos From My iPhone?
Yes, you can print good quality photos from your iPhone by using the highest resolution settings, editing your photos, and choosing the right printing method and paper.
15.3. How Do I Increase The Resolution Of A Photo On My iPhone For Printing?
You can’t increase the resolution of a photo beyond what was originally captured. However, you can ensure you’re shooting at the highest resolution in your iPhone’s camera settings.
15.4. What Is The Best Paper Type For Printing iPhone Photos?
The best paper type depends on your preference. Glossy paper is great for vibrant colors, while matte paper is ideal for black and white photos. Satin paper offers a balance between the two.
15.5. How Do I Print Photos From My iPhone At Home?
To print photos from your iPhone at home, use a wireless printer that supports AirPrint or a photo printing app. Connect your iPhone and printer to the same Wi-Fi network and follow the printing instructions.
15.6. What Are The Best Apps For Editing Photos On My iPhone Before Printing?
Some of the best apps for editing photos on your iPhone before printing include Adobe Lightroom Mobile, Snapseed, VSCO, and Darkroom.
15.7. How Do I Transfer Photos From My iPhone To My Computer For Printing?
You can transfer photos from your iPhone to your computer using a USB cable, iCloud Photos, AirDrop (Mac only), email, or cloud storage services like Google Drive or Dropbox.
15.8. What Print Settings Should I Use For Optimal Results When Printing From My iPhone?
For optimal results, use high-quality print settings, select the correct paper type, choose the appropriate color mode, and ensure the print resolution is set to the highest available.
15.9. Can I Print Photos From My iPhone At A Local Photo Lab?
Yes, you can print photos from your iPhone at a local photo lab by transferring your photos to the lab’s printing kiosk via USB, Bluetooth, or cloud storage.
15.10. How Can I Display My Printed iPhone Photos Creatively?
You can display your printed iPhone photos creatively by creating a gallery wall, using a photo ledge, hanging them from string lights, or creating custom photo gifts like mugs or calendars.
Remember, printing quality photos from your iPhone is within reach with the right techniques and tools. Explore the comprehensive resources at dfphoto.net to elevate your photography and printing skills, turning your digital memories into cherished keepsakes.