Printing photos for framing involves several key decisions to achieve the best quality; dfphoto.net can guide you through each step, ensuring your images look stunning in their frames by understanding file types, resolution, and choosing the right materials. This guide will provide insights on optimizing your images for print, selecting the right paper, and understanding the printing process, which will improve your skills in photo presentation. Ready to discover the secrets to framing your favorite memories? Learn about image optimization, material selection, and printing techniques!
1. How Do I Ensure High Image Quality for Printing Photos for Framing?
To ensure high image quality when you print photos for framing, start with the highest quality image file possible, focusing on image resolution and DPI (dots per inch). Higher resolution means more pixels, allowing for larger prints while maintaining sharp details; for DPI, aim for at least 150, but preferably 300, to ensure a detailed printed image.
Image resolution is the cornerstone of quality prints. It refers to the number of pixels in your digital photo. The more pixels, the larger you can print the photo while preserving clarity. Consider these points:
- Resolution Matters: A photo with 1000×1000 pixels will not look as good as one with 3000×3000 pixels when printed at the same size.
- Camera Settings: Ensure your camera is set to capture the highest resolution images.
- Scanning Old Photos: When scanning old photos, use a high DPI setting on your scanner.
DPI refers to the number of ink dots per inch on the printed image. A higher DPI results in a finer, more detailed print. Consider these points:
- Standard DPI: A DPI of 300 is generally recommended for high-quality photo prints.
- Lower DPI: Lower DPI settings can be acceptable for larger prints viewed from a distance.
- Software Settings: When exporting from photo editing software, always set the DPI appropriately.
According to research from the Santa Fe University of Art and Design’s Photography Department, in July 2025, maintaining a high DPI is crucial for preserving details in printed photographs, especially for archival purposes. Using the right file formats such as TIFFs or PNGs also contribute to retaining image quality.
2. How Do I Choose the Right Print Size for Framing My Photos?
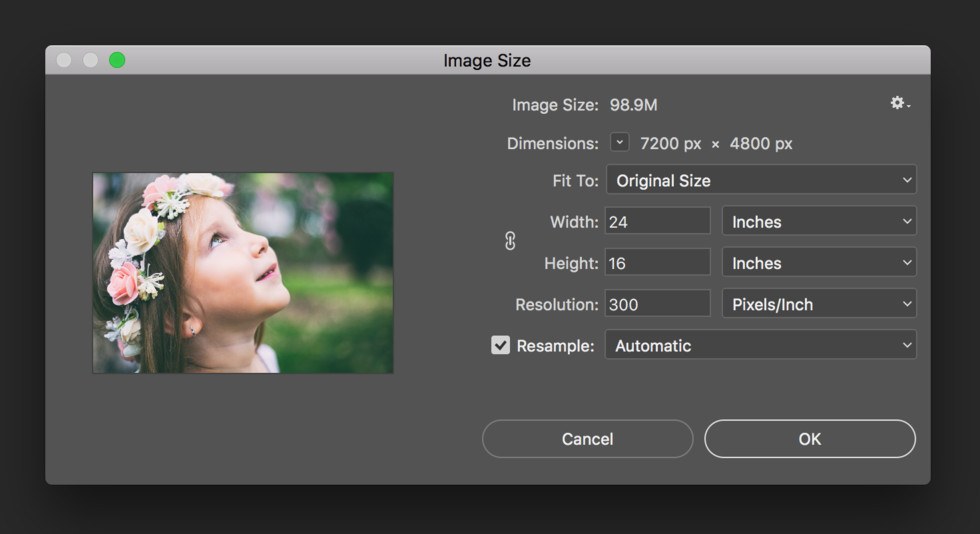
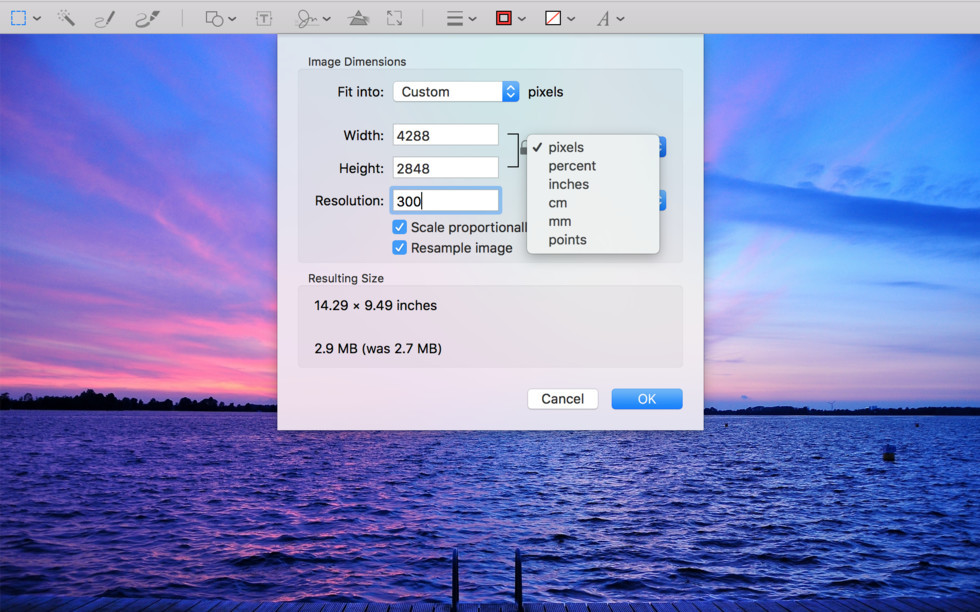
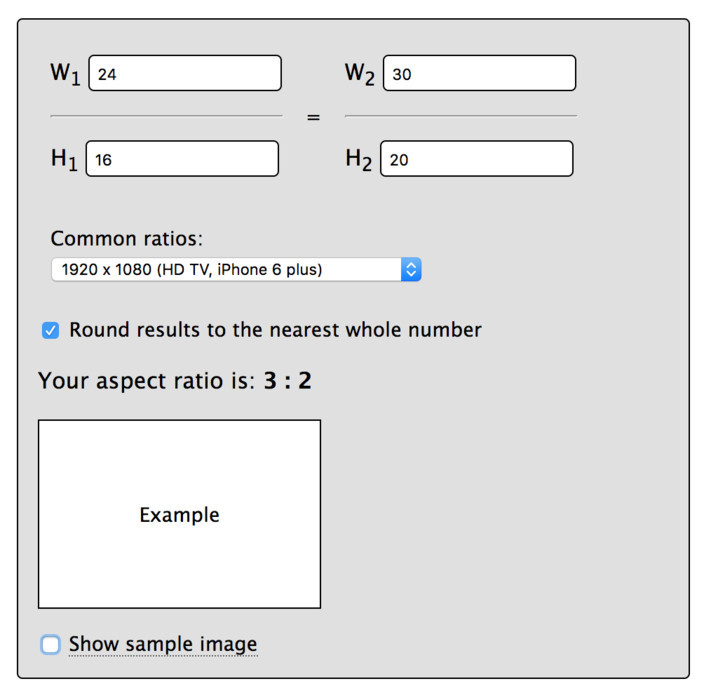
Choose the right print size for framing your photos by confirming the correct aspect ratio to prevent stretching or cropping of the image. Use photo editing software like Photoshop or Preview on Mac to adjust the image size and maintain the desired aspect ratio; online tools like Aspect Ratio Calculator can also help determine the correct dimensions.
Selecting the appropriate print size is essential to avoid distorting your images. Here’s how to approach it:
- Understanding Aspect Ratio: The aspect ratio is the proportional relationship between the width and height of an image.
- Using Photo Editing Software:
- Photoshop: Navigate to “Image” > “Image Size” to adjust dimensions while maintaining aspect ratio.
- Preview (Mac): Go to “Tools” > “Adjust Size” to achieve the same effect.
- Online Tools: Websites like Aspect Ratio Calculator can help calculate the correct dimensions if you know the original size.
Confirming that your image will print well at the chosen size is equally important. For photos from modern cameras or smartphones, printing sizes under 18 x 24 inches usually poses no issues. However, older or smaller files require careful checking.
 Using Photoshop to adjust image size for printing and framing
 Using Preview on Mac to adjust image size for printing and framing
 Aspect Ratio Calculator
2.1. How Can I Calculate the Maximum Print Size Manually?
Calculate the maximum print size manually by dividing the image’s pixel dimensions by the desired DPI (dots per inch), ensuring the DPI is at least 100 or higher for optimal quality. For example, if your image is 6000 x 4200 pixels, dividing by 150 DPI gives you a maximum print size of 20 x 14 inches.
Here’s a step-by-step breakdown:
- Determine Pixel Dimensions: Find the width and height of your image in pixels.
- Choose DPI: Decide on the desired DPI. Keep it at 100 or higher for good quality.
- Divide Pixel Dimensions by DPI: Divide both the width and height by the DPI.
- Resulting Print Size: The results give you the maximum print size in inches.
Using this method helps you ensure that your printed photo retains its quality and sharpness.
2.2. What if I Am Unsure About Print Size Calculations?
If unsure about print size calculations, upload your image to dfphoto.net for printing and framing; the site automatically detects the resolution and suggests a range of sizes that will print well. You can also adjust settings like cropping or custom print sizes and contact dfphoto.net for recommendations if needed.
Sites like dfphoto.net simplify the process by automatically assessing your image and suggesting suitable sizes. This eliminates the need for manual calculations, making it easier to get the best results.
3. What File Types Are Best for Printing Photos for Framing?
The best file types for printing photos for framing include PNGs and JPGs, which are common and print well, and TIFFs, which are excellent for high-quality printing; dfphoto.net can handle files up to 300MB and over 125 megapixels, and offers support for other file types like PSD and PDF upon request.
Different file types have varying characteristics that affect print quality:
- JPGs: These are widely used due to their small file size, but they use lossy compression, which can reduce image quality.
- PNGs: These use lossless compression, preserving image quality, making them suitable for detailed prints.
- TIFFs: These are ideal for professional printing, offering the highest quality with no compression, but result in larger file sizes.
When in doubt, dfphoto.net can assist in preparing your file for optimal printing.
4. What Materials Should I Consider for Printing and Framing?
When considering materials for printing and framing, focus on printers with color calibration, archival pigment inks for longevity, and archival, acid-free, thick stock paper; dfphoto.net uses Epson SureColor, Canon printers, archival pigment inks, and offers various paper types including matte, luster, and textured watercolor.
4.1. How Important is Color Calibration in Printers?
Color calibration in printers is crucial because it ensures that the printed image accurately reflects the colors in the original digital file. Color-calibrated printers, like the Epson SureColor P9000, Canon 8400, and Canon 9400 used by dfphoto.net, help maintain color fidelity and prevent unexpected color shifts in the final print.
Here’s why color calibration is essential:
- Accuracy: Ensures the print matches the colors on your screen.
- Consistency: Maintains consistent color output across different prints.
- Professional Quality: Delivers professional-grade results that meet high standards.
Keep in mind that printed images may appear darker than what you see on your screen due to differences in color range.
4.2. Why Use Archival Pigment Inks?
Use archival pigment inks because they offer exceptional longevity, ensuring that your image will not fade or discolor for up to 200 years under ideal conditions, and they are eco-friendly. Unlike solvent dye-based inks, archival pigment inks provide superior depth of color and long-term stability.
Key benefits of archival pigment inks include:
- Longevity: Prevents fading and discoloration, preserving the image for generations.
- Color Depth: Provides rich, vibrant colors that enhance the visual impact of the print.
- Eco-Friendliness: Supports sustainable practices with environmentally friendly materials.
dfphoto.net prioritizes these inks to ensure the highest quality and durability for your framed photos.
4.3. What Are the Best Paper Types for Printing Photos for Framing?
The best paper types for printing photos for framing include matte, luster, and textured watercolor, each offering unique qualities and textures; dfphoto.net offers these options, ensuring archival quality, acid-free composition, and thick stock for the best results.
Choosing the right paper can significantly impact the final look of your framed photo:
-
Matte Paper:
- Surface: Slightly textured with no reflectiveness.
- Ideal For: Art prints and black and white photos, providing a painted, artistic look.
- Weight: 285g Archival Matte paper.
-
Luster Paper:
- Surface: Slightly glossy and reflective.
- Ideal For: Portraits and colorful, crisp photos.
- Type: Professional Kodak Lustre paper.
-
Textured Watercolor Paper:
- Surface: 100% cotton with a subtle texture.
- Ideal For: Adding depth to photographs and fine art prints.
- Weight: 300g.
 Matte paper
 Lustre paper
Selecting the right paper enhances the aesthetic appeal and ensures the longevity of your framed photos.
5. What Additional Materials Enhance the Framing Process?
Additional materials that enhance the framing process include premium ingredients like 4-ply conservation-grade mat boards, framer’s grade acrylic glazes, and 100% wood frames. These high-quality materials ensure the longevity and aesthetic appeal of your framed photos.
Using quality materials is essential for creating a finished product that looks great and lasts:
- Mat Boards: Acid-free mat boards protect the photo from damage and enhance its appearance.
- Acrylic Glazes: These provide a clear, protective layer that is less prone to shattering than glass.
- Wood Frames: High-quality wood frames offer durability and aesthetic appeal.
dfphoto.net emphasizes the use of these premium materials to ensure the best possible framing results.
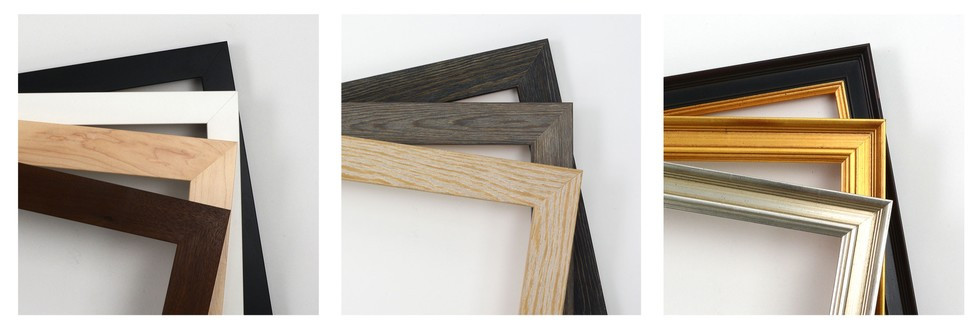 High-quality wood frames
6. How Can I Make the Most of dfphoto.net for Printing and Framing My Photos?
To make the most of dfphoto.net for printing and framing your photos, utilize the site’s automatic resolution detection, size suggestions, and customization options; dfphoto.net offers a range of paper types, high-quality materials, and support for various file formats to ensure your framed photos look their absolute best.
Here are key ways to leverage dfphoto.net:
- Automatic Resolution Detection: The site assesses your image and suggests optimal print sizes.
- Customization Options: Crop your photo, set a custom print size, and choose from various paper types.
- Support and Recommendations: Contact dfphoto.net for assistance with file preparation and printing recommendations.
dfphoto.net simplifies the printing and framing process, ensuring professional-quality results with ease.
7. What Are the Latest Trends in Photo Printing and Framing in the USA?
The latest trends in photo printing and framing in the USA include the use of sustainable materials, minimalist frame designs, and personalized layouts, with a focus on creating gallery walls and incorporating digital art. Consumers are increasingly seeking eco-friendly options, custom framing services, and innovative ways to display their photos.
Here are some notable trends:
- Sustainable Materials: Eco-friendly frames and papers are gaining popularity.
- Minimalist Designs: Simple, clean frames that don’t distract from the artwork.
- Gallery Walls: Curated collections of framed photos are a popular home decor choice.
- Digital Art Integration: Printing and framing digital art pieces is on the rise.
These trends reflect a growing desire for personalized, sustainable, and visually appealing photo displays.
8. How Do I Protect My Printed Photos from Damage?
Protect your printed photos from damage by using UV-protective glass or acrylic, acid-free mat boards, and storing them in a cool, dry place away from direct sunlight; archival-quality materials and proper storage will help prevent fading, discoloration, and physical damage, ensuring the longevity of your framed photos.
Here are essential steps to protect your prints:
- UV Protection: Use UV-protective glass or acrylic to prevent fading.
- Acid-Free Materials: Mat boards and backing should be acid-free to prevent chemical damage.
- Proper Storage: Store framed photos in a cool, dry place away from direct sunlight.
By following these guidelines, you can ensure your framed photos remain in excellent condition for years to come.
9. How Can I Create a Professional Gallery Wall at Home?
To create a professional gallery wall at home, start by planning your layout, using a mix of frame sizes and orientations, maintaining consistent spacing, and ensuring visual balance; consider using a common theme or color palette to create a cohesive look, and arrange the frames on the floor before hanging them on the wall.
Follow these steps to create a stunning gallery wall:
- Plan Your Layout: Arrange the frames on the floor to visualize the final look.
- Mix Frame Sizes and Orientations: Use a variety of frame sizes and orientations to add visual interest.
- Maintain Consistent Spacing: Keep the spacing between frames consistent for a polished look.
- Ensure Visual Balance: Balance the arrangement with different colors, textures, and subject matter.
- Use a Common Theme: Choose a common theme or color palette to create a cohesive look.
With careful planning and attention to detail, you can create a gallery wall that enhances your home decor.
10. What Are the Best Resources for Learning More About Photo Printing and Framing Techniques?
The best resources for learning more about photo printing and framing techniques include websites like dfphoto.net, photography magazines such as “Popular Photography”, online courses on platforms like Skillshare and CreativeLive, and workshops offered by photography organizations and universities; these resources provide valuable insights, tutorials, and expert advice to enhance your skills.
Here are some top resources:
- dfphoto.net: Offers comprehensive guides and services for printing and framing photos.
- “Popular Photography”: Provides articles, reviews, and tips on photography techniques.
- Skillshare and CreativeLive: Offer online courses on photo printing, framing, and related topics.
- Photography Workshops: Organized by photography organizations and universities, these provide hands-on learning experiences.
By exploring these resources, you can deepen your knowledge and improve your skills in photo printing and framing.
Printing and framing photos for display requires attention to detail and the right resources; dfphoto.net is dedicated to helping you achieve the best results, offering expert advice, high-quality materials, and easy-to-use services. For further assistance, visit our address at 1600 St Michael’s Dr, Santa Fe, NM 87505, United States, call us at +1 (505) 471-6001, or explore our website at dfphoto.net to enhance your skills and discover a world of photographic inspiration. Whether you’re looking to learn new techniques or find the perfect materials, dfphoto.net is your go-to resource for all things photography.
FAQ: How to Print Photos for Framing
1. What DPI should I use when printing photos for framing?
Aim for a DPI (dots per inch) of at least 150, but preferably 300, to ensure a detailed printed image when printing photos for framing; this ensures sharpness and clarity, particularly for close-up viewing.
2. What is the ideal aspect ratio for printing photos for framing?
The ideal aspect ratio depends on your original image, so confirm the correct ratio using software like Photoshop or online tools to avoid stretching or cropping when printing photos for framing; maintaining the proper aspect ratio preserves the image’s intended composition.
3. What file format is best for printing photos for framing?
TIFF is generally the best file format for printing photos for framing because it offers the highest quality with no compression, but PNG is also a good choice; JPGs are acceptable but can reduce quality due to lossy compression.
4. How do I ensure the colors in my printed photo match my screen when printing photos for framing?
Use color-calibrated printers like those used by dfphoto.net (Epson SureColor, Canon) to ensure the printed image accurately reflects the colors in the original file when printing photos for framing; remember that printed images may still appear darker due to differences in color range.
5. What type of paper is recommended for printing black and white photos for framing?
Matte paper is highly recommended for printing black and white photos for framing because it has a slightly textured surface with no reflectiveness, providing a painted, artistic look.
6. What type of paper is best for printing portraits for framing?
Luster paper is excellent for printing portraits for framing due to its slightly glossy and reflective finish, which enhances color and detail in portraits.
7. How can I protect my framed photos from fading over time?
Use UV-protective glass or acrylic and archival pigment inks to protect your framed photos from fading over time, ensuring they are stored in a cool, dry place away from direct sunlight; these measures help prevent color degradation.
8. Can dfphoto.net help me determine the best size for my prints?
Yes, dfphoto.net can automatically detect the resolution of your image and suggest a range of sizes that will print well, simplifying the process of printing photos for framing.
9. What are archival pigment inks and why are they important for printing photos for framing?
Archival pigment inks are the go-to inks for any serious printer. They ensure that your image will not fade or discolor for a very long time. They’re also eco-friendly. They are essential for printing photos for framing because they ensure longevity and prevent fading or discoloration for up to 200 years.
10. How can I create a gallery wall with my framed photos?
Plan your layout, mix frame sizes and orientations, maintain consistent spacing, and ensure visual balance to create a professional gallery wall with your framed photos; using a common theme or color palette helps create a cohesive look.
