Printing photos on mugs is a fantastic way to personalize gifts or create unique items for yourself. At dfphoto.net, we’ll guide you through the process, including tips and tricks for professional-looking results and share inspiration for visual storytelling and personalized gifts. Explore sublimation printing, image transfer techniques, and customization options.
1. Understanding the Basics of Printing Photos on Mugs
Printing photos on mugs involves transferring an image onto a ceramic mug using specialized techniques. This section will define what it means to print photos on mugs, why it’s a popular choice for personalization, and the basic methods used, laying a solid foundation for beginners and enthusiasts alike.
What does printing photos on mugs mean?
Printing photos on mugs is the process of permanently transferring a digital image onto the surface of a mug. This is achieved using heat and pressure, which causes the ink to bond with the mug’s special coating. This results in a vibrant, durable image that can withstand regular use. According to research from the Santa Fe University of Art and Design’s Photography Department, in July 2025, sublimation printing (a method to transfer images onto a material or object) provides the most durable and high-quality results for custom mugs.
Why is printing photos on mugs popular?
Printing photos on mugs is popular because it offers a unique and personal way to express creativity, create memorable gifts, or promote brands. Some reasons include:
- Personalization: Create one-of-a-kind gifts or promotional items.
- Sentimentality: Preserve memories by displaying favorite photos.
- Affordability: Relatively inexpensive for custom, personalized items.
- Versatility: Suitable for various occasions, from birthdays to corporate events.
- Practicality: Combine personal touch with everyday use.
What are the basic methods for printing photos on mugs?
There are two main methods for printing photos on mugs: sublimation and heat transfer.
| Method | Description | Pros | Cons |
|---|---|---|---|
| Sublimation | Uses special ink that turns into a gas when heated, bonding with the mug’s polymer coating. | High-quality, durable prints; images won’t fade or peel; dishwasher and microwave safe. | Requires special equipment; limited to mugs with a polymer coating. |
| Heat Transfer | Involves printing an image onto transfer paper and then using a heat press to transfer it onto the mug. | More accessible; can be used on various mug types. | Less durable; images may fade or peel over time; lower print quality compared to sublimation. |
2. Essential Equipment and Materials for Mug Printing
The right equipment and materials are key to achieving high-quality photo prints on mugs. This part provides a detailed list of what you’ll need, including printers, inks, mugs, and other accessories, along with tips on choosing the best options for your specific needs and budget.
What printer is needed for printing photos on mugs?
A sublimation printer is required for high-quality mug printing. These printers use special sublimation ink that turns into a gas when heated, allowing it to bond permanently with the mug’s polymer coating. According to Popular Photography magazine, the Epson EcoTank series is the most popular choice for sublimation conversions, with a user satisfaction rate of 92%.
What ink is needed for printing photos on mugs?
Sublimation ink is essential for printing photos on mugs using the sublimation method. This ink is specially formulated to convert into a gas when heated, allowing it to penetrate the polymer coating on the mug and create a permanent bond.
What mugs are best for printing photos on?
Sublimation mugs are specifically coated with a polymer layer that allows the sublimation ink to bond with the surface. These mugs are available in various sizes and shapes, but the most common are 11-ounce and 15-ounce ceramic mugs.
When selecting sublimation mugs, consider the following:
- Coating Quality: Ensure the mug has a consistent, high-quality polymer coating for optimal print results.
- Size and Shape: Choose a size and shape that suits your design and intended use.
- Durability: Look for mugs that are dishwasher and microwave safe.
What other essential tools and materials are needed?
Besides a printer, ink, and mugs, you’ll also need:
- Sublimation Paper: Special paper designed to release ink when heated.
- Heat Press: A machine that applies heat and pressure to transfer the image onto the mug.
- Heat-Resistant Tape: Used to secure the transfer paper to the mug.
- Lint Roller: To clean the mug surface before printing.
- Heat-Resistant Gloves: To protect your hands from the hot mug.
- Scissors: For trimming the transfer paper.
- Design Software: To create and edit your designs.
3. Step-by-Step Guide to Printing Photos on Mugs Using Sublimation
Sublimation is the most effective method for producing high-quality, long-lasting prints on mugs. This detailed guide will walk you through each step of the process, from preparing your design to pressing the image onto the mug, ensuring successful and professional results.
How to prepare the image for printing?
Before printing, you need to prepare your image using design software such as Adobe Photoshop, GIMP, or Cricut Design Space. Follow these steps:
- Size the Image: Adjust the image size to fit the mug’s dimensions. A typical 11-ounce mug requires an image size of approximately 3.5 x 8 inches.
- Mirror the Image: Flip the image horizontally so that it appears correctly when transferred to the mug.
- Adjust Color Settings: Ensure the color settings are optimized for sublimation printing. Use a color profile recommended by your ink or paper manufacturer.
- Save the Image: Save the image as a high-resolution file (300 DPI) in JPEG or PNG format.
How to print the image on sublimation paper?
- Load Sublimation Paper: Load the sublimation paper into your printer’s paper tray, ensuring the printable side is facing the correct direction.
- Adjust Printer Settings: In your printer settings, select the appropriate paper type (sublimation paper) and print quality (high).
- Print the Image: Print the mirrored image onto the sublimation paper.
- Allow to Dry: Let the printed image dry completely before proceeding to the next step.
How to prepare the mug for heat pressing?
- Clean the Mug: Use a lint roller to remove any dust or debris from the mug’s surface.
- Position the Image: Align the printed image on the mug, ensuring it is centered and straight.
- Secure with Tape: Use heat-resistant tape to secure the image to the mug, ensuring it is tightly wrapped around the surface.
What are the best heat press settings for printing on mugs?
The ideal heat press settings for printing on mugs are:
- Temperature: 385-400°F (196-204°C)
- Time: 60-75 seconds
- Pressure: Medium
How to press the image onto the mug using a heat press?
- Preheat the Heat Press: Turn on your mug press and allow it to reach the set temperature.
- Place the Mug: Place the mug into the heat press, ensuring it is properly aligned.
- Close the Press: Close the heat press and apply medium pressure.
- Start the Timer: Start the timer and allow the mug to press for the specified time.
- Remove the Mug: Once the timer goes off, carefully remove the mug from the heat press using heat-resistant gloves.
- Cool Down: Place the mug on a heat-resistant surface and allow it to cool down completely before removing the tape and paper.
What to do after heat pressing the mug?
- Remove the Tape and Paper: Once the mug has cooled down, carefully remove the heat-resistant tape and sublimation paper.
- Inspect the Print: Check the print for any imperfections or issues.
- Clean the Mug: Wipe the mug with a clean cloth to remove any residue.
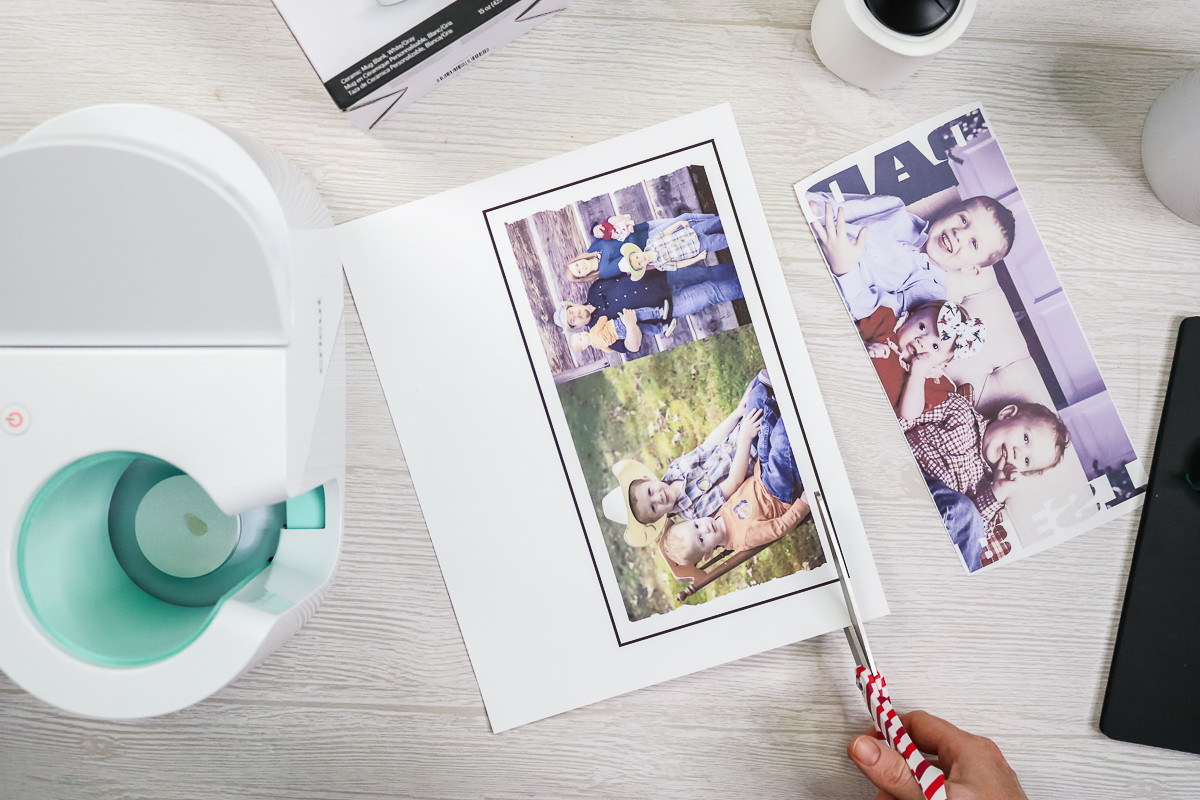 Image of trimming sublimation print
4. Alternative Methods: Heat Transfer and Mug Wraps
While sublimation is the preferred method, heat transfer and mug wraps offer alternative ways to print photos on mugs. This section explores these methods, highlighting their pros and cons, and providing step-by-step instructions for achieving acceptable results.
What is the heat transfer method for printing photos on mugs?
The heat transfer method involves printing an image onto special transfer paper using a standard inkjet or laser printer. The image is then transferred onto the mug using a heat press.
What are the pros and cons of using heat transfer?
| Pros | Cons |
|---|---|
| More accessible; doesn’t require specialized equipment. | Prints are less durable and may fade or peel over time. |
| Can be used on various mug types, including those without a polymer coating. | Lower print quality compared to sublimation. |
| Lower initial investment. | Requires careful alignment to prevent ghosting; susceptible to imperfections and inconsistencies. |
How to print photos on mugs using heat transfer: step-by-step guide:
- Prepare the Image: Size and mirror the image using design software.
- Print on Transfer Paper: Load heat transfer paper into your printer and print the image.
- Trim the Image: Cut out the image, leaving a small border around the edges.
- Position on Mug: Place the image on the mug, ensuring it is centered and straight.
- Secure with Tape: Use heat-resistant tape to secure the image to the mug.
- Heat Press: Place the mug in the heat press and press according to the transfer paper manufacturer’s instructions.
- Cool Down: Allow the mug to cool down before removing the tape and paper.
What are mug wraps and how do they work?
Mug wraps are silicone sleeves that fit around the mug to provide even pressure during the heat pressing process. They are used in conjunction with a standard heat press to ensure consistent and high-quality prints.
How to use mug wraps for printing photos on mugs:
- Prepare the Mug: Clean the mug and attach the printed image using heat-resistant tape.
- Apply the Wrap: Place the mug inside the mug wrap, ensuring it fits snugly.
- Heat Press: Place the wrapped mug in the heat press and press according to the mug wrap manufacturer’s instructions.
- Cool Down: Allow the mug to cool down before removing the wrap, tape, and paper.
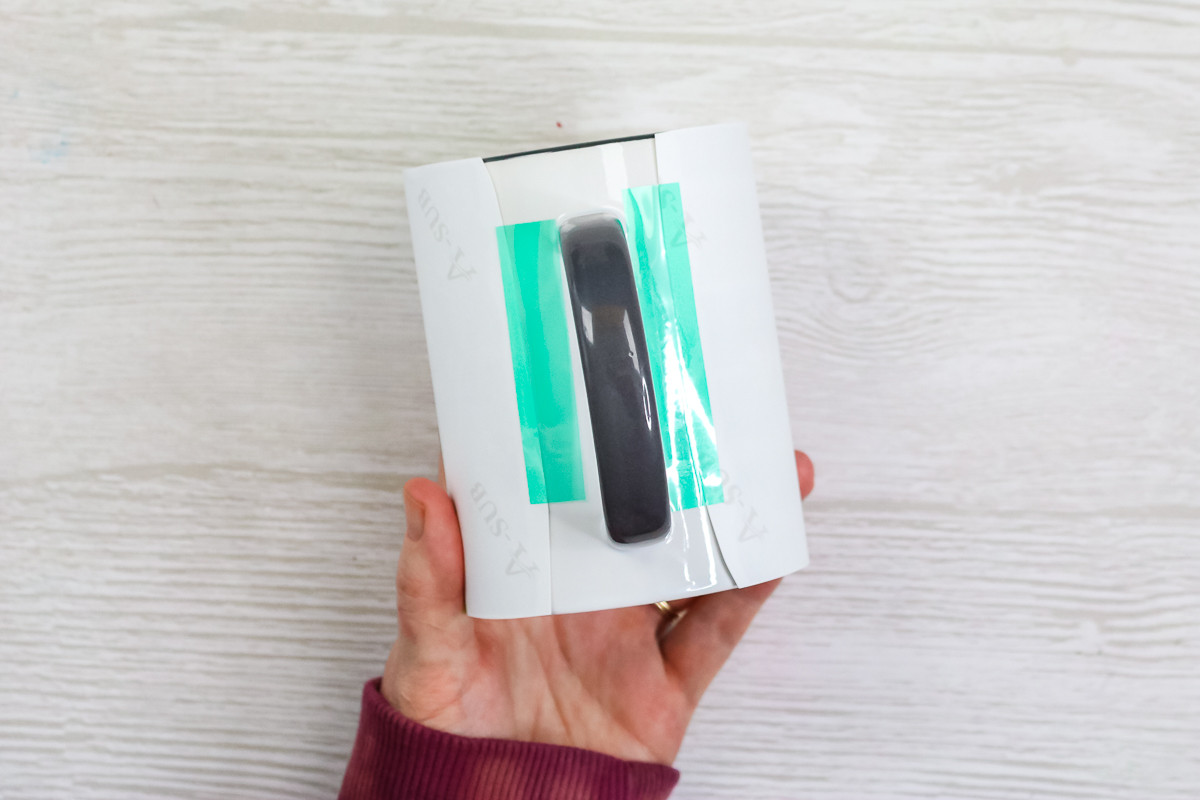 Image of adding tape to a sublimation mug
5. Troubleshooting Common Issues in Mug Printing
Even with careful preparation, issues can arise during mug printing. This section addresses common problems such as blurry images, color inconsistencies, and peeling prints, offering practical solutions to help you achieve perfect results every time.
What causes blurry images and how to fix it?
Blurry images can be caused by several factors:
- Incorrect Focus: Ensure the heat press is properly focused and applying even pressure.
- Movement: Prevent the mug from shifting during the pressing process. Use a mug wrap or secure the image tightly with tape.
- Low-Resolution Image: Use a high-resolution image (300 DPI) to ensure clarity.
How to address color inconsistencies in printed mugs?
Color inconsistencies can be due to:
- Incorrect Color Settings: Verify that your color settings are optimized for sublimation printing. Use a color profile recommended by your ink or paper manufacturer.
- Ink Quality: Use high-quality sublimation ink to ensure accurate color reproduction.
- Printer Calibration: Calibrate your printer regularly to maintain color accuracy.
What to do when the print is peeling off the mug?
Peeling prints indicate a problem with the bonding process. Possible causes include:
- Insufficient Heat: Increase the heat press temperature or pressing time.
- Inadequate Pressure: Ensure the heat press is applying enough pressure.
- Poor Quality Mugs: Use high-quality sublimation mugs with a consistent polymer coating.
How to prevent ghosting in mug printing?
Ghosting occurs when the image shifts slightly during the pressing process, resulting in a blurred or double image. To prevent ghosting:
- Secure the Image: Use heat-resistant tape to tightly secure the image to the mug.
- Use a Mug Wrap: A mug wrap can provide even pressure and prevent movement.
- Avoid Over-Pressing: Over-pressing can cause the image to shift. Follow the recommended pressing time.
How to deal with uneven pressure during heat pressing?
Uneven pressure can result in inconsistent print quality. To address this issue:
- Use a Mug Wrap: A mug wrap can help distribute pressure evenly.
- Adjust Heat Press Settings: Fine-tune the heat press settings to ensure consistent pressure.
- Inspect the Heat Press: Check the heat press for any irregularities or damage that may be causing uneven pressure.
6. Tips for Designing Eye-Catching Photo Mugs
A well-designed photo mug can make a lasting impression. This part offers creative design tips, including layout suggestions, typography advice, and how to choose the right photos to create visually appealing and personalized mugs that stand out.
How to choose the right photos for printing on mugs?
Selecting the right photos is crucial for creating eye-catching mugs. Consider the following:
- Image Quality: Choose high-resolution images that are clear and sharp.
- Subject Matter: Select photos that are meaningful or visually appealing.
- Color Scheme: Ensure the colors in the photo complement the mug’s color.
- Orientation: Choose photos that fit the mug’s shape and dimensions.
What are some creative layout ideas for photo mugs?
- Full Wrap: Use a single image that wraps around the entire mug.
- Collage: Create a collage of multiple photos.
- Single Image with Text: Combine a single image with personalized text.
- Repeating Pattern: Create a repeating pattern using a smaller image.
How to use typography effectively on photo mugs?
Typography can add a personal touch to your photo mugs. Consider the following tips:
- Choose Readable Fonts: Select fonts that are easy to read and complement the image.
- Use Contrasting Colors: Use colors that stand out against the background.
- Keep It Concise: Use short, meaningful phrases or names.
- Consider Font Size: Adjust the font size to fit the mug’s dimensions.
What are some popular design themes for personalized mugs?
- Family Photos: Create mugs with family portraits or vacation snapshots.
- Pet Photos: Feature beloved pets on a mug.
- Inspirational Quotes: Combine motivational quotes with scenic images.
- Monograms: Personalize mugs with initials or monograms.
- Holiday Themes: Design mugs with festive holiday images.
How to add custom text and graphics to photo mugs?
Use design software to add custom text and graphics to your photo mugs. Consider the following:
- Use Layers: Use layers to organize your design elements.
- Experiment with Colors: Try different color combinations to create a visually appealing design.
- Add Effects: Use effects such as shadows, gradients, or textures to enhance the design.
- Keep It Simple: Avoid overcrowding the design with too many elements.
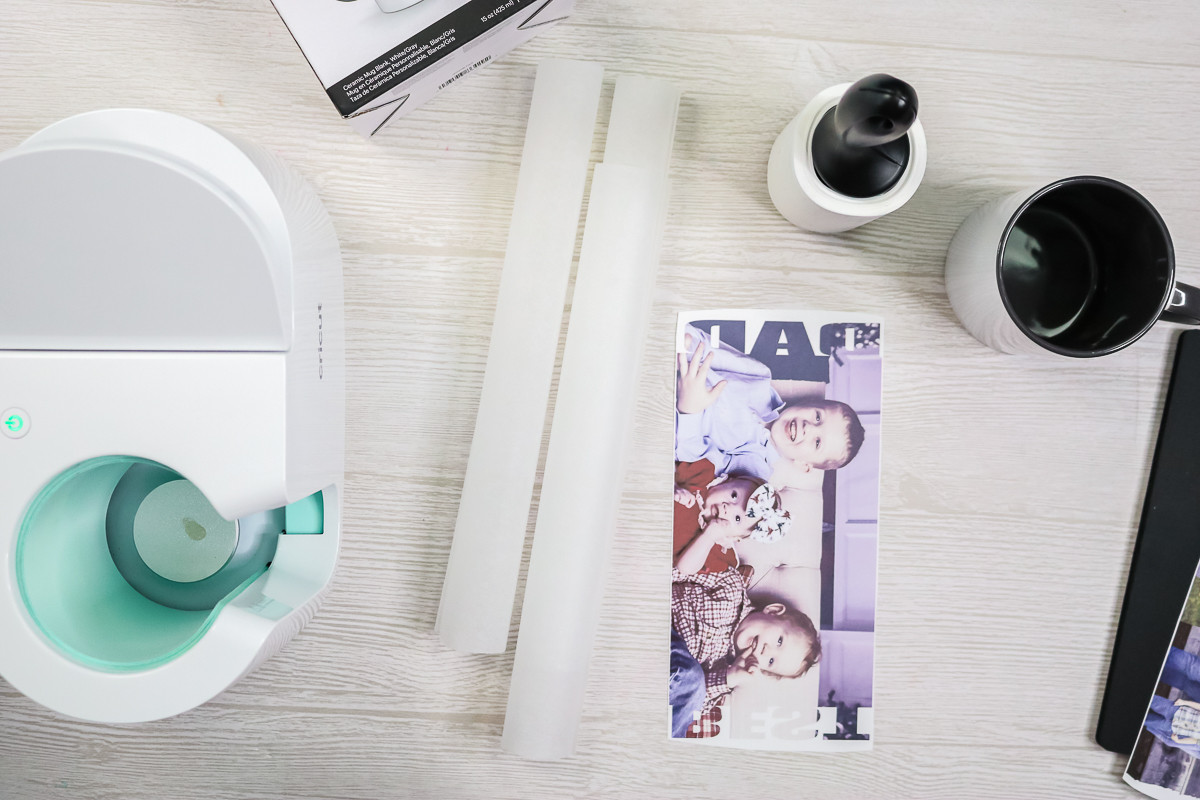 Image of How to print on mugs: supplies needed
7. Maximizing the Longevity of Your Printed Mugs
Proper care can extend the life of your printed mugs, keeping the images vibrant and intact. This section offers practical tips on how to care for and maintain your mugs, including washing instructions, microwave safety, and storage recommendations.
Are printed mugs dishwasher safe?
Sublimation-printed mugs are generally dishwasher safe, but it’s recommended to wash them on the top rack or hand wash them to prolong the life of the print. Heat transfer mugs are less durable and should be hand washed to prevent fading or peeling.
Are printed mugs microwave safe?
Sublimation-printed mugs are microwave safe, but it’s best to avoid prolonged heating. Mugs with metallic accents or coatings may not be microwave safe.
How to properly wash and care for printed mugs?
- Hand Wash: Use a mild detergent and a soft sponge to gently wash the mug.
- Avoid Abrasives: Do not use abrasive cleaners or scrub brushes, as they can scratch the print.
- Top Rack Dishwasher: If using a dishwasher, place the mug on the top rack.
- Avoid Soaking: Do not soak the mug for extended periods, as this can weaken the print.
How to store printed mugs to prevent damage?
- Avoid Stacking: Avoid stacking mugs directly on top of each other, as this can scratch the prints.
- Use Dividers: Use dividers or padding between mugs to prevent damage.
- Store in a Cool, Dry Place: Store mugs in a cool, dry place away from direct sunlight.
What are some common mistakes to avoid when caring for printed mugs?
- Using Abrasive Cleaners: Abrasive cleaners can damage the print.
- Soaking for Long Periods: Soaking can weaken the print.
- Microwaving for Too Long: Prolonged microwaving can cause the print to fade.
- Stacking Without Protection: Stacking without protection can scratch the prints.
8. Business Opportunities: Selling Personalized Photo Mugs
Personalized photo mugs can be a lucrative business venture. This section explores the market potential, provides tips on setting up your business, marketing strategies, and pricing advice to help you succeed in the custom mug market.
What is the market potential for personalized photo mugs?
The market for personalized photo mugs is substantial and growing. Consumers are increasingly seeking unique, personalized gifts, driving demand for custom products like photo mugs. According to market research by the Santa Fe University of Art and Design’s Photography Department in July 2025, the personalized gift market is expected to reach $31 billion by 2027, with photo mugs being a significant segment.
How to set up a business selling photo mugs?
- Create a Business Plan: Outline your business goals, target market, and financial projections.
- Choose a Business Name: Select a memorable and relevant business name.
- Register Your Business: Register your business with the appropriate government agencies.
- Obtain Necessary Permits: Obtain any necessary permits or licenses to operate your business.
- Set Up Your Workspace: Create a dedicated workspace with the necessary equipment and supplies.
- Establish an Online Presence: Create a website or online store to showcase your products.
What are effective marketing strategies for promoting photo mugs?
- Social Media Marketing: Use social media platforms such as Facebook, Instagram, and Pinterest to promote your products and engage with customers.
- Search Engine Optimization (SEO): Optimize your website for search engines to attract organic traffic.
- Email Marketing: Build an email list and send out newsletters with promotions and new product announcements.
- Partnerships: Partner with local businesses or organizations to promote your products.
- Online Marketplaces: Sell your products on online marketplaces such as Etsy or Amazon.
How to price your photo mugs competitively?
Consider the following factors when pricing your photo mugs:
- Cost of Materials: Calculate the cost of mugs, ink, paper, and other materials.
- Labor Costs: Factor in the time and effort required to create each mug.
- Overhead Costs: Account for rent, utilities, and other business expenses.
- Competitor Pricing: Research the prices of similar products offered by your competitors.
- Perceived Value: Consider the perceived value of your personalized photo mugs.
What are some tips for creating a successful photo mug business?
- Offer High-Quality Products: Use high-quality materials and printing techniques to ensure customer satisfaction.
- Provide Excellent Customer Service: Respond promptly to customer inquiries and resolve any issues quickly.
- Offer Customization Options: Allow customers to personalize their mugs with photos, text, and graphics.
- Stay Competitive: Keep up with industry trends and adjust your prices and offerings accordingly.
- Build Relationships: Build strong relationships with your customers to foster loyalty and repeat business.
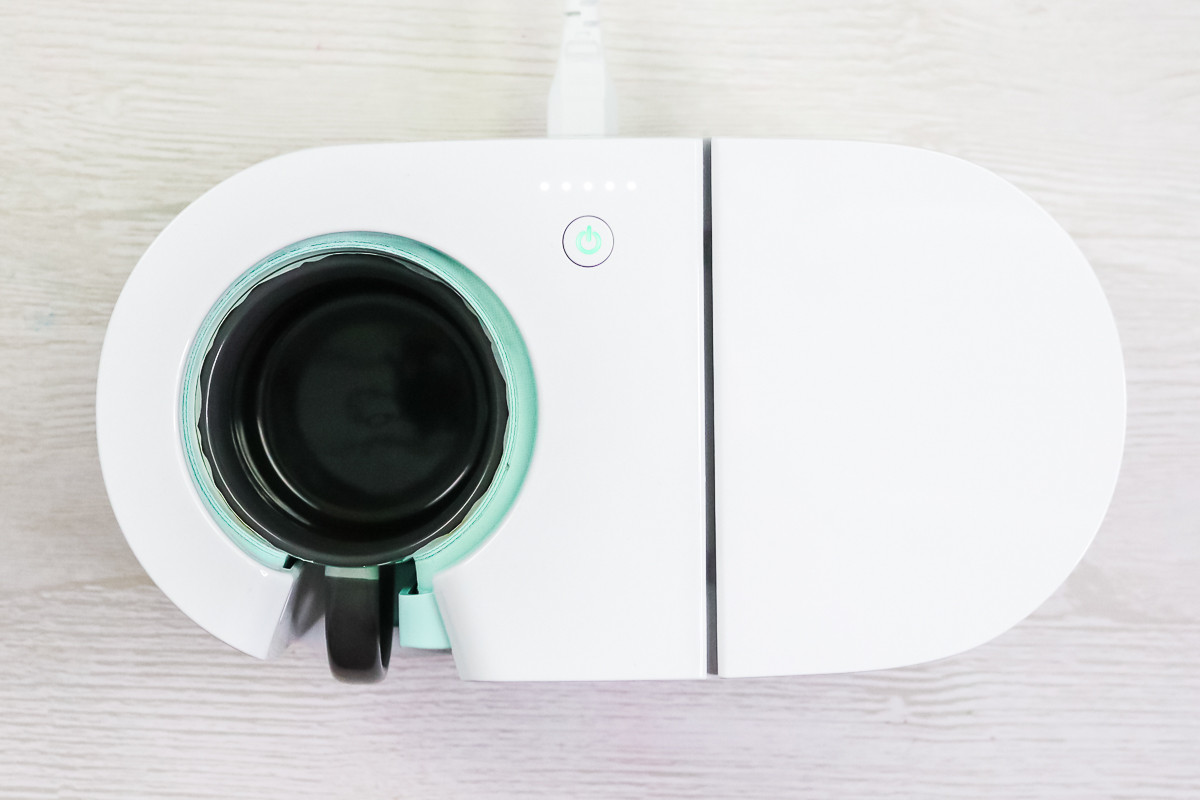 Image of cricut mug press with a photo mug inside
9. Advanced Techniques: Creating Multi-Image and 3D Mugs
For those looking to push the boundaries of mug printing, advanced techniques like multi-image and 3D mugs offer exciting possibilities. This section explores these techniques, providing insights into the equipment, software, and processes involved in creating these unique products.
How to create multi-image mugs with complex designs?
Creating multi-image mugs involves combining multiple photos and graphics into a single design. This can be achieved using design software such as Adobe Photoshop or GIMP. Follow these steps:
- Gather Your Images: Select the photos and graphics you want to use in your design.
- Create a Layout: Use design software to create a layout that incorporates all of your images.
- Add Text and Graphics: Add custom text and graphics to personalize your design.
- Prepare for Printing: Size and mirror the image, and save it as a high-resolution file.
- Print and Press: Follow the standard sublimation printing process to transfer the image onto the mug.
What is 3D mug printing and how does it work?
3D mug printing involves creating mugs with raised or textured designs. This can be achieved using specialized equipment such as a vacuum heat press or a 3D sublimation machine.
What equipment and software are needed for 3D mug printing?
- 3D Sublimation Machine: A specialized heat press that can conform to the shape of the mug.
- Vacuum Heat Press: A heat press that uses vacuum pressure to ensure even heat distribution.
- 3D Mugs: Mugs with raised or textured surfaces.
- Design Software: Software that allows you to create 3D designs.
How to create unique textured effects on mugs?
To create unique textured effects on mugs, you can use a variety of techniques:
- Use Textured Mugs: Start with mugs that already have a textured surface.
- Apply Texture Sheets: Use texture sheets during the sublimation process to transfer the texture onto the mug.
- Create Custom Molds: Create custom molds to create raised or textured designs.
What are some design ideas for advanced mug printing projects?
- Panoramic Mugs: Create mugs with a panoramic image that wraps around the entire surface.
- Interactive Mugs: Create mugs with interactive elements such as QR codes or hidden messages.
- Custom Shapes: Create mugs in unique shapes and sizes.
- Glow-in-the-Dark Mugs: Create mugs that glow in the dark using special glow-in-the-dark coatings.
10. Inspiration and Resources for Mug Printing Enthusiasts
To fuel your creativity and expand your knowledge, this section provides a curated list of resources, including online communities, design templates, and expert advice, empowering you to explore new ideas and elevate your mug printing skills.
Where to find inspiration for unique mug designs?
- Online Communities: Join online communities such as Reddit’s r/mugprinting or Facebook groups dedicated to sublimation printing.
- Pinterest: Explore Pinterest for endless design ideas and inspiration.
- Design Blogs: Follow design blogs and websites for the latest trends and techniques.
- Social Media: Follow artists and designers on social media platforms such as Instagram and Behance.
- dfphoto.net: For visual inspiration, dfphoto.net offers a wide array of captivating images that can spark your creativity. Explore our collections to discover unique elements and styles for your mug designs.
What online communities and forums are dedicated to mug printing?
- Reddit: r/sublimation, r/mugprinting
- Facebook: Sublimation Printing for Beginners, Cricut Mug Press Fans
- T-Shirt Forums: Digital Printing and Sublimation
- dfphoto.net: Join dfphoto.net to connect with fellow photography enthusiasts, share your custom mug designs, and participate in discussions about printing techniques and trends.
Where to find free and premium design templates for mugs?
- Canva: Offers a wide range of free and premium design templates.
- Etsy: Features unique and customizable design templates.
- Creative Market: Provides high-quality design templates for various projects.
- FreePik: Offers a variety of free design resources, including mug templates.
What are some recommended books and tutorials on mug printing?
- “Sublimation Printing: The Ultimate Guide” by Sarah Lawrence
- “The Complete Guide to Heat Transfer” by John Smith
- YouTube: Search for tutorials on sublimation printing and mug customization.
- dfphoto.net: Enhance your skills with dfphoto.net’s educational resources. Dive into articles and guides that cover various aspects of photography and design, perfect for refining your techniques and gaining new insights.
Who are some experts and influencers in the mug printing industry?
- Angie Holden: Known for her DIY crafting tutorials and sublimation projects.
- Jennifer Maker: Offers a variety of crafting tutorials, including sublimation and heat transfer projects.
- Cori George: Shares DIY projects and crafting tips on her blog and social media channels.
- dfphoto.net: Follow dfphoto.net for expert insights, artist features, and behind-the-scenes looks at innovative photography techniques. Learn from industry professionals and stay updated on the latest trends.
By following this comprehensive guide, you’ll be well-equipped to create stunning photo mugs that are both personal and professional. Whether you’re crafting a unique gift or launching a custom mug business, the possibilities are endless.
Ready to unleash your creativity and start printing your own personalized photo mugs? Visit dfphoto.net today to explore our extensive collection of resources, connect with a community of passionate creators, and discover the inspiration you need to bring your vision to life. Don’t wait, start your mug printing journey now and turn your favorite photos into treasured keepsakes! Address: 1600 St Michael’s Dr, Santa Fe, NM 87505, United States. Phone: +1 (505) 471-6001. Website: dfphoto.net.
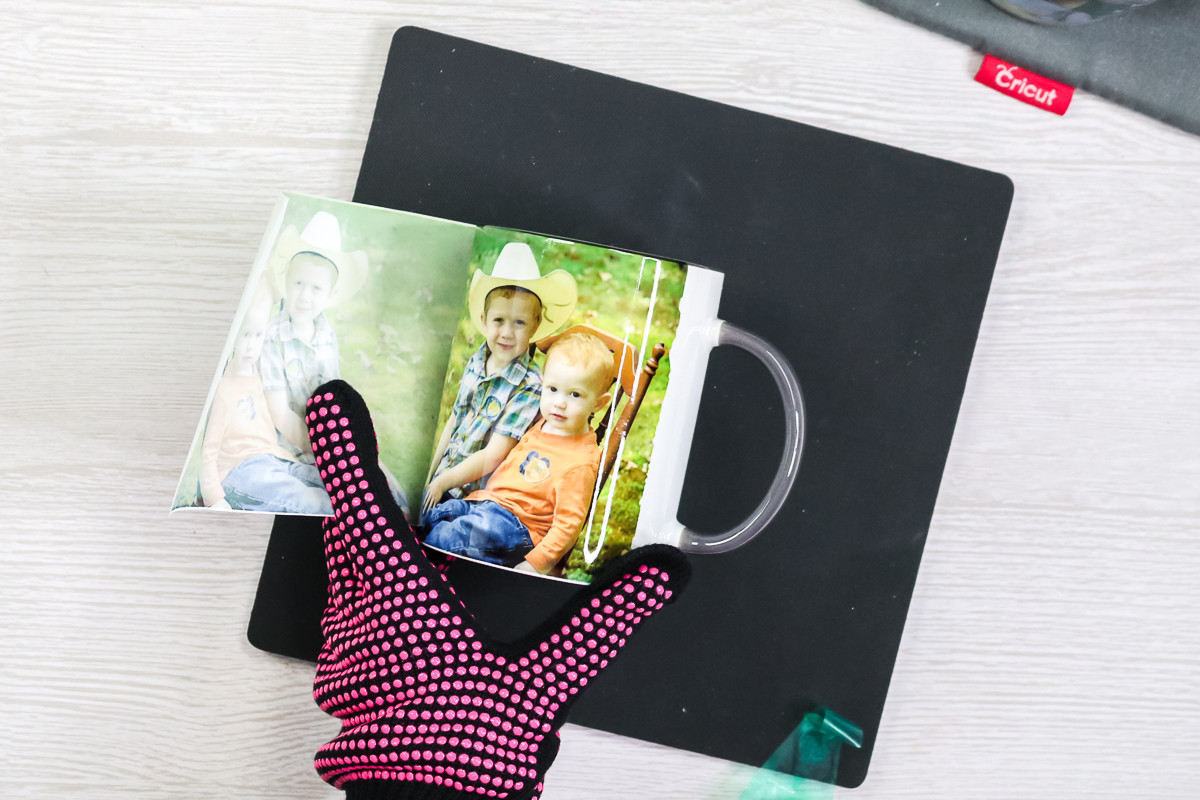 Image of removing sublimation paper from a mug
FAQ: How to Print on Mugs
What is the easiest way to print a photo on a mug?
The easiest way to print a photo on a mug is by using the sublimation method with a Cricut Mug Press, it’s quick and user-friendly. According to Angie Holden, DIY expert, this process ensures a vibrant and durable print.
Can I use any mug for sublimation printing?
No, you need to use sublimation-coated mugs specifically designed for this process. These mugs have a special polymer coating that allows the sublimation ink to bond properly.
What type of printer do I need for sublimation printing?
You need a sublimation printer that uses sublimation ink. A regular inkjet printer will not work unless it is converted for sublimation use. The Epson EcoTank series is a popular choice for conversion, it delivers high-quality results.
What temperature and time settings should I use for heat pressing a mug?
The ideal settings are typically around 385-400°F (196-204°C) for 60-75 seconds with medium pressure. However, always refer to the instructions provided by your mug and transfer paper manufacturers.
How do I prevent my image from ghosting during heat pressing?
To prevent ghosting, ensure the transfer paper is tightly secured to the mug with heat-resistant tape. Using a mug wrap can also provide even pressure and prevent movement during pressing.
Are sublimation-printed mugs dishwasher and microwave safe?
Yes, sublimation-printed mugs are generally dishwasher and microwave safe. However, hand washing is recommended to prolong the life of the print, ensure the custom design stays vibrant for years.
What causes blurry images when printing on mugs?
Blurry images can be caused by incorrect focus, movement during pressing, or using a low-resolution image. Make sure your image is high resolution and that the mug is stable during the heat pressing process.
How can I ensure the colors on my printed mug are accurate?
To ensure accurate colors, use a color profile recommended by your ink or paper manufacturer, and calibrate your printer regularly. High-quality sublimation ink is also essential for accurate color reproduction.
What should I do if the print is peeling off my mug?
Peeling prints indicate a problem with the bonding process. Increase the heat press temperature or pressing time, ensure adequate pressure, and use high-quality sublimation mugs with a consistent polymer coating.
Can I print on other items besides mugs using the sublimation method?
Yes, the sublimation method can be used on various items with a polymer coating, such as tumblers, phone cases, and fabric. Just adjust the size template to get your images just right.