Printing photos on coffee mugs is a fun and personalized way to enjoy your favorite memories every day, and dfphoto.net is here to guide you through the process. Whether you’re looking to create a unique gift or add a personal touch to your own collection, understanding the different printing methods and techniques is key. With the right approach, you can achieve professional-looking results that capture the essence of your cherished moments. Dive into the world of custom mug printing and discover the possibilities. Learn about design software, heat presses, and more, enhancing your skills in visual arts and photography-related projects.
1. Understanding the Basics of Mug Printing
What is involved in printing photos on coffee mugs? Mug printing involves transferring an image onto the surface of a mug using various techniques, each with its own set of advantages and disadvantages. From dye sublimation to UV printing, the method you choose will impact the final product’s durability, color vibrancy, and overall quality. Understanding these basics is the first step in creating personalized mugs that you’ll cherish. According to research from the Santa Fe University of Art and Design’s Photography Department, in July 2025, dye sublimation is the most popular mug printing method due to its ability to produce high-quality, durable images.
1.1. What Types of Mugs Are Best for Printing?
What mugs work best with photo printing? Ceramic mugs are generally considered the best for printing due to their smooth surface and heat resistance. However, glass and stainless steel mugs can also be used with certain printing methods. When selecting a mug, consider the coating, as some coatings are specifically designed for better ink adhesion and image quality.
- Ceramic Mugs: Ideal for sublimation and heat transfer due to their smooth, even surface.
- Glass Mugs: Suitable for digital and UV printing, offering a unique transparent effect.
- Stainless Steel Mugs: Best for laser engraving and UV printing, providing a durable and modern look.
1.2. What Equipment and Materials Do I Need?
What are the essential tools for mug printing? The equipment and materials needed will vary depending on the printing method you choose. However, some common essentials include:
- Computer and Design Software: For creating and editing your designs.
- Printer: A sublimation, inkjet, or UV printer, depending on your chosen method.
- Ink: Sublimation, UV-curable, or dye-based inks, depending on the printer.
- Mug Press or Heat Press: For transferring the image onto the mug.
- Heat-Resistant Tape: To secure the design in place.
- Blank Mugs: Choose mugs specifically coated for printing.
1.3. What is the Importance of Image Resolution?
Why does image quality matter in mug printing? High image resolution is crucial for achieving a clear and detailed print on your coffee mug. Low-resolution images can result in blurry or pixelated prints. Aim for a resolution of at least 300 DPI (dots per inch) to ensure the best possible outcome.
2. Exploring Different Mug Printing Methods
What are the different methods for printing photos on mugs? There are several popular printing methods, each with its own unique process and results:
- Dye Sublimation Printing
- UV Printing
- Digital Printing
- Direct Screen Printing
- Transfer Printing
2.1. What is Dye Sublimation Printing?
How does dye sublimation work for mug printing? Dye sublimation is a popular method that involves printing your design onto special sublimation paper using sublimation ink. The paper is then wrapped around the mug and placed in a heat press. The heat turns the ink into a gas, which bonds with the polymer coating on the mug, creating a permanent and vibrant image.
Equipment: blank mug, design software, sublimation printer, sublimation ink, sublimation paper, heat press, heat-resistant tape.
Process:
- Create your design using design software and print it on sublimation paper with sublimation ink.
- Secure the printed design around the mug with heat-resistant tape.
- Preheat the mug press to the recommended temperature (usually around 400°F or 200°C).
- Place the mug in the press and set the timer (typically 60-80 seconds).
- The heat turns the ink into a gas and bonds the image to the mug’s surface.
- Remove the mug, let it cool, and peel off the sublimation paper.
Pros:
- Vibrant and durable designs.
- Resistant to daily wear, tear, and fading.
- Dishwasher and microwave safe.
Cons:
- Works best on white or light-colored mugs.
- Can be more expensive for large production runs.
2.2. What is UV Printing?
How does UV printing work on mugs? UV printing uses ultraviolet (UV) light to cure the ink as it’s printed onto the mug. This method allows for printing on a variety of materials, including ceramic, glass, and stainless steel. UV printing produces sharp, durable images with vibrant colors.
Equipment: blank mug, design software, UV printer with UV-curable ink, UV light source.
Process:
- Prepare a high-resolution design, using vector graphics for sharp lines and bold colors.
- Clean the mug with alcohol or a cleaning agent to remove any residue.
- Calibrate the UV printer and set it up according to the manufacturer’s instructions.
- Align the mug in the printer with the desired print placement.
- Print the design.
- Place the mug under UV light to cure the ink.
Pros:
- Precise and accurate prints.
- Compatible with most mug materials.
- Supports a full range of colors.
- Eco-friendly printing technique.
Cons:
- One of the most expensive printing methods in terms of equipment.
- Limited print area, depending on the printer size and configuration.
2.3. What is Digital Printing?
What are the steps involved in digital mug printing? Digital printing, also known as inkjet printing, is a cost-effective option for small orders. It involves printing your design directly onto the mug using an inkjet printer and dye-based inks. While it’s a faster method, the print is less durable compared to sublimation or UV printing.
Equipment: blank ceramic or glass mug, design software, inkjet printer, dye-based inks.
Process:
- Prepare a high-resolution design that’s compatible with an inkjet printer.
- Clean the mug to remove any residue.
- Calibrate the printer and set it up according to the manufacturer’s instructions.
- Place the mug according to the intended print area.
- Print the image.
- Dry or cure the ink, depending on the type of printer.
Pros:
- Fast and cost-effective.
- Ideal for printing on ceramic or glass mugs.
- Eco-friendly.
- Minimal setup and cleanup.
Cons:
- Less durable than other techniques.
- Suitable for small orders only.
- Not recommended for dishwasher or microwave use.
2.4. What is Direct Screen Printing?
How does direct screen printing work for mugs? Direct screen printing involves creating a stencil of your design on a mesh screen. Ink is then pushed through the screen onto the mug, transferring the image. This method is best for bulk orders and designs with large print areas.
Equipment: mug, design software, screen printing press, mesh screens, squeegees, emulsion, ink.
Process:
- Create your custom design.
- Prepare the mesh screen and cover it with an emulsion.
- Place your artwork on the mesh screen and expose it to bright light.
- Wash off the hard emulsion, leaving only your design on the mesh.
- Place the mug in the mug press and align it for accurate results.
- Apply the desired inks on the mesh and use squeegees to distribute it evenly across the design.
- Press the screen on the mug to transfer the image onto the product’s surface.
- Let the inks dry.
Pros:
- Suitable for designs covering large print areas.
- Works on white and different-colored mugs.
- Allows overlapping colors.
- Delivers lasting results.
Cons:
- Most suitable for bulk mug orders.
- Long setup time.
- Tedious for intricate designs.
- Each color requires a separate screen, and precise alignment is necessary.
2.5. What is Transfer Printing?
What is the process of transfer printing on mugs? Transfer printing involves printing your design onto special transfer paper, which is then applied to the mug using a heat press. This method is cost-effective for small orders and allows for full customization and wraparound designs.
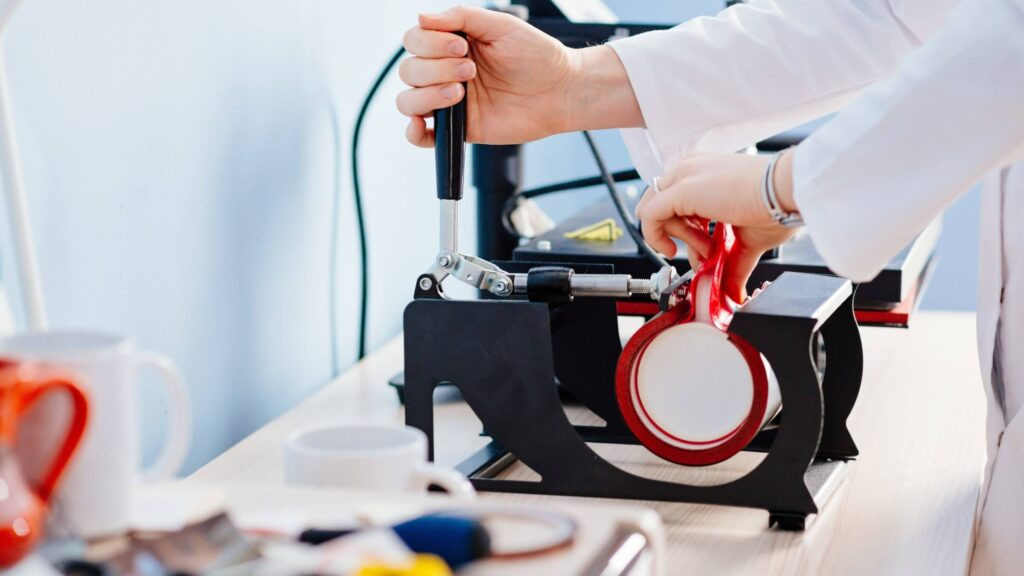 A person uses a machine to print designs on a mug through heat transfer.
Equipment: mug, design software, heat press, transfer paper, printer, cutting tools.
Process:
- Create your custom design and adjust the size and resolution accordingly.
- Print the design on the transfer paper.
- Trim the transfer paper to achieve proper alignment with the mug.
- Clear off any residue from the mug with alcohol or a cleaning agent.
- Apply the transfer paper on the mug and secure it to firmly attach the design.
- Put the mug in the heat press and set the right time and temperature for perfect results.
- Let the mug cool, then remove the transfer paper to reveal the final design.
Pros:
- Produces color-accurate, durable, and vibrant prints.
- Cost-effective for small orders.
- Straightforward technique for full customization and wraparound designs.
Cons:
- Less durable than other printing methods, such as sublimation.
- The transfer film can sometimes be visible in the final design.
- Smaller details and texts may not transfer as clearly.
3. Designing Your Photo Mug
How do I create the perfect design for my photo mug? Designing your photo mug involves several key steps:
- Choosing the right images
- Using design software
- Considering layout and text
- Ensuring proper image resolution
- Previewing your design
3.1. How to Choose the Right Images?
What makes an image suitable for mug printing? Select high-quality images that are clear, well-lit, and have a resolution of at least 300 DPI. Avoid images that are blurry, pixelated, or have poor lighting. Consider the overall composition and how it will look when wrapped around the mug.
3.2. Which Design Software Should I Use?
What software is best for designing mug images? There are several design software options available, ranging from free to professional-grade:
- Adobe Photoshop: Professional software with advanced editing capabilities.
- Adobe Illustrator: Vector-based software ideal for creating logos and graphics.
- Canva: User-friendly online tool with a wide range of templates and design elements.
- GIMP: Free, open-source image editing software.
- CorelDRAW: Professional vector graphics editor.
3.3. How Should I Layout the Design and Text?
What are the best practices for mug design layout? Consider the placement of your images and text to create a visually appealing design. Keep in mind the curvature of the mug and how the design will wrap around it. Use design software to preview your layout and make adjustments as needed.
3.4. How to Ensure Proper Image Resolution?
Why is image resolution important in mug design? Proper image resolution is critical for achieving a clear and detailed print. Ensure that your images have a resolution of at least 300 DPI to avoid blurry or pixelated results. You can check and adjust the resolution of your images using design software like Adobe Photoshop or GIMP.
3.5. How to Preview the Final Design?
How can I see how the final mug will look before printing? Most design software and online mug printing services offer a preview feature that allows you to see how your design will look on the mug before printing. Take advantage of this feature to make any necessary adjustments and ensure that you are happy with the final result.
4. Step-by-Step Guide to Printing a Photo on a Mug
What is the process for printing photos on mugs? Here’s a step-by-step guide to printing a photo on a mug using the dye sublimation method:
- Prepare Your Design: Create your design using design software and ensure it has a high resolution (300 DPI).
- Print on Sublimation Paper: Print your design on sublimation paper using sublimation ink.
- Wrap the Mug: Securely wrap the printed design around the mug using heat-resistant tape.
- Heat Press: Preheat the mug press to the recommended temperature (around 400°F or 200°C).
- Press the Mug: Place the mug in the press and set the timer (typically 60-80 seconds).
- Cool and Peel: Remove the mug from the press, let it cool, and carefully peel off the sublimation paper.
- Inspect the Final Result: Check the print for any imperfections and ensure that the image is clear and vibrant.
4.1. Preparing the Design
How do I prepare my image for mug printing? Start by selecting a high-quality image with a resolution of at least 300 DPI. Use design software to crop, resize, and enhance your image as needed. Consider adding text, graphics, or other design elements to personalize your mug.
4.2. Printing on Sublimation Paper
Why do I need special sublimation paper? Sublimation paper is specially coated to release the ink when heated. Use sublimation ink in your printer to ensure that the colors transfer properly to the mug. Print your design in reverse (mirror image) so that it appears correctly on the final product.
4.3. Wrapping the Mug
How do I attach the design to the mug? Carefully wrap the printed design around the mug, ensuring that it is aligned properly. Use heat-resistant tape to secure the paper in place, making sure there are no gaps or wrinkles.
4.4. Using the Heat Press
What is the best way to use a heat press for mug printing? Preheat your mug press to the recommended temperature (usually around 400°F or 200°C). Place the mug in the press and set the timer according to the manufacturer’s instructions (typically 60-80 seconds). Apply even pressure to ensure that the image transfers properly.
4.5. Cooling and Peeling
How do I remove the paper after printing? Once the timer goes off, carefully remove the mug from the press and place it on a heat-resistant surface to cool. Once the mug is cool enough to handle, carefully peel off the sublimation paper to reveal the final design.
4.6. Inspecting the Final Result
What should I look for when inspecting the printed mug? Check the print for any imperfections, such as blurry areas, faded colors, or smudges. Ensure that the image is clear, vibrant, and properly aligned. If you notice any issues, you may need to adjust your printing settings or technique.
5. Tips and Tricks for Perfect Mug Printing
What are some tips for printing high-quality photos on mugs? Here are some tips and tricks to help you achieve perfect mug printing results:
- Use high-quality images
- Choose the right printing method
- Calibrate your equipment
- Use heat-resistant tape
- Apply even pressure
- Allow the mug to cool properly
- Protect your designs
5.1. Why Use High-Quality Images?
How does image quality affect the final print? High-quality images are essential for achieving a clear and detailed print on your coffee mug. Avoid using low-resolution images, as they can result in blurry or pixelated prints. Aim for a resolution of at least 300 DPI.
5.2. How to Choose the Right Printing Method?
Which printing method is best for my project? The best printing method for your project will depend on your budget, the materials you are using, and the desired results. Dye sublimation is a popular choice for its vibrant and durable prints, while UV printing is ideal for printing on a variety of materials.
5.3. Why Calibrate Your Equipment?
How can I ensure my equipment is working correctly? Calibrating your equipment, such as your printer and heat press, is essential for achieving consistent and accurate results. Follow the manufacturer’s instructions to calibrate your equipment and ensure that it is working properly.
5.4. How to Use Heat-Resistant Tape?
Why is heat-resistant tape important for mug printing? Heat-resistant tape is used to securely attach the printed design to the mug during the heat pressing process. This tape is designed to withstand high temperatures without melting or leaving residue on the mug.
5.5. Why Apply Even Pressure?
How does pressure affect the quality of the print? Applying even pressure during the heat pressing process is crucial for ensuring that the image transfers properly to the mug. Uneven pressure can result in blurry areas, faded colors, or other imperfections.
5.6. How to Properly Cool the Mug?
Why should I let the mug cool before removing the paper? Allowing the mug to cool properly before removing the paper is important for preventing smudging or other damage to the print. Place the mug on a heat-resistant surface and allow it to cool completely before peeling off the sublimation paper.
5.7. Protecting Your Designs
How can I protect my printed mugs? To protect your printed mugs and ensure that they last for years to come, consider applying a protective coating or sealant. This will help to prevent fading, scratching, and other damage.
6. Common Mistakes to Avoid in Mug Printing
What are the common pitfalls in mug printing and how can I avoid them? Here are some common mistakes to avoid in mug printing:
- Using low-resolution images
- Not calibrating your equipment
- Using the wrong type of ink or paper
- Applying too much or too little pressure
- Not allowing the mug to cool properly
- Using abrasive cleaners
6.1. How Does Low-Resolution Images Affect Print Quality?
How can I avoid blurry prints? Using low-resolution images is one of the most common mistakes in mug printing. Always use high-quality images with a resolution of at least 300 DPI to avoid blurry or pixelated prints.
6.2. Why Is Calibration Essential?
What happens if I don’t calibrate my printer? Not calibrating your equipment can lead to inconsistent and inaccurate results. Always calibrate your printer and heat press according to the manufacturer’s instructions to ensure that they are working properly.
6.3. What Happens If I Use Incorrect Materials?
How does the type of ink and paper affect the final print? Using the wrong type of ink or paper can result in poor image quality and durability. Always use sublimation ink and sublimation paper for dye sublimation printing, and follow the manufacturer’s recommendations for other printing methods.
6.4. What Impact Does Pressure Have on Printing?
How do I ensure consistent pressure during printing? Applying too much or too little pressure during the heat pressing process can result in uneven image transfer. Experiment with different pressure settings to find the optimal level for your equipment and materials.
6.5. How Does Cooling Affect Print Quality?
Why should I wait before handling the mug? Not allowing the mug to cool properly before removing the paper can cause smudging or other damage to the print. Always allow the mug to cool completely before peeling off the sublimation paper.
6.6. What Cleaning Products Should I Avoid?
How should I clean my printed mugs? Using abrasive cleaners can damage the print on your mug. Always use mild soap and water to clean your printed mugs, and avoid using abrasive sponges or scrub brushes.
7. Creative Ideas for Photo Mugs
What are some unique ideas for personalized photo mugs? Photo mugs are a versatile and thoughtful gift that can be customized for any occasion. Here are some creative ideas for photo mugs:
- Family photo collage
- Pet portraits
- Travel memories
- Motivational quotes
- Custom illustrations
- Monogrammed mugs
- Themed mugs
7.1. How To Create a Family Photo Collage Mug?
What photos are best for a family collage? Create a heartwarming family photo collage mug by selecting a variety of your favorite family photos. Use design software to arrange the photos in a visually appealing layout, and add text or graphics to personalize your mug.
7.2. How To Capture a Pet Portrait Mug?
What makes a good pet portrait for a mug? Celebrate your furry friends with a custom pet portrait mug. Use a high-quality photo of your pet and add their name or a fun quote to create a unique and memorable mug.
7.3. How To Display Travel Memories On a Mug?
How can I showcase my travel adventures on a mug? Showcase your travel adventures with a travel-themed photo mug. Select your favorite travel photos and arrange them in a collage, or create a wraparound design featuring a scenic landscape or iconic landmark.
7.4. How To Print Motivational Quotes on Mugs?
What are some inspirational quotes I can use? Inspire yourself or a loved one with a motivational quote mug. Choose a quote that resonates with you and add it to your mug design, along with a complementary image or graphic.
7.5. What Are Custom Illustration Mugs?
Where can I find custom illustrations for my mug? Create a unique and artistic mug with custom illustrations. Hire an artist to create a custom illustration for you, or use online resources to find pre-made illustrations that you can add to your mug design.
7.6. How To Design Monogrammed Mugs?
How can I personalize a mug with a monogram? Personalize your mugs with a classic monogram design. Use design software to create a custom monogram featuring your initials, and add it to your mug in a stylish font and color.
7.7. What Are Some Popular Mug Themes?
What are some popular themes for photo mugs? Create themed mugs for holidays, birthdays, or special occasions. Some popular themes include:
- Christmas
- Valentine’s Day
- Mother’s Day
- Father’s Day
- Graduation
- Wedding
8. Maintaining and Caring for Your Photo Mugs
How do I keep my photo mugs looking their best? Proper maintenance and care are essential for keeping your photo mugs looking their best. Here are some tips for maintaining and caring for your photo mugs:
- Hand wash your mugs
- Avoid abrasive cleaners
- Avoid extreme temperatures
- Store your mugs properly
- Protect your designs
8.1. Why Hand Wash Your Mugs?
How does dishwashing affect the print on my mug? Hand washing your mugs is the best way to protect the print and ensure that it lasts for years to come. Dishwashers can be too harsh on printed mugs, causing the colors to fade or the image to peel.
8.2. What Cleaners Should I Avoid?
How can I prevent damage from cleaning products? Avoid using abrasive cleaners, such as scouring pads or harsh chemicals, as they can damage the print on your mug. Use mild soap and water to clean your mugs, and avoid using abrasive sponges or scrub brushes.
8.3. How Can Extreme Temperatures Affect Mugs?
Can I put my mug in the microwave or freezer? Avoid exposing your photo mugs to extreme temperatures, as this can cause the print to crack or fade. Do not put your mugs in the microwave or freezer, and avoid pouring boiling liquids into cold mugs.
8.4. How Should I Store My Mugs?
How can I prevent scratches when storing my mugs? Store your mugs properly to prevent scratches and other damage. Store your mugs in a cool, dry place, away from direct sunlight. Consider using mug racks or padded dividers to protect your mugs from chipping or breaking.
8.5. What Can I Use To Protect My Designs?
How can I make my mug prints last longer? To protect your designs and ensure that they last for years to come, consider applying a protective coating or sealant. This will help to prevent fading, scratching, and other damage.
9. Where to Find Inspiration and Resources for Mug Printing
Where can I find ideas and information about mug printing? Finding inspiration and resources is essential for staying creative and informed about mug printing. Here are some places to find inspiration and resources:
- Online tutorials
- Design communities
- Social media
- Mug printing forums
- Photography and design blogs
- Local workshops
9.1. How Can Online Tutorials Help?
Where can I find step-by-step mug printing guides? Online tutorials are a great way to learn new techniques and improve your mug printing skills. Look for tutorials on YouTube, Vimeo, and other video-sharing platforms, or search for written tutorials on blogs and websites.
9.2. How Can Design Communities Help?
Where can I get feedback on my mug designs? Design communities are a great place to share your work, get feedback, and connect with other designers. Join online design communities on platforms like Behance, Dribbble, and DeviantArt to showcase your mug designs and get inspired by others.
9.3. How Can Social Media Help?
How can I stay up-to-date with mug printing trends? Social media platforms like Instagram, Pinterest, and Facebook are great for finding inspiration and staying up-to-date with the latest mug printing trends. Follow mug printing accounts, design influencers, and related hashtags to discover new ideas and techniques.
9.4. How Can Mug Printing Forums Help?
Where can I ask questions about mug printing? Mug printing forums are a great place to ask questions, share tips, and connect with other mug printing enthusiasts. Join online forums on platforms like Reddit and specialized mug printing websites to get advice and support from experienced printers.
9.5. How Can Photography and Design Blogs Help?
Where can I learn about design principles for mug printing? Photography and design blogs are a great resource for learning about design principles, typography, color theory, and other topics related to mug printing. Read blogs from reputable sources to improve your design skills and stay informed about industry trends. You can find a wealth of knowledge and inspiration at dfphoto.net.
9.6. How Can Local Workshops Help?
Where can I get hands-on experience with mug printing? Local workshops and classes are a great way to get hands-on experience with mug printing and learn from experienced instructors. Check your local community centers, art schools, and craft stores for upcoming workshops and classes.
10. Frequently Asked Questions (FAQ) About Printing Photos on Mugs
10.1. What is the best way to print a photo on a coffee mug?
Dye sublimation is often considered the best method due to its durability and vibrant results, which involves using sublimation paper and a heat press to transfer the image onto the mug.
10.2. Can I print on any type of mug?
No, it’s best to use mugs specifically coated for printing, such as ceramic mugs with a polymer coating for dye sublimation, to ensure the ink adheres properly.
10.3. What resolution should my photo be for printing on a mug?
Aim for a resolution of at least 300 DPI (dots per inch) to ensure the printed image is clear and detailed, avoiding blurry or pixelated results.
10.4. How do I prevent the image from fading on my printed mug?
Use high-quality inks and printing methods, and avoid abrasive cleaners or dishwashers, opting for hand washing to prolong the life of the print.
10.5. What equipment do I need to start printing mugs at home?
You’ll need a computer, design software, a sublimation or UV printer, sublimation ink (if using dye sublimation), sublimation paper, heat-resistant tape, and a mug press.
10.6. Is it possible to print a full wraparound design on a mug?
Yes, methods like dye sublimation and transfer printing allow for full wraparound designs, providing complete customization of the mug surface.
10.7. How long does the printing process typically take?
The printing process can take anywhere from a few minutes to an hour, depending on the method used, including design preparation, printing, heat pressing, and cooling.
10.8. Can I use regular paper instead of sublimation paper?
No, regular paper will not work for dye sublimation; you must use specially coated sublimation paper to ensure the ink transfers correctly.
10.9. What are the advantages of UV printing over dye sublimation?
UV printing can be used on a wider range of materials, including glass and stainless steel, and offers precise, accurate prints with vibrant colors, but the equipment can be more expensive.
10.10. How do I clean a printed mug to ensure the design lasts?
Hand wash the mug with mild soap and water, avoiding abrasive sponges or harsh chemicals, to protect the print and ensure its longevity.
Printing photos on coffee mugs is a rewarding and creative endeavor that allows you to personalize your everyday items and create unique gifts. Whether you choose dye sublimation, UV printing, or another method, understanding the basics and following the right steps will help you achieve professional-looking results. Remember to use high-quality images, calibrate your equipment, and protect your designs to ensure that your photo mugs last for years to come.
Ready to start your mug printing journey? Explore dfphoto.net for more detailed guides, creative ideas, and a vibrant community of photography and design enthusiasts. Discover the best techniques, find inspiration for your next project, and connect with fellow creators. Visit dfphoto.net today and unleash your creativity! Address: 1600 St Michael’s Dr, Santa Fe, NM 87505, United States. Phone: +1 (505) 471-6001.