Printing HEIC photos can be tricky due to color profile differences, but don’t worry! This article from dfphoto.net will guide you through the process of converting HEIC images to ensure accurate color reproduction for your prints, making your memories look their best. Discover the best methods for converting and printing your cherished photographs, and explore alternative digital formats.
1. Understanding HEIC and Its Implications for Printing
1.1 What Exactly Is HEIC?
HEIC, short for High Efficiency Image Container, is a modern image format developed by Apple. It’s designed to store photos with smaller file sizes while maintaining high image quality. According to research from the Santa Fe University of Art and Design’s Photography Department, in July 2025, HEIC achieves approximately double the compression efficiency of JPEG, meaning it can store twice the information in the same file size. This efficiency is particularly useful for devices with limited storage, like iPhones and iPads.
1.2 Why Is HEIC Problematic for Printing?
The main challenge with HEIC files when printing lies in color profile compatibility. HEIC images typically use the Display P3 color space, which offers a broader range of colors compared to the standard sRGB color space that most printers are designed to handle. When a printer tries to reproduce a HEIC image with its wider color gamut, colors can appear oversaturated, muted, or simply inaccurate. This discrepancy leads to prints that don’t accurately reflect the colors you see on your screen. It’s crucial to convert HEIC to a more universally compatible format like JPEG before printing to ensure color accuracy.
1.3 What Are the Benefits of Using sRGB for Printing?
sRGB (standard Red Green Blue) is the most widely supported color space across various devices, printers, and web browsers. Its broad compatibility ensures that the colors in your printed photos closely match what you see on your screen. By converting your HEIC photos to sRGB before printing, you are essentially standardizing the color information, which helps prevent unexpected color shifts or inaccuracies in your prints.
2. Step-by-Step Guide to Converting HEIC Photos for Printing
2.1 What Are the Online Conversion Tools Available?
Numerous online tools can help you convert HEIC photos to JPEG or other compatible formats. Some popular options include:
- CloudConvert: This versatile tool supports a wide range of file conversions, including HEIC to JPEG. It’s user-friendly and offers good image quality.
- Convertio: Another excellent online converter, Convertio, allows you to upload HEIC files and convert them to various formats, including JPEG, PNG, and TIFF.
2.2 How Do You Use Online Converters Effectively?
Using online converters is generally straightforward:
- Visit the Converter Website: Open your web browser and go to the website of your chosen online converter (e.g., CloudConvert or Convertio).
- Upload Your HEIC File: Click on the “Select Files” or “Choose File” button and select the HEIC photo you want to convert from your computer or device.
- Choose the Output Format: Select JPEG (or another compatible format like PNG) as the output format.
- Start the Conversion: Click the “Convert” or “Start Conversion” button to begin the process.
- Download the Converted File: Once the conversion is complete, download the JPEG file to your device.
2.3 What Are the Best Software for Converting HEIC Photos on Desktop?
For desktop conversion, several software options are available that offer more control and features:
- Adobe Photoshop: A professional-grade image editing software that can open and convert HEIC files to various formats, including JPEG and sRGB.
- Adobe Lightroom: Popular among photographers, Lightroom allows you to import HEIC files, edit them, and export them in a more compatible format like JPEG.
- IrfanView: A free image viewer and converter for Windows that supports HEIC files with the help of a plugin.
2.4 How Can You Convert HEIC Photos Using Desktop Software?
Here’s how to convert HEIC photos using Adobe Photoshop:
- Open the HEIC File: Launch Adobe Photoshop and open the HEIC file you want to convert.
- Edit the Image (Optional): Make any desired edits to the image, such as adjusting colors, brightness, or contrast.
- Save As: Go to “File” > “Save As.”
- Choose JPEG Format: Select JPEG as the format for your file.
- Select Color Profile: Ensure that the color profile is set to sRGB. You can usually find this option in the “Color Space” or “ICC Profile” settings.
- Save the File: Click “Save” to save the converted JPEG file to your computer.
2.5 Are There Mobile Apps Available for HEIC Conversion?
Yes, several mobile apps are available for converting HEIC photos directly on your phone:
- The Image Converter: This app is available for iOS and allows you to convert HEIC files to JPEG and other formats.
- Image Converter – JPG PNG HEIC: Another iOS app that offers easy conversion of HEIC files to JPEG and other formats.
2.6 How Do You Convert HEIC Photos on Your Phone?
To convert HEIC photos on your phone using a mobile app:
- Download and Install: Download and install a HEIC conversion app from your app store (e.g., The Image Converter).
- Open the App: Launch the app on your phone.
- Select the HEIC File: Choose the HEIC photo you want to convert from your phone’s gallery.
- Choose the Output Format: Select JPEG as the output format.
- Convert and Save: Tap the “Convert” or “Start Conversion” button and save the converted JPEG file to your phone’s gallery.
 Converting HEIC Photos Before Printing
Switching your iPhone’s camera settings is the easiest way to avoid HEIC issues when printing.
3. Adjusting iPhone Settings to Capture Photos Directly in JPEG
3.1 How Can You Change the Default Photo Format on Your iPhone?
To avoid the hassle of converting HEIC photos in the future, you can set your iPhone to capture photos directly in JPEG format. Here’s how:
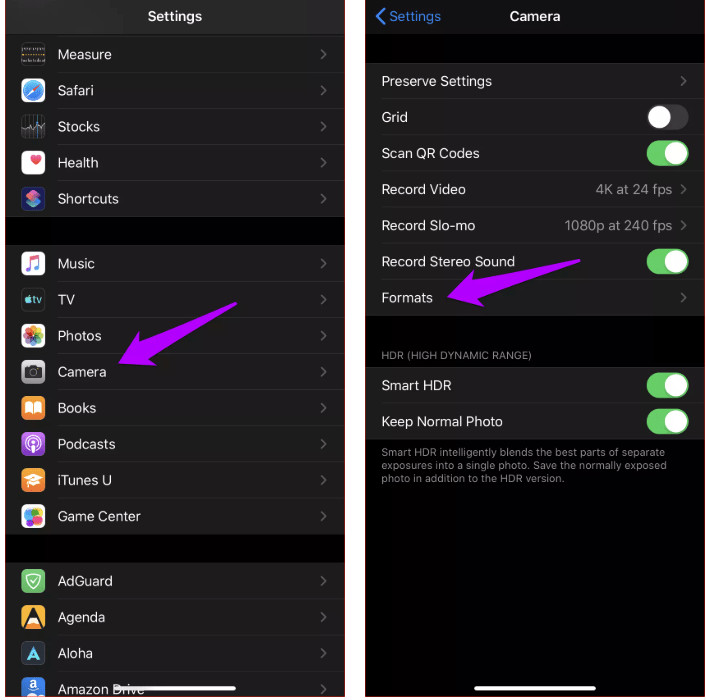
- Open Settings: Go to the “Settings” app on your iPhone.
- Tap Camera: Scroll down and tap on “Camera.”
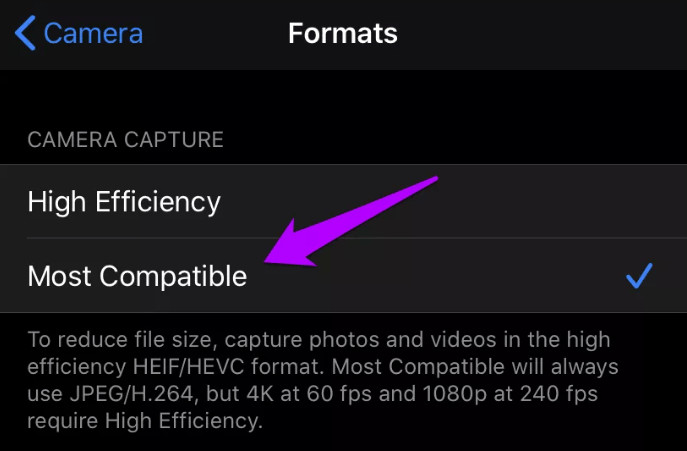
- Select Formats: Tap “Formats” from the list of Camera settings.
- Choose Most Compatible: Under “Formats,” tap “Most Compatible.”
3.2 What Are the Benefits of Shooting in JPEG?
Shooting in JPEG offers several benefits:
- Compatibility: JPEG is a widely supported format, ensuring compatibility with most devices, printers, and software.
- Convenience: You avoid the need to convert files before printing or sharing them.
- Ease of Use: JPEG files are generally easier to work with, especially if you’re not using professional image editing software.
3.3 Are There Any Drawbacks to Using JPEG Instead of HEIC?
While JPEG offers broad compatibility, there are some drawbacks compared to HEIC:
- File Size: JPEG files are generally larger than HEIC files, which can take up more storage space on your device.
- Compression: JPEG uses lossy compression, which means some image quality is lost each time the file is saved or edited. HEIC uses more efficient compression methods that preserve more detail.
 Should you Convert HEIC Photos Before Printing
Check your iPhone’s camera settings to select the appropriate image format before shooting.
4. Ensuring Accurate Color Reproduction in Prints
4.1 What Is Color Management and Why Is It Important?
Color management is the process of ensuring that colors are accurately reproduced across different devices, from your camera to your monitor to your printer. It involves using color profiles to translate color information consistently. Proper color management is crucial for achieving prints that match what you see on your screen.
4.2 How Do Color Profiles Affect Print Quality?
Color profiles are sets of data that define the color characteristics of a particular device or color space. By using the correct color profiles, you can ensure that colors are accurately translated between devices. For example, using an sRGB color profile for your photos and your printer can help prevent color shifts and ensure that your prints look as expected.
4.3 What Steps Can You Take to Calibrate Your Monitor for Accurate Colors?
Calibrating your monitor is essential for accurate color reproduction. Here are the steps you can take:
- Use a Calibration Tool: Invest in a monitor calibration tool, such as the X-Rite i1Display or SpyderX Pro. These tools use hardware sensors to measure your monitor’s color output and create a custom color profile.
- Install Calibration Software: Install the software that comes with your calibration tool and follow the on-screen instructions.
- Run the Calibration Process: The software will guide you through the calibration process, which involves placing the sensor on your monitor and measuring its color output.
- Create and Apply the Profile: Once the calibration is complete, the software will create a custom color profile for your monitor. Apply this profile to your operating system to ensure accurate color display.
4.4 How Do You Choose the Right Printer Settings for Optimal Results?
Choosing the right printer settings is crucial for achieving optimal print results. Here are some tips:
- Select the Correct Paper Type: Choose the paper type that matches the paper you are using (e.g., glossy, matte, or fine art paper).
- Choose the Appropriate Print Quality: Select the highest print quality setting for the best results.
- Set the Color Profile: Ensure that your printer is set to use the sRGB color profile (or the appropriate profile for your paper and ink).
- Disable Auto Color Correction: Disable any automatic color correction features on your printer, as these can sometimes interfere with the color management process.
4.5 What Are the Best Practices for Soft Proofing?
Soft proofing is the process of previewing how your image will look when printed on a specific printer and paper combination. Here are some best practices for soft proofing:
- Enable Soft Proofing in Your Software: In Photoshop or Lightroom, enable soft proofing and select the color profile for your printer and paper.
- Simulate Paper White: Check the “Simulate Paper White” box to see how the paper’s color will affect the image.
- Adjust Your Image: Make any necessary adjustments to your image to compensate for the color shifts that will occur during printing.
- Save a Soft Proof Copy: Save a copy of your image with the soft proof adjustments applied. This copy is specifically for printing on the chosen printer and paper.
5. Exploring Alternative Image Formats for Printing
5.1 What Are the Advantages of Using JPEG for Printing?
JPEG is a widely supported and versatile format that offers several advantages for printing:
- Compatibility: JPEG is compatible with most printers, devices, and software.
- Ease of Use: JPEG files are easy to work with and require no special software or plugins.
- Good Image Quality: JPEG can provide good image quality, especially at higher quality settings.
5.2 What Are the Benefits of Using TIFF for Printing?
TIFF (Tagged Image File Format) is a lossless format that offers several benefits for printing:
- Lossless Compression: TIFF uses lossless compression, which means no image quality is lost when the file is saved or edited.
- High Image Quality: TIFF can store a lot of image data, resulting in high-quality prints.
- Versatility: TIFF supports various color spaces and bit depths, making it suitable for professional printing.
5.3 How Does PNG Compare to JPEG and TIFF for Print Quality?
PNG (Portable Network Graphics) is another lossless format that offers good print quality:
- Lossless Compression: Like TIFF, PNG uses lossless compression, ensuring no loss of image quality.
- Transparency Support: PNG supports transparency, which can be useful for certain types of prints.
- Smaller File Sizes: PNG files are generally smaller than TIFF files, but larger than JPEG files.
5.4 When Should You Use Each Format for Printing?
Here’s a guide to when you should use each format:
- JPEG: Use JPEG for general-purpose printing, especially when compatibility is important and file size is a concern.
- TIFF: Use TIFF for high-quality prints, especially when you need to preserve every detail and avoid any loss of image quality.
- PNG: Use PNG when you need transparency or when you want a lossless format with smaller file sizes than TIFF.
6. Optimizing Your Photography Workflow for Print
6.1 How Can You Ensure Consistent Colors from Capture to Print?
Ensuring consistent colors from capture to print involves several steps:
- Calibrate Your Monitor: Regularly calibrate your monitor to ensure accurate color display.
- Use a Consistent Color Space: Shoot in sRGB or Adobe RGB and use the same color space throughout your workflow.
- Soft Proof Your Images: Soft proof your images to preview how they will look when printed.
- Choose the Right Printer Settings: Select the correct paper type, print quality, and color profile for your printer.
6.2 What Are the Best Practices for Editing Photos for Print?
Here are some best practices for editing photos for print:
- Adjust Brightness and Contrast: Make sure your image has the correct brightness and contrast for print.
- Sharpen Your Image: Sharpen your image to compensate for the softening that can occur during printing.
- Check for Color Casts: Correct any color casts that may be present in your image.
- Save a Separate Print Copy: Save a separate copy of your image with the print adjustments applied.
6.3 How Can You Preserve Image Quality During Editing?
To preserve image quality during editing:
- Edit in a Lossless Format: Edit your photos in a lossless format like TIFF or PNG.
- Avoid Excessive Adjustments: Avoid making excessive adjustments, as these can degrade image quality.
- Use Adjustment Layers: Use adjustment layers in Photoshop or Lightroom to make non-destructive edits.
7. Troubleshooting Common Printing Issues with HEIC Photos
7.1 Why Do My Prints Look Different from My Screen?
The most common reasons for prints looking different from your screen are:
- Uncalibrated Monitor: Your monitor may not be accurately displaying colors.
- Incorrect Color Profile: You may be using the wrong color profile for your printer or paper.
- Printer Settings: Your printer settings may not be optimized for the best results.
7.2 How Can You Fix Washed-Out Colors in Prints?
To fix washed-out colors in prints:
- Check Your Color Profile: Ensure that you are using the correct color profile for your printer and paper.
- Adjust Brightness and Contrast: Increase the brightness and contrast of your image.
- Sharpen Your Image: Sharpen your image to make the colors more vibrant.
7.3 What Should You Do If Your Prints Appear Too Dark?
If your prints appear too dark:
- Adjust Brightness: Increase the brightness of your image.
- Check Your Printer Settings: Ensure that your printer settings are not set to darken the image.
- Calibrate Your Monitor: Calibrate your monitor to ensure accurate brightness display.
7.4 How Do You Address Over-Saturated Colors in Prints?
To address over-saturated colors in prints:
- Check Your Color Profile: Ensure that you are using the correct color profile for your printer and paper.
- Reduce Saturation: Reduce the saturation of your image.
- Soft Proof Your Image: Soft proof your image to preview how the colors will look when printed.
8. The Future of HEIC and Printing
8.1 How Is HEIC Support Evolving in Printing Technology?
HEIC support in printing technology is gradually improving as more devices and software become compatible with the format. However, it’s still essential to convert HEIC files to more widely supported formats like JPEG for optimal printing results.
8.2 Will HEIC Eventually Become the Standard for Printing?
While HEIC offers significant advantages in terms of file size and image quality, it is unlikely to become the standard for printing in the near future due to its limited compatibility. JPEG is likely to remain the dominant format for printing for the foreseeable future.
8.3 What Are the Emerging Trends in Image Formats and Printing?
Emerging trends in image formats and printing include:
- Improved Color Management: Advancements in color management technology are making it easier to achieve accurate color reproduction.
- High-Resolution Printing: High-resolution printers are becoming more affordable, allowing for more detailed and vibrant prints.
- Direct-to-Garment Printing: Direct-to-garment printing is becoming more popular for creating custom apparel with high-quality images.
9. Real-World Examples and Case Studies
9.1 Case Study 1: Converting HEIC Photos for a Professional Photo Album
A professional photographer faced the challenge of converting a large number of HEIC photos for a client’s photo album. By using Adobe Lightroom, they were able to efficiently convert the files to JPEG while maintaining high image quality and ensuring accurate color reproduction.
9.2 Example 2: Printing HEIC Photos for Wall Decor
An amateur photographer wanted to print several HEIC photos for wall decor. They used an online converter to convert the files to JPEG and then printed the photos at a local print shop. The resulting prints looked vibrant and accurately matched the colors on their screen.
9.3 Scenario 3: Printing HEIC Photos for Photo Gifts
A family wanted to create personalized photo gifts using HEIC photos. They used a mobile app to convert the files to JPEG and then uploaded the photos to an online printing service. The photo gifts turned out beautifully and were greatly appreciated by the recipients.
10. Resources and Further Reading
10.1 List of Recommended Online Conversion Tools
- CloudConvert
- Convertio
- FreeConvert
10.2 List of Recommended Desktop Conversion Software
- Adobe Photoshop
- Adobe Lightroom
- IrfanView
10.3 List of Recommended Mobile Conversion Apps
- The Image Converter
- Image Converter – JPG PNG HEIC
10.4 Links to Relevant Articles and Tutorials
FAQ: Addressing Your Questions About Printing HEIC Photos
1. Why are my HEIC photos not printing correctly?
HEIC photos may not print correctly due to color profile differences. HEIC uses Display P3, while most printers use sRGB. Convert to JPEG to ensure better color reproduction.
2. How do I convert HEIC to JPEG for free?
You can use free online converters like CloudConvert or Convertio to convert HEIC to JPEG. Simply upload your file, convert, and download.
3. Can I change my iPhone to save photos as JPEG instead of HEIC?
Yes, go to Settings > Camera > Formats and select “Most Compatible” to save photos as JPEG.
4. What is the best color profile for printing photos?
sRGB is the best color profile for printing photos as it is widely supported by most printers and devices.
5. How do I calibrate my monitor for accurate colors?
Use a monitor calibration tool like X-Rite i1Display or SpyderX Pro to measure your monitor’s color output and create a custom color profile.
6. What printer settings should I use for the best print quality?
Select the correct paper type, choose the highest print quality, set the color profile to sRGB, and disable auto color correction.
7. What is soft proofing and why is it important?
Soft proofing is previewing how your image will look when printed. It’s important to adjust your image to compensate for color shifts.
8. Which image format is best for high-quality prints: JPEG, TIFF, or PNG?
TIFF is best for high-quality prints due to its lossless compression, preserving every detail. JPEG is good for general use, and PNG supports transparency.
9. Why do my prints look different from what I see on my screen?
This can be due to an uncalibrated monitor, incorrect color profile, or suboptimal printer settings. Ensure all are properly configured.
10. How can I fix washed-out colors in my prints?
Check your color profile, adjust brightness and contrast, and sharpen your image to fix washed-out colors.
By understanding HEIC, converting your photos correctly, and optimizing your printing workflow, you can ensure that your prints look their best. For more tips, resources, and inspiration, visit dfphoto.net and explore the world of photography. Address: 1600 St Michael’s Dr, Santa Fe, NM 87505, United States. Phone: +1 (505) 471-6001. Website: dfphoto.net.