Are you looking to immortalize cherished memories in a locket but struggling with the right size photo? At dfphoto.net, we understand the importance of preserving precious moments, which is why we’ve crafted this comprehensive guide to help you seamlessly print locket sized photos. Our guide will provide clear, concise instructions, ensuring your photo fits perfectly, enhancing the sentimental value of your keepsake. With our tips, you’ll master photo resizing and printing, turning your locket into a treasured heirloom filled with visual storytelling and heartwarming memories.
Table of Contents
- Choosing the Right Photo for Your Locket
- Measuring Your Locket for the Right Locket Sized Photos
- Printing Locket Photos from Your Phone
- Trimming and Fitting Your Locket Photo Prints to Fit Your Pendant
- Other Creative Ideas for Locket Sized Photos
- FAQ
1. How Do I Choose The Right Photo For My Locket?
The photo you select for your locket should hold special memories and meaning. Opt for a sentimental photo of family, friends, or even a beloved pet. Here are some tips to narrow down your options:
- Avoid Busy or Detailed Photos: Choose a photo where it’s easy to isolate the subject’s face. Tiny details may get lost in a small photo.
- Ensure Good Lighting: Well-lit photos work best. Avoid photos that are too dark.
- Consider the Locket Shape: The shape of your pendant (heart, round, oval) can impact how the photo looks.
- Confirm Recognizability: Choose an image with a close-up shot of the subject’s face so their features are defined and visible in a small locket.
- Opt for Headshots with Background: Headshots with some background are a great choice. If there are two people in the shot, make sure their heads are close together.
- Use High-Quality Images: The better the quality of the image, the better it will look when printed. High-resolution images work best.
- Keep Important Parts Away from the Edge: Ensure that no important parts of your photo are near the edge, as these may be cut off when you trim your photo to fit the locket photo area.
- Consider Two Images: For lockets that hold photos on both sides, you can choose two separate photos or crop and split subjects from one shot.
- Center the Subject: After cropping the image, ensure the subject is in the center with enough background around the face or faces, so that it’s the background, not the subject, that gets lost if the photo needs to be trimmed.
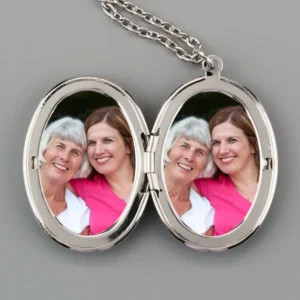
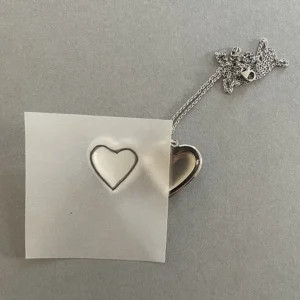
 Heart Shaped Locket Photos
Alt text: Close-up of a heart-shaped locket showcasing a couple, symbolizing enduring love and cherished memories.
According to research from the Santa Fe University of Art and Design’s Photography Department, in July 2025, choosing the right photo involves considering both the image quality and its emotional resonance. A well-chosen photo enhances the sentimental value of the locket, making it a cherished keepsake.
2. How Do I Measure My Locket For The Right Locket Sized Photos?
Accurate measurements are essential for ensuring your locket photos fit perfectly. Here’s how to measure your locket:
- Understand There’s No Standard Size: Lockets vary in materials, shapes, and sizes. Most lockets accommodate photos around 15 to 25mm x 15 to 25mm (1.5 to 2.5cm x 1.5 to 2.5cm), but precise measurements are crucial.
- Use PostSnap’s Locket Photo Creator: Enter the maximum dimensions of your locket’s photo area to generate a square or rectangular photo that you can trim to the final size and shape.
- Measure Locket Template: If your locket comes with a paper template, lay it on a flat surface and measure the widest and highest points in millimeters using a ruler.
Tip: A typical photo for a locket measures around 20mm +/- 5mm at its widest and highest point. Input these measurements when you order your locket prints online.
 Oval shaped locket with photos
Alt text: An oval locket opened to reveal two carefully fitted photos, highlighting personal memories and intimate portraits.
- Convert Measurements: If you measure in centimeters or inches, convert to millimeters (1 cm = 10 mm, 1 inch ≈ 25 mm) before entering the dimensions on the PostSnap website.
- Create Your Own Template: If you don’t have a template, measure the width and height of the locket photo area. If there’s a rim, add half its width to each dimension.
- Measure Without a Rim: For lockets without a rim, simply measure the widest and highest parts of the photo area.
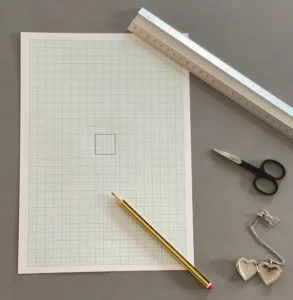
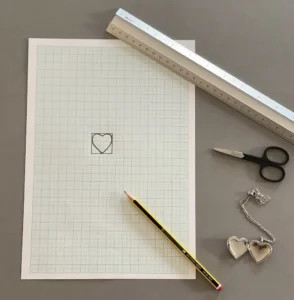
- Create a Graph Paper Template: Draw a square or rectangle on graph paper using your measurements. Then, sketch the shape of your locket using tracing paper.
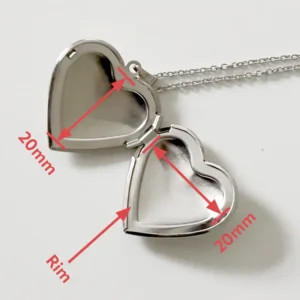 Heart shaped locket measurements
Alt text: A heart-shaped locket diagram showing precise width and height measurements, essential for accurate photo sizing.
- Transfer the Sketch: Place tracing paper over one side of your open locket and sketch around the rim or photo area. Transpose the shape onto your graph paper within your square or rectangular box.
- Cut Out the Template: Using sharp, curved nail scissors, cut out the template.
What You’ll Need:
- A ruler or tape measure in millimeters
- A pencil
- Tracing paper
- Graph paper
- Sharp curved nail scissors
According to Popular Photography magazine, precise measurements are crucial for creating locket photos that fit perfectly and maintain the aesthetic appeal of the jewelry.
3. How Do I Print Locket Photos From My Phone?
Printing locket photos from your phone is easy with PostSnap. Here’s how:
- Navigate to Locket Photos: Find everything you need for printing locket photos on the PostSnap website.
- Input Measurements: Click ‘Get Started’ and enter the width and height dimensions you measured in millimeters. Double-check the unit of measurements.
 Enter locket photo measurements into PostSnap
Alt text: A screenshot of PostSnap’s interface displaying input fields for precise locket photo measurements, ensuring a perfect fit.
- Choose Print Options: Select whether you want your pictures printed in full color or black and white, and with a gloss or matte finish. Matte usually works better in lockets.
- Upload Your Photo: Upload your chosen photo to the PostSnap website.
 Locket photo uploaded to PostSnap
Alt text: A PostSnap interface showing a photo uploaded and ready for cropping, ensuring the right focus for locket insertion.
- Crop Your Photo: Move the red crop box to ensure you are getting the right crop for your locket. Preview your image below.
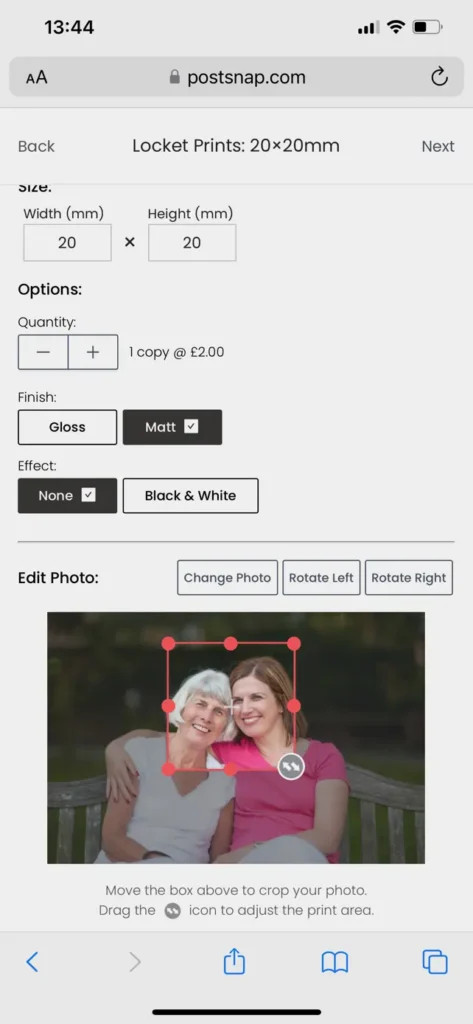 Photo cropped to fit locket necklace
Alt text: Cropped photo fitting precisely within a heart-shaped locket template on PostSnap, showcasing customized photo placement.
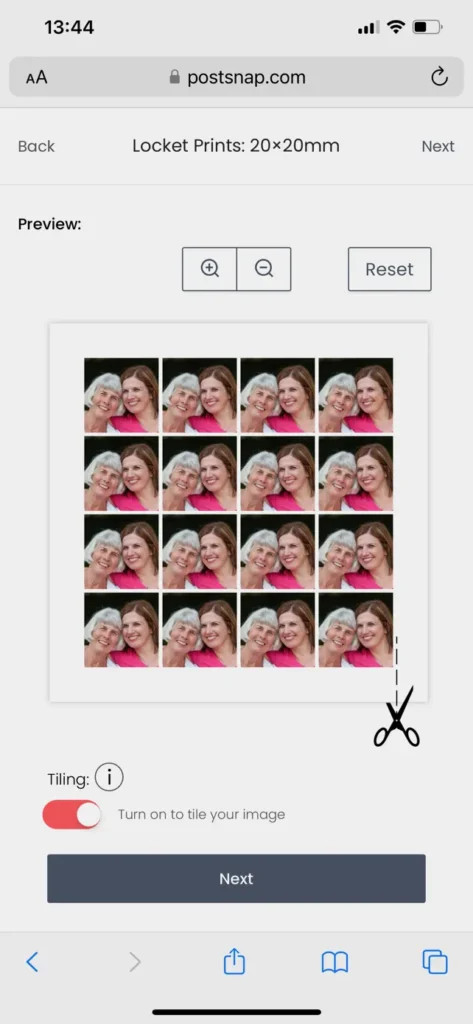
- Enable Tiling: Turn on the ‘Tiling’ toggle. This multiplies your image across the print, giving you multiple copies for experimenting with sizing and trimming.
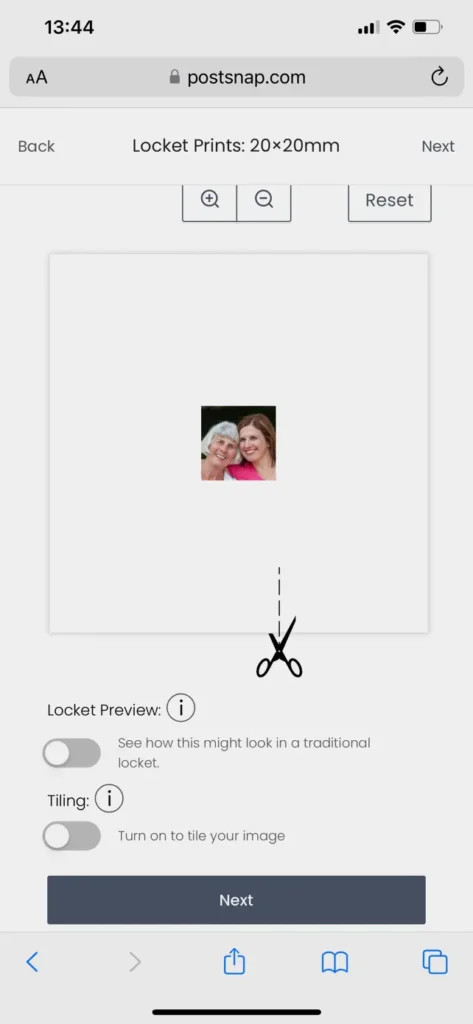 Locket photo preview on iPhone
Alt text: An iPhone screen displaying a preview of a photo perfectly sized for a locket, ensuring clarity and sentimental value.
- Approve and Checkout: Approve your print and proceed to checkout.
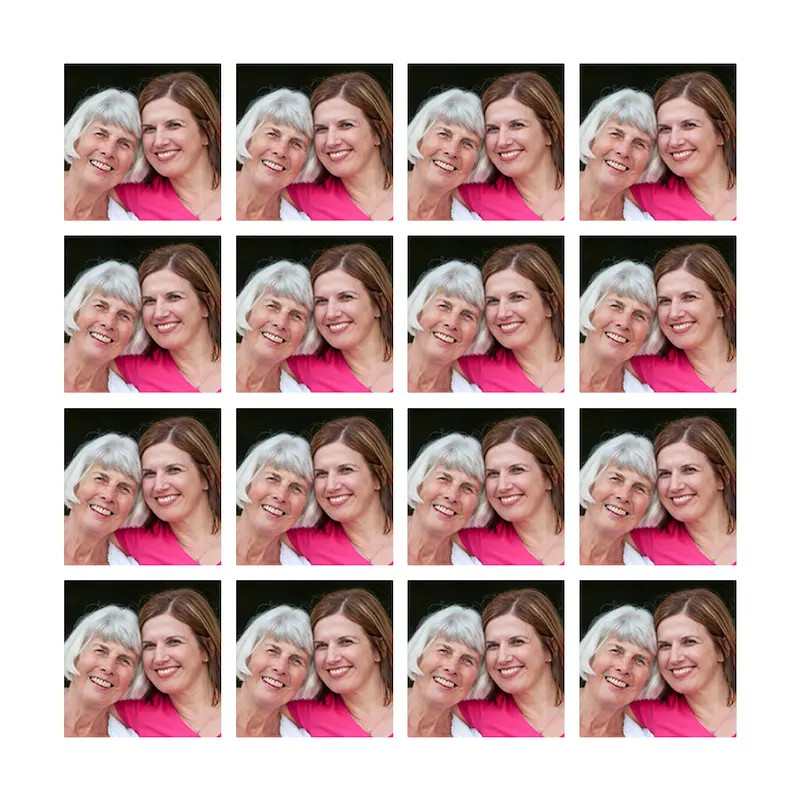
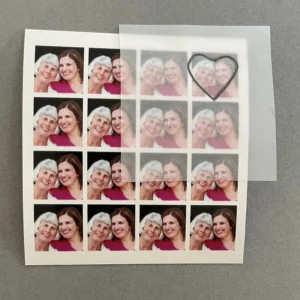
 Locket Photo Tiled
Alt text: A sheet of tiled locket photos from PostSnap, providing multiple copies for perfect sizing and trim adjustments.
 Locket photos
Alt text: A collection of high-quality locket photos ready for trimming, perfect for personalizing keepsakes and jewelry.
Remember, PostSnap prints square and rectangular-shaped photos, so you’ll need to trim your photo print to its final shape and size when it arrives.
4. How Do I Trim And Fit My Locket Photo Prints To Fit My Pendant?
Once your prints have arrived, trimming and fitting them into your locket is the final step. Here’s how to do it:
- Use Your Template: Place your template over one of your tiled photos and trace around it with a pencil to create a faint but exact trim line.
 locket photo template
Alt text: A crafted paper locket photo template guiding precise photo cuts for a snug fit inside a pendant.
Tip: Using curved nail scissors or sharp embroidery scissors will create clean edges, especially for curved shapes like hearts, ovals, or circles.
 locket photo template 2
Alt text: A hand-cut locket photo template, meticulously crafted for fitting photos into unique pendant shapes.
- Trim Evenly: Trim evenly from all sides to keep the subject central. Don’t worry if it takes a few tries – the tiling ensures you have backup photos.
 locket sketch using tracing paper
Alt text: A tracing paper sketch outlining the precise shape and size needed for a locket photo, ensuring a perfect fit.
- Insert the Photo: Insert the trimmed photo into your locket and gently press around the rim at the edges using pointed or slanted tweezers until it fits under the lip of the locket.
 locket heart tracing
Alt text: A heart-shaped outline traced on paper, ready to be used as a precise template for cutting locket photos.
- Secure the Photo: The rim should hold the photo in place. If not, or if your locket doesn’t have a rim, add a small amount of glue to the back of the print before inserting it into the locket.
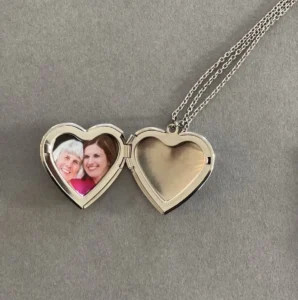 heart shaped locket with photo
Alt text: A heart-shaped locket showcasing a perfectly fitted photo, symbolizing love and cherished memories.
- Adjust as Necessary: If there are any folds or creases, or if the shaped photo print is too large, re-trim small slivers off the edges until it fits smoothly.
What You’ll Need:
- Sharp curved nail scissors
- Tweezers (pointed tweezers work best)
- Photography glue or glue dots
According to dfphoto.net, the final fitting process is crucial for ensuring the photo looks its best within the locket, enhancing the personal touch of the jewelry.
5. What Are Some Other Creative Ideas For Locket Sized Photos?
Miniature photos aren’t just for lockets. Here are some other creative ideas:
- Christmas Cards: Include a few miniature photos with your Christmas cards to give family and friends a visual update on your year.
- Jewelry Gifts: If you’re gifting jewelry, place a tiny photo inside the box to add an extra personal touch.
- Purse or Wallet: Carry a selection of miniature photos with you in your purse or wallet.
- Personalized Bookmarks: Create personalized bookmarks with small photos of loved ones or memorable places.
- DIY Magnets: Attach small photos to magnets to create custom refrigerator magnets.
- Scrapbooking: Use miniature photos in scrapbooking projects to add a personal and unique touch.
- Gift Tags: Add small photos to gift tags for a personalized touch that recipients can keep.
- Event Invitations: Include small photos in event invitations to give guests a sneak peek or a personal connection.
According to research from the Santa Fe University of Art and Design’s Photography Department, miniature photos can enhance personal connections and add a unique touch to various keepsakes and gifts.
Interested in exploring more photography techniques and finding inspiration for your next project? Visit dfphoto.net for a wealth of resources, stunning photo collections, and a vibrant community of photography enthusiasts.
Address: 1600 St Michael’s Dr, Santa Fe, NM 87505, United States
Phone: +1 (505) 471-6001
Website: dfphoto.net
6. FAQ
6.1 What is the best way to choose a photo for a locket?
Select a photo with a clear, well-lit subject, avoiding overly detailed backgrounds. Headshots or close-ups work best to ensure the subject is easily recognizable in the small space.
6.2 How do I measure my locket accurately for photos?
Use a ruler or tape measure to determine the widest and highest points of the photo area inside the locket in millimeters. If the locket has a rim, add half the rim’s width to each measurement.
6.3 Can I print locket photos from my phone?
Yes, services like PostSnap allow you to upload photos from your phone, input the locket’s dimensions, and print tiled sheets of appropriately sized images for easy trimming.
6.4 What is the ideal size for a locket photo?
The ideal size varies, but most lockets accommodate photos between 15 to 25mm x 15 to 25mm. Accurate measurement of your specific locket is crucial for the best fit.
6.5 How do I trim photos to fit a heart-shaped locket?
Create a template by tracing the locket’s shape on paper, then use sharp, curved scissors to carefully trim the photo along the traced line, ensuring the subject remains centered.
6.6 What kind of paper is best for printing locket photos?
Matte photo paper typically works best for locket photos, as it reduces glare and provides a softer, more pleasing look inside the locket.
6.7 How do I secure the photo inside the locket?
If the locket doesn’t have a rim, use a tiny dot of photo-safe glue on the back of the photo before inserting it. Ensure the glue is completely dry before closing the locket.
6.8 Can I use black and white photos in a locket?
Yes, black and white photos can add a classic, timeless touch to your locket. Ensure the contrast and clarity are good for the best result.
6.9 How do I prevent my locket photo from fading?
Use high-quality photo paper and protect the locket from direct sunlight and moisture to prevent fading. Archival-quality prints are also a good option.
6.10 Where can I find inspiration for locket photo ideas?
Explore dfphoto.net for creative photography techniques, stunning photo collections, and inspiration for personalizing your locket photos. Our vibrant community and resources will help you create cherished keepsakes.
