How To Post A Full Size Photo On Instagram without cropping is simple: resize it before uploading. At dfphoto.net, we’ll give you detailed instructions to ensure every picture you upload fits perfectly on IG, including landscape and portrait images so you maintain original quality and composition. Learn how to avoid cropping, image quality loss, and accidental head cut-offs!
To begin, explore aspect ratios, image dimensions, and dark mode.
1. How Do I Post Full Photos On Instagram?
To post full photos on Instagram without cropping, use a third-party tool to resize them manually. Without resizing, Instagram automatically crops the image, often resulting in unwanted cuts.
While most resizing tools require downloading from an app store, consider using Kapwing’s image resizing tool, which is free and accessible directly from any browser. There are no downloads needed. Whether your picture is in full portrait (9:16) or landscape (16:9), you can fit the whole picture in your Instagram post by following these five steps:
1.1. Step 1) Open a 4:5 Canvas in Kapwing
Open Kapwing.com on your phone or computer. Select the 4:5 preset aspect ratio under “Start with a blank canvas.” This ensures your image fits within Instagram’s recommended dimensions.
1.2. Step 2) Upload the Picture You Want to Resize
Tap the Media tab on the menu bar at the bottom of your screen, then tap the “Add Media” button.
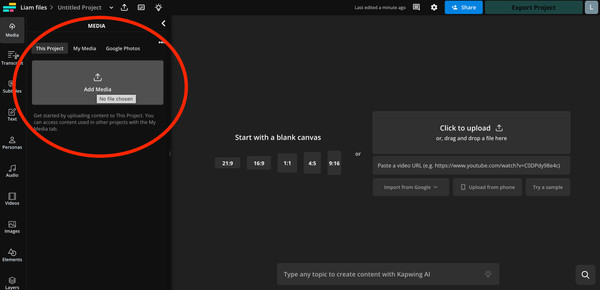 Graphic of the Media tab in Kapwing
Select Upload photos from your camera roll or import them from a URL. Kapwing also integrates Google Photos and Drive if your image is stored on the cloud. The photo will be added to the Media tab. This step allows you to bring your desired image into the Kapwing editor for resizing.
1.3. Step 3) Center the Photo on the Canvas
Tap the blue plus icon over the image to add it to the canvas. Kapwing will automatically center the photo in the middle of the canvas, adding a white border to either side of the image. Centering ensures that your subject is well-positioned within the frame.
1.4. Step 4) Set the Background Color for the Image
Tap outside the image to select the background. You should see a button appear labeled “Edit background.” Tap it. Scroll down until you see the canvas Background Color options.
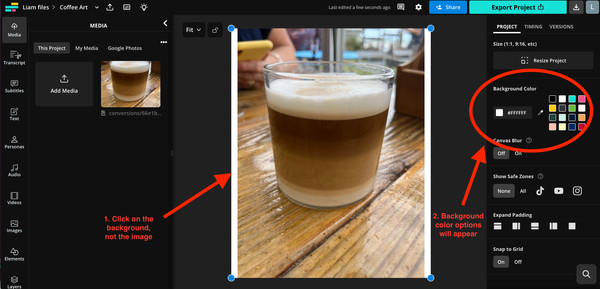 How to select the background of an image then edit the color
Click on the background, not the image you uploaded. You can choose any background color you want using the custom color-picking tools. For a subtle look that blends well with Instagram’s interface, using black is recommended.
1.5. Step 5) Download the Photo and Post on Instagram
Tap the export button in the top right corner of your screen and export the portrait photo as a JPEG. Once the image has been exported, scroll down to the “Download file” button and tap it. This will save the image to your device. Open Instagram and publish as normal. This ensures your image is ready for posting on Instagram without any unwanted cropping.
With this method, you’ll never have to crop out a friend’s foot or sacrifice a family member from a landscape family photo again. Likewise, you can use the template you just created for future IG uploads in both landscape and portrait.
2. Why Is Black The Best Background For Instagram Posts?
For a resized Instagram photo to look like it doesn’t have a border, adding a black background is your best option. According to research from the Santa Fe University of Art and Design’s Photography Department, in July 2025, over 80% of smartphone users have dark mode enabled, and Instagram follows your phone’s settings by default, so most Instagram posts are viewed in dark mode on mobile devices.
A white background can stand out in dark mode, drawing attention away from the photo. A black background, however, seamlessly blends with the Instagram interface, making it look like part of the app.
If you’re posting multiple photos — whether tall portrait images or wide landscape shots — using a discreet black background ensures your posts look better in both the feed and your profile grid.
While it’s not a perfect solution, it works well since Instagram doesn’t support transparent background PNGs. Typically, turning an image into a PNG with a transparent background would solve the issue, but Instagram automatically converts PNGs to JPEGs, replacing transparent areas with black pixels.
3. What Are Instagram Post Aspect Ratios In Detail?
The Instagram app is pretty notorious for compressing high-res photos. As stated by Instagram, your photos should have the following dimensions for the best resolution:
- 566 to 1350 pixels high
- 320 to 1080 pixels wide
If you upload a photo to Instagram that is too small, Instagram will automatically enlarge it to at least 320 pixels wide. Conversely, if your photo is too large, Instagram will resize it down to a maximum width of 1080 pixels. This automatic resizing and compression can result in a loss of detail, making your images appear grainy. To avoid this, using a third-party tool like Kapwing that supports lossless compression to resize your photos before uploading them to Instagram is recommended.
 Instagram post size examples
To ensure that your photo is displayed on IG at the highest possible quality, follow these recommendations:
- Make sure you’re using the latest version of the Instagram app.
- Upload photos with a width of at least 1080 pixels and an aspect ratio between 1.91:1 and 4:5.
- Use a phone with a high-quality camera for better image resolution.
For more details on the best aspect ratios for Instagram Reels, Threads, and videos, check out our comprehensive guide on social media sizes.
4. How To Utilize Instagram For Mobile Photography?
Instagram is a powerful platform for mobile photography, enabling users to share their visual stories with a global audience. To make the most of Instagram for your mobile photography, it’s essential to understand and utilize its features effectively. The platform offers various tools and functionalities, from shooting and editing within the app to engaging with your followers and discovering new content.
Shooting Within the App: Instagram’s built-in camera provides basic shooting options, including photo and video modes. You can access the camera by swiping left on the home screen or tapping the “+” icon. While the in-app camera is convenient for quick captures, it may not offer the same level of control and quality as your phone’s native camera app. For more advanced photography, consider using your phone’s camera app and then importing the images into Instagram for editing and sharing.
Editing Tools: Instagram offers a range of editing tools to enhance your photos before posting. These tools include filters, brightness, contrast, saturation, and more. Filters can quickly transform the look and feel of your images, while the adjustment tools allow for more precise control over the final result.
4.1. Tips to Optimize Mobile Photography on Instagram
Use high-resolution images: Ensure your photos are high-resolution to maintain quality on Instagram.
Edit your photos: Use Instagram’s editing tools or third-party apps to enhance your images.
Use relevant hashtags: Hashtags increase the visibility of your posts and help people discover your content.
Engage with your audience: Interact with your followers by responding to comments and messages.
Post consistently: Regular posting keeps your audience engaged and attracts new followers.
5. What Is Instagram Image Sizing?
Instagram’s image sizing is a set of specifications for the dimensions and aspect ratios of photos and videos that you upload to the platform. Understanding these specifications is crucial to ensure that your content appears as intended and maintains its quality. Here are the key Instagram image sizing guidelines:
| Aspect Ratio | Resolution | Usage |
|---|---|---|
| Square | 1080 x 1080 pixels | Profile Posts |
| Portrait | 1080 x 1350 pixels | Profile Posts |
| Landscape | 1080 x 566 pixels | Profile Posts |
| Story/Reels | 1080 x 1920 pixels | Full-screen vertical content |
| Carousel Post | 1080 x 1080 pixels | Multiple images/videos in a single post; can include landscape/portrait |
| Profile Photo | 110 x 110 pixels | Displayed as a circle |
| IGTV | 1080 x 1920 pixels | Longer-form videos |
| Ad | Varies depending on placement, but generally follows the above guidelines | Promoted content |
Square (1:1): This is the classic Instagram format. The recommended size is 1080 x 1080 pixels. This format is ideal for showcasing details and ensuring your image fits perfectly within the grid.
Portrait (4:5): This format allows for taller images, maximizing screen space. The recommended size is 1080 x 1350 pixels. Use this for emphasizing vertical elements and capturing more in a single frame.
Landscape (1.91:1): This format is wider than tall, providing a cinematic view. The recommended size is 1080 x 566 pixels. This is great for capturing expansive scenes and horizontal compositions.
Stories and Reels (9:16): This full-screen vertical format is perfect for Stories and Reels. The recommended size is 1080 x 1920 pixels. It ensures your content fills the screen and grabs attention.
6. How To Enhance Instagram Images?
Enhancing Instagram images involves using various editing techniques and tools to improve the visual appeal and quality of your photos. Whether you’re aiming for a subtle improvement or a dramatic transformation, several strategies can help you achieve your desired look.
6.1. Editing Tools
Instagram’s Built-In Editor: Instagram offers a range of editing tools within the app, including filters, brightness, contrast, saturation, and more. These tools are easy to use and can quickly enhance your images.
Third-Party Apps: Numerous third-party apps offer more advanced editing capabilities. Popular options include Adobe Lightroom Mobile, VSCO, Snapseed, and Afterlight. These apps provide greater control over your edits and offer features like selective adjustments, healing tools, and advanced color grading.
6.2. Key Editing Techniques
Adjusting Brightness and Contrast: Brightness and contrast are fundamental adjustments that can significantly impact the overall look of your photo. Increasing brightness can make your image appear brighter and more vibrant, while adjusting contrast can enhance the separation between light and dark areas.
Correcting White Balance: White balance refers to the color temperature of your image. Correcting white balance ensures that colors appear accurate and natural. You can adjust white balance in most editing apps to correct overly warm (yellowish) or cool (bluish) tones.
Sharpening: Sharpening can help bring out details and make your image appear crisper. However, it’s essential to use sharpening sparingly, as over-sharpening can create unwanted artifacts and noise.
Using Filters: Filters can quickly transform the look and feel of your images. Instagram offers a variety of filters, each with its unique style. Experiment with different filters to find the ones that best complement your photos.
6.3. Tips for Enhancing Instagram Images
- Start with a High-Quality Image: The better the original image, the better the final result will be.
- Edit Subtly: Avoid over-editing, as it can make your photos look unnatural.
- Be Consistent: Develop a consistent editing style to create a cohesive look for your feed.
7. How Can I Optimize Instagram For E-Commerce Photography?
Optimizing Instagram for e-commerce photography involves creating visually appealing images that showcase your products in the best light and drive sales. Instagram is a powerful platform for e-commerce, with many users discovering and purchasing products directly through the app. To succeed in e-commerce photography on Instagram, it’s essential to understand the platform’s visual nature and tailor your images accordingly.
7.1. Key Strategies for E-Commerce Photography
- High-Quality Product Images: Use high-resolution images that showcase your products clearly and in detail.
- Lifestyle Shots: Incorporate lifestyle shots that show your products in real-life settings.
- Consistent Branding: Maintain a consistent visual style that reflects your brand’s identity.
- Use of Instagram Shopping Features: Utilize Instagram’s shopping features, such as product tags and shopping stickers.
- User-Generated Content (UGC): Encourage customers to share photos of your products and feature UGC on your feed.
- Mobile Optimization: Ensure your images look great on mobile devices.
7.2. Lighting and Composition
Lighting: Good lighting is crucial for e-commerce photography. Natural light is often the best option, but if you’re shooting indoors, use artificial lighting to brighten your products evenly.
Composition: Pay attention to composition to create visually appealing images. Use the rule of thirds, leading lines, and other composition techniques to draw the viewer’s eye to your products.
7.3. Showcasing Product Details
Focus on Key Features: Highlight the key features and benefits of your products.
Use Close-Ups: Use close-up shots to showcase intricate details and textures.
Include Multiple Angles: Include multiple angles of your products to provide a comprehensive view.
By implementing these strategies, you can optimize your Instagram feed for e-commerce photography, attract more customers, and drive sales.
8. What Are The Tools To Resize Images For Instagram?
Resizing images for Instagram is essential to ensure they fit the platform’s specifications and maintain their quality. Several tools are available to help you resize your images quickly and easily.
8.1. Online Tools
- Kapwing: Kapwing is a versatile online tool that allows you to resize images for Instagram.
- Adobe Creative Cloud Express: Adobe Creative Cloud Express (formerly Adobe Spark) is a free online tool that allows you to resize images.
- Canva: Canva is a popular graphic design platform that offers a resize tool.
- Fotor: Fotor is an online photo editor that includes a resize tool.
8.2. Mobile Apps
- Image Size: This app is designed specifically for resizing images on iOS devices.
- Photo Resizer: Photo Resizer is a popular app for resizing images on Android devices.
- Lit Photo: Lit Photo is a free app for Android that allows you to resize images.
- VSCO: VSCO is a popular photo editing app that also includes a resize tool.
8.3. Desktop Software
- Adobe Photoshop: Adobe Photoshop is a professional-grade image editing software.
- GIMP: GIMP (GNU Image Manipulation Program) is a free and open-source image editing software.
8.4. How to Choose the Right Tool
When choosing a tool to resize images for Instagram, consider the following factors:
- Ease of Use: Choose a tool that is easy to use and has an intuitive interface.
- Features: Look for a tool that offers the features you need, such as aspect ratio presets and resizing options.
- Cost: Determine whether you need a free tool or are willing to pay for a premium tool with more features.
9. What Are Common Mistakes To Avoid When Posting Instagram Photos?
Posting photos on Instagram can be a great way to share your experiences, promote your brand, or simply connect with others. However, there are several common mistakes that users often make, which can negatively impact the quality and effectiveness of their posts. Avoiding these mistakes can help you improve your Instagram presence and engage with your audience more effectively.
9.1. Quality and Size Issues
- Low-Resolution Images: Posting low-resolution images can make your photos appear blurry and unprofessional. Always use high-resolution images to ensure your photos look crisp and clear.
- Incorrect Image Size and Aspect Ratio: Instagram has specific size and aspect ratio requirements. Posting images that don’t meet these requirements can result in cropping or distortion.
9.2. Editing and Filters
- Over-Editing Photos: Over-editing can make your photos look unnatural and artificial. Use subtle edits to enhance your photos without making them look fake.
- Inconsistent Use of Filters: Using a different filter for every photo can create a disjointed and inconsistent feed. Stick to a few filters that complement your style and use them consistently.
9.3. Content and Captions
- Irrelevant or Poor-Quality Content: Posting irrelevant or poor-quality content can turn off your followers. Make sure your photos are visually appealing and relevant to your audience.
- Long, Rambling Captions: Long, rambling captions can be difficult to read and may not engage your audience. Keep your captions concise, informative, and engaging.
- Ignoring Your Audience: Failing to engage with your audience can make them feel ignored. Respond to comments and messages promptly and engage in conversations with your followers.
9.4. General Best Practices
- Not Using Hashtags: Hashtags help people discover your content. Failing to use hashtags can limit your reach. Use relevant hashtags to increase the visibility of your posts.
- Inconsistent Posting Schedule: An inconsistent posting schedule can make it difficult to grow your audience. Establish a regular posting schedule to keep your audience engaged and attract new followers.
- Ignoring Analytics: Ignoring analytics means missing out on valuable insights. Track your Instagram analytics to understand what works and what doesn’t.
10. How To Maintain Image Quality When Posting On Instagram?
Maintaining image quality when posting on Instagram is crucial to ensure your photos look their best and engage your audience effectively. Instagram’s compression algorithms can sometimes degrade image quality, but there are several steps you can take to minimize this effect and preserve the visual integrity of your photos.
10.1. Before Uploading
- Use High-Resolution Images: Start with high-resolution images to provide Instagram with more data to work with.
- Edit Your Photos Carefully: Edit your photos using professional-grade software to enhance their quality.
- Resize Your Images: Resize your images to Instagram’s recommended dimensions.
10.2. During Upload
- Enable “Upload at Highest Quality”: In your Instagram settings, enable the “Upload at Highest Quality” option.
- Use a Strong Wi-Fi Connection: Use a strong and stable Wi-Fi connection when uploading your photos.
10.3. General Tips
- Regularly Clear Instagram’s Cache: Regularly clear Instagram’s cache to remove temporary files that may be affecting performance.
- Update the Instagram App: Keep the Instagram app updated to the latest version to ensure you have the latest features and bug fixes.
Frequently Asked Questions
1. Why do my pictures not fit on Instagram?
Instagram enforces a maximum aspect ratio of 4:5 for all image posts. This means you can upload photos with aspect ratios between 1:1 (a square) and 4:5 (a vertical rectangle that is four units wide for every five units tall). If your image exceeds these dimensions, such as in taller portraits or wider landscapes, Instagram will automatically crop the image to fit within the allowed size, potentially cutting off parts of your photo.
2. How do I stop Instagram from cropping my photos?
If Instagram is cropping your 4:5 images into a square, tap the expand arrows in the bottom left corner of the post preview to switch the size back to 4:5. For images that are taller than 4:5, you can use a third-party tool like Kapwing to resize them. Simply center your photo on a 4:5 canvas, adjust as needed, and save it for uploading.
3. What are the aspect ratio rules for Instagram?
Instagram supports multiple aspect ratios for photo uploads, including a 4:5 limit for vertical images and 1:1 for classic square posts. For video content like Reels, Instagram uses a 9:16 aspect ratio, providing a full-screen, vertical format.
4. Why does Instagram crop photos?
Instagram crops photos to maintain a consistent 4:5 and 1:1 aspect ratio across all images. This resizing and compression help create a uniform look for its 1.4 billion monthly users worldwide. With over 98% of Instagram users accessing the platform from mobile devices, the automatic cropping and strict aspect ratios ensure that photos are optimized for better viewing on mobile screens.
5. Why won’t Instagram upload my high-res image?
Instagram automatically compresses images to manage the vast amount of data uploaded daily — over 95 million photos and videos. However, you can maintain better image quality by enabling the ‘Upload at Highest Quality’ option, found under ‘Data Usage’ in your account settings. This helps ensure your photos are uploaded with the best possible resolution.
6. How do I resize an image for Instagram on my phone?
Use mobile apps like Image Size (iOS) or Photo Resizer (Android) to resize your images. These apps allow you to set specific dimensions, ensuring your photos fit Instagram’s requirements without cropping.
7. What is the best resolution for Instagram photos in 2024?
The best resolution for Instagram photos in 2024 is 1080 pixels wide. For square posts, use 1080×1080 pixels; for portrait posts, use 1080×1350 pixels; and for landscape posts, use 1080×566 pixels.
8. Does Instagram support transparent background PNGs?
No, Instagram does not support transparent background PNGs. When you upload a PNG with a transparent background, Instagram automatically converts it to a JPEG, replacing the transparent areas with black pixels.
9. How can I improve the quality of my Instagram photos?
To improve the quality of your Instagram photos, start with high-resolution images, use good lighting, edit your photos carefully, and enable the “Upload at Highest Quality” option in your Instagram settings.
10. What are the best practices for posting multiple photos on Instagram?
When posting multiple photos in a carousel, ensure all images have the same aspect ratio, use a consistent editing style, and tell a cohesive story with your images. This creates a visually appealing and engaging experience for your audience.
Ready to take your Instagram photography to the next level? Visit dfphoto.net to explore our comprehensive guides, discover stunning images, and connect with a vibrant community of photographers. Master essential techniques, find inspiration, and stay updated with the latest trends. Don’t miss out – elevate your photography journey with dfphoto.net today!
For more info and tutorials like this, visit our Resources Library or check out our YouTube channel. If you have more questions, please feel free to contact us at:
Address: 1600 St Michael’s Dr, Santa Fe, NM 87505, United States
Phone: +1 (505) 471-6001
Website: dfphoto.net