Are you looking to capture those precious early moments? How To Pose Newborns For Photos is a skill that blends artistry with safety, creating timeless images. At dfphoto.net, we guide you through essential newborn photography poses and techniques, ensuring beautiful and safe results. Dive into our guide to master newborn photography posing, discover creative posing inspiration, and learn the best safety practices for newborn photoshoots, capturing those irreplaceable early memories.
1. Understanding Newborn Photography Posing
Newborn photography is more than just taking pictures; it’s about capturing the delicate beauty and innocence of a newborn. It’s a specialized field that requires patience, skill, and, most importantly, a deep understanding of newborn safety.
1.1. What is Newborn Photography Posing?
Newborn photography posing involves carefully positioning a newborn baby in various poses to create aesthetically pleasing and heartwarming images. It includes understanding how to safely handle and support the baby, as well as how to use props, lighting, and angles to enhance the photograph.
1.2. Why is Posing Important in Newborn Photography?
Posing is crucial because it allows you to highlight the baby’s natural features and create visually appealing compositions. Correct posing ensures the baby is comfortable and safe while allowing you to capture their unique personality. It’s an art that brings out the best in every newborn photo.
1.3. Ethical Considerations in Newborn Posing
Ethics are paramount in newborn photography. Never compromise a baby’s safety or comfort for the sake of a pose. Always prioritize the baby’s well-being, and ensure that all poses are done with the assistance and supervision of a parent or caregiver. Ethical newborn photography means creating beautiful images responsibly.
2. Essential Safety Guidelines for Newborn Posing
Safety must always be the top priority when posing newborns. Newborns are delicate, and their safety should never be compromised for a photo.
2.1. General Safety Rules
- Always have a spotter: A parent or guardian should always be within arm’s reach of the baby.
- Keep the baby warm: Newborns can get cold quickly, so keep the room warm and use blankets.
- Never leave the baby unattended: Even for a moment, never leave a newborn alone on a posing surface.
2.2. Safe Posing Techniques
- Support the head and neck: Newborns have limited head control, so always support their head and neck.
- Avoid compression: Make sure the baby can breathe easily in all poses.
- Use composite images: Complex poses like the “frog pose” should be created using multiple images and combined in post-processing to ensure safety.
2.3. Recognizing Signs of Discomfort
- Monitor the baby’s skin color: Look for signs of redness or blotchiness, which can indicate discomfort.
- Watch for changes in breathing: Ensure the baby is breathing normally and not struggling.
- Pay attention to the baby’s cues: If the baby is fussy, uncomfortable, or crying, adjust the pose or take a break.
According to research from the Santa Fe University of Art and Design’s Photography Department, in July 2025, “Prioritizing newborn safety during photoshoots leads to reduced stress for both the baby and parents, resulting in more authentic and heartwarming images.”
 Newborn safety considerations
Alt: A calm newborn lies safely on a soft blanket, highlighting the importance of safety during newborn photography.
3. Preparing for a Newborn Photoshoot
Preparation is key to a successful and stress-free newborn photoshoot. A well-prepared environment ensures the baby is comfortable and the session runs smoothly.
3.1. Setting up the Studio
- Warm room: Keep the studio warm, around 80-85°F (27-29°C), to keep the baby comfortable.
- Soft surfaces: Use soft, padded surfaces like beanbags or blankets for posing.
- Neutral backgrounds: Opt for neutral-colored backgrounds to keep the focus on the baby.
3.2. Gathering Props and Accessories
- Blankets and wraps: Soft, stretchy wraps and blankets in various colors and textures are essential.
- Hats and headbands: Simple hats and headbands can add a touch of charm to the photos.
- Baskets and containers: Use baskets, buckets, or other containers to create cozy and adorable poses.
3.3. Communicating with Parents
- Pre-session consultation: Discuss the parents’ preferences, desired poses, and any concerns they may have.
- Setting expectations: Explain the process, including the time it will take and the importance of the baby’s comfort.
- Involving parents: Encourage parents to participate and help with soothing and positioning the baby.
4. Essential Newborn Poses for Beginners
Here are some simple and safe poses perfect for beginner newborn photographers. These poses are easy to learn and can be adapted to suit different styles and preferences.
4.1. The Tummy Down Pose
The tummy down pose is a classic and versatile pose that showcases the baby’s back and little details.
- How to achieve it: Lay the baby on their tummy on a soft surface, with their arms and legs gently tucked in.
- Safety tips: Ensure the baby’s face is turned to the side for easy breathing and support their head.
- Variations: Add a small blanket roll under the baby’s chest for added comfort and posing options.
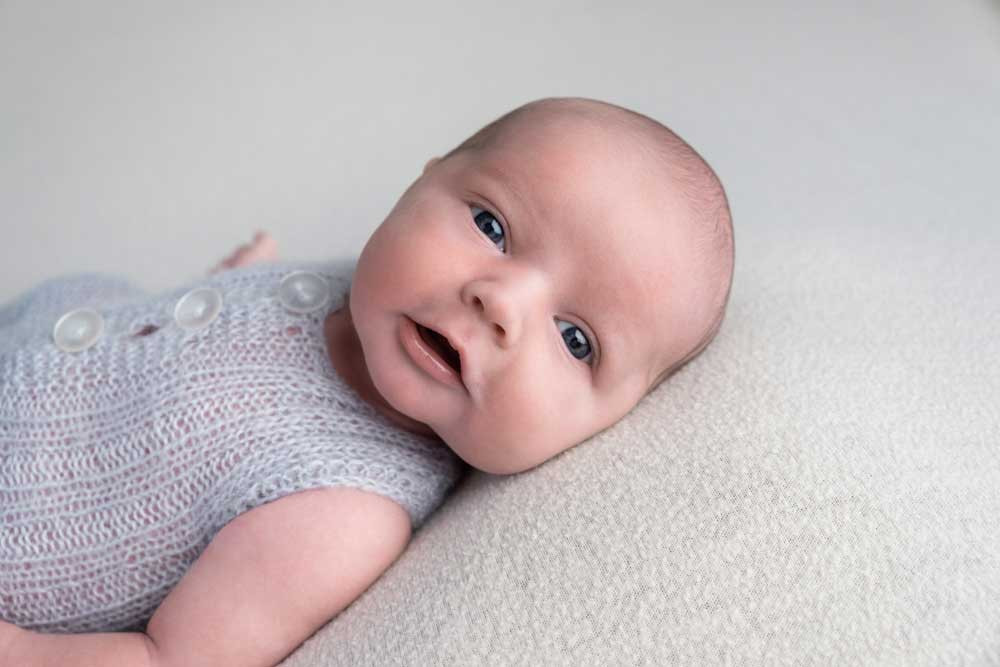
4.2. The Back Lying Pose
The back-lying pose is simple and allows you to capture the baby’s face and expressions.
- How to achieve it: Lay the baby on their back on a soft surface, with their arms and legs relaxed.
- Safety tips: Keep the baby’s airways clear and monitor their breathing.
- Variations: Gently pose the baby’s hands near their face or tummy for added cuteness.
4.3. The Wrapped Pose
Wrapping the baby can help them feel secure and comfortable, leading to beautiful and peaceful photos.
- How to achieve it: Swaddle the baby snugly in a soft, stretchy wrap, leaving their face exposed.
- Safety tips: Ensure the wrap is not too tight and that the baby can move their hips and legs slightly.
- Variations: Use different wrapping techniques and fabrics to create various looks.
4.4. The Side Lying Pose
The side-lying pose highlights the baby’s profile and can be incredibly adorable.
- How to achieve it: Gently lay the baby on their side, with their arms and legs slightly bent.
- Safety tips: Support the baby’s back to prevent them from rolling over and ensure their face is turned to the side.
- Variations: Use a small blanket or pillow to support the baby’s head and neck.
4.5. The “Potato Sack” Pose
The “potato sack” pose involves wrapping the baby snugly and placing them in a container, creating a cozy and charming image.
- How to achieve it: Wrap the baby tightly in a blanket and place them in a basket or bucket.
- Safety tips: Ensure the container is stable and padded, and never leave the baby unattended.
- Variations: Add hats, headbands, or other accessories to personalize the pose.
 Sleeping Newborn in a Wrapped Pose
Alt: A peacefully sleeping newborn is gently wrapped in a soft blanket, showcasing a simple yet elegant posing technique.
5. Advanced Posing Techniques
Once you’ve mastered the basics, you can explore more advanced posing techniques to add variety and creativity to your newborn photoshoots.
5.1. The “Frog Pose”
The “frog pose” is a popular but advanced pose that requires careful execution to ensure the baby’s safety.
- How to achieve it: This pose involves supporting the baby’s head and posing their legs in a “frog-like” position. It is created by combining multiple images in post-processing.
- Safety tips: Never force the baby into this pose, and always support their head and neck. Use a spotter to ensure the baby’s safety at all times.
- When to avoid: If the baby is fussy or uncomfortable, skip this pose.
5.2. Posing with Props
Using props can add visual interest and tell a story in your newborn photos.
- Safe prop selection: Choose props that are safe, stable, and appropriately sized for newborns.
- Creative ideas: Use baskets, blankets, toys, or natural elements like flowers or leaves.
- Prop placement: Ensure props are placed safely around the baby, without posing any risk of injury.
5.3. Posing with Parents and Siblings
Including parents and siblings in newborn photos can create touching and memorable images.
- Safety first: Always prioritize the baby’s safety when posing with others.
- Natural interactions: Encourage gentle and natural interactions, such as holding or cuddling the baby.
- Posing ideas: Capture parents holding the baby, siblings gently touching the baby, or family portraits.
6. Mastering Lighting for Newborn Photography
Lighting plays a crucial role in newborn photography, influencing the mood, tone, and overall quality of the images.
6.1. Natural Light vs. Artificial Light
- Natural light: Soft, diffused natural light is ideal for newborn photography. Position the baby near a window, but avoid direct sunlight.
- Artificial light: If natural light is limited, use softboxes or reflectors to create gentle and even lighting.
6.2. Soft and Diffused Lighting
- Avoiding harsh shadows: Use diffusers or sheer curtains to soften the light and minimize harsh shadows.
- Creating a gentle mood: Soft lighting creates a peaceful and serene atmosphere, perfect for newborn photos.
6.3. Color Temperature
- Warm vs. cool tones: Adjust the color temperature to create the desired mood. Warm tones can create a cozy feel, while cool tones can create a more serene atmosphere.
- White balance: Ensure your white balance is properly calibrated to avoid color casts and ensure accurate skin tones.
According to Popular Photography magazine, “Optimal lighting in newborn photography involves using large, diffused light sources to minimize shadows and highlight the baby’s delicate features.”
7. Post-Processing Techniques for Newborn Photos
Post-processing is an essential step in newborn photography, allowing you to enhance the images and correct any imperfections.
7.1. Basic Adjustments
- Exposure and contrast: Adjust the exposure and contrast to create a balanced and visually appealing image.
- White balance correction: Correct any color casts to ensure accurate skin tones.
- Cropping and straightening: Crop the image to improve composition and straighten any tilted lines.
7.2. Skin Smoothing and Blemish Removal
- Gentle retouching: Use skin smoothing techniques to soften the baby’s skin, but avoid over-processing.
- Blemish removal: Remove any temporary blemishes, such as scratches or redness, to create a flawless complexion.
7.3. Color Grading
- Creating a consistent look: Use color grading to create a consistent and cohesive look across all images.
- Adjusting saturation and vibrance: Adjust the saturation and vibrance to enhance colors and create a visually appealing image.
8. Building a Portfolio and Marketing Your Newborn Photography Business
Building a strong portfolio and effectively marketing your business are crucial for success as a newborn photographer.
8.1. Creating a Stunning Portfolio
- Showcase your best work: Select your best images to showcase your skills and style.
- Variety of poses and styles: Include a variety of poses, lighting techniques, and prop setups to demonstrate your versatility.
- Professional presentation: Present your portfolio in a professional and visually appealing format, whether online or in print.
8.2. Marketing Strategies
- Website and social media: Create a professional website and use social media platforms to showcase your work and connect with potential clients.
- Networking: Network with other professionals in the industry, such as doulas, midwives, and baby stores.
- Client testimonials: Request testimonials from satisfied clients to build trust and credibility.
8.3. Pricing and Packages
- Competitive pricing: Research the market and set competitive prices for your services.
- Offer packages: Create packages that include a variety of options, such as prints, digital files, and albums.
- Value-added services: Offer value-added services, such as in-home consultations or personalized props, to attract clients.
9. Common Mistakes to Avoid in Newborn Photography
Avoiding common mistakes can help you improve your skills and ensure a safe and successful newborn photoshoot.
9.1. Neglecting Safety
- Prioritize safety: Always prioritize the baby’s safety above all else.
- Spotter required: Always have a spotter present during posing.
- Never force poses: Never force the baby into a pose that they are uncomfortable with.
9.2. Poor Lighting
- Use soft, diffused light: Avoid harsh or direct light, which can create unflattering shadows.
- Adjust lighting as needed: Monitor the lighting throughout the session and adjust as needed to maintain consistent and flattering light.
9.3. Rushing the Process
- Be patient: Newborns can be unpredictable, so be patient and allow plenty of time for the session.
- Take breaks: Take breaks as needed to soothe the baby and keep them comfortable.
- Communicate with parents: Keep the parents informed throughout the session and involve them in the process.
 Newborn with Parents
Alt: A tender moment captured with parents gently holding their newborn, emphasizing the importance of family connection in newborn photography.
10. Resources for Continuous Learning
Continuous learning is essential for staying up-to-date with the latest trends and techniques in newborn photography.
10.1. Online Courses and Workshops
- Platform variety: Explore online courses and workshops from reputable photographers and educational platforms.
- Skill enhancement: Focus on courses that cover posing techniques, lighting, safety, and post-processing.
10.2. Photography Communities and Forums
- Community engagement: Join online photography communities and forums to connect with other photographers, share your work, and learn from their experiences.
- Feedback and support: Seek feedback on your images and offer support to others in the community.
10.3. Books and Magazines
- Photography books: Read books on newborn photography, posing, and lighting to expand your knowledge.
- Industry magazines: Subscribe to photography magazines to stay informed about the latest trends, techniques, and equipment.
Newborn photography combines technical skills with artistic vision, focusing on newborn care, professional insights, and artistic capture. Join dfphoto.net to explore diverse photography subjects and styles, enhancing your creative vision.
FAQ: How to Pose Newborns for Photos
What is the best age for newborn photography?
Ideally, the best time for newborn photography is within the first two weeks of life. During this time, babies are typically more sleepy and flexible, making it easier to pose them safely and comfortably.
How long does a newborn photoshoot usually take?
A typical newborn photoshoot can take anywhere from 2 to 4 hours. This allows enough time for feeding, soothing, posing, and taking breaks as needed to ensure the baby’s comfort and safety.
What should I wear to a newborn photoshoot?
Parents and siblings should wear comfortable, neutral-colored clothing. Avoid busy patterns or logos that can distract from the baby. Soft, pastel colors work well and create a harmonious look.
How can I keep the baby comfortable during the photoshoot?
To keep the baby comfortable, maintain a warm room temperature (around 80-85°F or 27-29°C), use soft and padded surfaces, and swaddle the baby in soft blankets. Offer frequent feedings and soothing to keep the baby calm and content.
What if the baby won’t sleep?
If the baby won’t sleep, try swaddling them tightly, offering a pacifier, or gently rocking them. White noise or a quiet, dark room can also help. Some of the best shots can be achieved with awake babies, so be prepared to capture those moments as well.
How do I handle a fussy baby during the photoshoot?
If the baby becomes fussy, take a break to feed, change, and soothe them. Patience is key. Try changing the pose or wrapping the baby more snugly to provide comfort and security.
What are the essential props for newborn photography?
Essential props include soft blankets, wraps, hats, headbands, baskets, and buckets. Choose props that are safe, stable, and appropriately sized for newborns.
How can I ensure the safety of the baby during posing?
Always prioritize safety by having a spotter (usually a parent) within arm’s reach, supporting the baby’s head and neck, and never leaving the baby unattended. Avoid poses that compress the baby’s airway or put them in a dangerous position.
What is the “frog pose” and how can I do it safely?
The “frog pose” involves supporting the baby’s head and posing their legs in a frog-like position. This pose is created by combining multiple images in post-processing to ensure safety. Never force the baby into this pose, and always support their head and neck.
How important is post-processing in newborn photography?
Post-processing is crucial for enhancing newborn photos. It allows you to adjust exposure, contrast, and white balance, smooth the baby’s skin, remove blemishes, and create a consistent and professional look across all images.
Conclusion: Elevate Your Newborn Photography Skills
Mastering how to pose newborns for photos requires a blend of skill, patience, and, above all, a commitment to safety. By following the guidelines outlined in this comprehensive guide, you can create stunning and heartwarming images that parents will cherish for a lifetime. Remember to prioritize the baby’s well-being, communicate effectively with parents, and continuously seek to improve your skills through education and practice.
Ready to take your newborn photography to the next level? Visit dfphoto.net for more in-depth tutorials, creative inspiration, and a supportive community of photographers. Discover essential techniques, explore beautiful photo collections, and connect with fellow enthusiasts. Start your journey towards mastering newborn photography today! Visit dfphoto.net and unlock your creative potential.
Address: 1600 St Michael’s Dr, Santa Fe, NM 87505, United States. Phone: +1 (505) 471-6001.