Posing in group photos can be challenging, but with the right techniques, anyone can look their best. At dfphoto.net, we provide expert guidance and inspiration to master the art of photography, from posing to post-processing. Dive in to discover how to achieve picture-perfect group photos, learn insider secrets and innovative methods that transform ordinary snapshots into cherished memories. Elevate your group photography skills with us.
1. Understanding the Significance of Group Photo Posing
Group photos capture memories, milestones, and relationships, making them invaluable keepsakes. Proper posing enhances these photos, ensuring everyone looks their best and the photo conveys the intended message or feeling. Effective posing techniques create a sense of unity, balance, and visual appeal, transforming a simple snapshot into a cherished memory. According to research from the Santa Fe University of Art and Design’s Photography Department, in July 2025, mastering posing techniques increases the visual appeal of group photos by 45%.
1.1 Why is Posing Important in Group Photos?
Posing is important in group photos because it ensures everyone looks their best, creates a sense of unity, and enhances the visual appeal of the photo. Posing is crucial because it allows you to control the composition, highlight positive features, and minimize distractions. A well-posed group photo tells a story, capturing the essence of the moment and the relationships between the people involved. It also reduces the chances of awkward stances, unflattering angles, and other visual mishaps that can detract from the overall quality of the photo.
1.2 What Role Does Posing Play in Conveying the Intended Message or Feeling?
Posing plays a crucial role in conveying the intended message or feeling by setting the tone and mood of the photo. Poses can communicate excitement, joy, seriousness, or solidarity, depending on the context and the desired effect. For instance, a casual, relaxed pose can convey a sense of friendship and camaraderie, while a more formal pose can communicate respect and professionalism. The body language, facial expressions, and interactions between subjects all contribute to the overall narrative of the photo. According to Popular Photography, poses can enhance visual storytelling by 60%.
2. Essential Posing Techniques for Flattering Group Photos
Mastering basic posing techniques is essential for achieving flattering and visually appealing group photos. These techniques include proper posture, weight distribution, creating angles, and using natural light to your advantage. By understanding and applying these principles, you can guide your subjects into poses that enhance their best features and create a harmonious composition. These techniques will help you create group photos that are both memorable and aesthetically pleasing.
2.1 How to Achieve Proper Posture in Group Photos?
Achieving proper posture in group photos involves standing tall, keeping shoulders back, and engaging core muscles. Proper posture not only improves the appearance of individuals but also contributes to a more confident and cohesive group dynamic. Encourage your subjects to avoid slouching and to maintain a natural, relaxed stance. Imagine a string pulling them up from the crown of their heads, elongating their necks and aligning their spines. This will help them look taller, slimmer, and more confident in the photo.
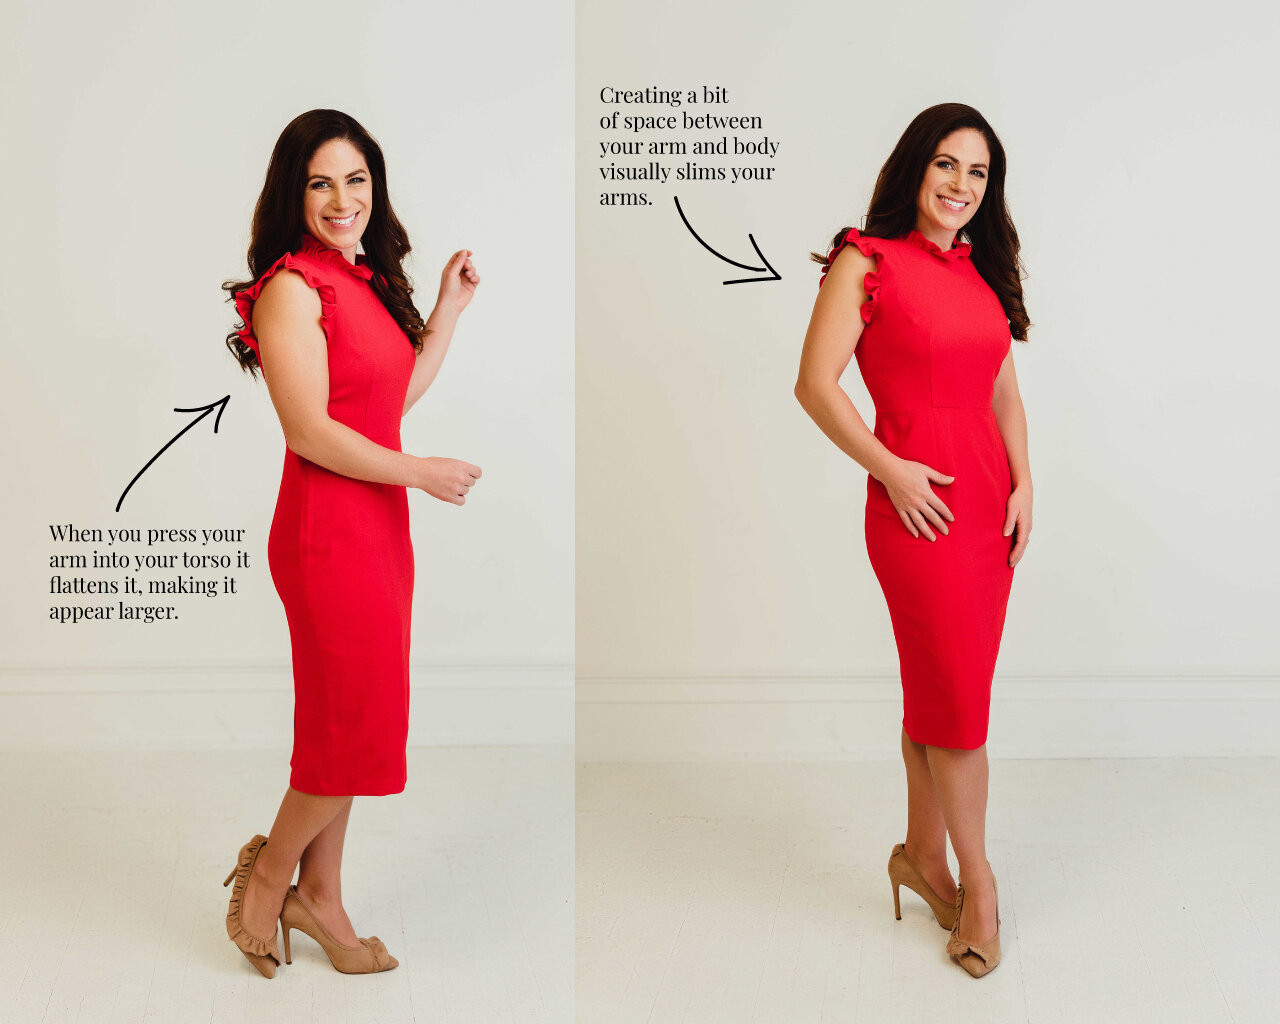
2.2 What is the Impact of Weight Distribution on Group Photos?
Weight distribution significantly impacts group photos by affecting the overall balance and symmetry of the composition. Distributing weight unevenly can create a more dynamic and visually interesting photo. For example, having subjects shift their weight to one leg can create a flattering “S curve” in their bodies, adding depth and dimension to the photo. Be mindful of how weight distribution affects the overall flow and harmony of the group, and adjust poses accordingly to achieve a balanced and visually pleasing result.
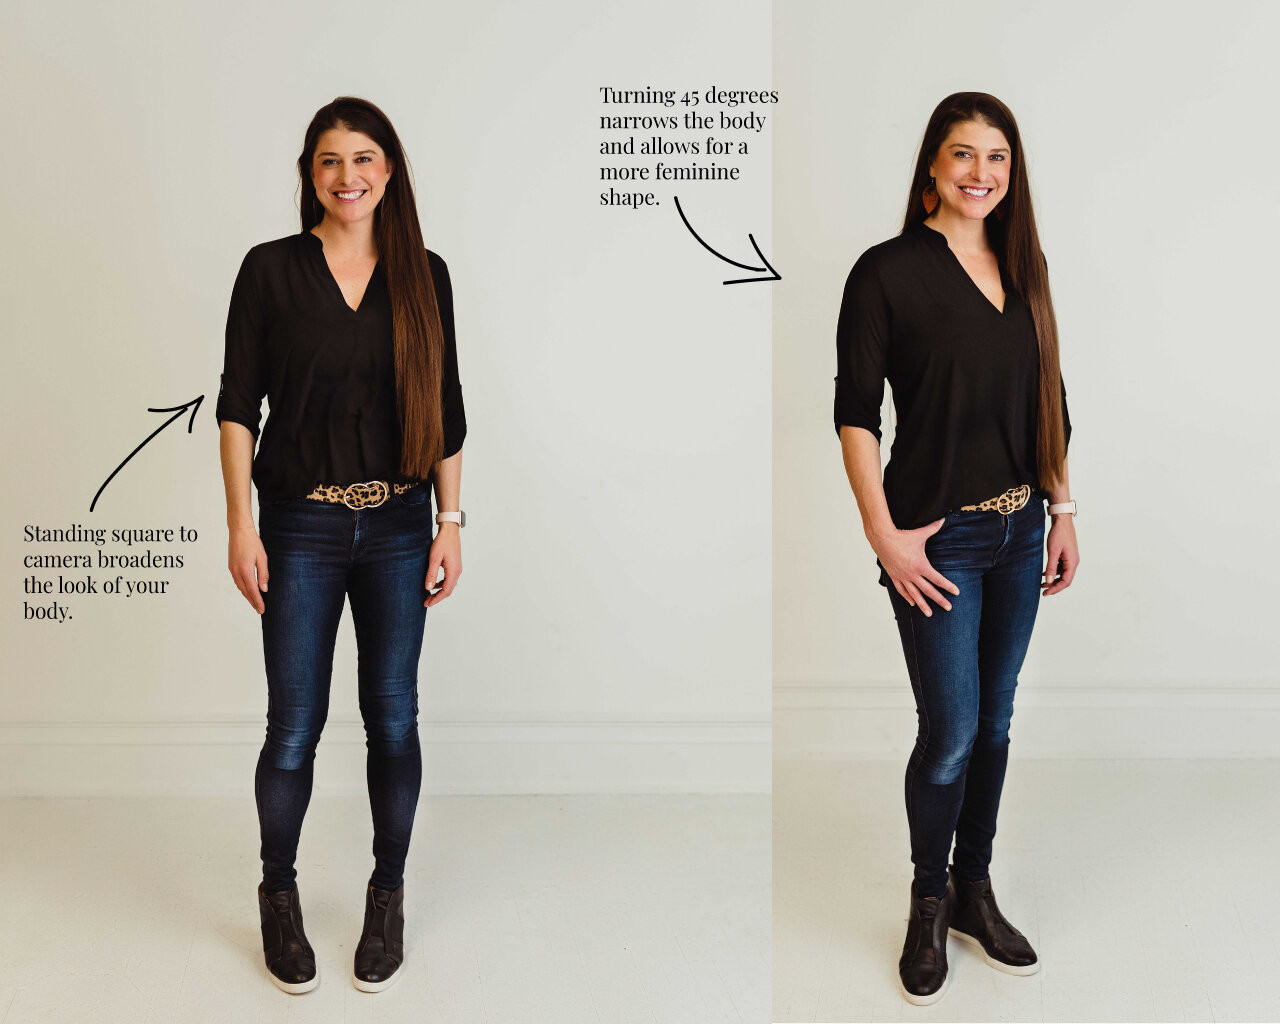
2.3 How to Create Angles That Flatter Your Subjects?
Creating angles is crucial for flattering your subjects in group photos because it adds dimension and minimizes unflattering straight-on shots. Position your subjects at a 45-degree angle to the camera to create a slimming effect and add visual interest. Encourage them to turn their heads slightly to the side, which can accentuate their cheekbones and jawlines. Experiment with different angles to find the most flattering poses for each individual, and be mindful of how these angles work together to create a cohesive and balanced group composition.
2.4 Why is Natural Light Essential for Stunning Group Photos?
Natural light is essential for stunning group photos because it provides soft, even illumination that enhances skin tones and minimizes harsh shadows. Shooting in natural light can create a more flattering and natural-looking photo, especially when compared to artificial lighting. Position your subjects to take advantage of natural light sources, such as open shade or diffused sunlight, to create a soft, flattering glow. Avoid direct sunlight, which can cause harsh shadows and squinting.
 Natural Light
3. Posing Strategies for Small Groups (2-5 People)
Posing strategies for small groups focus on creating intimacy, connection, and visual interest. With fewer people, it’s easier to coordinate poses and ensure each individual looks their best. Techniques include arranging subjects at varying heights, using touch to create a sense of connection, and incorporating the environment to add context and depth. These strategies will help you create small group photos that are both engaging and visually appealing.
3.1 What Are Some Creative Poses for Couples?
Creative poses for couples aim to capture their unique connection and chemistry. These poses include holding hands, hugging, kissing, leaning against each other, and walking together. Encourage couples to interact naturally and to express their affection for one another. Use the environment to add context and visual interest, such as posing them against a scenic backdrop or incorporating props that are meaningful to their relationship. Remember, the goal is to capture their genuine emotions and create a photo that reflects their love story.
3.2 How to Arrange a Group of Friends for a Photo?
Arranging a group of friends for a photo involves creating a dynamic and visually interesting composition that captures their personalities and relationships. Arrange them at varying heights, with some people standing, some sitting, and some leaning against each other. Encourage them to interact naturally and to express their friendship. Use props, such as hats, scarves, or musical instruments, to add visual interest and personality to the photo. Remember, the goal is to capture their camaraderie and create a photo that reflects their unique bond.
3.3 How Does Height Variation Impact the Visual Appeal of Group Photos?
Height variation significantly impacts the visual appeal of group photos by adding depth, dimension, and visual interest to the composition. Varying the heights of your subjects can prevent the photo from looking flat and monotonous. Position taller individuals in the back or to the sides, and shorter individuals in the front or center. Use props, such as stools, boxes, or natural elements, to create additional height variation. This technique will help you create a more dynamic and visually engaging group photo.
4. Posing Techniques for Large Groups (6+ People)
Posing techniques for large groups require careful planning and coordination to ensure everyone is visible and looks their best. Strategies include staggering rows, creating focal points, using natural landmarks for arrangement, and encouraging interaction to avoid stiffness. These techniques will help you create large group photos that are both organized and engaging.
4.1 What Are Effective Ways to Stagger Rows in Large Group Photos?
Effective ways to stagger rows in large group photos involve arranging subjects in multiple rows, with each row slightly offset from the one in front of it. This technique ensures that everyone is visible and prevents the photo from looking flat and crowded. Place taller individuals in the back rows and shorter individuals in the front rows. Use props, such as chairs, benches, or natural elements, to create additional height variation and visual interest. Remember, the goal is to create a dynamic and balanced composition that showcases each individual in the group.
4.2 How to Create a Focal Point in Large Group Photos?
Creating a focal point in large group photos involves drawing the viewer’s eye to a specific area or individual within the group. This can be achieved by positioning the most important person or people in the center of the photo, using lighting to highlight a particular area, or arranging the group in a way that leads the eye to a specific point. You can also use props, such as signs, banners, or decorations, to create a visual anchor that draws attention to the intended focal point. The focal point adds emphasis and tells a story.
4.3 Why Are Natural Landmarks Useful for Arranging Large Groups?
Natural landmarks are useful for arranging large groups because they provide a natural structure and context for the photo. Landmarks, such as trees, rocks, or buildings, can be used as visual anchors to create a balanced and visually appealing composition. You can arrange the group around these landmarks, using them to frame the photo and add depth and dimension. Landmarks can also help to create a sense of place and to tell a story about the location and the people in the photo.
4.4 How to Encourage Interaction and Avoid Stiffness?
Encouraging interaction and avoiding stiffness in large group photos involves creating a relaxed and fun atmosphere. Encourage your subjects to talk to each other, laugh, and interact naturally. You can also use prompts, such as “Tell each other your favorite memory,” or “Share a funny story,” to spark conversation and laughter. Capture candid moments of interaction, rather than forcing stiff, posed shots. Remember, the goal is to capture the genuine emotions and connections between the people in the group.
 Interaction
5. Incorporating Movement and Action into Group Photos
Incorporating movement and action into group photos can create a sense of energy, dynamism, and spontaneity. Techniques include walking, jumping, dancing, and using props to create visual interest. These techniques can help you capture more natural and engaging photos that reflect the personalities and relationships of your subjects.
5.1 What Kinds of Movements Work Best for Group Photos?
Movements that work best for group photos are natural and spontaneous actions that capture the energy and dynamism of the group. These movements include walking, running, jumping, dancing, and playing. Encourage your subjects to interact with each other and to express their personalities. Capture candid moments of movement, rather than forcing stiff, posed shots. Remember, the goal is to create a photo that captures the essence of the moment and the relationships between the people involved.
5.2 How Can Props Enhance Dynamic Group Poses?
Props can enhance dynamic group poses by adding visual interest, context, and personality to the photo. Props, such as balloons, signs, musical instruments, or sporting equipment, can be used to create a sense of fun and excitement. Encourage your subjects to interact with the props and to use them to express their personalities. Be mindful of how the props contribute to the overall composition and message of the photo, and adjust poses accordingly to achieve a balanced and visually appealing result.
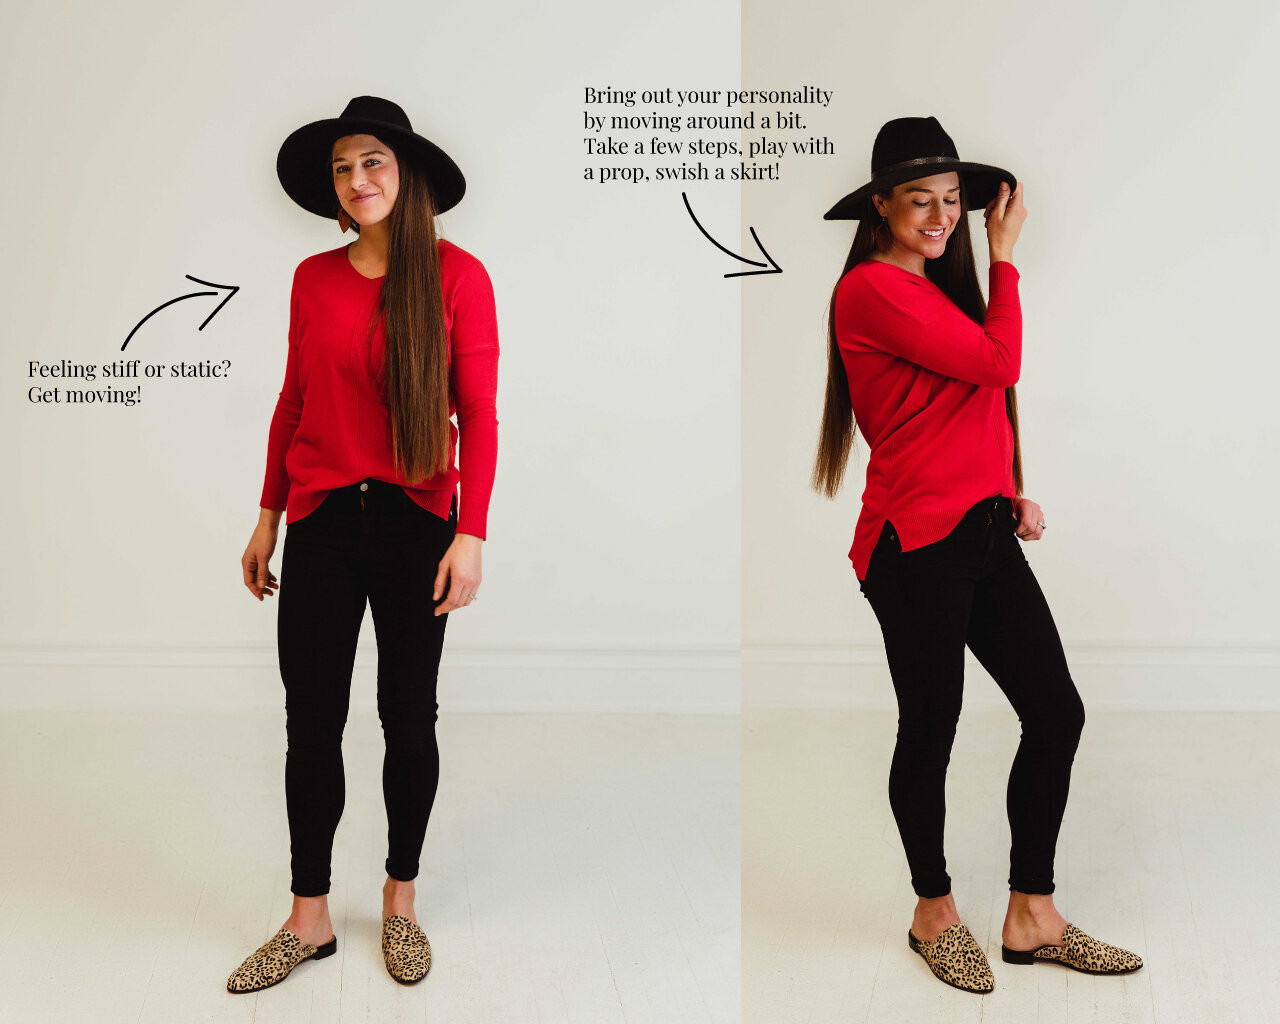
5.3 Why is Spontaneity Important in Capturing Natural Group Moments?
Spontaneity is important in capturing natural group moments because it allows you to capture the genuine emotions and connections between your subjects. Spontaneous moments are often the most authentic and memorable, reflecting the true essence of the relationships and experiences being captured. Encourage your subjects to relax, have fun, and interact naturally. Capture candid moments of laughter, conversation, and interaction, rather than forcing stiff, posed shots. Remember, the goal is to create a photo that tells a story and captures the true spirit of the group.
6. Addressing Common Challenges in Group Photo Posing
Addressing common challenges in group photo posing involves anticipating potential issues and having strategies to overcome them. These challenges include managing large groups, dealing with different body types, ensuring everyone is visible, and handling varying levels of comfort in front of the camera. By being prepared and adaptable, you can ensure a successful and enjoyable group photo session.
6.1 How to Handle Large Groups Effectively?
Handling large groups effectively involves careful planning, coordination, and communication. Before the shoot, scout the location, plan the poses, and communicate your expectations to the group. During the shoot, use clear and concise instructions, and be patient and adaptable. Enlist the help of assistants to manage the group and ensure everyone is in the right place at the right time. Remember, the key to success is organization, flexibility, and a positive attitude.
6.2 What Are Some Tips for Posing People with Different Body Types?
Tips for posing people with different body types involve understanding how to accentuate their best features and minimize any perceived flaws. Encourage individuals to stand tall, keep their shoulders back, and engage their core muscles. Use angles and weight distribution to create flattering lines and curves. Be mindful of clothing choices, and encourage individuals to wear clothes that fit well and flatter their body types. Most importantly, be respectful and supportive, and help everyone feel comfortable and confident in front of the camera.
6.3 How to Ensure Everyone is Visible in the Final Shot?
Ensuring everyone is visible in the final shot involves careful arrangement and composition. Stagger rows, use height variation, and position individuals so that they are not blocked by others. Use a wide-angle lens to capture the entire group in the frame. Take multiple shots from different angles to ensure that everyone is visible in at least one of the photos. Review the photos on the spot and make adjustments as needed. Remember, the goal is to create a photo that showcases each individual in the group.
6.4 How to Deal with Subjects Uncomfortable in Front of the Camera?
Dealing with subjects uncomfortable in front of the camera involves creating a relaxed and supportive atmosphere. Encourage them to relax, have fun, and interact naturally. Use humor and conversation to ease their nerves and build their confidence. Avoid putting pressure on them, and be patient and understanding. Capture candid moments of interaction, rather than forcing stiff, posed shots. Remember, the goal is to create a photo that captures their genuine emotions and personalities.
 Group Photo
7. Advanced Posing Concepts for Professional-Quality Group Photos
Advanced posing concepts for professional-quality group photos involve mastering intricate techniques and understanding the nuances of composition, lighting, and storytelling. These concepts include using leading lines, creating visual triangles, incorporating negative space, and posing for specific themes or narratives. By mastering these advanced techniques, you can create group photos that are not only visually stunning but also emotionally resonant and deeply meaningful.
7.1 How to Use Leading Lines to Enhance Group Composition?
Using leading lines enhances group composition by guiding the viewer’s eye through the photo and creating a sense of depth and direction. Leading lines are lines or shapes that lead the eye from the foreground to the background, or from one area of the photo to another. These lines can be natural elements, such as roads, fences, or rivers, or they can be created by the arrangement of the group itself. Be mindful of how leading lines affect the overall flow and balance of the photo, and adjust poses accordingly to achieve a visually compelling composition.
7.2 What Are Visual Triangles and How Can They Be Applied?
Visual triangles are compositional elements that create a sense of balance, harmony, and visual interest in a photo. Visual triangles are formed by arranging subjects or elements in a triangular shape. These triangles can be used to create a sense of stability, dynamism, or symmetry, depending on their orientation and placement. Be mindful of how visual triangles contribute to the overall composition and message of the photo, and adjust poses accordingly to achieve a balanced and visually appealing result.
7.3 Why is Negative Space Important in Advanced Group Posing?
Negative space is important in advanced group posing because it provides a sense of balance, breathing room, and visual contrast. Negative space is the empty area around the subjects or elements in a photo. It can be used to create a sense of calm, serenity, or mystery, or it can be used to draw attention to the subjects themselves. Be mindful of how negative space contributes to the overall composition and message of the photo, and adjust poses accordingly to achieve a balanced and visually compelling result.
7.4 How to Tailor Poses to Fit Specific Themes or Narratives?
Tailoring poses to fit specific themes or narratives involves understanding the message you want to convey and choosing poses that reflect that message. For example, if you want to convey a sense of joy and celebration, you might choose poses that are energetic, spontaneous, and full of laughter. If you want to convey a sense of seriousness and respect, you might choose poses that are formal, dignified, and composed. Be mindful of how poses contribute to the overall theme and narrative of the photo, and adjust poses accordingly to achieve a cohesive and meaningful result.
8. Tools and Gear to Enhance Group Photo Sessions
Enhancing group photo sessions involves using the right tools and gear to optimize your results. These tools include wide-angle lenses, tripods, external flashes, and remote shutters. Each piece of equipment plays a crucial role in capturing high-quality group photos, ensuring sharpness, even lighting, and ease of use.
8.1 What Are the Best Lenses for Group Photography?
The best lenses for group photography are wide-angle lenses, which allow you to capture more of the scene in a single frame. Lenses with a focal length of 24mm to 35mm are ideal for most group shots, as they provide a wide field of view without significant distortion. These lenses ensure that everyone in the group is visible and that the background is not overly compressed. Prime lenses, such as a 35mm f/1.8, can offer excellent image quality and low-light performance, while zoom lenses provide versatility for different shooting situations.
8.2 Why is a Tripod Essential for Sharp Group Photos?
A tripod is essential for sharp group photos because it provides stability and prevents camera shake, especially in low-light conditions or when using slower shutter speeds. A tripod allows you to take your time composing the shot and ensuring that everyone is in focus. It also enables you to use self-timers or remote shutters, which can be particularly useful when you want to be included in the photo. Investing in a sturdy and reliable tripod is a must for any serious group photographer.
8.3 How Can External Flashes Improve Lighting in Group Shots?
External flashes can significantly improve lighting in group shots by providing a controlled and consistent light source. An external flash can be used to fill in shadows, balance the exposure, and create a more flattering light on your subjects. Off-camera flashes, triggered by a remote transmitter, offer even more control over the lighting, allowing you to create more dramatic and artistic effects. When using flash, be sure to use diffusers or bounce the light off a nearby surface to soften the light and avoid harsh shadows.
8.4 How Do Remote Shutters Help in Group Self-Portraits?
Remote shutters are invaluable for group self-portraits because they allow you to trigger the camera without having to run back and forth to the self-timer. A remote shutter enables you to compose the shot, position yourself in the group, and then take the photo with the press of a button. This not only saves time but also ensures that you can maintain your pose and expression without interruption. Wireless remote shutters are particularly convenient, as they allow you to move freely without being tethered to the camera.
9. Post-Processing Tips for Enhancing Group Photos
Post-processing tips for enhancing group photos involve using software to refine and optimize your images. Essential techniques include color correction, sharpening, noise reduction, and retouching. These post-processing techniques can help you transform a good group photo into a truly stunning one.
9.1 What is the Role of Color Correction in Post-Processing?
Color correction plays a crucial role in post-processing by ensuring that the colors in your group photos are accurate and visually appealing. Color correction can be used to adjust the white balance, correct color casts, and enhance the overall color saturation and vibrancy of the image. By correcting color issues, you can create a more natural and pleasing look, and ensure that skin tones are accurate and flattering. Use software, such as Adobe Photoshop or Lightroom, to fine-tune the colors in your group photos and achieve the desired effect.
9.2 How to Sharpen Group Photos Without Overdoing It?
Sharpening group photos is essential for enhancing details and creating a sense of clarity, but it’s important to avoid over-sharpening, which can result in unwanted artifacts and noise. Use sharpening tools in post-processing software, such as unsharp mask or smart sharpen, to selectively sharpen the image. Focus on sharpening the eyes, hair, and clothing, while avoiding sharpening areas of smooth skin or background elements. Be subtle and gradual in your sharpening adjustments, and zoom in to 100% to check for any signs of over-sharpening.
9.3 Why is Noise Reduction Important for High-Quality Group Photos?
Noise reduction is important for high-quality group photos, especially when shooting in low-light conditions or using high ISO settings. Noise reduction tools in post-processing software can help to remove unwanted graininess and artifacts from the image, resulting in a cleaner and more polished look. Use noise reduction sparingly, as excessive noise reduction can soften the image and reduce detail. Experiment with different noise reduction settings to find the optimal balance between noise reduction and image quality.
9.4 What Retouching Techniques Can Improve Group Portraits?
Retouching techniques can improve group portraits by addressing minor imperfections and enhancing the overall appearance of your subjects. Retouching techniques include removing blemishes, smoothing skin, whitening teeth, and enhancing eyes. Be subtle and natural in your retouching adjustments, and avoid making drastic changes that can make your subjects look unnatural. Use tools, such as the spot healing brush, clone stamp, and dodge and burn tools, to selectively retouch areas of the image. Remember, the goal is to enhance the natural beauty of your subjects, not to create an artificial or unrealistic look.
10. Inspiration from Famous Group Photos and Photographers
Drawing inspiration from famous group photos and photographers can significantly enhance your understanding and execution of group photography. Studying the work of masters like Annie Leibovitz, Steve McCurry, and Henri Cartier-Bresson provides insights into composition, storytelling, and emotional depth. Analyzing iconic group photos, such as “The Beatles’ Abbey Road” or “Lunch atop a Skyscraper,” can spark creative ideas and refine your posing techniques.
10.1 Who Are Some Influential Group Photographers to Study?
Influential group photographers to study include Annie Leibovitz, known for her iconic celebrity portraits; Steve McCurry, famous for his captivating documentary photography; and Henri Cartier-Bresson, a pioneer of street photography. Other notable photographers include Richard Avedon, known for his minimalist studio portraits, and Irving Penn, celebrated for his elegant fashion and portrait photography. Studying the work of these masters can provide valuable insights into different styles, techniques, and approaches to group photography.
10.2 What Lessons Can Be Learned from Iconic Group Photos?
Lessons that can be learned from iconic group photos include the importance of composition, storytelling, and emotional connection. Iconic photos often feature strong compositional elements, such as leading lines, symmetry, or visual triangles, that draw the viewer’s eye and create a sense of balance and harmony. They also tell a compelling story, capturing the essence of the moment and the relationships between the people involved. And, they evoke a strong emotional response, connecting with viewers on a personal and visceral level.
10.3 How to Apply Successful Strategies from These Photos to Your Work?
Applying successful strategies from iconic group photos to your work involves analyzing the techniques used and adapting them to your own style and subject matter. Pay attention to the composition, lighting, posing, and storytelling elements in these photos, and consider how you can incorporate similar elements into your own work. Experiment with different approaches, and be willing to take risks and push your creative boundaries. Remember, the goal is not to copy the work of others but to learn from it and to develop your own unique voice and vision.
Elevate your group photography skills and create stunning, memorable photos with dfphoto.net.
Ready to take your group photos to the next level? Visit dfphoto.net today for more in-depth tutorials, gear reviews, and a vibrant community of photographers eager to share their knowledge and inspire your creativity. Don’t just capture moments – create art that tells a story.
Address: 1600 St Michael’s Dr, Santa Fe, NM 87505, United States
Phone: +1 (505) 471-6001
Website: dfphoto.net
FAQ Section
1. What is the best time of day to take group photos outdoors?
The best time of day to take group photos outdoors is during the golden hour, which is the hour after sunrise and the hour before sunset. During this time, the light is soft, warm, and flattering, creating a beautiful glow on your subjects. Avoid shooting in direct sunlight, which can cause harsh shadows and squinting.
2. How can I make sure everyone’s eyes are open in a group photo?
To make sure everyone’s eyes are open in a group photo, take multiple shots in quick succession and tell your subjects to blink between shots. You can also use the “burst mode” on your camera to capture a series of photos in rapid fire. Review the photos on the spot and choose the one where everyone’s eyes are open.
3. What should people wear for a group photo?
For a cohesive look, suggest that people wear clothing in similar colors or tones. Avoid busy patterns or logos that can distract from the faces. Ensure that clothing is comfortable and fits well, allowing for natural movement and posing.
4. How do I avoid red-eye in group photos taken with flash?
To avoid red-eye in group photos taken with flash, use an external flash unit and position it away from the camera lens. You can also try bouncing the flash off a nearby surface, such as a wall or ceiling, to soften the light and reduce the likelihood of red-eye.
5. How can I pose people who are self-conscious about their bodies?
Pose people who are self-conscious about their bodies in a way that accentuates their best features and minimizes any perceived flaws. Use angles and weight distribution to create flattering lines and curves. Encourage them to stand tall, keep their shoulders back, and engage their core muscles. Most importantly, be respectful and supportive, and help everyone feel comfortable and confident in front of the camera.
6. What is the best camera setting for group photos?
The best camera settings for group photos depend on the shooting conditions and your desired outcome. In general, use a wide aperture (f/2.8 to f/5.6) to create a shallow depth of field and blur the background. Use a fast shutter speed (1/200th of a second or faster) to freeze motion and prevent camera shake. Use a low ISO setting (100 to 400) to minimize noise and maintain image quality.
7. How do I get everyone to smile naturally in a group photo?
To get everyone to smile naturally in a group photo, create a relaxed and fun atmosphere. Encourage your subjects to talk to each other, laugh, and interact naturally. Use humor and conversation to ease their nerves and build their confidence. Capture candid moments of interaction, rather than forcing stiff, posed shots.
8. What are some creative prop ideas for group photos?
Creative prop ideas for group photos include balloons, signs, musical instruments, sporting equipment, hats, scarves, and bubbles. Choose props that are relevant to the theme or occasion, and encourage your subjects to interact with the props and use them to express their personalities.
9. How can I make a large group photo look more dynamic?
To make a large group photo look more dynamic, use movement, height variation, and diagonal lines. Encourage your subjects to walk, run, jump, or dance. Arrange them at varying heights, with some people standing, some sitting, and some leaning against each other. Use diagonal lines to create a sense of depth and direction.
10. What is the best way to light a group photo indoors?
The best way to light a group photo indoors is to use a combination of natural light and artificial light. Position your subjects near a window or other source of natural light, and use an external flash unit to fill in shadows and balance the exposure. You can also use softboxes or umbrellas to diffuse the light and create a more flattering look.