Live Photos capture moments in a unique way, blending still photography with a touch of motion. This guide, brought to you by dfphoto.net, will walk you through everything you need to know about How To Play A Live Photo, use and share them. Dive in to discover the tips and tricks that will help you to unleash the full potential of the moving pictures and photo techniques, ensuring every memory is vibrantly preserved.
1. Understanding Live Photos
What exactly are Live Photos, and how do they differ from traditional still images or videos?
Live Photos are more than just static images; they capture a brief moment in time, complete with motion and sound. Essentially, when you snap a Live Photo on your iPhone or iPad, the camera records 1.5 seconds of video both before and after the moment you press the shutter button. This results in a dynamic image that comes to life when you touch and hold it.
1.1. The Magic Behind Live Photos
Live Photos debuted with the iPhone 6s and have since become a standard feature on newer iOS devices. According to Apple, the intent was to bring memories to life in a more engaging way than traditional photographs allowed.
The technical process involves capturing a short video clip at 15 frames per second, along with the still image. This allows your device to create a seamless transition between the static photo and the moving segment.
1.2. Key Features and Benefits
- Motion and Sound: Unlike static photos, Live Photos include both motion and sound, providing a more immersive experience.
- Key Photo Selection: You can choose the perfect frame to represent your Live Photo.
- Fun Effects: Apply effects like Loop, Bounce, and Long Exposure to add creative flair.
- Easy Sharing: Share your Live Photos with friends and family across various platforms.
1.3. Devices Compatible with Live Photos
Live Photos can be taken and viewed on:
- iPhone 6s and later
- iPad (5th generation) and later
- iPad Air (3rd generation) and later
- iPad mini (5th generation) and later
- iPad Pro models (2016 and later)
 An iPhone displaying Live Photos, showcasing the camera app's Live Photo feature
2. How to Capture a Live Photo
Capturing Live Photos is straightforward, but here’s a step-by-step guide to ensure you get the best results:
2.1. Step-by-Step Guide
- Open the Camera App: Launch the Camera app on your iPhone or iPad.
- Ensure Photo Mode is Selected: Make sure your camera is set to photo mode.
- Turn on Live Photos: Look for the Live Photo icon (a series of concentric circles) at the top of the screen. If it has a slash through it, tap the icon to turn Live Photos on. When active, the icon will be yellow.
- Hold Your Device Steady: Keep your device as still as possible to avoid blurriness in the final result.
- Tap the Shutter Button: Press the shutter button to capture your Live Photo.
2.2. Tips for Taking Great Live Photos
- Steady Hands: Stability is key. Use both hands or a tripod to minimize camera shake.
- Good Lighting: Ensure adequate lighting to capture clear and vibrant images.
- Anticipate Movement: Think about the 1.5 seconds before and after you press the shutter. What action or emotion do you want to capture?
- Experiment: Don’t be afraid to try different angles and compositions to find the most compelling shot.
2.3. Common Mistakes to Avoid
- Sudden Movements: Avoid jerking the camera immediately after taking the photo, as this can result in a jarring transition.
- Low Light Conditions: Live Photos taken in low light may appear grainy or blurry. Try to use natural or artificial lighting to improve image quality.
- Forgetting to Turn on Live Photos: It’s easy to forget to activate the Live Photos feature. Always double-check the icon before taking your shot.
3. Playing and Viewing Live Photos
Once you’ve captured your Live Photos, how do you view and enjoy them? Here’s how:
3.1. Finding Your Live Photos
- Open the Photos App: Launch the Photos app on your iPhone or iPad.
- Navigate to Albums: Tap the “Albums” tab at the bottom of the screen.
- Find the Live Photos Album: Scroll down to the “Media Types” section and tap on “Live Photos.”
3.2. Playing Live Photos
- Open the Live Photo: Tap on the Live Photo you want to view.
- Touch and Hold: Press and hold the screen to bring the Live Photo to life. You’ll see the motion and hear the sound captured during those brief moments.
3.3. Sharing Live Photos
- Select the Live Photo: Open the Live Photo you want to share.
- Tap the Share Button: Tap the share icon (a square with an upward-pointing arrow) in the bottom-left corner of the screen.
- Choose Your Sharing Method: Select how you want to share your photo, such as via Messages, Mail, or social media.
3.4. Supported Platforms
- iOS Devices: Live Photos are natively supported on iPhones and iPads.
- macOS: You can view and play Live Photos on Macs running macOS High Sierra or later.
- Social Media: Some platforms like Facebook and Tumblr support Live Photos directly. When sharing to other platforms, they may be converted to static images or GIFs.
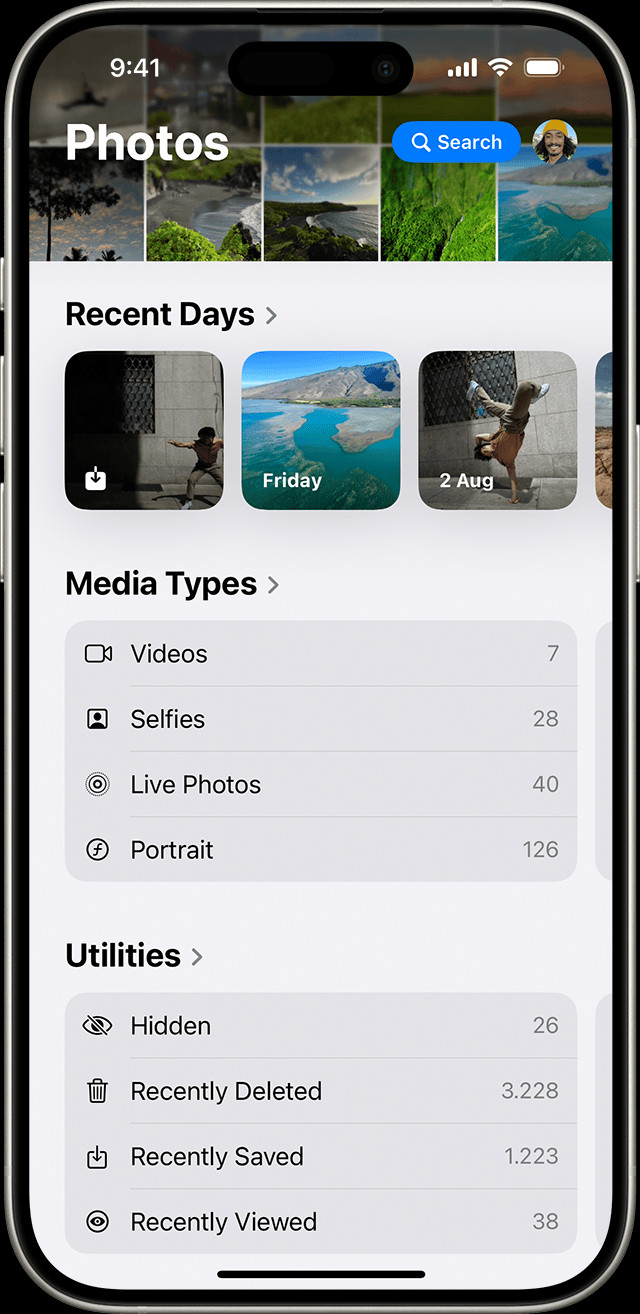 A screenshot of the Photos app, demonstrating how to locate the Live Photos album
4. Editing and Enhancing Live Photos
Live Photos can be edited to enhance their visual appeal. Here’s how:
4.1. Changing the Key Photo
The key photo is the still frame that appears when the Live Photo isn’t playing. To change it:
- Open the Live Photo: Select the Live Photo you want to edit.
- Tap Edit: Tap the “Edit” button in the top-right corner.
- Tap the Live Photos Icon: Look for the Live Photos icon at the bottom of the screen and tap it.
- Move the Slider: Drag the slider to select a new frame.
- Make Key Photo: Release your finger and tap “Make Key Photo.”
- Tap Done: Save your changes by tapping “Done.”
4.2. Adding Effects
Live Photos offer several fun effects:
- Loop: Turns your Live Photo into a repeating video loop.
- Bounce: Makes your Live Photo play forward and then backward continuously.
- Long Exposure: Simulates a long exposure effect, blurring motion and creating a dreamy look.
To add an effect:
- Open the Live Photo: Select the Live Photo you want to edit.
- Tap the Live Photos Icon: Tap the Live Photos icon at the top of the screen.
- Choose an Effect: Select “Loop,” “Bounce,” or “Long Exposure.”
4.3. Basic Editing Adjustments
You can also make basic adjustments to your Live Photos, such as:
- Adjusting Exposure: Brighten or darken the image.
- Changing Contrast: Increase or decrease the difference between light and dark areas.
- Adjusting Color: Modify the saturation, vibrance, and white balance.
- Applying Filters: Add a filter for a stylized look.
4.4. Third-Party Apps for Editing Live Photos
For more advanced editing options, consider using third-party apps like:
- Adobe Lightroom: A professional-grade photo editing app with powerful tools and features.
- VSCO: Offers a wide range of filters and editing tools, perfect for creating a unique aesthetic.
- Enlight Pixaloop: Animate your photos and add special effects.
Remember that editing Live Photos in third-party apps may remove the Live Photo effects.
4.5. Live Photo to Video Conversion
How can you convert Live Photos into videos, and what are the benefits of doing so?
Converting Live Photos to videos makes them more versatile and shareable. Videos can be easily uploaded to platforms that don’t support Live Photos natively, ensuring that your memories can be enjoyed by a wider audience.
4.5.1. Steps to Convert Live Photos to Video
- Open the Photos App: Start by opening the Photos app on your iPhone or iPad.
- Select the Live Photo: Navigate to the Live Photo you wish to convert.
- Tap the Share Button: Tap the share icon located in the bottom-left corner of the screen.
- Scroll and Select Save as Video: Scroll through the share options until you find “Save as Video.” Tap this option.
- Video Saved: The Live Photo will be saved as a video in your Camera Roll. You can now access it just like any other video.
4.5.2. Benefits of Converting to Video
- Broader Compatibility: Videos are supported on virtually all social media platforms and devices, ensuring that your memories can be viewed anywhere.
- Easier Sharing: Sharing videos is often simpler than sharing Live Photos, particularly with users who may not be familiar with the Live Photo format.
- No Special Software Required: Unlike Live Photos, videos don’t require any special software or apps to view, making them accessible to everyone.
5. Sharing Your Live Photos
Sharing Live Photos can be a bit tricky since not all platforms support the format natively. Here’s what you need to know:
5.1. Sharing on iOS Devices
When sharing between iOS devices (iPhones, iPads, and Macs), Live Photos are shared seamlessly. Simply use AirDrop, Messages, or iCloud Photo Sharing.
5.2. Sharing on Social Media
- Facebook: Facebook supports Live Photos. When you upload a Live Photo, viewers can tap and hold to see it come to life.
- Tumblr: Tumblr also supports Live Photos.
- Other Platforms: Platforms like Instagram and Twitter do not support Live Photos directly. When sharing to these platforms, your Live Photo will be converted to a still image or a GIF.
5.3. Sharing via Email
When you share a Live Photo via email, it is typically sent as a still image. To share the full Live Photo, consider using iCloud Photo Sharing or another cloud storage service.
5.4. Converting to GIF
Another option is to convert your Live Photo to a GIF before sharing. Here’s how:
- Open the Photos App: Launch the Photos app on your iPhone or iPad.
- Select the Live Photo: Navigate to the Live Photo you wish to convert.
- Tap the Share Button: Tap the share icon in the bottom-left corner.
- Scroll and Select Save as GIF: Scroll through the options until you find “Save as GIF.”
- GIF Saved: The Live Photo will be saved as a GIF in your Camera Roll. You can now share it on platforms that support GIFs.
5.5. Potential Issues and Solutions
- Compatibility Issues: Some recipients may not be able to view Live Photos if they are using older devices or unsupported platforms. Convert to video or GIF format for broader compatibility.
- File Size: Live Photos can be larger than static images. Consider using cloud storage or compressing the file before sharing.
- Privacy Concerns: Be mindful of privacy when sharing Live Photos, as they may capture more than just the intended subject.
6. Advanced Techniques and Tips
Ready to take your Live Photo skills to the next level? Here are some advanced techniques and tips:
6.1. Using Live Photos for Creative Storytelling
Live Photos can add depth and emotion to your storytelling. Capture moments that unfold over time, such as a child’s first steps or a musician’s performance.
6.2. Creating Cinemagraphs
A cinemagraph is a still photo with a subtle, looping animation. Create your own cinemagraphs by capturing a Live Photo and then using a third-party app to isolate the moving elements.
6.3. Shooting in Burst Mode
Burst mode allows you to capture a rapid sequence of photos. While not technically Live Photos, burst mode can be useful for capturing action shots and selecting the perfect frame.
6.4. Using a Tripod
For maximum stability, use a tripod when shooting Live Photos. This is especially important in low light conditions or when capturing long exposure effects.
6.5. Exploring Different Perspectives
Experiment with different angles and compositions to find unique and compelling shots. Get down low, shoot from above, or try a Dutch angle for a more dynamic look.
7. Preserving and Storing Live Photos
How can you ensure that your Live Photos are safely stored and easily accessible?
7.1. Backing Up Your Live Photos
Backing up your Live Photos is crucial to prevent data loss. Here are several methods you can use:
- iCloud Photo Library: Enable iCloud Photo Library to automatically sync your photos and videos across all your Apple devices. This ensures that your Live Photos are backed up to the cloud and accessible from anywhere.
- Google Photos: Google Photos offers free unlimited storage for photos and videos (up to a certain resolution). Simply install the Google Photos app on your iPhone or iPad and enable backup and sync.
- External Hard Drive: Manually transfer your Live Photos to an external hard drive for safekeeping. This is a good option if you prefer to have a physical backup of your files.
- Cloud Storage Services: Use cloud storage services like Dropbox or OneDrive to back up your Live Photos. These services offer secure storage and easy access from any device.
7.2. Managing Storage Space
Live Photos can take up a significant amount of storage space on your device. Here are some tips for managing your storage:
- Optimize Storage: Enable “Optimize iPhone Storage” in your iCloud Photo Library settings. This will store full-resolution photos and videos in iCloud while keeping smaller, optimized versions on your device.
- Delete Unnecessary Photos: Regularly review your Live Photos and delete any that you don’t need.
- Transfer to External Storage: Move your Live Photos to an external hard drive or cloud storage service to free up space on your device.
- Compress Files: Use a file compression app to reduce the size of your Live Photos without sacrificing too much quality.
7.3. Archiving Live Photos
Archiving your Live Photos is important for long-term preservation. Here are some best practices:
- Create a System: Develop a consistent naming and folder structure for your Live Photos.
- Use Metadata: Add metadata (such as captions, keywords, and location data) to your Live Photos to make them easier to search and organize.
- Store Multiple Backups: Keep multiple backups of your Live Photos in different locations (e.g., cloud storage, external hard drive, and physical media).
- Regularly Check Your Backups: Periodically check your backups to ensure that they are still accessible and that the files are not corrupted.
8. Troubleshooting Common Issues
Encountering issues with your Live Photos? Here are some common problems and solutions:
8.1. Live Photos Not Playing
- Ensure Live Photos is Enabled: Make sure that Live Photos is turned on in the Camera app.
- Check Device Compatibility: Ensure that you are viewing the Live Photo on a compatible device.
- Update iOS: Update your iPhone or iPad to the latest version of iOS.
- Restart Your Device: Try restarting your device to resolve any software glitches.
8.2. Poor Image Quality
- Use Good Lighting: Ensure adequate lighting when capturing Live Photos.
- Keep Your Device Steady: Minimize camera shake by using both hands or a tripod.
- Clean Your Lens: Clean your lens to remove any smudges or dirt.
- Adjust Camera Settings: Experiment with different camera settings to optimize image quality.
8.3. Sharing Problems
- Convert to Video or GIF: Convert your Live Photo to video or GIF format for broader compatibility.
- Use iCloud Photo Sharing: Share your Live Photo via iCloud Photo Sharing.
- Check File Size: Ensure that the file size is not too large for the sharing platform.
- Verify Internet Connection: Make sure you have a stable internet connection when sharing online.
8.4. Storage Issues
- Optimize Storage: Enable “Optimize iPhone Storage” in your iCloud Photo Library settings.
- Delete Unnecessary Photos: Regularly review and delete any Live Photos that you don’t need.
- Transfer to External Storage: Move your Live Photos to an external hard drive or cloud storage service.
9. The Future of Live Photos
What does the future hold for Live Photos?
9.1. Advancements in Technology
As technology continues to evolve, we can expect to see further advancements in Live Photos. This may include:
- Improved Image Quality: Higher resolution sensors and better image processing algorithms will result in sharper, more detailed Live Photos.
- Enhanced Effects: New and innovative effects will add even more creative possibilities.
- Better Stabilization: Improved stabilization technology will reduce camera shake and produce smoother videos.
- Seamless Integration: Live Photos will be more seamlessly integrated into various platforms and devices.
9.2. Integration with Augmented Reality (AR)
Live Photos could be integrated with augmented reality (AR) to create even more immersive experiences. Imagine pointing your phone at a Live Photo and seeing the scene come to life in 3D.
9.3. Increased Adoption
As more people discover the benefits of Live Photos, we can expect to see increased adoption across various platforms and devices. This may lead to new and innovative ways of capturing and sharing memories.
10. Embracing the Art of Live Photography
Live Photos offer a unique way to capture and relive memories. By understanding the techniques and tips outlined in this guide, you can unleash the full potential of this dynamic format.
10.1. Finding Inspiration
Explore the work of other Live Photo enthusiasts for inspiration. Look for unique perspectives, creative effects, and compelling stories.
10.2. Practicing Regularly
The more you practice, the better you’ll become at capturing great Live Photos. Experiment with different settings, angles, and compositions.
10.3. Sharing Your Work
Share your Live Photos with friends, family, and the broader online community. Get feedback and learn from others.
10.4. Staying Curious
Stay curious and continue to explore the possibilities of Live Photos. As technology evolves, new and exciting opportunities will emerge.
FAQ: Frequently Asked Questions About Live Photos
1. What is a Live Photo?
A Live Photo is a feature on iPhones and iPads that captures a short video clip along with a still image, creating a dynamic photo with motion and sound.
2. How do I take a Live Photo?
Open the Camera app, ensure Live Photos is turned on (the icon is yellow), hold your device steady, and tap the shutter button.
3. How do I play a Live Photo?
Open the Live Photo in the Photos app and touch and hold the screen to bring it to life.
4. Can I edit Live Photos?
Yes, you can edit Live Photos to change the key photo, add effects, and make basic adjustments like exposure and contrast.
5. How do I share Live Photos on social media?
Some platforms like Facebook and Tumblr support Live Photos directly. For others, you may need to convert them to video or GIF format.
6. How do I convert a Live Photo to a video?
Open the Live Photo, tap the share icon, and select “Save as Video.”
7. How do I turn off Live Photos?
Tap the Live Photos icon in the Camera app to turn it off. The icon will have a slash through it when the feature is disabled.
8. What devices support Live Photos?
Live Photos are supported on iPhone 6s and later, iPad (5th generation) and later, iPad Air (3rd generation) and later, iPad mini (5th generation) and later, and iPad Pro models from 2016 or later.
9. How do I back up Live Photos?
You can back up Live Photos using iCloud Photo Library, Google Photos, external hard drives, or cloud storage services.
10. Are Live Photos worth it?
Yes, Live Photos are worth it if you want to capture more than just a static image. They add depth, emotion, and immersion to your memories.
Live Photos offer an innovative way to capture and share memories, blending still photography with a touch of motion and sound. By following the tips and techniques outlined in this comprehensive guide, you can master the art of Live Photography and unleash its full potential. Whether you’re capturing everyday moments or creating stunning works of art, Live Photos provide a unique and engaging way to relive your experiences. Explore the world of photography further with dfphoto.net, where you can find a wealth of resources, stunning photo collections, and a vibrant community of fellow photography enthusiasts. If you’re eager to deepen your photographic skills and seek inspiration, visit dfphoto.net today to explore our tutorials, galleries, and community forums. Discover how to elevate your photography and connect with other passionate photographers in the USA, particularly in vibrant locations like Santa Fe.
Address: 1600 St Michael’s Dr, Santa Fe, NM 87505, United States.
Phone: +1 (505) 471-6001.
Website: dfphoto.net.