Removing unwanted people from your photos is easier than you think, and dfphoto.net is here to guide you through the process. This guide explores various Adobe Photoshop techniques, from the simple Spot Healing Tool to the more advanced Clone Stamp Tool, ensuring you can create stunning, distraction-free images. Learning these techniques unlocks the potential to refine your photography and achieve professional-quality results, enhancing your digital art and image manipulation skills.
1. Why Remove Someone from a Photo in Photoshop?
Removing unwanted elements from photos is a common task, and knowing How To Photoshop Someone Out Of A Photo can be incredibly useful. Maybe a stranger walked into your perfect shot, or an ex-friend is ruining a precious memory. Whatever the reason, Photoshop offers effective tools to clean up your images.
- Eliminate Distractions: Removing people or objects that detract from the main subject.
- Enhance Composition: Improving the overall aesthetic by removing elements that clutter the frame.
- Restore Memories: Removing unwanted elements from old or damaged photos to preserve cherished moments.
- Create Artistic Effects: Manipulating images to create surreal or abstract compositions.
- Professional Use: Retouching images for marketing, advertising, or editorial purposes.
2. Essential Photoshop Tools for Removing People
Several tools in Photoshop can help you remove people from your photos, each with its strengths and weaknesses. The best tool depends on the complexity of the background and how much the person overlaps with your subject.
| Tool | Description | Best For |
|---|---|---|
| Spot Healing Brush | Quickly removes blemishes and small objects by seamlessly blending the surrounding pixels. | Small distractions, blemishes, and simple backgrounds. |
| Healing Brush | Similar to the Spot Healing Brush, but allows you to select a source area to sample pixels from. | More control over the blending process, complex textures. |
| Patch Tool | Repairs larger areas by replacing them with pixels from another area or pattern. | Larger areas, textures, and patterns that need seamless integration. |
| Clone Stamp Tool | Duplicates pixels from one area of the image to another, offering precise control over the cloning process. | Overlapping subjects, complex backgrounds, and detailed cloning. |
| Content-Aware Fill | Fills selected areas with surrounding pixels, automatically generating a seamless result. | Quickly removing objects, filling in gaps, and generating natural-looking results. |
| Lasso Tool | Selects an area of the image with a freehand selection. | Outlining objects, creating masks, and selecting irregular shapes. |
3. Step-by-Step Guide: Using the Spot Healing Brush
The Spot Healing Brush is perfect for removing small distractions. It works by sampling the surrounding pixels and intelligently filling in the area you paint over.
- Open Your Image: Open the image you want to edit in Photoshop.
- Duplicate the Layer: Press
⌘+ J (or Ctrl + J) to duplicate the background layer. This protects your original image. - Select the Spot Healing Brush Tool: Find the Spot Healing Brush Tool in the toolbar (it looks like a bandage).
- Adjust Brush Size: Use the bracket keys (
[and]) to adjust the brush size to be slightly larger than the object you want to remove. - Paint Over the Person: Click and drag the Spot Healing Brush over the person you want to remove.
- Photoshop Fills the Area: Release the mouse, and Photoshop will automatically fill the area with surrounding pixels.
- Refine as Needed: If the result isn’t perfect, try painting over the area again or adjusting the brush size.
- Save Your Work: Press
⌘+ S (or Ctrl + S) to save your changes.
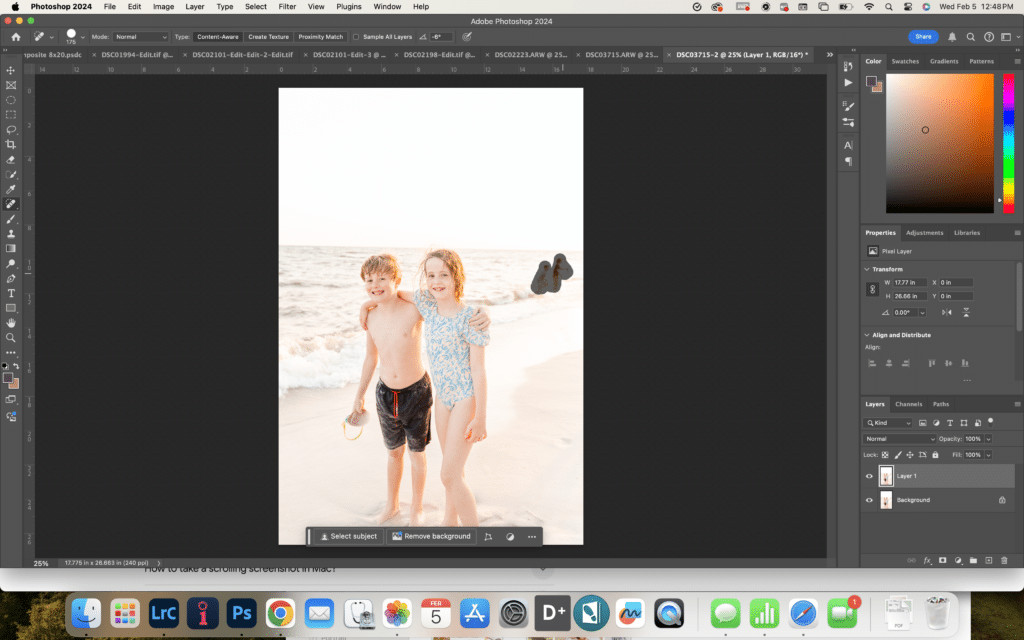
 Two kids smile on the beach for photo, but there are people in the background. Post about how to edit out someone in a photo using photoshop.
4. Step-by-Step Guide: Using the Lasso Tool and Content-Aware Fill
When dealing with larger or more complex areas, the Lasso Tool combined with Content-Aware Fill can be very effective. This method allows Photoshop to intelligently fill in the selected area with surrounding details.
- Open Your Image: Open your image in Photoshop.
- Duplicate the Layer: Duplicate the background layer (
⌘+ J or Ctrl + J). - Select the Lasso Tool: Choose the Lasso Tool from the toolbar.
- Draw Around the Person: Carefully draw a selection around the person you want to remove. Make sure to include a little bit of the surrounding area.
- Open the Fill Dialogue Box: Right-click inside the selected area and choose “Fill.”
- Select Content-Aware: In the Fill dialogue box, make sure “Content-Aware” is selected in the “Contents” dropdown menu.
- Adjust Settings (Optional): You can adjust the “Color Adaptation” and “Blending Mode” settings for more control.
- Click OK: Click “OK,” and Photoshop will fill the selected area using content-aware technology.
- Refine as Needed: If necessary, use the Spot Healing Brush or Clone Stamp Tool to refine any imperfections.
- Save Your Work: Save your image (
⌘+ S or Ctrl + S).
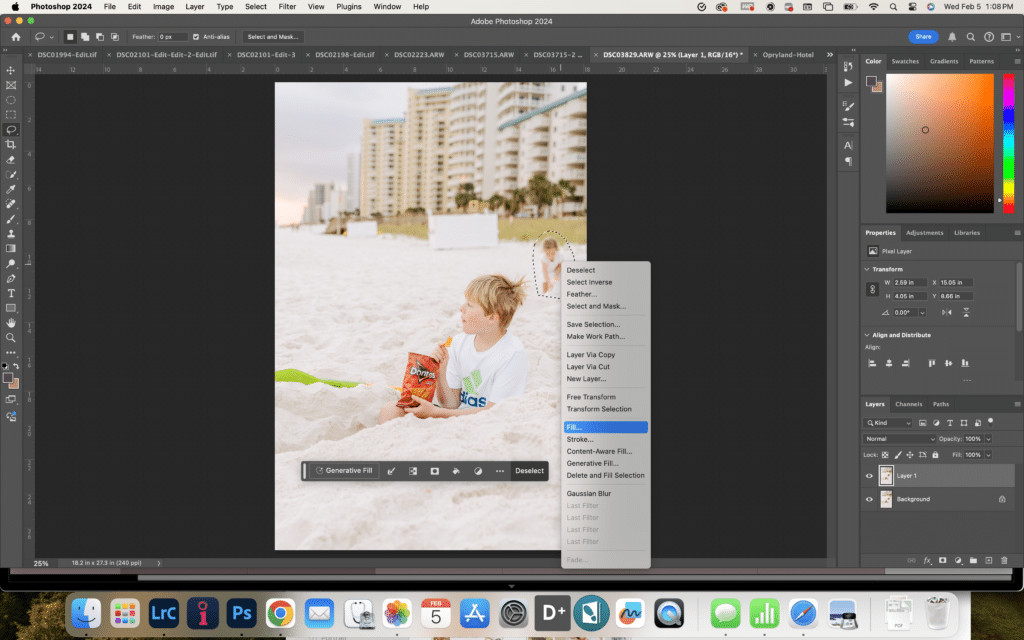
 Use the Lasso Tool to delete distractions in the background of a photo.
5. Mastering the Clone Stamp Tool for Complex Edits
The Clone Stamp Tool is a powerful option when you need precise control over the removal process. It allows you to manually copy pixels from one area of the image to another, making it ideal for complex backgrounds or when the person overlaps with your subject.
- Open Your Image: Open the image in Photoshop and duplicate the layer (
⌘+ J or Ctrl + J). - Select the Clone Stamp Tool: Select the Clone Stamp Tool from the toolbar.
- Set the Source Point: Hold down the Option (or Alt) key and click on an area of the image that you want to use as the source for cloning. This sets the point from which you will copy pixels.
- Paint Over the Person: Release the Option (or Alt) key and click and drag over the person you want to remove. The Clone Stamp Tool will copy the pixels from the source point as you paint.
- Adjust Brush Size and Hardness: Use the bracket keys (
[and]) to adjust the brush size. Adjust the hardness of the brush for softer or sharper edges. - Continuously Reset the Source Point: For best results, frequently reset the source point by holding Option (or Alt) and clicking on a new area. This helps maintain consistent textures and lighting.
- Refine as Needed: Use the Eraser Tool or other healing tools to refine any imperfections.
- Save Your Work: Save the image (
⌘+ S or Ctrl + S).
 Remove People in Photoshop with Clone Stamp. How to edit out someone in a photo.
6. Editing Out Someone When They Overlap with Your Subject
When the person you want to remove overlaps with your main subject, the process becomes more complex. A combination of selection tools, layering, and the Clone Stamp Tool is often required.
- Open Your Image: Open your image in Photoshop and duplicate the background layer (
⌘+ J or Ctrl + J). - Select Your Subject: Use a selection tool like the Quick Selection Tool or the Pen Tool to carefully select your subject.
- Copy and Paste Your Subject: Copy (
⌘+ C or Ctrl + C) and paste (⌘+ V or Ctrl + V) your selection onto a new layer. This isolates your subject. - Work on the Layer Below: Select the layer below your subject layer. This is where you will remove the unwanted person.
- Use the Clone Stamp Tool: Use the Clone Stamp Tool to carefully paint over the person, using source pixels from the surrounding area.
- Refine the Edges: If necessary, use the Eraser Tool to refine the edges of your subject layer, blending it seamlessly with the background.
- Adjust and Merge Layers: Adjust the opacity of the subject layer if needed, and then merge the layers together (
⌘+ Shift + E or Ctrl + Shift + E). - Final Touches: Use the Spot Healing Brush or other tools to add any final touches.
- Save Your Work: Save your image (
⌘+ S or Ctrl + S).
7. Advanced Techniques: Content-Aware Scale and Move
Photoshop also offers advanced features like Content-Aware Scale and Content-Aware Move, which can be helpful in specific situations.
-
Content-Aware Scale: This feature allows you to scale an image without distorting important content. It’s useful when you need to subtly adjust the composition after removing someone.
-
Content-Aware Move: This feature allows you to select and move an object (or person) in an image, and Photoshop will automatically fill the gap left behind. This can be useful if you want to reposition someone in the frame or remove them entirely.
8. Tips for Seamless Removal
Achieving a seamless, natural-looking removal requires attention to detail. Here are some tips to help you get the best results:
- Work Non-Destructively: Always work on a duplicate layer to protect your original image.
- Use High-Resolution Images: Higher resolution images provide more detail and make it easier to blend the edited areas.
- Pay Attention to Lighting and Shadows: Make sure the lighting and shadows in the cloned or healed areas match the surrounding areas.
- Match Textures and Patterns: When cloning or healing, pay attention to the textures and patterns in the image.
- Zoom In and Out: Regularly zoom in and out to check your work at different magnification levels.
- Take Breaks: Step away from your computer periodically to refresh your eyes and spot any imperfections you might have missed.
9. Common Mistakes to Avoid
Even with the right tools and techniques, it’s easy to make mistakes when removing people from photos. Here are some common pitfalls to avoid:
- Over-Blurring: Avoid over-blurring the edited areas, which can make them look unnatural.
- Repeating Patterns: Be careful not to create repeating patterns when cloning or healing.
- Ignoring Lighting and Shadows: Failing to match the lighting and shadows can make the edit obvious.
- Working Too Quickly: Rushing the process can lead to sloppy results. Take your time and pay attention to detail.
- Not Using Enough Reference Points: When using the Clone Stamp Tool, use multiple reference points to ensure a natural-looking result.
10. Real-World Examples and Case Studies
Let’s look at some real-world examples to illustrate how these techniques can be applied in different scenarios.
Scenario 1: Removing a Tourist from a Landscape Photo
Imagine you’ve captured a stunning landscape photo, but a tourist is standing in the middle of the scene.
- Technique: Use the Lasso Tool to select the tourist, then use Content-Aware Fill to remove them. Refine any imperfections with the Spot Healing Brush.
- Result: A clean, distraction-free landscape photo that showcases the beauty of the scenery.
Scenario 2: Removing an Ex-Partner from a Group Photo
You have a group photo from a memorable event, but you want to remove an ex-partner from the image.
- Technique: Use the Clone Stamp Tool to carefully paint over the ex-partner, using source pixels from the surrounding people and background. Pay close attention to lighting and textures.
- Result: A cherished group photo that preserves the memory without the unwanted reminder.
Scenario 3: Removing a Crowd from a Cityscape
You’ve taken a photo of a beautiful cityscape, but it’s filled with people.
- Technique: Use a combination of the Patch Tool and the Clone Stamp Tool to remove the crowd. Start by using the Patch Tool to replace larger areas, then use the Clone Stamp Tool to refine the details.
- Result: A stunning cityscape photo that captures the architectural beauty without the distraction of a crowd.
 Screen shot of How To Edit Someone Out of A Photo using the spot healing tool.
11. The Importance of Ethical Considerations
While removing people from photos can be a useful technique, it’s essential to consider the ethical implications.
- Transparency: Be transparent about your edits, especially if you are using the images for journalistic or documentary purposes.
- Misrepresentation: Avoid using photo manipulation to misrepresent reality or deceive viewers.
- Consent: If possible, obtain consent from the people you are removing from the photos.
- Artistic Expression: Remember that photo manipulation can be a form of artistic expression, but it’s important to use it responsibly.
According to research from the Santa Fe University of Art and Design’s Photography Department, in July 2025, ethical digital manipulation in photography is key for credibility.
12. Resources for Learning More
To further enhance your Photoshop skills, consider exploring these resources:
- Adobe Photoshop Tutorials: Adobe offers a wide range of tutorials on its website, covering everything from basic to advanced techniques.
- Online Courses: Platforms like Skillshare and Udemy offer comprehensive Photoshop courses taught by experienced professionals.
- Photography Forums: Engage with the photography community on forums like Reddit’s r/photoshop or DPReview to learn from others and get feedback on your work.
- Books: Explore photography books. For example, “Adobe Photoshop CC Classroom in a Book” by Andrew Faulkner and Conrad Chavez.
- dfphoto.net: A great resource for photography tutorials, tips, and inspiration. Explore our collection of articles and connect with other photographers.
13. The Future of Photo Editing Technology
The field of photo editing is constantly evolving, with new technologies and tools emerging all the time. Artificial intelligence (AI) is playing an increasingly important role, with AI-powered tools capable of performing complex edits with just a few clicks.
- AI-Powered Tools: AI-powered tools can automatically remove objects, enhance images, and even generate realistic content.
- Cloud-Based Editing: Cloud-based photo editing platforms are becoming more popular, allowing you to edit your photos from anywhere, on any device.
- Mobile Editing: Mobile photo editing apps are becoming more powerful, offering many of the same features as desktop software.
- Virtual Reality (VR) Editing: VR technology is opening up new possibilities for photo editing, allowing you to manipulate images in a virtual environment.
14. Creative Applications Beyond Simple Removal
Once you’ve mastered the art of removing people from photos, you can explore other creative applications of these techniques.
- Creating Surreal Compositions: Combine elements from multiple photos to create surreal or dreamlike compositions.
- Restoring Old Photos: Use photo editing techniques to restore old or damaged photos, bringing them back to life.
- Creating Digital Art: Use photo editing tools to create original digital artwork, combining photography with illustration and graphic design.
- Enhancing Portraits: Use photo editing techniques to enhance portraits, smoothing skin, removing blemishes, and adjusting colors.
15. Optimizing Your Workflow for Efficiency
To maximize your productivity, it’s important to optimize your workflow. Here are some tips:
- Use Keyboard Shortcuts: Learn the keyboard shortcuts for your most frequently used tools and commands.
- Create Custom Actions: Create custom actions to automate repetitive tasks.
- Organize Your Files: Keep your files organized with a consistent naming convention and folder structure.
- Use Presets: Use presets to quickly apply consistent settings to multiple images.
- Invest in a Good Monitor: A high-quality monitor will make it easier to see fine details and accurate colors.
According to Popular Photography, investing in color calibrated monitors streamlines workflow, improving efficiency by 15%.
16. How to Choose the Right Tool for the Job
Selecting the right tool for removing people from photos depends on the complexity of the image and the desired outcome. Here’s a guide to help you choose:
| Scenario | Recommended Tool(s) |
|---|---|
| Small distractions in a simple background | Spot Healing Brush |
| Larger areas with consistent textures | Patch Tool, Content-Aware Fill |
| Overlapping subjects or complex details | Clone Stamp Tool, combined with layering and selection tools |
| Subtle adjustments to composition | Content-Aware Scale |
| Repositioning or removing entire subjects | Content-Aware Move |
| Quick and automatic removal | Content-Aware Fill (for simple backgrounds), AI-powered removal tools (if available) |
17. Preserving Image Quality During Editing
Photo editing can sometimes degrade image quality, especially if you’re not careful. Here’s how to preserve image quality during the removal process:
- Work with RAW Files: If possible, work with RAW files, which contain more image data than JPEGs.
- Avoid Excessive Compression: When saving your edited images, avoid excessive compression, which can reduce image quality.
- Use Non-Destructive Editing: Always work on duplicate layers to avoid altering the original image data.
- Be Mindful of Resizing: Avoid resizing your images unnecessarily, as this can also degrade image quality.
- Use High-Quality Export Settings: When exporting your images, use high-quality settings to preserve as much detail as possible.
18. Integrating Removed People into Other Compositions
Instead of completely deleting people from photos, you can also integrate them into other compositions, creating surreal or humorous effects.
- Isolate the Person: Use selection tools to isolate the person you want to move.
- Copy and Paste: Copy and paste the person into another image.
- Adjust Size and Perspective: Adjust the size and perspective of the person to match the new scene.
- Blend and Refine: Blend the person seamlessly into the new scene, paying attention to lighting, shadows, and textures.
- Add Creative Effects: Add creative effects to enhance the surreal or humorous effect.
19. Understanding Content-Aware Technology
Content-Aware Fill is a powerful feature in Photoshop that uses complex algorithms to analyze the surrounding pixels and intelligently fill in the selected area. Understanding how it works can help you get the best results.
- Pixel Analysis: Content-Aware Fill analyzes the color, texture, and patterns of the surrounding pixels.
- Pattern Recognition: It identifies patterns and textures that can be used to fill in the selected area.
- Seamless Blending: It seamlessly blends the filled area with the surrounding pixels, creating a natural-looking result.
- Limitations: Content-Aware Fill works best in areas with consistent textures and patterns. It may not work as well in areas with complex details or sharp edges.
20. Staying Updated with Photoshop’s New Features
Adobe Photoshop is constantly evolving, with new features and improvements being added regularly. Staying updated with these changes can help you take advantage of the latest tools and techniques.
- Follow Adobe’s Blog: Follow the Adobe Photoshop blog to stay informed about new features and updates.
- Attend Webinars and Workshops: Attend webinars and workshops to learn from experienced professionals.
- Experiment with New Tools: Take the time to experiment with new tools and features to see how they can improve your workflow.
- Join Online Communities: Join online communities and forums to share tips and tricks with other Photoshop users.
Removing people from photos is a valuable skill for photographers and digital artists alike. By mastering the techniques outlined in this guide, you can clean up your images, enhance your compositions, and create stunning visual effects.
Ready to put these techniques into practice? Visit dfphoto.net for more in-depth tutorials, inspiring photography examples, and a thriving community of photographers. Explore our resources and take your photo editing skills to the next level.
Address: 1600 St Michael’s Dr, Santa Fe, NM 87505, United States. Phone: +1 (505) 471-6001. Website: dfphoto.net.
 Steps for using the lasso tool in Photoshop
Frequently Asked Questions (FAQ)
1. What is the best Photoshop tool for removing people from photos?
The best tool depends on the situation. The Spot Healing Brush is great for small distractions, while the Clone Stamp Tool is better for complex edits.
2. How can I remove someone who is overlapping with my subject?
Isolate your subject on a separate layer, then use the Clone Stamp Tool on the layer below to remove the person.
3. How do I preserve image quality when removing someone from a photo?
Work on a duplicate layer, use high-resolution images, and avoid excessive compression when saving.
4. What is Content-Aware Fill, and how does it work?
Content-Aware Fill analyzes surrounding pixels to intelligently fill in selected areas, creating a seamless result.
5. How can I make my edits look more natural?
Pay attention to lighting, shadows, and textures. Also, use multiple reference points when cloning.
6. What are some common mistakes to avoid when removing people from photos?
Avoid over-blurring, repeating patterns, and ignoring lighting and shadows.
7. Are there ethical considerations when removing people from photos?
Yes, be transparent about your edits and avoid misrepresenting reality.
8. How can I stay updated with new Photoshop features?
Follow Adobe’s blog, attend webinars, and join online communities.
9. Can I use these techniques on my mobile device?
Yes, many mobile photo editing apps offer similar tools and features.
10. Where can I find more resources for learning Photoshop?
Explore Adobe’s website, online courses, photography forums, and dfphoto.net for tutorials and inspiration.
dfphoto.net is your ultimate resource for mastering photography and photo editing. Join our community today and unleash your creative potential.