Photoshop someone into a photo seamlessly can be achieved with the right photo editing techniques, creating professional and realistic results; dfphoto.net offers the perfect guide. Whether you aim to include a “missing” person in a family portrait or add a touch of fantasy by inserting someone into a creative scene, mastering these Photoshop manipulations will elevate your skills in photo composites, digital imaging, and artistic photo enhancements.
1. Why Photoshop Someone Into a Photo?
There are several reasons why you might want to Photoshop someone into a photo:
- To include a missing person: Perhaps someone couldn’t make it to a group photo, or you want to add a loved one who has passed away.
- To create a composite image: You might want to create a surreal or fantasy image by combining different elements.
- To fix a damaged photo: If a photo is damaged, you might be able to use Photoshop to replace a missing person or object.
- For fun: It can be a fun and creative way to experiment with photo editing and create unique images.
2. What Are the Key Considerations Before You Start?
Before diving into Photoshop, consider these factors to ensure a realistic outcome:
- Lighting: Match the lighting of the person you’re adding to the lighting of the original photo. Is it a bright, sunny day or a dimly lit room?
- Perspective: Ensure the perspective of the person matches the perspective of the original photo. Are they standing at the same angle?
- Resolution: The resolution of the person you’re adding should be similar to the resolution of the original photo.
- Color Balance: Colors should be similar.
- Shadows: Creating realistic shadows can enhance the authenticity of the composite.
3. What Are the Essential Photoshop Tools for Adding Someone to a Photo?
Familiarize yourself with these essential Photoshop tools:
- Selection Tools (Pen Tool, Quick Selection Tool, Object Selection Tool, Lasso Tool): Used to accurately select the person you want to add.
- Move Tool: Used to move the selected person into the target photo.
- Eraser Tool: Used to remove any unwanted background from the selected person.
- Transform Tools (Scale, Rotate, Skew): Used to adjust the size, position, and perspective of the selected person.
- Adjustment Layers (Curves, Levels, Color Balance, Hue/Saturation): Used to match the lighting and color of the selected person to the original photo.
- Masking: Non-destructively hide parts of a layer to blend the added person seamlessly.
4. How to Select the Right Picture of the Person?
Selecting the right picture of the person is crucial for a seamless Photoshop integration:
- Match the Photo: Choose a picture that matches the photo you want to add the person to.
- Lighting Similarity: Look for similarity in lighting.
- Weather and Age: Ensure the weather and age in the photo are similar.
- Simple Background: Use a picture of the person that contains the most simple background available.
- Tone and Lighting: It’d be a lot easier to start with lighting/tones that aren’t too far off.
- Picture Size: Make sure their picture is bigger or as big as the photo you want to put them in.
5. What Are the Detailed Steps to Photoshop Someone into a Photo?
Follow these detailed steps to seamlessly Photoshop someone into a photo using Adobe Photoshop:
5.1. Step 1: Open Both Images in Photoshop
Open both the image containing the person you want to add (the “subject”) and the image you want to add them to (the “background”) in Photoshop.
5.2. Step 2: Select the Subject
Choose the best selection tool based on the complexity of the subject and background:
- Pen Tool: For precise selections with clean edges.
- Quick Selection Tool: For quick and easy selections, especially with well-defined subjects.
- Object Selection Tool: Automatically selects objects identified by Photoshop’s AI.
- Lasso Tool: For freehand selections, useful for irregular shapes.
5.2.1. Using the Pen Tool
- Select the Pen Tool from the toolbar (or press
P). - Carefully click around the subject to create a path. Use anchor points to define curves and straight lines.
- Close the path by clicking on the starting point.
- Right-click inside the path and choose Make Selection. Set the Feather Radius to a small value (e.g., 0.5 pixels) to soften the edges.
5.2.2. Using the Quick Selection Tool
- Select the Quick Selection Tool from the toolbar (or press
W). - Adjust the brush size as needed.
- Click and drag over the subject to select it. The tool automatically detects edges.
- Use the
[ ]keys to decrease or increase the brush size.
5.2.3. Using the Object Selection Tool
- Select the Object Selection Tool from the toolbar (usually grouped with the Quick Selection Tool).
- Ensure that “Object Selection” is selected in the top options bar.
- Draw a rectangle or lasso around the subject. Photoshop will automatically identify and select it.
5.2.4. Using the Lasso Tool
- Select the Lasso Tool from the toolbar (or press
L). - Click and drag around the subject to create a freehand selection.
- Close the selection by releasing the mouse button.
5.3. Step 3: Refine the Selection
Regardless of the initial tool used, refine the selection using Select and Mask for professional results.
-
Go to Select > Select and Mask.
-
In the Select and Mask workspace:
- View Mode: Choose a view mode that provides good contrast (e.g., Overlay, On Black, On White).
- Edge Detection: Adjust the Radius slider to refine the edge.
- Global Refinements: Use the Smooth, Feather, Contrast, and Shift Edge sliders to further refine the selection.
- Output Settings: Choose Layer Mask as the output option.
-
Click OK to apply the refined selection as a layer mask.
5.4. Step 4: Move the Subject to the Background Image
- Select the Move Tool from the toolbar (or press
V). - Click and drag the subject layer (with the mask) from the Layers panel to the background image.
5.5. Step 5: Adjust the Subject’s Size and Position
- Select the subject layer in the Layers panel.
- Press
Ctrl+T(Windows) orCmd+T(Mac) to activate the Free Transform tool. - Hold
Shiftwhile dragging the corner handles to scale the subject proportionally. - Position the subject where you want it in the background image.
- Right-click inside the transform box for additional options like Rotate, Skew, Distort, and Perspective.
5.6. Step 6: Match the Lighting and Color
Adjust the lighting and color to make the subject blend seamlessly with the background.
5.6.1. Shadows and Highlights
- Go to Layer > New Adjustment Layer > Curves.
- Clip the adjustment layer to the subject layer by clicking the clipping mask icon at the bottom of the Properties panel (or right-click the adjustment layer and choose Create Clipping Mask).
- Adjust the curve to match the overall lighting of the background. Add points to the curve and drag them to lighten or darken the subject.
- Create another Curves adjustment layer, clip it to the subject, and focus on adjusting the shadows and highlights.
5.6.2. Color Balance
- Go to Layer > New Adjustment Layer > Color Balance.
- Clip the adjustment layer to the subject layer.
- Adjust the Midtones, Shadows, and Highlights sliders to match the color balance of the background.
5.6.3. Match Color
-
Go to Image > Adjustments > Match Color.
-
In the Match Color dialog:
- Source: Select the current document.
- Layer: Select the background layer.
- Adjust the Luminance, Color Intensity, and Fade sliders to blend the subject with the background.
- Check the Neutralize box if necessary.
5.7. Step 7: Add Shadows
Create realistic shadows to ground the subject in the scene.
- Create a new layer below the subject layer.
- Select the Brush Tool (or press
B). - Choose a soft, round brush with low opacity (e.g., 20%).
- Set the color to a dark shade that matches the shadows in the background.
- Paint shadows on the new layer, following the direction of the light source.
- Apply a Gaussian Blur filter (Filter > Blur > Gaussian Blur) to soften the shadows.
- Adjust the layer’s opacity to fine-tune the shadow intensity.
5.8. Step 8: Fine-Tune and Blend
- Dodge and Burn: Use the Dodge Tool (to lighten) and Burn Tool (to darken) to refine the subject’s lighting and shadows. Set the Range to Midtones and Exposure to a low value (e.g., 10-15%).
- Blur Edges: Use a soft brush with the Eraser Tool to gently blend the edges of the subject with the background.
- Noise: Add a slight amount of noise to the subject layer to match the noise in the background (Filter > Noise > Add Noise).
5.9. Step 9: Final Adjustments
- Add a Color Lookup adjustment layer at the top of the layer stack (Layer > New Adjustment Layer > Color Lookup) to apply a final color grade to the entire image.
- Experiment with different lookup tables (LUTs) to achieve the desired look.
- Adjust the layer’s opacity to control the intensity of the effect.
5.10. Step 10: Save Your Work
Save your work in a layered format (PSD) to allow for future edits. Also, save a flattened version (JPEG) for sharing.
6. What Are Some Common Mistakes to Avoid?
- Ignoring Lighting and Perspective: This is the most common mistake and results in unrealistic composites.
- Poor Selections: Hasty or inaccurate selections create jagged edges and detract from the realism.
- Overdoing Adjustments: Subtle adjustments are more effective than drastic changes.
- Forgetting Shadows: Shadows ground the subject in the scene and add depth.
- Not Blending Edges: Hard edges make the subject look pasted on.
7. What Are Advanced Techniques to Enhance Realism?
- Frequency Separation: Use frequency separation to smooth skin and textures while preserving detail.
- Clipping Masks: Use clipping masks to apply adjustments non-destructively to specific layers.
- Smart Objects: Convert layers to smart objects to apply filters non-destructively and preserve image quality.
- Blending Modes: Experiment with different blending modes (e.g., Multiply, Screen, Overlay) to blend layers creatively.
- Content-Aware Fill: Use content-aware fill to seamlessly remove unwanted objects or imperfections.
- Brush Settings: Customize brush settings (e.g., size, hardness, opacity, flow) for precise control.
8. How Can I Use Adjustment Layers Effectively?
Adjustment layers are a cornerstone of non-destructive editing in Photoshop. Here’s how to use them effectively:
- Non-Destructive Editing: Adjustment layers apply changes without directly altering the pixels of the original image.
- Clipping Masks: Clip adjustment layers to specific layers to affect only those layers.
- Layer Masks: Use layer masks to selectively apply adjustments to different areas of the image.
- Opacity: Adjust the opacity of adjustment layers to control the intensity of the effect.
- Blending Modes: Experiment with different blending modes to achieve unique results.
9. What Are the 5 Intended Search Results of The Keyword?
Here are 5 search intentions for the keyword “How To Photoshop Someone Into A Photo”:
- Step-by-Step Tutorial: Users want a detailed, easy-to-follow guide on how to add someone to a photo using Photoshop.
- Realistic Blending Techniques: Users seek tips and tricks for seamlessly blending the added person with the original photo, including matching lighting, color, and shadows.
- Selection Tool Comparison: Users want to understand the pros and cons of different selection tools (e.g., Pen Tool, Quick Selection Tool, Object Selection Tool) for isolating the person.
- Troubleshooting Common Issues: Users need solutions for common problems, such as jagged edges, mismatched lighting, and unrealistic shadows.
- Advanced Compositing Techniques: Users are interested in learning advanced techniques for creating complex and realistic composite images.
10. What Are Some Useful Tips for Beginners?
- Start Simple: Begin with straightforward images and gradually work your way up to more complex scenes.
- Practice Makes Perfect: The more you practice, the better you’ll become at Photoshop.
- Watch Tutorials: There are countless free tutorials available online that can help you learn new techniques.
- Experiment: Don’t be afraid to experiment with different tools and settings to see what works best.
- Use High-Resolution Images: High-resolution images provide more detail and make it easier to create realistic composites.
11. How Can dfphoto.net Help You Master Photo Manipulation?
dfphoto.net offers a wealth of resources to help you master photo manipulation:
- Comprehensive Tutorials: Access detailed, step-by-step tutorials on various Photoshop techniques.
- Expert Tips: Learn valuable tips and tricks from experienced photographers and digital artists.
- Inspiring Examples: Explore a gallery of stunning composite images to inspire your own creations.
- Community Forum: Connect with other Photoshop enthusiasts, ask questions, and share your work.
- Resource Library: Discover a curated collection of free assets, including textures, brushes, and stock images.
Visit dfphoto.net to explore our extensive collection of tutorials, tips, and resources. Elevate your photography skills, discover new techniques, and connect with a vibrant community of photographers. Address: 1600 St Michael’s Dr, Santa Fe, NM 87505, United States. Phone: +1 (505) 471-6001. Website: dfphoto.net.
FAQ: How to Photoshop Someone Into a Photo
12.1. What is the best Photoshop tool for selecting someone out of a photo?
The best tool depends on the image. The Pen Tool offers precision, the Quick Selection Tool is fast, the Object Selection Tool is automated, and the Lasso Tool is flexible.
12.2. How do I make the lighting match when I Photoshop someone into a picture?
Use adjustment layers like Curves, Levels, and Color Balance, clipped to the subject’s layer, to fine-tune brightness, contrast, and color tones.
12.3. Why does the person I added look out of place?
Mismatched lighting, perspective, or resolution can make the added person look unnatural. Adjust these elements carefully.
12.4. How do I create realistic shadows for the added person?
Create a new layer, use a soft brush with low opacity to paint shadows, and apply a Gaussian Blur for realism.
12.5. What should I do if the edges of the person I added look jagged?
Use the Select and Mask tool to refine the selection, feather the edges, or use a soft eraser brush to blend the edges.
12.6. Can I Photoshop someone into a photo using my phone?
Yes, mobile apps like Adobe Photoshop Mix and PicsArt allow you to perform basic photo manipulation tasks on your phone.
12.7. How important is it to match the resolution of the images?
Matching resolution is crucial for a seamless blend. If the resolutions differ significantly, the added person may appear pixelated or blurry.
12.8. What are clipping masks, and how do they help?
Clipping masks allow adjustment layers to affect only the layer directly below them, providing precise control over adjustments.
12.9. Is it ethical to Photoshop someone into a photo?
The ethics of photo manipulation depend on the context and intent. It’s generally acceptable for artistic purposes but can be problematic if used to deceive or misrepresent reality.
12.10. Where can I find free Photoshop tutorials?
Websites like dfphoto.net and YouTube offer numerous free Photoshop tutorials for various skill levels.
By following these steps and tips, you can Photoshop someone into a photo seamlessly and create stunning composite images. Remember to visit dfphoto.net for more in-depth tutorials, expert advice, and a vibrant community of photographers. Happy Photoshopping!
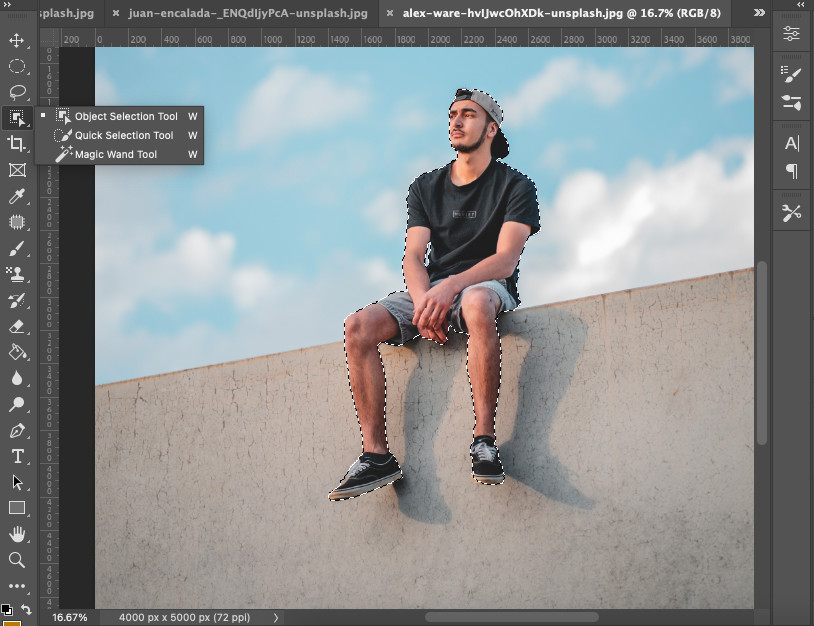 Selection tool in adobe photoshop