Have you ever wished you could add someone special to a photograph, whether to complete a family portrait or create a fun, imaginative scene? With Adobe Photoshop, seamlessly integrating people into photos is not only possible but achievable with the right techniques. This guide will walk you through the process of How To Photoshop People Into Photos, ensuring professional and realistic results every time.
Whether you’re aiming to mend a group photo that feels incomplete or looking to unleash your creativity by placing someone into a whimsical backdrop, mastering the art of photo manipulation in Photoshop opens up a world of possibilities. Let’s explore the essential steps to seamlessly Photoshop someone into a picture.
Don’t Have Photoshop?
 Adobe Photoshop software box, indicating where to download the program.
Download Adobe Photoshop
Get access to the industry-standard photo editing software and follow along with this easy-to-understand tutorial.
Start your 7-day free trial today
While you might be familiar with basic photo editing techniques in Photoshop, adding a person to a photo requires a more refined approach. This tutorial is designed to provide you with a clear, step-by-step method, breaking down each action to make the process as smooth and efficient as possible. Let’s get started and discover how to seamlessly integrate individuals into your chosen photographs.
Step-by-Step Guide: How to Photoshop a Person into a Picture
Step 1: Selecting the Perfect Photo of Your Subject
Before you even open Photoshop, the crucial first step towards a successful photo manipulation lies in choosing the right photograph of the person you intend to add. This pre-Photoshop selection process is paramount and can significantly impact the realism of your final image.
The key is to select a source image of your subject that closely matches the target photo in several aspects. Consider factors beyond just age or general setting; pay close attention to lighting conditions and overall ambiance.
For instance, if you are aiming to insert someone into a brightly lit beach scene, using a photo of them taken indoors under dim lighting will likely result in an unnatural and obviously edited outcome. Similarly, adding a person in winter clothing to a summer beach photo will immediately break the illusion.
To ensure a natural-looking composite, prioritize photos of your subject that feature simple backgrounds. Less clutter in the background of the source photo translates to less intricate editing work for you. Images with minimal distractions like other people, objects, or complex patterns simplify the extraction process significantly. Photoshop favors efficiency, and starting with a clean source image is working smarter, not harder.
Lighting and tone consistency are also vital. While Photoshop allows for adjustments to match these elements later, beginning with source and target photos that have similar lighting and tonal qualities will streamline the blending process. If your target photo is an indoor shot with soft, diffused light, choose a source photo of your subject taken in similar indoor lighting conditions rather than harsh sunlight.
Finally, ensure that the source photo of the person is of equal or greater size and resolution than the target photo. Enlarging a smaller image to fit a larger one can lead to pixelation and a loss of detail in the inserted subject, making the manipulation obvious. Starting with a high-quality source image prevents these issues and ensures a seamless integration.
Step 2: Precisely Cutting Out the Person in Photoshop
Now, the creative process truly begins! It’s time to digitally extract the person from their original photo, preparing them for seamless integration into the new scene.
First, launch Adobe Photoshop and open the photograph of the person you wish to add – this is your subject photo.
The next step is to carefully select the person’s figure, essentially outlining them to separate them from their background. Photoshop offers several tools for this purpose, each with its strengths and ideal use cases. The best tool for you will depend on your skill level and the complexity of the image.
- Pen Tool:
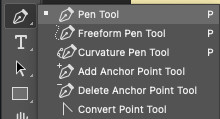 Close-up view of the Pen Tool icon in Adobe Photoshop's toolbar.
The Pen Tool is renowned for creating the most precise selections, making it ideal for cleanly cutting out subjects, especially people. It allows for the creation of vector paths, offering unparalleled control and accuracy.
While incredibly powerful, the Pen Tool has a steeper learning curve and requires practice for mastery. It involves strategically placing anchor points along the edge of the person and manipulating Bezier handles to create smooth curves and lines that precisely trace the outline.
To use it, select the Pen Tool from the toolbar (icon resembling a fountain pen tip, or press ‘P’). Begin by placing your first anchor point along the edge of the person. Continue placing anchor points around the entire figure, eventually closing the path by clicking back on the initial point. As you place points, you can click and drag to extend Bezier handles, shaping curves in your path. Don’t worry about hair details at this stage; a rough outline is sufficient for now.
- Quick Selection Tool:
Introduced in Photoshop CS3, the Quick Selection Tool offers a more user-friendly and rapid selection method. It’s particularly effective when there’s good contrast between the subject and the background.
Select the Quick Selection Tool from the toolbar (icon resembling a brush with a selection outline). Simply “paint” over the person’s body with the tool. Photoshop intelligently detects edges based on color and texture, automatically expanding the selection to encompass the subject. Ensure you cover all areas of the person to create a complete selection outline, indicated by a dashed line.
- Object Selection Tool:
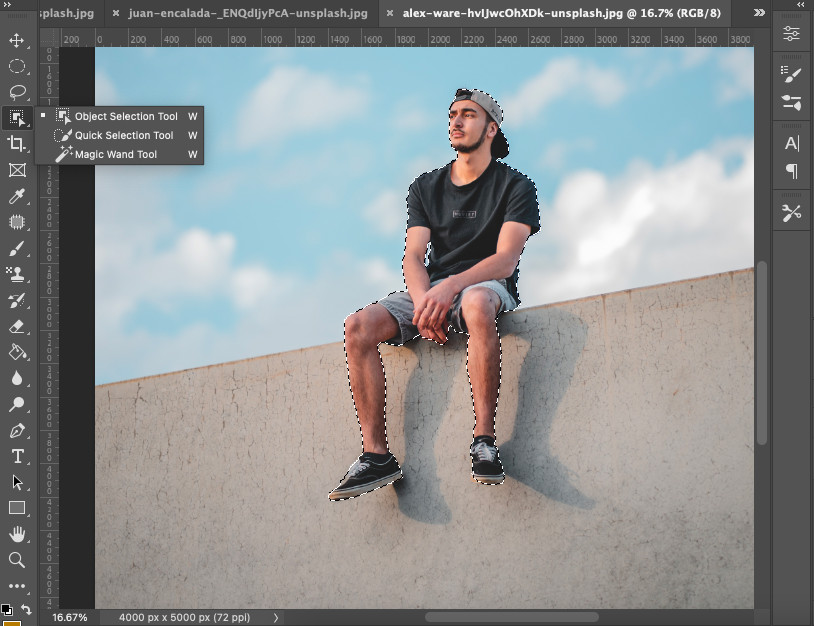 Screenshot demonstrating the Object Selection Tool in use within Adobe Photoshop.
A more recent addition to Photoshop, the Object Selection Tool leverages AI for remarkably accurate and automated subject selection. It’s often faster than the Pen Tool while providing excellent results.
Find the Object Selection Tool in the same group as the Quick Selection Tool. In the options bar at the top, click “Select Subject.” Photoshop will automatically analyze the image and generate a selection outline around the most prominent subject – ideally, the person. The accuracy depends on the image quality and subject definition, but it often provides a great starting point for refining your selection.
- Lasso Tool:
The Lasso Tool is a freehand selection tool, offering flexibility and direct user control. Its accuracy is directly tied to the user’s dexterity in drawing.
Select the Lasso Tool from the toolbar (icon resembling a lasso rope). Click and hold the mouse button to begin drawing a freehand outline around the person. Carefully trace the edge of the person’s figure, and release the mouse button to close the loop and finalize the selection. The resulting selection will appear as dashed lines.
Step 3: Transferring the Cutout to Your Target Photo
With your subject expertly selected, the next step is to move this cutout into the target photograph – the image where you want to Photoshop the person into.
Navigate to the “Edit” menu at the top of your Photoshop interface and select “Copy.” This action copies the selected cutout of the person to your clipboard.
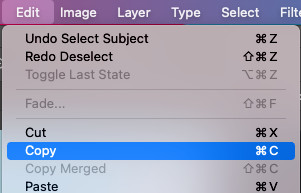 Screenshot showing the "Copy" option selected in the Edit menu in Photoshop.
Next, open your target photograph in Photoshop, just as you opened the subject photo in Step 2. Ensure the target photo is active by clicking on its tab or window.
Return to the “Edit” menu and this time, choose “Paste.” The cutout of the person will now appear superimposed onto your target photograph as a new layer.
For quicker workflow, utilize keyboard shortcuts. Press Ctrl+C (Windows) or Cmd+C (macOS) to copy, and Ctrl+V (Windows) or Cmd+V (macOS) to paste.
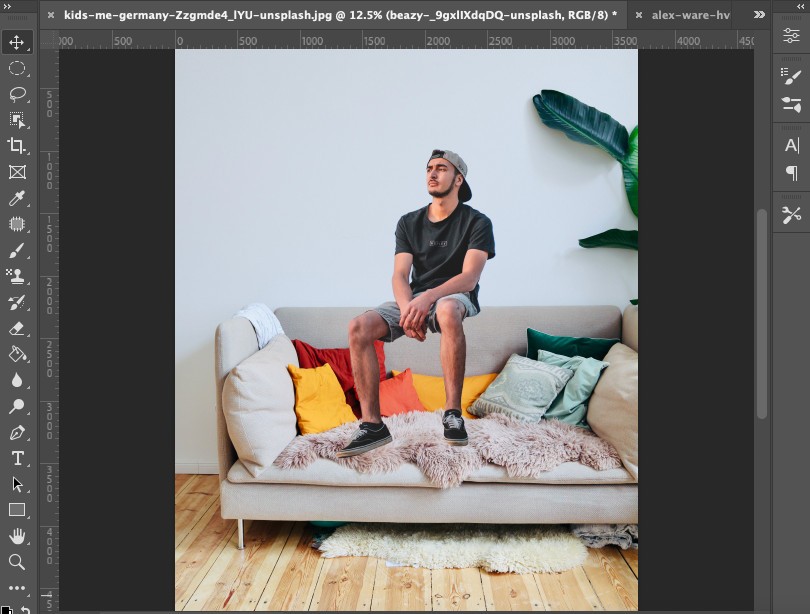 Screenshot showing the pasted image in the target photo, ready for adjustments.
Step 4: Refining the Edges and Removing Background Remnants
To make the newly inserted person look like a natural part of the target photo, it’s crucial to eliminate any lingering traces of their original background. The Eraser Tool, combined with Layer Masks, is your ally in this refinement process.
Locate the “Layers” panel (usually on the right side of your Photoshop interface). Select the layer containing the pasted cutout of the person.
Click the “Add Layer Mask” icon at the bottom of the Layers panel. It resembles a rectangle with a circle inside. A white mask thumbnail will appear next to your layer thumbnail. Layer masks are non-destructive, meaning you can hide and reveal parts of a layer without permanently deleting them.
Select the Eraser Tool from the toolbar (icon resembling a traditional eraser). In the options bar at the top, adjust the Eraser Tool settings. Start by reducing the “Size” and setting “Hardness” to 0%. A soft eraser edge helps blend the cutout more seamlessly.
Carefully brush around the edges of the person in the image using the Eraser Tool. Because you are working on the Layer Mask (ensure the mask thumbnail is selected, not the layer thumbnail), erasing with black will hide parts of the cutout, effectively removing any unwanted background remnants. If you erase too much, switch your foreground color to white and paint back onto the mask to reveal parts of the cutout again. This back-and-forth ability is the beauty of layer masks.
For areas with solid color background remnants, the Magic Wand Tool can expedite the process. Select the Magic Wand Tool, click on the solid color background area, and then press the Delete key (or Backspace). This can quickly remove large areas of uniform color.
For meticulous edge refinement, especially around hair or intricate details:
- Zoom in closely (use the Zoom Tool or Ctrl/+ or Cmd/+).
- Reduce the Eraser Tool size further.
- Slightly increase “Hardness” for more defined erasing, but keep it relatively soft for blending.
- Carefully erase remaining background fragments, taking your time to achieve clean, natural edges.
Step 5: Adjusting Size and Position for Realistic Integration
Now that your cutout is clean and background-free, it’s time to adjust its size and position within the target photo to create a believable perspective and composition.
Ensure the layer containing the person’s cutout is selected in the Layers panel.
Select the “Move Tool” from the top of the toolbar (icon resembling a cross with arrows).
To resize the person proportionally, activate the “Free Transform” tool by pressing Ctrl+T (Windows) or Cmd+T (macOS). A bounding box with handles will appear around the person. Hold down the Shift key (to maintain aspect ratio) and drag one of the corner handles inwards or outwards to resize the person to fit realistically within the scene. Consider the scale of other elements in the target photo to determine appropriate sizing.
With the Move Tool still selected, simply click and drag the person within the target photo to reposition them. Consider the composition and where the person would naturally fit within the scene. Pay attention to ground lines, perspective, and interactions with other elements in the photo.
Step 6: Harmonizing Colors and Lighting for Seamless Blending
The final, and arguably most critical, step is to adjust the colors and lighting of the inserted person to match the ambient conditions of the target photo. This is what truly sells the illusion and makes the Photoshop manipulation appear natural and undetectable.
Ensure the layer containing the person is selected. To access adjustment layers, click the “Create new fill or adjustment layer” icon at the bottom of the Layers panel (it’s a half-filled circle).
From the adjustment layer menu, select “Curves.” The Curves adjustment allows for fine-tuning of brightness, contrast, and overall tonal range. Experiment with the curve by clicking and dragging to adjust the highlights, midtones, and shadows of the inserted person until their lighting feels consistent with the target photo’s lighting.
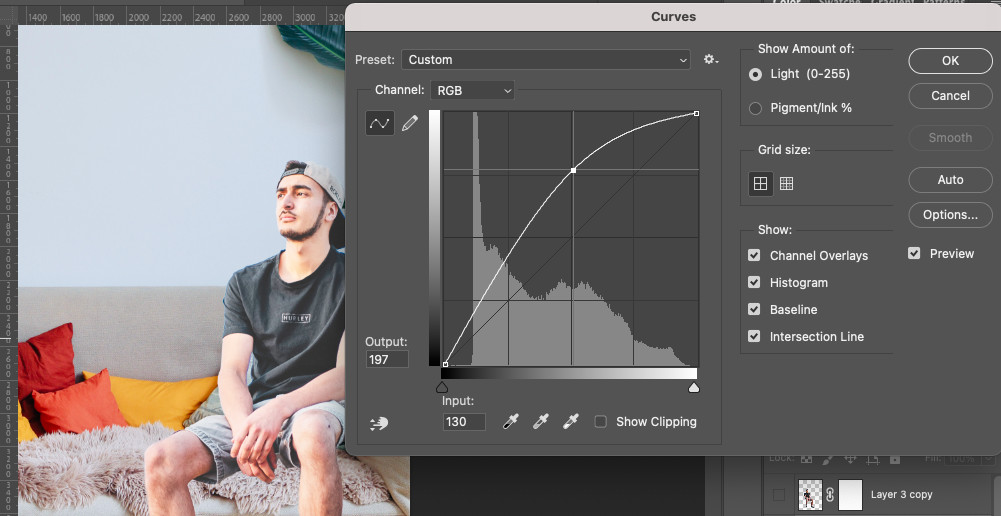 Screenshot demonstrating the Curves adjustment layer being used to match lighting.
For color adjustments, return to the “Create new fill or adjustment layer” menu and select “Hue/Saturation.” This adjustment layer allows you to modify the hue (color), saturation (intensity), and lightness of the inserted person. Subtly tweak these sliders to match the color tone and temperature of the target photo. Pay attention to white balance, color casts, and overall color harmony.
You can also use other adjustment layers like “Brightness/Contrast,” “Color Balance,” or “Levels” to further refine the blending, depending on the specific needs of your images. The key is to make subtle, incremental adjustments and constantly compare the inserted person to the surrounding elements in the target photo.
With careful attention to these steps, you can master the art of how to Photoshop people into photos, creating seamless and believable composites that enhance your creative vision.
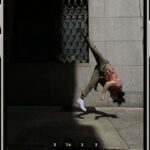
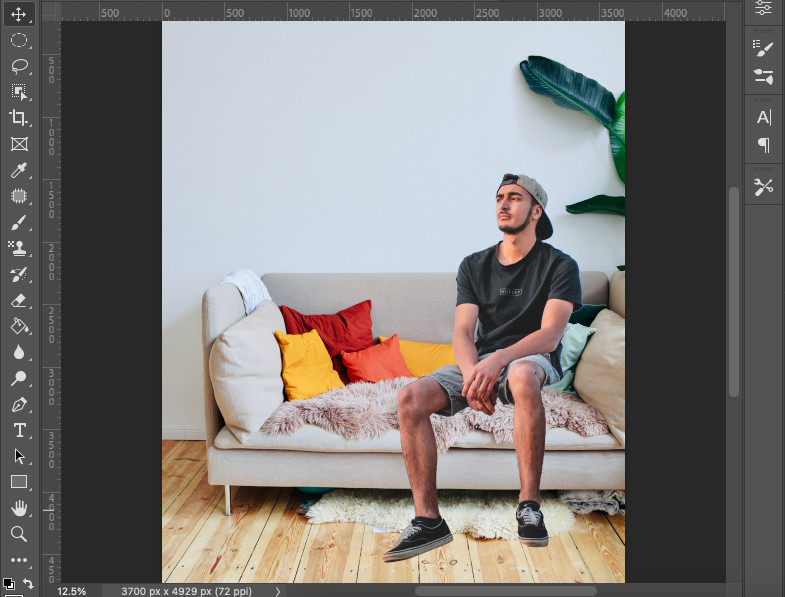 Final image of a person seamlessly photoshopped into a new background, showcasing realistic blending.
Don’t Have Photoshop?
Adobe Photoshop software box, indicating where to download the program.
Download Adobe Photoshop
Access the full power of Adobe Photoshop and start creating your own photo manipulations today.
Start your 7-day free trial now