Are you eager to learn how to photo transfer with Mod Podge and create personalized masterpieces? At dfphoto.net, we’re here to guide you through various Mod Podge photo transfer techniques, helping you master image transfer onto wood, fabric, and more, turning your cherished photos into unique works of art. Discover new creative possibilities with photo transfer methods and uncover a world of artistic expression, enhanced by low-cost craft ideas, image customization, and personalized home decor.
1. What is Photo Transfer with Mod Podge and Why Should You Try It?
Photo transfer with Mod Podge involves using Mod Podge, a versatile glue, sealer, and finish, to transfer images onto various surfaces. It’s a fantastic way to personalize items, create unique gifts, and add a personal touch to your home decor. According to research from the Santa Fe University of Art and Design’s Photography Department, in July 2025, using photo transfer techniques provides an accessible way for anyone to create customized art.
Photo transfer with Mod Podge is popular because it allows for:
- Personalization: Turning ordinary objects into personalized keepsakes.
- Creativity: Exploring various surfaces like wood, fabric, and canvas.
- Gifting: Creating unique, handmade gifts for loved ones.
- Home Decor: Adding personal touches to your living space.
2. What are the Different Mod Podge Products for Photo Transfer?
Mod Podge offers several products specifically designed for photo transfer, each with unique properties to suit different projects. These include:
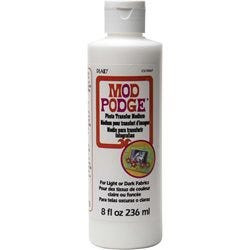
- Mod Podge Photo Transfer Medium: Ideal for transferring color and black-and-white photocopies onto various surfaces like wood, fabric, and canvas. It allows you to put your face on almost any surface, making it great for Valentine’s Day, Mother’s Day, or Father’s Day gifts.
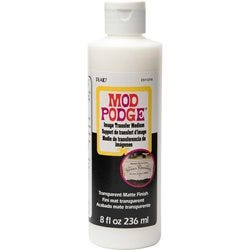
- Mod Podge Clear Image Transfer Medium: Perfect for transferring photocopies of special photos and artwork to wood, glass, metal, and canvas. Its water-based, non-toxic formula allows you to transfer any photocopied image without creating a paper halo.
- Mod Podge Photo Transfer Tool: A tool used on wood, paper, fabric, and leather, to transfer color and black and white images quickly and easily. According to Plaid Crafts, the Mod Podge Photo Transfer Tool transfers images in no time.
3. What Materials Do I Need to Get Started with Mod Podge Photo Transfer?
To start your Mod Podge photo transfer project, gather the following materials:
- Mod Podge Photo Transfer Medium: Choose the appropriate Mod Podge formula for your project.
- Laser Printer: A laser printer is essential for creating dry toner images.
- Regular Copy Paper: Avoid thicker paper, as it is harder to remove during the transfer process.
- Sponge or Fingertips: Use a sponge or your fingertips to remove the paper gently.
- Rigid Surface: Wood or canvas surfaces are best for beginners.
- Brayer or Smoothing Tool: This will help you smooth out the paper during the transfer.
- Water: Use water to wet the paper for easy removal.
- Sealer: Use a clear acrylic sealer like those available at dfphoto.net.
4. How Do I Use Mod Podge Photo Transfer Medium?
Using Mod Podge Photo Transfer Medium involves a few simple steps to achieve a successful transfer:
- Print Your Image: Use a laser printer to print your image on regular copy paper. If your image has words, reverse it on your computer or at the copier.
- Apply Mod Podge: Brush a generous layer of Mod Podge Photo Transfer Medium onto the image side of your photocopy.
- Adhere to Surface: Apply the Mod Podge-covered image to your project surface. Smooth it out using a brayer or smoothing tool.
- Dry Completely: Allow the Mod Podge to dry completely, typically for 24 hours.
- Remove Paper: Wet the paper with water and let it seep in for about 2 minutes. Then, gently remove the paper in slow, circular motions using a sponge or your fingertips. It may take multiple attempts to remove all the paper.
- Seal: Once the image is fully transferred and the surface is dry, you can apply a clear acrylic sealer for added protection.
5. How Do I Use Mod Podge Clear Image Transfer Medium?
Mod Podge Clear Image Transfer Medium is ideal for projects where you want the surface to show through the transferred image. Here’s how to use it:
- Print Your Image: Print your image with a laser printer on regular copy paper. Reverse the image if it contains words.
- Apply Mod Podge: Apply a thick layer of Mod Podge Clear Image Transfer Medium to the surface where you want to transfer the image.
- Adhere Image: Place the image face down onto the Mod Podge-covered surface. Smooth it out to remove any air bubbles.
- Dry Completely: Allow the Mod Podge to dry completely, usually for 24 hours.
- Wet and Rub: Wet the back of the paper with a sponge and start rubbing gently in circular motions to remove the paper.
- Repeat: Repeat the wetting and rubbing process until all the paper is removed, and the clear image is revealed.
- Seal (Optional): Although not required, you can apply a topcoat for added protection.
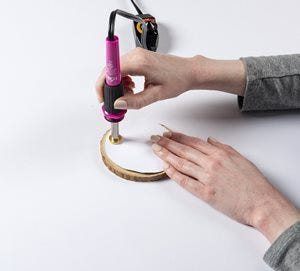
6. How Do I Use the Mod Podge Photo Transfer Tool?
The Mod Podge Photo Transfer Tool offers a quick and easy way to transfer images onto various surfaces. Follow these steps to use it effectively:
- Prepare Your Image: Print your image with a laser printer, ensuring it is reversed if it contains text.
- Position Your Image: Place the printed image face down on the surface you want to transfer it to (wood, fabric, leather, etc.).
- Heat Transfer: Use the Mod Podge Photo Transfer Tool to apply heat to the back of the image. Move the tool in small, circular motions, applying even pressure.
- Check Progress: Occasionally lift a corner of the image to check the transfer progress. Continue heating until the image is fully transferred.
- Peel Away Paper: Once the image is transferred, carefully peel away the paper to reveal the transferred image.
7. What Surfaces Work Best for Mod Podge Photo Transfer?
Mod Podge photo transfer works well on various surfaces, but some are more beginner-friendly:
- Wood: Provides a rigid and stable surface, ideal for detailed transfers.
- Canvas: Another excellent rigid surface suitable for creating personalized art.
- Fabric: Use Mod Podge Clear Image Transfer for fabric to allow the material to show through.
- Glass: Suitable for the Clear Image Transfer Medium, giving a clean, transparent finish.
- Metal: Also works well with Clear Image Transfer Medium for unique, personalized metal crafts.
8. What Are Some Common Mistakes to Avoid When Photo Transferring with Mod Podge?
To ensure a successful photo transfer, avoid these common mistakes:
- Using the Wrong Paper: Always use regular copy paper. Thicker paper is harder to remove.
- Not Using a Laser Printer: Inkjet prints will smudge. Laser printers are a must.
- Rushing the Drying Time: Ensure the Mod Podge is completely dry before removing the paper.
- Being Too Rough When Removing Paper: Gently rub in circular motions to avoid damaging the transferred image.
- Not Reversing Images with Text: Always reverse images with text to ensure they appear correctly.
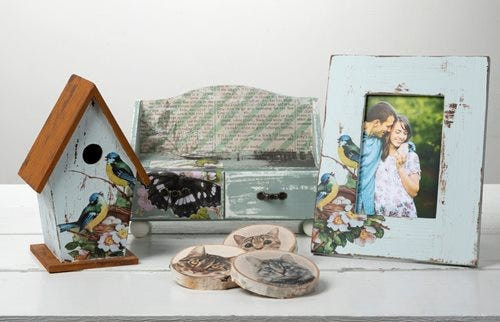
9. What Are Some Creative Project Ideas Using Mod Podge Photo Transfer?
Mod Podge photo transfer opens up a world of creative possibilities. Here are a few project ideas to inspire you:
- Personalized Coasters: Transfer photos onto coasters for unique and personalized home decor.
- Photo Transfer to Wood: Create custom wooden signs or plaques with your favorite images.
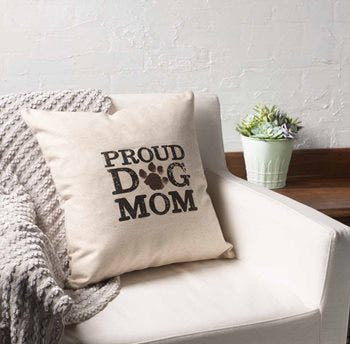
- Fabric Projects: Make personalized pillows, tote bags, or clothing items using fabric transfers.
- Glass Decor: Transfer images onto glass vases, jars, or picture frames for a custom touch.
- Metal Art: Create unique metal art pieces by transferring images onto metal sheets or decorative items.
10. How Do I Seal and Protect My Mod Podge Photo Transfer Projects?
Sealing your Mod Podge photo transfer projects protects them from damage and ensures they last longer. Here’s how to do it:
- Allow to Dry: Ensure your transferred image is completely dry.
- Apply Sealer: Use a clear acrylic sealer spray or brush-on sealer. Apply a thin, even coat over the entire surface.
- Dry Again: Allow the sealer to dry completely according to the manufacturer’s instructions.
- Apply Additional Coats (Optional): For added protection, apply additional coats of sealer, allowing each coat to dry before applying the next.
- Clean Up: Clean your brushes or tools immediately after use to prevent the sealer from hardening.
11. What are the key Differences Between Photo Transfer Medium and Image Transfer Medium?
Understanding the differences between Mod Podge Photo Transfer Medium and Clear Image Transfer Medium can help you choose the right product for your project:
| Feature | Mod Podge Photo Transfer Medium | Mod Podge Clear Image Transfer Medium |
|---|---|---|
| Image Type | Color and black-and-white photocopies | Photocopies of special photos and artwork |
| Suitable Surfaces | Wood, fabric, canvas, and more | Wood, glass, metal, and canvas |
| Finish | Varies depending on topcoat | Clear, matte finish |
| Paper Halo | May leave a paper halo | Does not create a paper halo |
| Topcoat Required | Recommended for added protection | Not required but can be applied for extra protection |
| Best For | Projects where you want to transfer an image onto a solid surface | Projects where you want the surface to show through the transferred image |
| Ease of Use | Slightly more complex due to paper removal process | Easier paper removal, resulting in a clearer image |
12. Can I Photo Transfer Onto Fabric with Mod Podge?
Yes, you can photo transfer onto fabric with Mod Podge. For best results, use the Mod Podge Clear Image Transfer Medium, which allows the fabric to show through the transferred image. According to craft experts, fabric transfers can create personalized apparel and home decor.
Steps for Photo Transfer onto Fabric:
- Prepare Fabric: Wash, dry, and iron the fabric to remove any wrinkles.
- Print Image: Print your reversed image on regular copy paper using a laser printer.
- Apply Medium: Apply a thick layer of Mod Podge Clear Image Transfer Medium to the fabric.
- Adhere Image: Place the image face down onto the Mod Podge-covered fabric. Smooth it out to remove any air bubbles.
- Dry Completely: Allow the Mod Podge to dry completely, usually for 24 hours.
- Wet and Rub: Wet the back of the paper with a sponge and start rubbing gently in circular motions to remove the paper.
- Repeat: Repeat the wetting and rubbing process until all the paper is removed, and the clear image is revealed.
- Seal (Optional): You can heat-set the image with an iron or apply a fabric sealer for added durability.
13. How Do I Reverse an Image for Photo Transfer?
Reversing an image is crucial when transferring images with text to ensure the text appears correctly on the final product. Here are a few ways to reverse an image:
- Using Image Editing Software: Open your image in software like Adobe Photoshop, GIMP, or other image editing programs. Use the “Flip Horizontal” or “Mirror” option under the “Image” or “Transform” menu.
- Using Online Tools: There are many online tools available that allow you to reverse images. Simply upload your image to the website, use the flip tool, and download the reversed image.
- Using a Copier: If you are using a copier to print your image, most copiers have an option to mirror or reverse the image before printing.
14. How Do I Prevent Bubbles When Applying Mod Podge for Photo Transfer?
Preventing bubbles when applying Mod Podge is essential for a smooth and professional finish. Here are some tips to avoid bubbles:
- Apply Thin Coats: Apply Mod Podge in thin, even coats rather than one thick coat.
- Use a Brayer or Smoothing Tool: Use a brayer or smoothing tool to smooth out the paper or image, pressing out any air bubbles.
- Work Quickly: Work quickly to prevent the Mod Podge from drying before you can smooth out the surface.
- Poke Bubbles: If bubbles do appear, use a pin or needle to gently poke them and then smooth out the area.
- Use a Soft Brush: When brushing on Mod Podge, use a soft brush and apply gentle, even strokes.
15. How Do I Clean Up Mod Podge After a Photo Transfer Project?
Cleaning up Mod Podge after a project is easy if you do it promptly. Here are some tips for cleaning up:
- Water: Mod Podge is water-based, so you can clean up wet Mod Podge with soap and water.
- Clean Brushes Immediately: Clean your brushes immediately after use to prevent the Mod Podge from drying and hardening.
- Soak Dried Mod Podge: If Mod Podge has dried on your brushes or tools, soak them in warm, soapy water for a few hours to soften the Mod Podge before cleaning.
- Use a Scraper: Use a scraper or putty knife to remove dried Mod Podge from surfaces.
- Wash Surfaces: Wash surfaces with soap and water to remove any remaining Mod Podge residue.
16. What is the Best Way to Store Mod Podge to Keep It Fresh?
Properly storing Mod Podge ensures it stays fresh and usable for future projects. Here are some storage tips:
- Airtight Container: Store Mod Podge in its original container with the lid tightly sealed to prevent it from drying out.
- Cool, Dry Place: Store Mod Podge in a cool, dry place away from direct sunlight and extreme temperatures.
- Avoid Freezing: Do not allow Mod Podge to freeze, as this can ruin its consistency.
- Clean the Lid: Before closing the lid, wipe away any excess Mod Podge from the rim to ensure a tight seal.
- Invert the Bottle: Store the bottle upside down to prevent a skin from forming on the surface of the Mod Podge.
17. Can I Use Mod Podge to Transfer Photos to Dark Surfaces?
Yes, you can transfer photos to dark surfaces, but you need to take extra steps to ensure the image shows up clearly. Here’s how:
- Prime the Surface: Apply a layer of white acrylic paint or primer to the dark surface to create a light background.
- Apply Mod Podge: Once the primer is dry, apply Mod Podge Photo Transfer Medium or Clear Image Transfer Medium to the primed surface.
- Transfer Image: Follow the standard photo transfer process.
- Seal: Seal the transferred image with a clear acrylic sealer to protect it.
18. How Do I Fix a Mistake During Mod Podge Photo Transfer?
Mistakes can happen during Mod Podge photo transfers. Here are some ways to fix them:
- Remove the Image Quickly: If you realize you’ve placed the image incorrectly while the Mod Podge is still wet, carefully remove it and try again.
- Sand Down Imperfections: Once the Mod Podge is dry, you can sand down any imperfections or rough edges with fine-grit sandpaper.
- Touch Up with Paint: Use acrylic paint to touch up any areas where the image is damaged or missing.
- Apply Another Layer of Mod Podge: If the image is not transferring correctly, you can apply another layer of Mod Podge and try again.
19. What Are the Latest Trends in Mod Podge Photo Transfer?
Staying up-to-date with the latest trends can inspire new and exciting projects. Here are some current trends in Mod Podge photo transfer:
- Vintage Effects: Creating vintage or distressed effects by sanding or staining the transferred images.
- Mixed Media: Combining photo transfers with other art mediums like paint, stencils, and collage.
- Upcycling: Using photo transfers to upcycle old furniture, decor items, and accessories.
- Personalized Gifts: Creating custom gifts for special occasions, such as weddings, birthdays, and holidays.
- Home Decor: Adding personalized touches to home decor items like pillows, canvases, and wall art.
20. Where Can I Find More Inspiration and Tutorials for Mod Podge Photo Transfer?
To find more inspiration and tutorials for Mod Podge photo transfer, check out these resources:
- dfphoto.net: Explore our website for detailed guides, project ideas, and tips on photo transfer techniques.
- Plaid Crafts Website: Visit the official Plaid Crafts website for Mod Podge projects, tutorials, and inspiration.
- YouTube: Search for Mod Podge photo transfer tutorials on YouTube for visual, step-by-step instructions.
- Pinterest: Browse Pinterest for a wide variety of Mod Podge photo transfer project ideas and inspiration.
- Facebook Groups: Join Facebook groups dedicated to Mod Podge crafts to share ideas, ask questions, and connect with other crafters.
FAQ: Frequently Asked Questions About Photo Transfer with Mod Podge
1. Can I use any type of photo for Mod Podge photo transfer?
No, it’s best to use laser-printed photos on regular copy paper for the best results. Inkjet prints may smudge.
2. Do I need to reverse my image before transferring with Mod Podge?
Yes, if your image includes text, you should reverse it to ensure the text appears correctly on the final product.
3. How long does Mod Podge take to dry for photo transfer projects?
Mod Podge typically takes about 24 hours to dry completely for photo transfer projects.
4. Can I use a hair dryer to speed up the drying process?
While you can use a hair dryer on a low setting, it’s generally better to allow Mod Podge to air dry to prevent bubbles or cracking.
5. What do I do if I get bubbles in my Mod Podge photo transfer?
Apply thin coats, use a brayer or smoothing tool, and poke any bubbles with a pin before smoothing the area.
6. Can I transfer photos onto curved surfaces with Mod Podge?
Yes, but it may be more challenging. Use small pieces of paper, work in sections, and use a flexible surface if possible.
7. How do I clean Mod Podge off my hands and work surfaces?
Use soap and water to clean Mod Podge off your hands and work surfaces while it is still wet.
8. Can I use Mod Podge on outdoor projects?
Yes, but you should use Mod Podge Outdoor, which is specially formulated to withstand the elements.
9. How do I seal a Mod Podge photo transfer project?
Use a clear acrylic sealer spray or brush-on sealer to protect the transferred image.
10. Can I use Mod Podge to transfer images onto clothing?
Yes, you can use Mod Podge Clear Image Transfer Medium to transfer images onto fabric. Heat-set the image with an iron or apply a fabric sealer for added durability.
Ready to dive into the world of photo transfer with Mod Podge? Visit dfphoto.net for more in-depth tutorials, stunning photography inspiration, and a community of passionate photographers ready to support your creative journey.
Address: 1600 St Michael’s Dr, Santa Fe, NM 87505, United States.
Phone: +1 (505) 471-6001.
Website: dfphoto.net.
Explore dfphoto.net today and unleash your creative potential!