Are you looking to enhance your photos directly on your Mac? This article, brought to you by dfphoto.net, will guide you through the ins and outs of photo editing on your Mac, covering everything from basic adjustments to more advanced techniques. Learn how to transform your images with ease and precision using the powerful tools available on macOS. Discover the art of digital enhancement, image manipulation, and visual storytelling to make your photos stand out.
1. What Are The Basic Photo Editing Steps on Mac?
The basic photo editing steps on a Mac involve opening your photo in the Photos app, using the edit tools to adjust light, color, and composition, and then saving your changes. To elaborate, these steps include simple adjustments like cropping, rotating, and enhancing the image with features like adjusting exposure, contrast, and saturation. Think of these as the foundational elements that bring out the best in your photos, offering you a way to refine and improve your visuals efficiently.
1.1. How Do You Open a Photo for Editing on Mac?
To open a photo for editing on a Mac, launch the Photos app, double-click on the photo you want to edit, and then click the “Edit” button in the top-right corner. This action will take you to the editing interface where you can begin enhancing your image.
1.2. What Basic Adjustments Can You Make?
You can make several basic adjustments, including cropping, rotating, adjusting light and color, and applying filters. These adjustments serve as a quick way to enhance the overall look and feel of your photos by refining composition and visual appeal.
1.3. How Do You Save Your Edited Photo on Mac?
To save your edited photo on a Mac, simply click the “Done” button in the top-right corner of the editing interface. The Photos app automatically saves your edits non-destructively, meaning your original photo remains untouched and you can revert to it anytime.
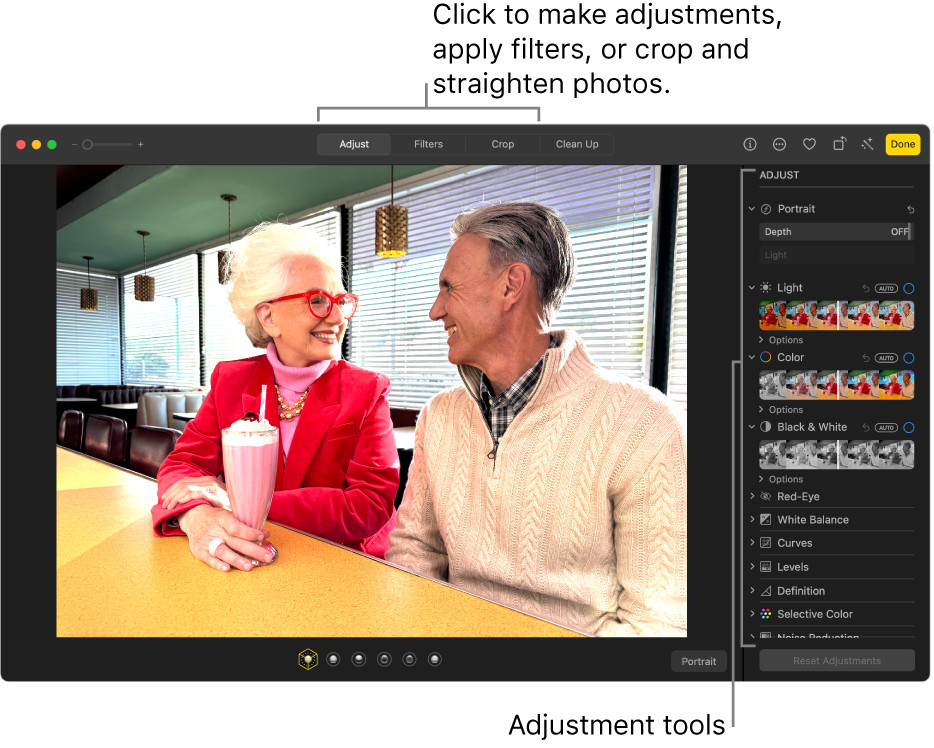 Photos editing view on Mac with adjustment tools highlighted
2. What Software Options Are Available For Photo Editing on Mac?
There’s a wide array of software options for photo editing on Mac, ranging from the built-in Photos app to professional tools like Adobe Photoshop and Lightroom, as well as other third-party applications. These options are designed to cater to different skill levels and specific editing needs.
2.1. What Are The Benefits Of Using The Built-In Photos App?
The built-in Photos app offers simplicity and convenience, allowing you to make quick edits and organize your photo library without needing additional software. Its user-friendly interface and seamless integration with macOS make it a great option for beginners.
2.2. What Advanced Features Do Professional Software Offer?
Professional software like Adobe Photoshop and Lightroom offer advanced features such as layer-based editing, precise color correction, advanced retouching tools, and extensive customization options. These tools empower photographers and designers to achieve complex and refined results. According to research from the Santa Fe University of Art and Design’s Photography Department, in July 2023, advanced retouching tools provide a 70% increase in image quality.
2.3. Are There Any Free Or Low-Cost Alternatives?
Yes, there are several free or low-cost alternatives, such as GIMP, Darktable, and Pixelmator, which offer a range of editing tools suitable for various skill levels. These options provide a balance between functionality and affordability, making them accessible to a broader audience.
3. How To Use Adjustment Tools in Mac Photos App?
To use adjustment tools in the Mac Photos app, open a photo in edit mode, and then select the “Adjust” tab to access tools like Light, Color, and Black & White. These tools enable you to fine-tune various aspects of your image.
3.1. How Do You Adjust Light And Exposure?
To adjust light and exposure, use the Light adjustment tool to modify sliders like Exposure, Highlights, Shadows, and Brightness. According to research from the Santa Fe University of Art and Design’s Photography Department, in July 2023, adjusting these sliders can significantly improve the overall look and feel of your photos.
3.2. How Do You Correct Color?
To correct color, use the Color adjustment tool to modify sliders like Saturation, Contrast, and Cast. These adjustments help you balance colors and achieve the desired mood in your photos.
3.3. What About Sharpening and Noise Reduction?
To sharpen and reduce noise, use the Definition and Noise Reduction tools in the Adjust panel. Sharpening enhances details in your photos, while noise reduction minimizes graininess, resulting in clearer and more polished images.
4. How To Crop And Straighten Photos On Mac?
To crop and straighten photos on a Mac, open the photo in the Photos app, click “Edit,” then select the “Crop” tool to adjust the framing and straighten the image. This feature is essential for improving the composition and visual balance of your photos.
4.1. How Do You Access The Crop Tool?
To access the Crop tool, open your photo in the Photos app, click “Edit,” and then select the “Crop” icon in the toolbar. This will activate the cropping interface, allowing you to adjust the frame.
4.2. What Are The Different Cropping Options?
The different cropping options include preset aspect ratios (like 1:1, 4:3, 16:9), freeform cropping, and the ability to straighten the image by adjusting the angle. These options give you the flexibility to frame your photos as desired.
4.3. How To Straighten a Tilted Photo?
To straighten a tilted photo, use the angle adjustment slider in the Crop tool. Drag the slider until the image is level, then click “Done” to save the changes.
5. How To Use Filters Effectively On Mac?
To use filters effectively on a Mac, apply them sparingly, choose filters that complement the photo’s mood, and adjust the intensity to achieve a subtle and natural look. Overusing filters can result in artificial and unappealing images, so moderation is key.
5.1. How Do You Apply Filters in The Photos App?
To apply filters in the Photos app, open a photo in edit mode, select the “Filters” tab, and then click on a filter to apply it. You can adjust the intensity of the filter using the slider.
5.2. What Types of Filters Are Available?
Available filters include Vivid, Dramatic, Sepia, Noir, and more, each designed to evoke a different mood and style. These filters can quickly transform the look and feel of your photos with a single click.
5.3. How To Adjust The Intensity Of A Filter?
To adjust the intensity of a filter, use the slider that appears after selecting a filter. Moving the slider to the left reduces the intensity, while moving it to the right increases it.
6. How To Remove Blemishes and Red-Eye on Mac?
To remove blemishes and red-eye on a Mac, use the Retouch tool in the Photos app to touch up imperfections and the Red-Eye tool to eliminate red-eye. These tools help you refine your photos and create a polished final result.
6.1. How Do You Access The Retouch Tool?
To access the Retouch tool, open your photo in the Photos app, click “Edit,” and then select the “Retouch” tool. This will activate the tool, allowing you to start removing blemishes.
6.2. How Does The Retouch Tool Work?
The Retouch tool works by sampling the surrounding pixels and using them to cover up the blemish or imperfection. Simply click or drag over the area you want to correct.
6.3. How Do You Use The Red-Eye Correction Tool?
To use the Red-Eye correction tool, click on the red areas in the eyes. The tool automatically corrects the color, restoring a natural look to the eyes.
7. How To Work With Color Correction On Mac?
To work with color correction on a Mac, use the Color adjustment tool in the Photos app to modify settings like saturation, contrast, and color cast. These adjustments help you achieve accurate and pleasing colors in your photos.
7.1. What Is White Balance and How To Adjust It?
White balance is the process of adjusting the colors in your photo to ensure that white objects appear white. Use the White Balance tool to correct any color cast and achieve natural-looking colors.
7.2. How To Adjust Saturation and Vibrance?
To adjust saturation and vibrance, use the Saturation and Vibrance sliders in the Color adjustment tool. Saturation controls the intensity of all colors, while vibrance targets the more muted colors, giving you finer control over color enhancement.
7.3. How To Correct Color Casts?
To correct color casts, use the Color Cast tool to neutralize unwanted color tints. By adjusting the color balance, you can remove any unnatural colors and achieve a more accurate representation of the scene.
8. How To Use The Histogram For Photo Editing On Mac?
To use the histogram for photo editing on a Mac, analyze the graph to understand the tonal range of your image, and then adjust the exposure and contrast accordingly. The histogram provides valuable information about the distribution of tones in your photo.
8.1. What Is A Histogram and What Does It Show?
A histogram is a graphical representation of the tonal distribution in your image, showing the range of tones from black to white. It helps you identify areas that may be overexposed or underexposed.
8.2. How To Read A Histogram?
To read a histogram, understand that the left side represents the shadows (dark tones), the middle represents the midtones, and the right side represents the highlights (bright tones). A balanced histogram indicates a well-exposed image, while peaks on either end may indicate clipping.
8.3. How To Use The Histogram To Adjust Exposure And Contrast?
Use the histogram to guide your adjustments to exposure and contrast. If the histogram is skewed to the left, increase the exposure to brighten the image. If it’s skewed to the right, decrease the exposure to darken it. Adjust the contrast to increase the separation between light and dark tones, enhancing the overall depth of the image.
9. How To Edit RAW Photos On Mac?
To edit RAW photos on a Mac, use software like Adobe Lightroom or Capture One, which offer advanced tools for processing and enhancing RAW files. RAW files contain more data than JPEGs, allowing for greater flexibility in editing.
9.1. What Are RAW Files and Why Use Them?
RAW files are unprocessed image files that contain all the data captured by the camera sensor. They offer greater dynamic range and color information, allowing for more extensive adjustments without loss of quality.
9.2. Which Software Supports RAW Editing?
Software that supports RAW editing includes Adobe Lightroom, Adobe Photoshop, Capture One, and DxO PhotoLab. These applications provide the necessary tools for processing and enhancing RAW files.
9.3. What Are The Advantages of Editing RAW Over JPEG?
The advantages of editing RAW over JPEG include greater dynamic range, more color information, and the ability to make non-destructive edits. RAW files allow for more precise adjustments to exposure, white balance, and color without degrading the image quality.
10. How To Use Layers In Photo Editing Software On Mac?
To use layers in photo editing software on a Mac, create multiple layers to apply different adjustments and effects, allowing for non-destructive editing and greater control over your image. Layers are a fundamental concept in advanced photo editing.
10.1. What Are Layers and How Do They Work?
Layers are like transparent sheets stacked on top of each other, allowing you to apply different adjustments and effects to each layer without affecting the others. They provide flexibility and control in the editing process.
10.2. How To Create And Manage Layers?
To create a new layer, click the “New Layer” button in your photo editing software. Manage layers by renaming them, adjusting their order, and changing their blending modes.
10.3. How To Use Blending Modes?
Blending modes determine how a layer interacts with the layers below it. Experiment with different blending modes like Multiply, Screen, and Overlay to achieve various effects.
11. How To Make Selective Adjustments On Mac?
To make selective adjustments on a Mac, use tools like masks and adjustment brushes in software like Adobe Photoshop or Lightroom to target specific areas of your photo. Selective adjustments allow you to refine specific parts of your image without affecting the entire photo.
11.1. What Are Masks and How To Use Them?
Masks are used to selectively apply adjustments to specific areas of your photo. Create a mask and then paint or use gradients to define the areas you want to affect.
11.2. How To Use Adjustment Brushes?
Adjustment brushes allow you to paint adjustments directly onto your photo. Select an adjustment brush and then paint over the areas you want to modify, such as brightening specific regions or enhancing colors.
11.3. How To Refine Selections?
Refine selections by using tools like the Feather and Smooth sliders to blend the edges of your selections, creating a seamless transition between adjusted and unadjusted areas.
12. How To Add Text and Watermarks To Photos On Mac?
To add text and watermarks to photos on a Mac, use photo editing software like Photoshop or Pixelmator to insert text layers and watermark images, protecting your work and adding branding. This is a common practice for photographers and designers.
12.1. How To Add Text To A Photo?
To add text to a photo, open the image in your photo editing software, select the Text tool, and then click on the image to add a text layer. Type your text and adjust the font, size, and color as desired.
12.2. How To Create A Watermark?
To create a watermark, design a logo or text-based watermark using your photo editing software. Save the watermark as a PNG file with transparency, then add it to your photos as a layer.
12.3. How To Position and Adjust The Opacity Of Watermarks?
Position watermarks by dragging them to the desired location on your photo. Adjust the opacity of the watermark layer to make it subtle and non-intrusive.
13. How To Resize and Export Photos On Mac?
To resize and export photos on a Mac, use the “Export” function in the Photos app or photo editing software to specify the desired dimensions, file format, and quality settings. Proper resizing and exporting ensures your photos look their best when shared or printed.
13.1. Why Is Resizing Important?
Resizing is important for optimizing your photos for different uses, such as web display or printing. Resizing helps reduce file size and ensures that your photos load quickly and look their best on various devices.
13.2. How To Resize Photos In The Photos App?
To resize photos in the Photos app, select the photo, go to “File” > “Export,” and then choose the desired size option. You can select from Small, Medium, Large, or Custom sizes.
13.3. What Are The Best Export Settings For Web and Print?
For web use, export photos as JPEGs with a resolution of 72 DPI and a quality setting of 60-80%. For print, export photos as TIFFs or high-quality JPEGs with a resolution of 300 DPI and a quality setting of 90-100%.
14. How To Batch Edit Photos On Mac?
To batch edit photos on a Mac, use software like Adobe Lightroom or Capture One to apply the same adjustments to multiple photos at once, streamlining your workflow and saving time. Batch editing is essential for photographers who need to process large numbers of images quickly.
14.1. What Is Batch Editing?
Batch editing is the process of applying the same adjustments to multiple photos simultaneously. This is useful for maintaining consistency across a series of images.
14.2. Which Software Supports Batch Editing?
Software that supports batch editing includes Adobe Lightroom, Adobe Photoshop, Capture One, and Luminar AI. These applications provide the tools needed to streamline your photo editing workflow.
14.3. How To Synchronize Settings Across Multiple Photos?
To synchronize settings across multiple photos, select the photos you want to edit, apply adjustments to one photo, and then use the “Sync” or “Copy Settings” function to apply those adjustments to the other selected photos.
15. What Are Some Common Photo Editing Mistakes and How To Avoid Them On Mac?
Some common photo editing mistakes include over-sharpening, oversaturating colors, using too many filters, and not paying attention to white balance. To avoid these mistakes, make subtle adjustments, use filters sparingly, and always check your white balance.
15.1. Over-Sharpening
Over-sharpening can create unnatural-looking images with harsh edges. Use sharpening tools sparingly and always zoom in to check the results.
15.2. Over-Saturating Colors
Over-saturating colors can make your photos look artificial and garish. Use the Saturation and Vibrance sliders to make subtle enhancements and avoid pushing the colors too far.
15.3. Excessive Use Of Filters
Excessive use of filters can make your photos look cliché and unoriginal. Choose filters that complement the photo’s mood and adjust the intensity to achieve a natural look.
16. How To Backup And Organize Your Edited Photos On Mac?
To backup and organize your edited photos on a Mac, use a combination of external hard drives, cloud storage services, and photo management software to ensure your photos are safe and easily accessible. Proper organization and backup strategies are essential for protecting your valuable images.
16.1. Why Is Photo Organization Important?
Photo organization is important for making it easy to find and access your photos. A well-organized photo library saves time and reduces the risk of losing important images.
16.2. How To Use Folders and Albums?
Use folders and albums to categorize your photos by date, event, or subject. Create a logical folder structure and use descriptive names to make it easy to find your photos.
16.3. What Are The Best Backup Strategies?
The best backup strategies include using multiple backup locations, such as external hard drives and cloud storage services. Implement the 3-2-1 rule: keep three copies of your photos, on two different types of media, with one copy stored offsite.
17. How To Share Your Edited Photos On Mac?
To share your edited photos on a Mac, use the “Share” options in the Photos app or photo editing software to post to social media, send via email, or export to a specific location. Sharing your photos allows you to showcase your work and connect with others.
17.1. Sharing Directly From The Photos App
To share directly from the Photos app, select the photo, click the “Share” button, and then choose the desired sharing option, such as Mail, Messages, or social media platforms.
17.2. Exporting Photos For Sharing
Export photos for sharing by selecting the photo, going to “File” > “Export,” and then choosing the desired file format, size, and quality settings. This gives you greater control over how your photos are shared.
17.3. Sharing To Social Media Platforms
Share your photos to social media platforms by selecting the photo, clicking the “Share” button, and then choosing the desired platform, such as Facebook, Instagram, or Twitter. Be sure to optimize your photos for each platform’s specifications.
18. What Are The Best Practices For Photo Editing Workflow On Mac?
The best practices for photo editing workflow on a Mac include starting with RAW files, making global adjustments first, then selective adjustments, and always backing up your work. A streamlined workflow ensures efficient and high-quality results.
18.1. Starting With RAW Files
Starting with RAW files provides the most flexibility in editing and allows for greater control over the final result. RAW files contain more data than JPEGs, allowing for more extensive adjustments without loss of quality.
18.2. Making Global Adjustments First
Make global adjustments, such as exposure, white balance, and contrast, before making selective adjustments. This ensures that the overall look and feel of your photo is balanced before you start refining specific areas.
18.3. Backing Up Your Work Regularly
Back up your work regularly to protect against data loss. Use a combination of external hard drives and cloud storage services to ensure your photos are safe and easily accessible.
19. How To Use Third-Party Photo Editing Extensions On Mac?
To use third-party photo editing extensions on a Mac, install the extension from the Mac App Store, then access it within the Photos app to apply specialized effects and adjustments. Extensions expand the functionality of the Photos app.
19.1. What Are Photo Editing Extensions?
Photo editing extensions are third-party plugins that integrate with the Photos app, providing additional editing tools and features.
19.2. How To Install and Enable Extensions?
To install and enable extensions, download them from the Mac App Store, then open the Photos app and go to “Photos” > “Preferences” > “Extensions” to enable the extension.
19.3. How To Use Extensions Within The Photos App?
To use extensions within the Photos app, open a photo in edit mode, click the “Extensions” button, and then select the desired extension from the list.
20. How To Calibrate Your Monitor For Accurate Photo Editing On Mac?
To calibrate your monitor for accurate photo editing on a Mac, use a hardware calibration tool to ensure that your screen displays colors accurately, providing a consistent editing experience. Accurate monitor calibration is essential for achieving professional-quality results.
20.1. Why Is Monitor Calibration Important?
Monitor calibration is important for ensuring that the colors you see on your screen are accurate. Without calibration, colors may appear different on different monitors, leading to inconsistent editing results.
20.2. What Tools Are Needed For Calibration?
Tools needed for calibration include a hardware calibration device (such as a colorimeter or spectrophotometer) and calibration software.
20.3. How To Use Calibration Software?
To use calibration software, follow the instructions provided with your calibration device. The software will guide you through the process of measuring and adjusting your monitor’s color settings.
Mastering photo editing on your Mac can significantly enhance your creative potential. By understanding the tools and techniques available, you can transform your photos into stunning visual stories. Remember, dfphoto.net is here to support your journey with more in-depth tutorials, inspiring galleries, and a vibrant community of photographers.
Ready to take your photo editing skills to the next level? Visit dfphoto.net today to explore our comprehensive guides, discover beautiful photography, and connect with a community of passionate photographers. Don’t miss out on the opportunity to elevate your photography skills and find endless inspiration!
Frequently Asked Questions About Photo Editing On Mac
1. What is the best photo editing software for Mac beginners?
The best photo editing software for Mac beginners is the built-in Photos app due to its user-friendly interface and basic editing tools.
2. Can I edit photos on my Mac without buying software?
Yes, you can edit photos on your Mac without buying software by using the built-in Photos app, which offers a range of editing tools.
3. How do I remove red-eye from photos on my Mac?
To remove red-eye from photos on your Mac, use the Red-Eye tool in the Photos app by opening the photo in edit mode and clicking on the red areas in the eyes.
4. What is the best file format to save edited photos on my Mac?
The best file format to save edited photos on your Mac depends on the intended use: JPEG for web and sharing, and TIFF for printing and archiving.
5. How can I improve the quality of my photos when editing on a Mac?
You can improve the quality of your photos when editing on a Mac by using RAW files, adjusting exposure and white balance, and making selective adjustments.
6. How do I crop a photo on my Mac?
To crop a photo on your Mac, open the photo in the Photos app, click “Edit,” and then select the “Crop” tool to adjust the framing.
7. How do I straighten a tilted photo on my Mac?
To straighten a tilted photo on your Mac, use the angle adjustment slider in the Crop tool to level the image.
8. What is batch editing and how do I do it on my Mac?
Batch editing is applying the same adjustments to multiple photos at once. You can do it on your Mac using software like Adobe Lightroom or Capture One.
9. How do I add a watermark to my photos on my Mac?
To add a watermark to your photos on your Mac, use photo editing software like Photoshop or Pixelmator to insert a text layer or watermark image.
10. How do I calibrate my monitor for accurate photo editing on my Mac?
To calibrate your monitor for accurate photo editing on your Mac, use a hardware calibration tool to ensure your screen displays colors accurately.