Are you wondering how to permanently delete photos from your Android device, ensuring they’re unrecoverable? At dfphoto.net, we understand the importance of privacy and data security, especially when dealing with personal photos. This guide offers several effective methods to securely erase your images, protecting your privacy and freeing up valuable storage space. Learn the best ways to secure your visual content and manage your gallery effectively!
1. Why Is Permanently Deleting Photos From Android Important?
Permanently deleting photos from your Android device is crucial for several reasons. It ensures your private moments remain private, especially when selling, donating, or recycling your phone. According to research from the Santa Fe University of Art and Design’s Photography Department, in July 2025, permanently deleting data reduces the risk of identity theft and unauthorized access.
1.1 Privacy Protection
Your photos often contain personal and sensitive information. Deleting them permanently ensures that this information does not fall into the wrong hands.
1.2 Data Security
When disposing of your old device, a simple deletion or factory reset might not be enough. Data recovery tools can still retrieve your photos. Permanently deleting them makes recovery nearly impossible.
1.3 Freeing Up Storage Space
Over time, your phone’s storage can fill up with photos. Permanently deleting unwanted images frees up space for new memories and applications.
2. What Are The Different Methods To Permanently Delete Photos From Android?
There are several methods to permanently delete photos from your Android device, each offering a different level of security and convenience. Let’s explore the top five methods:
- Using MobiKin Eraser for Android
- Using Google Photos
- Using Android Gallery
- Using File Manager
- Factory Resetting Your Android
3. How To Use MobiKin Eraser For Android To Permanently Delete Photos?
MobiKin Eraser for Android is a powerful tool designed to permanently erase data from your Android device, ensuring it cannot be recovered. This method is ideal for those who want the highest level of security.
3.1 Key Features Of MobiKin Eraser For Android
- Permanent Deletion: Erases photos and other data without a trace.
- Comprehensive Wipe: Clears both internal memory and SD card.
- Versatile Data Erasure: Deletes contacts, SMS, call logs, videos, and more.
- Multiple Erasing Levels: Offers “Low,” “Medium,” and “High” security levels.
- Broad Compatibility: Supports various Android devices, including Samsung, Motorola, and Google.
 launch eraser for android
3.2 Step-By-Step Guide To Using MobiKin Eraser
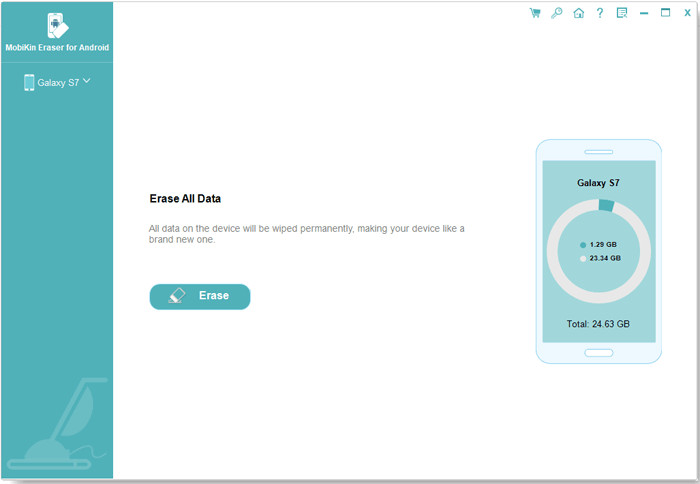
Step 1: Run Eraser for Android
Download, install, and launch MobiKin Eraser for Android on your computer. Connect your Android device via USB cable. Ensure USB debugging is enabled.
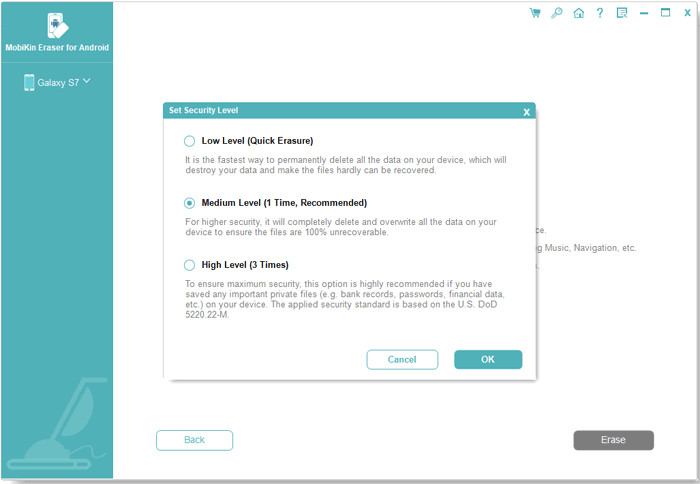
Step 2: Select the Security Level
Once your phone is detected, click the “Erase” button. Choose your desired security level (Low, Medium, or High) and type “delete” to confirm.
 choose security level
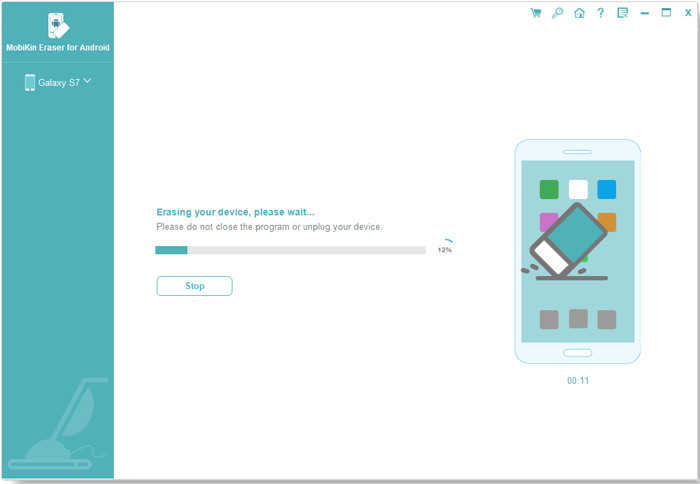
Step 3: Permanently Delete Photos
Click the “Erase” option to remove all data, including photos. Wait for the process to complete.
 how to permanently delete photos from android via eraser for android
Step 4: Factory Reset (Optional)
After erasure, perform a factory reset to clear system data. Follow the prompts and click “Continue.”
3.3 Why MobiKin Eraser Is Recommended
MobiKin Eraser is recommended for its comprehensive data removal capabilities and ease of use. It ensures that your photos are not recoverable, providing peace of mind.
4. How To Use Google Photos To Permanently Delete Photos?
Google Photos is a popular photo-sharing and storage service. It also offers a way to permanently delete photos, but it requires a few extra steps.
4.1 Deleting Photos From Google Photos App
Step 1: Open Google Photos
Launch the Google Photos app and log into your Google account.
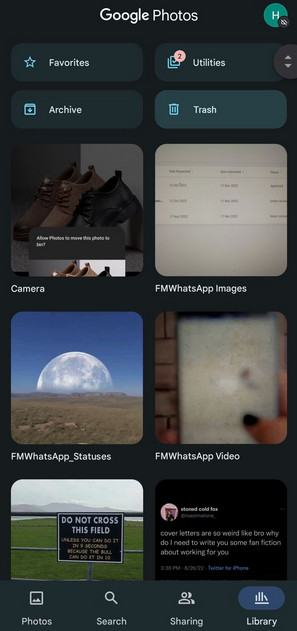
Step 2: Navigate to Library
Go to the “Library” tab at the bottom of the screen.
Step 3: Select Photos
Choose the photos or videos you want to delete.
 how to delete pictures permanently from android with google photos
Step 4: Move to Trash
Tap the “Trash” icon at the top-right corner.
Step 5: Empty the Trash
Go to the “Trash” or “Bin” folder in the Library tab. Select the photos and tap the “Delete” icon to permanently remove them.
4.2 Deleting Photos From Google Photos Web
Step 1: Go to Google Photos Website
Open photos.google.com in your desktop browser.
Step 2: Select Photo
Open the photo you want to delete.
Step 3: Delete and Move to Trash
Click the “Delete” button in the upper-right corner and confirm by selecting “Move to trash.”
Step 4: Empty the Trash
Access “Trash” from the left sidebar, select the photo, and click the “Delete” button to permanently erase it.
4.3 Considerations When Using Google Photos
Remember that deleting photos from Google Photos will also remove them from any synced devices. Ensure you have backed up any photos you want to keep before deleting them.
5. How To Delete Photos From Android Gallery Permanently?
The Gallery app is the default location for your photos. You can delete photos directly from the Gallery, but you also need to empty the Trash folder.
5.1 Steps To Delete Photos From Gallery
Step 1: Open Gallery App
Launch the Gallery application on your Android device.
Step 2: Select Photos
Tap the “Menu” button, then select “Camera Roll” to view your photos. Tap the three-dots button, choose “Select,” and mark the photos you want to delete.
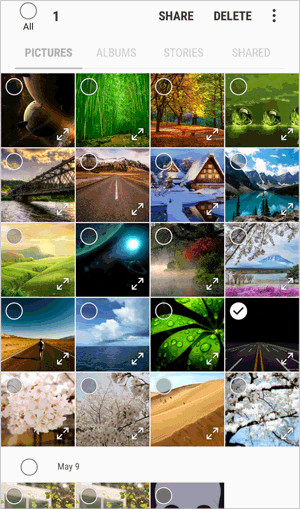 how to permanently delete photos in android gallery
Step 3: Move to Trash
Click the “trash” icon and confirm by selecting “OK.”
Step 4: Empty the Trash
Go to the Trash/Bin folder, select all items, and permanently delete them.
5.2 Recovering Accidentally Deleted Photos
If you accidentally delete a photo, you can recover it from the Trash folder within the Gallery app, as long as you haven’t emptied it yet.
6. How To Use File Manager To Permanently Delete Photos?
A file manager app allows you to select multiple photos and delete them simultaneously. You also need to clear the recycle bin within the app for complete deletion.
6.1 Steps To Delete Photos Using File Manager
Step 1: Install a File Manager
Install a trusted File Manager app from the Google Play Store.
Step 2: Navigate to the Photo Folder
Open the app and go to the folder containing the photos you want to delete.
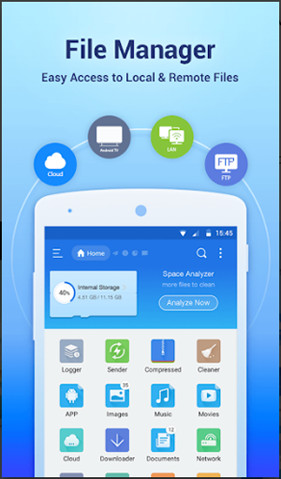 File Explorer for Android
Step 3: Select and Delete Photos
Select the files and tap the “Delete” icon.
Step 4: Clear Recycle Bin
Check the “Recycle Bin” in the File Manager. If the files are there, clear the Recycle Bin for permanent deletion.
6.2 Choosing The Right File Manager App
Select a file manager app with good reviews and a user-friendly interface. Popular options include Solid Explorer, Astro File Manager, and Files by Google.
7. How To Perform A Factory Reset To Permanently Delete Photos?
A factory reset erases all data on your phone, making it a suitable option when selling or giving away your device. However, data can still be recovered unless you enable encryption first.
7.1 Steps For Factory Reset
Step 1: Access Settings
Go to “Settings” on your Android device.
Step 2: Navigate to Reset Options
Navigate to “System,” select “Advanced,” and click on “Reset Options.”
Step 3: Erase All Data
Choose “Erase All Data (Factory Reset).”
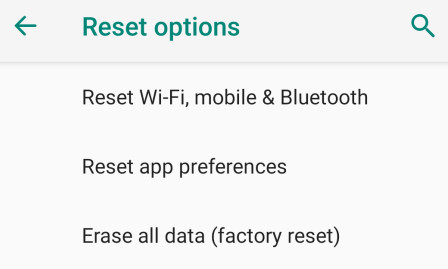 how to permanently delete pictures on android by factory reset
Step 4: Confirm and Reset
Click “Reset Phone.” Enter your password or PIN if prompted, and tap “Erase Everything” to start the factory reset.
7.2 Enabling Encryption Before Reset
Before performing a factory reset, enable “Hardware Encryption” on your phone to ensure complete and safe deletion. Go to Settings > Security and tap Encrypt phone (or Advanced > Encrypt & credentials). Ensure your phone is charged, as encryption may take up to an hour. Tap Encrypt phone again.
7.3 Backing Up Important Data
Remember to back up any important data before performing a factory reset, as this process will erase everything on your phone.
8. Understanding Data Recovery And Its Limitations
Even after permanently deleting photos, there’s a chance they might be recoverable using specialized software. However, the success of data recovery depends on several factors, including:
8.1 Factors Affecting Data Recovery
- Time Since Deletion: The longer the time since deletion, the lower the chances of recovery.
- Overwriting Data: If new data has been written to the storage space, the old data may be overwritten and unrecoverable.
- Type of Deletion: Secure deletion methods like using MobiKin Eraser make recovery extremely difficult.
8.2 Tips To Minimize Data Recovery Risks
- Use Secure Deletion Tools: Employ tools like MobiKin Eraser for secure data erasure.
- Enable Encryption: Encrypt your device before performing a factory reset.
- Avoid Using the Device: After deleting sensitive data, minimize device usage to prevent overwriting.
9. How To Choose The Right Method For You?
The best method for permanently deleting photos depends on your specific needs and situation. Here’s a quick guide:
9.1 Scenarios And Recommended Methods
- Selling or Donating Your Phone: Use MobiKin Eraser for Android or a factory reset with encryption.
- Regular Cleanup: Use Google Photos or Gallery app with emptying the Trash/Bin folder.
- Deleting Sensitive Photos: Use a file manager with secure deletion features or MobiKin Eraser.
9.2 Comparison Table Of Methods
| Method | Security Level | Convenience | Pros | Cons |
|---|---|---|---|---|
| MobiKin Eraser for Android | High | Medium | Ensures permanent deletion, comprehensive wipe | Requires computer, may take longer |
| Google Photos | Medium | High | Easy to use, syncs across devices | Requires Google account, photos may still be recoverable |
| Android Gallery | Low | High | Simple and quick, default app | Less secure, photos can be easily recovered |
| File Manager | Medium | Medium | Allows selecting multiple files, offers recycle bin feature | Requires installing a file manager, may not be as secure as Eraser |
| Factory Reset with Encryption | High | Medium | Erases all data, good for selling/donating | Time-consuming, requires backup |
10. Best Practices For Managing Photos On Android
Managing your photos effectively can prevent the need for drastic deletion measures. Here are some best practices:
10.1 Regularly Backing Up Photos
Back up your photos to a secure cloud service or external storage device. This ensures you won’t lose precious memories if something goes wrong.
10.2 Organizing Photos Into Folders
Create folders to organize your photos by date, event, or category. This makes it easier to find and manage your images.
10.3 Using Cloud Storage Wisely
Choose a cloud storage service that meets your needs and budget. Google Photos, Dropbox, and Amazon Photos are popular options.
10.4 Periodically Reviewing And Deleting Unwanted Photos
Make it a habit to review your photos regularly and delete any unwanted or duplicate images. This helps keep your storage space free and your gallery organized.
11. How Does Dfphoto.Net Help You With Photo Management?
At dfphoto.net, we offer a wealth of resources to help you manage your photos effectively. Our website provides detailed guides, tips, and tutorials on various aspects of photography, including:
11.1 Resources Available On Dfphoto.Net
- Photography Techniques: Learn about various photography techniques to capture stunning images.
- Editing Tips: Discover how to enhance your photos using editing software.
- Equipment Reviews: Get insights on the latest cameras, lenses, and accessories.
- Inspiration and Ideas: Explore galleries of beautiful photos and find inspiration for your own projects.
11.2 Community And Support
Join our vibrant community of photographers to share your work, ask questions, and get feedback. Our forums and social media channels are great places to connect with fellow enthusiasts.
11.3 Exclusive Tutorials And Guides
Access exclusive tutorials and guides on photo management, editing, and organization. Our expert-created content helps you take your photography skills to the next level.
12. Common Mistakes To Avoid When Deleting Photos
Deleting photos permanently requires careful attention to avoid common mistakes. Here are some pitfalls to watch out for:
12.1 Not Emptying The Trash/Recycle Bin
Simply deleting photos moves them to the Trash or Recycle Bin. You must empty these folders to permanently remove the images.
12.2 Forgetting To Delete From Cloud Storage
If your photos are synced to a cloud service like Google Photos, deleting them from your device may not remove them from the cloud. Make sure to delete them from the cloud as well.
12.3 Not Backing Up Important Photos
Always back up your important photos before deleting them. Accidentally deleting precious memories can be heartbreaking.
12.4 Using Unreliable Deletion Methods
Relying on simple deletion methods may not be secure. Use reliable tools like MobiKin Eraser or encryption to ensure permanent removal.
13. Addressing User Concerns And FAQs
Here are some frequently asked questions and concerns about permanently deleting photos from Android:
13.1 Q: Why Can’t I Permanently Delete Photos From My Android Phone?
- A: Deleted photos may still be in the Trash or Recycle Bin. Empty them for permanent deletion. Also, check Google Photos if sync is enabled, and clear app caches.
13.2 Q: What Is The Difference Between Regular Deletion And Permanent Deletion?
- A: Regular deletion moves files to a trash folder, where they can be restored until the trash is emptied. Permanent deletion removes files completely by overwriting the storage space.
13.3 Q: Can I Recover Permanently Deleted Photos Even After A Factory Reset?
- A: If you have completely deleted photos and do not have a backup, recovery is difficult but not impossible. Specialized data recovery tools may still retrieve some data, especially if the device has not been used extensively since deletion.
13.4 Q: How Do I Ensure My Photos Are Completely Unrecoverable?
- A: Use secure deletion tools like MobiKin Eraser for Android or enable encryption before performing a factory reset. These methods overwrite the storage space, making recovery nearly impossible.
13.5 Q: What Are The Best Cloud Storage Options For Backing Up My Photos?
- A: Popular options include Google Photos, Dropbox, Amazon Photos, and Microsoft OneDrive. Choose a service that offers sufficient storage space, security features, and ease of use.
14. Staying Updated With The Latest Trends In Photo Security
The landscape of photo security is constantly evolving. Stay informed about the latest trends and technologies to protect your privacy:
14.1 Following Industry News And Blogs
Keep up with the latest news and articles from photography and technology blogs. This helps you stay informed about new threats and security measures.
14.2 Attending Workshops And Webinars
Participate in workshops and webinars on photo security and data privacy. These events provide valuable insights and practical tips.
14.3 Engaging With Online Communities
Join online communities and forums to discuss photo security issues and share best practices with other photographers.
15. How Technology Can Protect Our Visual Content
Technology plays a vital role in protecting our visual content, offering various tools and techniques to enhance security:
15.1 Watermarking Photos To Prevent Unauthorized Use
Watermarking your photos adds a visible or invisible overlay that identifies you as the copyright holder. This deters unauthorized use and makes it easier to track down infringements.
15.2 Encryption Tools For Protecting Photo Files
Encryption tools scramble your photo files, making them unreadable without the correct decryption key. This protects your photos from unauthorized access.
15.3 Blockchain Technology For Copyright Protection
Blockchain technology can be used to create a tamper-proof record of your photo’s creation and ownership. This provides a strong legal basis for copyright protection.
16. Final Thoughts: Take Control Of Your Photo Privacy
Taking control of your photo privacy is essential in today’s digital age. By following the methods and best practices outlined in this guide, you can ensure that your photos remain private and secure.
We encourage you to explore the resources available on dfphoto.net to further enhance your photo management skills. From learning new photography techniques to discovering the latest equipment, our website is your ultimate destination for all things photography.
Address: 1600 St Michael’s Dr, Santa Fe, NM 87505, United States.
Phone: +1 (505) 471-6001.
Website: dfphoto.net.
Are you ready to take your photography to the next level? Visit dfphoto.net today and discover a world of inspiration, education, and community. Let us help you capture, protect, and share your visual stories with confidence.
17. Call To Action
Ready to master photo deletion and management? Visit dfphoto.net for more in-depth guides, stunning photo galleries, and a thriving community of photographers. Elevate your skills and protect your memories today!