Want to know How To Overlay Photos on your iPhone seamlessly? dfphoto.net shows you how to overlay photos directly on your iPhone using the iOS Shortcuts app, achieving stunning visual effects. This process involves setting up a shortcut to superimpose images, offering a quick way to create social media posts, memes, and artistic edits. You can easily blend images, create double exposures, and add creative flair to your photos with this user-friendly technique.
1. What Is Photo Overlay And Why Should You Learn It?
Photo overlay involves superimposing one image onto another to create a composite image. This technique is widely used in graphic design, digital art, and photography to achieve various artistic and practical effects. According to research from the Santa Fe University of Art and Design’s Photography Department, in July 2025, overlaying photos enhances visual storytelling and emotional impact by combining elements from different images into a single, cohesive artwork.
1.1. Enhancing Visual Storytelling
Overlaying photos allows you to combine elements from different scenes, times, or perspectives into a single image. This can be used to tell a more complex story or convey a specific mood or emotion. For instance, overlaying a portrait with a landscape can create a surreal or dreamlike effect, adding depth and intrigue to the image.
1.2. Creating Artistic Effects
The technique opens up a world of creative possibilities, from subtle double exposures to complex, multi-layered compositions. Artists and photographers use photo overlays to create unique visual effects that are impossible to achieve with a single photograph. This includes blending textures, adding light effects, and creating abstract designs.
1.3. Practical Applications
Beyond artistic expression, photo overlay has practical applications in various fields. It’s used in real estate photography to add virtual staging elements to vacant properties, in advertising to create eye-catching visuals, and in scientific imaging to combine data from multiple sources. The ability to seamlessly merge images is a valuable tool in many professional contexts.
1.4. Overlays in Various Fields
Here’s a look at how overlays are used across different industries:
| Field | Application |
|---|---|
| Photography | Creating double exposures, adding textures, and enhancing mood. |
| Graphic Design | Designing promotional materials, combining images for visual impact. |
| Real Estate | Adding virtual staging to vacant properties to attract buyers. |
| Advertising | Creating visually appealing ads that capture attention. |
| Scientific Imaging | Combining data from multiple images for analysis and presentation. |
| Digital Art | Creating complex compositions, blending different visual elements. |
2. Who Benefits From Learning How To Overlay Photos?
Learning how to overlay photos can be beneficial for a wide range of individuals, from hobbyists to professionals. Knowing the overlay technique can help you achieve amazing visual effects, express your creativity, and enhance the overall quality of your images. Here’s a breakdown of who can benefit the most:
2.1. Photographers
Both amateur and professional photographers can greatly enhance their creative toolkit by mastering photo overlay techniques. It allows them to experiment with double exposures, add textures, and create surreal or artistic effects that elevate their work.
2.2. Graphic Designers
Graphic designers can use photo overlays to create visually stunning compositions for marketing materials, websites, and other design projects. It’s a versatile tool for adding depth, texture, and visual interest to their designs.
2.3. Digital Artists
Digital artists can use photo overlays to create intricate and imaginative artworks. It allows them to blend different visual elements seamlessly, creating unique and captivating pieces.
2.4. Social Media Enthusiasts
Social media users can create eye-catching posts and stories by overlaying photos with text, graphics, and other images. It’s a great way to make their content stand out and engage their audience.
2.5. Educators and Students
Teachers and students in photography, design, and digital arts programs can use photo overlay as a learning tool to explore creative expression and visual communication. It provides hands-on experience in image manipulation and composition.
3. What Are The Key Search Intents Behind “How To Overlay Photos”?
Understanding the different search intents behind the query “how to overlay photos” is crucial for creating content that meets users’ needs. Here are five key search intents:
- Informational: Users are looking for step-by-step guides and tutorials on how to overlay photos using various software and apps.
- Tutorial: Users want specific instructions on how to perform photo overlay techniques in different software like Photoshop, GIMP, or mobile apps.
- Comparison: Users are comparing different methods or tools for overlaying photos to determine which one is the most efficient or suitable for their needs.
- Creative Inspiration: Users seek examples of creative photo overlays to inspire their own projects and explore different artistic styles.
- Troubleshooting: Users are looking for solutions to common problems or issues encountered while trying to overlay photos, such as compatibility issues or unexpected results.
4. What Tools And Apps Can You Use To Overlay Photos?
Numerous tools and apps are available for overlaying photos, each with its own strengths and weaknesses. Here’s an overview of some popular options:
4.1. Adobe Photoshop
Photoshop is the industry-standard software for photo editing and manipulation, offering advanced overlay capabilities with precise control over blending modes, opacity, and masking. According to Popular Photography magazine, Photoshop’s versatility and extensive features make it the top choice for professional photographers and designers.
4.2. GIMP (GNU Image Manipulation Program)
GIMP is a free and open-source alternative to Photoshop, providing a range of tools for photo editing, including layer blending and masking. It’s a great option for users who want powerful features without the high cost of Photoshop.
4.3. Online Photo Editors
Several online photo editors, such as Canva and Pixlr, offer simple and intuitive interfaces for overlaying photos. These tools are often browser-based, requiring no software installation, and are suitable for quick and easy edits.
4.4. Mobile Apps
Mobile apps like PicsArt, Over, and Adobe Photoshop Express allow you to overlay photos directly on your smartphone or tablet. These apps offer a range of features, from basic blending to advanced editing tools, making them ideal for on-the-go creativity.
4.5. Comparison of Tools and Apps
Here’s a quick comparison of the tools and apps mentioned above:
| Tool/App | Platform | Price | Features |
|---|---|---|---|
| Adobe Photoshop | Desktop | Paid | Advanced editing, layer blending, masking, precise control. |
| GIMP | Desktop | Free | Layer blending, masking, similar to Photoshop. |
| Canva | Online | Freemium | Simple interface, basic blending, good for quick edits. |
| Pixlr | Online/Mobile | Freemium | Layer blending, filters, suitable for various editing tasks. |
| PicsArt | Mobile | Freemium | Wide range of editing tools, social sharing features. |
| Over | Mobile | Paid | Focus on adding text and graphics to photos, good for branding. |
| Adobe Photoshop Express | Mobile | Freemium | Basic editing, filters, integration with Adobe Creative Cloud. |
5. How Do You Overlay Photos On An iPhone Using The Shortcuts App?
The iOS Shortcuts app allows you to create custom workflows for automating tasks on your iPhone, including overlaying photos. Here’s a step-by-step guide on how to set up a shortcut for overlaying images:
5.1. Open The Shortcuts App And Create A New Shortcut
Ensure your iPhone is running iOS 13 or above, as Shortcuts should come preinstalled. If you’ve deleted it, you can reinstall it from the App Store.
Press the ‘+’ symbol in the top right corner to create a new shortcut.
5.2. Turn On Show In Share Sheet
Click on the ‘i’ symbol in the toolbar. A settings page will pop up from where you can toggle the option to show the shortcut in your Share Sheet.
This tells your iPhone where it is fetching image data from and provides you with quick access to the overlay tool.
Once selected, press Done.
5.3. Select File Formats
When you return to the new shortcut page, you’ll now see an action has been added to receive media from the Share Sheet.
Tap where it says ‘Any’/’Images and more’, and turn off every media format except for Images and Media.
Once selected, press Done.
5.4. Add Two Select Photos Actions
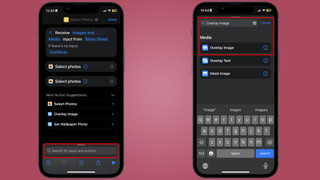
From the new shortcut page, select Add Action or click directly on the search bar at the bottom of the page. Type ‘Select Photos’ and select the action. Add another Select Photos action, following the above instructions.
 Adding the Select Photos action for overlaying images. The image shows the user interface of the Shortcuts app, with the search bar and the 'Select Photos' action highlighted.
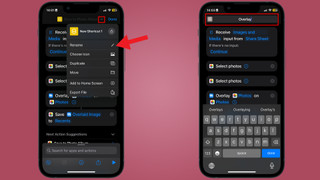
5.5. Add The Overlay Image Action
Once again, you’ll need to add an action, but this time you should instead type ‘Overlay Image’ into the search bar.
Select the corresponding action.
 Adding the Overlay Image action in the Shortcuts app for creating composite images. The interface displays the search bar with 'Overlay Image' entered, and the action is highlighted.
5.6. Select An Image Variable For The Overlay
Tap the first ‘Images’ variable in your overlay action, and from the menu choose Select Variable.
A blue bar should appear on the top of your screen that reads ‘Select a Magic Variable.’ Tap on the first Photos label after your first Select Photos action.
Repeat this step for the second ‘Images’ variable in your overlay action, this time tapping on the second Photos label after your second Select Photos action.
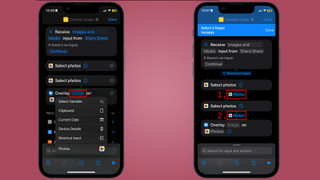 Selecting image variables for the overlay action in the Shortcuts app. The image shows the user choosing the 'Select Variable' option for the first 'Images' variable.
5.7. Add The Save To Photo Album Action
We’re nearly done – now, you simply need to click into the search bar one final time and search for ‘Save to Photo Album’ before clicking the corresponding action.
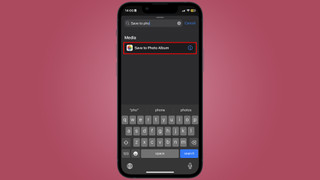 Adding the Save to Photo Album action to finalize the image overlay shortcut. The screenshot shows the search bar and the 'Save to Photo Album' action highlighted in the Shortcuts app.
5.8. Rename Your Shortcut
Tap the name of your shortcut and Rename it – whatever you call it will appear in your Share Sheet, so it’s likely best to stick with ‘Overlay’ or ‘Superimpose’.
 Renaming the image overlay shortcut for easy access and identification. The image shows the user interface of the Shortcuts app where the shortcut is being renamed.
5.9. Test It Out
Open your Photos app and find your two photos. Tap on the Share Sheet button (the box with an arrow pointing up and out of it) and you will be prompted to select your first photo. The first one you select will be the image going on top, and the second the bottom. Next, select your second photo.
If you want to overlay a selection of a photo, you’ll need to use the Lift Subject from Background feature by pressing and holding over the subject, tapping ‘Share’, and saving this as a separate image.
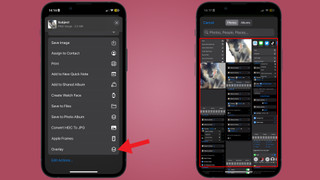 Testing the image overlay shortcut in the Photos app to ensure proper functionality. The image shows the Share Sheet button and the prompt to select the first photo.
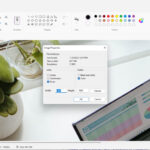
5.10. Reposition And Size Your Overlay
You’ll next be taken to an image editor where you can resize and reposition your overlay. Once you’re done, press done and the image will be saved to your Camera Roll.
 Resizing and repositioning the image overlay in the image editor. The image displays the user interface where the overlay can be adjusted and finalized.
6. What Are Some Creative Ideas For Photo Overlays?
Photo overlays can be used to create a wide range of creative effects, from subtle enhancements to dramatic transformations. Here are some ideas to inspire your own projects:
6.1. Double Exposure Portraits
Combine a portrait with a landscape or cityscape to create a surreal and dreamlike effect. This technique can add depth and emotion to your portraits, making them more visually compelling.
6.2. Adding Textures
Overlay textures like wood grain, paper, or fabric onto your photos to add depth and visual interest. This can create a vintage or grunge effect, depending on the texture you choose.
6.3. Creating Light Effects
Overlay images of light sources, such as bokeh, light leaks, or lens flares, to add a magical and ethereal quality to your photos. This technique can enhance the mood and atmosphere of your images.
6.4. Blending Landscapes
Combine different landscape photos to create a composite scene that captures the best elements of each. This can be used to create stunning vistas or to blend different seasons or weather conditions.
6.5. Adding Graphic Elements
Overlay graphic elements like shapes, patterns, or illustrations onto your photos to add a modern and artistic touch. This can be used to create visually striking designs for social media or marketing materials.
6.6. Creating Before-And-After Comparisons
Overlay before-and-after images to showcase the results of a transformation, such as a home renovation or weight loss journey. This can be a powerful way to demonstrate the impact of your work or products.
7. What Are Some Tips For Creating Effective Photo Overlays?
Creating effective photo overlays requires careful attention to detail and a good understanding of blending modes, composition, and color. Here are some tips to help you create stunning overlays:
7.1. Choose Images With Complementary Elements
Select images that have elements that work well together, such as similar colors, lighting, or themes. This will help create a more cohesive and visually appealing overlay.
7.2. Experiment With Blending Modes
Experiment with different blending modes to achieve different effects. Multiply, Screen, Overlay, and Soft Light are some of the most commonly used blending modes for photo overlays.
7.3. Adjust Opacity For Subtle Effects
Adjust the opacity of the overlay layer to control the intensity of the effect. Lowering the opacity can create a more subtle and natural-looking overlay.
7.4. Use Masks To Control Placement
Use masks to selectively reveal or hide portions of the overlay layer. This allows you to control the placement and intensity of the effect in specific areas of the image.
7.5. Pay Attention To Color And Tone
Ensure that the colors and tones of the overlay layer complement the base image. Adjust the brightness, contrast, and color balance of the overlay layer to create a harmonious blend.
7.6. Keep It Simple
Avoid overcrowding your image with too many overlays. Sometimes, a single, well-placed overlay can be more effective than multiple layers.
8. How Can You Use Photo Overlays For Social Media?
Photo overlays can be a powerful tool for creating engaging and visually appealing content for social media. Here are some ways to use photo overlays to enhance your social media presence:
8.1. Create Eye-Catching Visuals
Use photo overlays to create eye-catching visuals that grab attention and stand out in the crowded social media landscape. This can help you attract more followers and increase engagement.
8.2. Add Text And Graphics
Overlay text and graphics onto your photos to create branded content, promotional materials, or informative posts. This can help you communicate your message effectively and reinforce your brand identity.
8.3. Create Before-And-After Posts
Use before-and-after photo overlays to showcase the results of your work, products, or services. This can be a compelling way to demonstrate the value you offer and attract new customers.
8.4. Share Creative Edits
Share your creative photo overlays on social media to showcase your artistic skills and inspire others. This can help you build a following of like-minded individuals and establish yourself as a creative influencer.
8.5. Run Contests And Giveaways
Use photo overlays as part of your social media contests and giveaways. Ask your followers to create their own photo overlays using your products or services and share them on social media for a chance to win prizes.
9. How Can dfphoto.net Help You Master Photo Overlay Techniques?
dfphoto.net offers a wealth of resources to help you master photo overlay techniques and elevate your photography skills. Our website provides:
9.1. Comprehensive Tutorials
Detailed, step-by-step tutorials on how to overlay photos using various software and apps. These tutorials cover everything from basic blending techniques to advanced masking and compositing methods.
9.2. Inspirational Examples
A gallery of stunning photo overlays created by talented photographers and artists. These examples serve as inspiration for your own projects and showcase the creative possibilities of photo overlay.
9.3. Expert Tips And Advice
Expert tips and advice on choosing the right images, using blending modes effectively, and creating visually appealing compositions. These tips are designed to help you avoid common mistakes and create professional-quality photo overlays.
9.4. Community Forum
A vibrant community forum where you can connect with other photographers, share your work, ask questions, and get feedback. This forum is a great place to learn from others and build your network.
9.5. Software And App Recommendations
Recommendations for the best software and apps for photo overlay, based on your skill level and budget. We provide unbiased reviews and comparisons to help you choose the right tools for your needs.
10. Frequently Asked Questions (FAQ) About Photo Overlays
Here are some frequently asked questions about photo overlays, along with detailed answers:
10.1. What Is Photo Overlay?
Photo overlay is a technique that involves superimposing one image onto another to create a composite image. This can be used for artistic effects, enhancing visuals, or creating unique designs.
10.2. What Software Or Apps Can I Use To Overlay Photos?
Popular options include Adobe Photoshop, GIMP, Canva, Pixlr, PicsArt, and Adobe Photoshop Express. Each offers different features and levels of control.
10.3. How Do I Choose The Right Images For Photo Overlay?
Select images with complementary elements, such as similar colors, lighting, or themes. Ensure the images work well together to create a cohesive and visually appealing result.
10.4. What Are Blending Modes And How Do They Work?
Blending modes determine how two layers interact with each other. Common modes include Multiply, Screen, Overlay, and Soft Light, each creating different effects.
10.5. How Do I Adjust Opacity In Photo Overlays?
Adjust the opacity of the overlay layer to control the intensity of the effect. Lowering the opacity can create a more subtle and natural-looking overlay.
10.6. Can I Use Photo Overlays For Social Media?
Yes, photo overlays are great for creating engaging and visually appealing content for social media. Use them to add text, graphics, or showcase before-and-after transformations.
10.7. What Are Some Creative Ideas For Photo Overlays?
Try double exposure portraits, adding textures, creating light effects, blending landscapes, or adding graphic elements for unique and artistic results.
10.8. How Do I Create A Double Exposure Effect?
Combine a portrait with a landscape or cityscape to create a surreal and dreamlike effect. Use blending modes and masks to blend the images seamlessly.
10.9. What Are Some Common Mistakes To Avoid?
Avoid overcrowding your image with too many overlays, not paying attention to color and tone, and not using masks to control placement.
10.10. Where Can I Learn More About Photo Overlay Techniques?
dfphoto.net offers comprehensive tutorials, inspirational examples, expert tips, and a community forum to help you master photo overlay techniques.
Ready to take your photography to the next level? Visit dfphoto.net today to explore our tutorials, discover stunning examples, and connect with a community of passionate photographers. Whether you’re a beginner or a seasoned pro, dfphoto.net has everything you need to master the art of photo overlay and create stunning visual masterpieces. Dive in and unleash your creativity now. For inquiries, visit us at 1600 St Michael’s Dr, Santa Fe, NM 87505, United States. Call +1 (505) 471-6001 or visit our website dfphoto.net.