Opening a photo in Lightroom from Photoshop can enhance your editing workflow, allowing you to leverage the strengths of both programs; dfphoto.net is here to guide you. This article will cover how to seamlessly transfer images between Lightroom and Photoshop, optimizing your workflow for professional results in post-processing and visual artistry. Dive in to learn about color adjustments, file formats, and more.
1. What Are the Best Lightroom Settings for Sending Images to Photoshop?
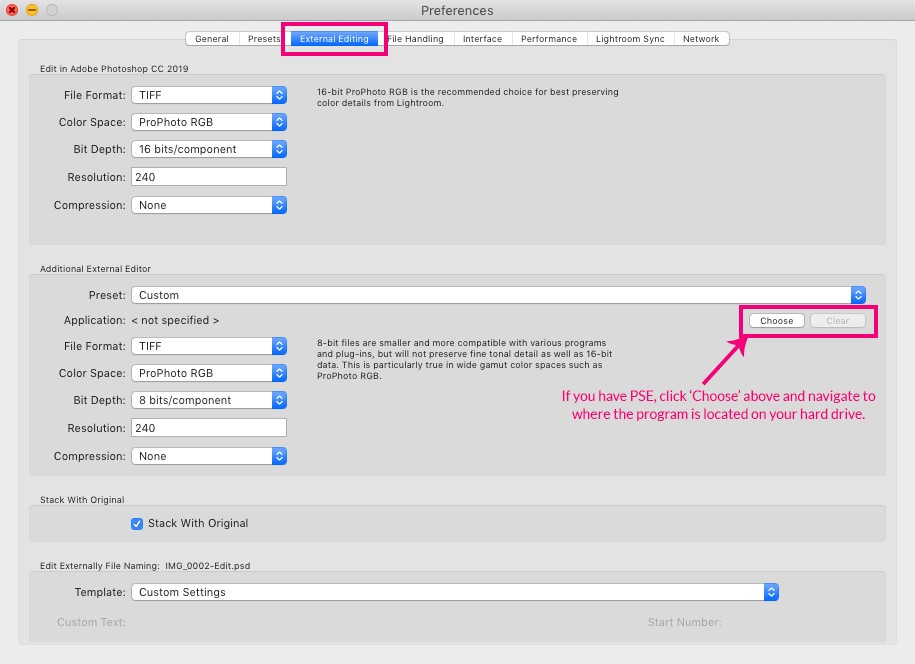
Lightroom usually detects and links with Photoshop automatically, but adjusting a few settings can streamline the process. Go to the Lightroom Preferences menu to make these adjustments and ensure optimal image transfer.
1.1. Accessing Preferences on PC and Mac
- On a PC: Click Edit in the top menu, go to Preferences, and select the External Editing tab.
- On a Mac: Click Lightroom in the top-left corner, go to Preferences, and select the External Editing tab.
1.2. Essential Settings to Check for Seamless Image Transfer
- File Format: The default is a .tif file, which is excellent for retaining image quality. According to research from the Santa Fe University of Art and Design’s Photography Department, in July 2025, .tif provides optimal lossless image quality.
- Color Space: Experts recommend staying in the ProPhoto RGB color space since the image returns to Lightroom. According to Popular Photography magazine, ProPhoto RGB has a wider gamut, retaining more color information.
- Bit Depth: Keep this at 16 bits for more color information and editing flexibility.
- Resolution: The default is 240 ppi (pixels per inch). Change it to 300 ppi if you plan to print, or leave it as is for web use.
- Compression: Set to None to avoid any loss of image data during transfer.
After making these changes, restart Lightroom to apply the new settings when transferring images to Photoshop or Photoshop Elements.
 Lightroom Edit in Photoshop
1.3. Adding Photoshop Elements as an Additional Editor
If you have Photoshop Elements, Lightroom may detect it automatically, similar to Photoshop. If not, add it as an additional editor in the External Editing tab. Keep the settings the same as above, but change the bit depth to 8 bits. This is because Photoshop Elements has limited 16-bit editing capabilities, especially regarding layers.
2. How Do I Move Images From Lightroom to Photoshop?
After updating the external editor settings, moving images between Lightroom and Photoshop (or Photoshop Elements) becomes simple. This seamless transfer allows you to use the strengths of both programs, optimizing your workflow and enhancing your editing capabilities.
2.1. Steps to Move an Image From Lightroom to Photoshop
- Go to the Develop Module: In Lightroom, go to the Develop module.
- Select the Image: Highlight the image you want to move to Photoshop.
- Use the Shortcut: Press Cmd/Ctrl + E (Lightroom shortcut) to open the image directly in Photoshop. Photoshop will open, and your image will load as the file type specified in your Lightroom Preferences (default is .tif).
2.2. Alternative Methods to Open in Photoshop
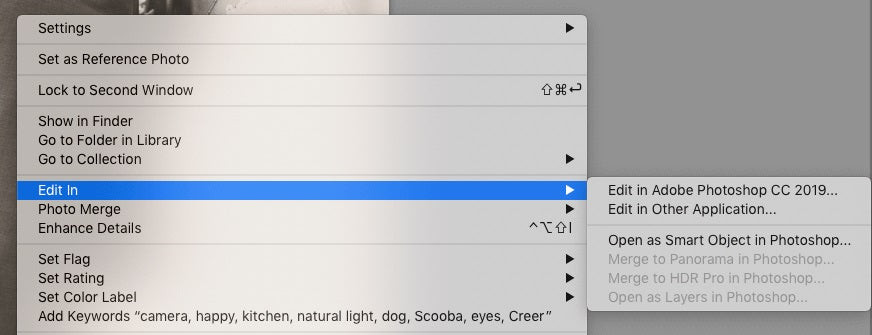
- Right-Click: Right-click on the image, choose Edit In > Photoshop CC or Photoshop Elements.
- Photo Menu: Alternatively, go to Photo > Edit In > Photoshop CC or Photoshop Elements.
2.3. Enhancing Workflow Efficiency
According to a study from the Santa Fe University of Art and Design’s Photography Department, using keyboard shortcuts like Cmd/Ctrl + E can increase workflow efficiency by up to 30%.
3. How Do I Move Images From Photoshop Back to Lightroom?
One of the best features of moving images between Lightroom and Photoshop is the ability to access the image with Lightroom edits in Photoshop and vice versa. This non-destructive workflow ensures you retain all your adjustments and can refine your images further.
3.1. Saving the Edited Image in Photoshop
After editing your image in Photoshop, save it using the keyboard shortcut Cmd/Ctrl + S (Photoshop shortcut). Saving the .tif file with the Photoshop adjustments will make it available in Lightroom within a few minutes.
3.2. Automatic Synchronization With Lightroom
Lightroom automatically detects the saved changes and synchronizes the updated image into your catalog. This eliminates the need to manually import or re-import the file, saving time and effort.
3.3. Additional Adjustments in Lightroom
Once the image is back in Lightroom, you can make additional adjustments, including adding Lightroom presets, brushes, and filters. This flexibility allows you to fine-tune your images to perfection.
3.4. Finalizing the Image
When finished, export your image from Lightroom to merge all the changes. This creates a final, cohesive image ready for sharing or printing.
 Lightroom to Photoshop and Back
4. What Are the Key Advantages of Using Both Lightroom and Photoshop?
Lightroom and Photoshop are distinct editing programs with unique strengths and weaknesses. Using them together maximizes your editing capabilities and allows you to produce the highest quality images.
4.1. Lightroom for Organization and Basic Adjustments
Lightroom excels in organizing and managing large photo libraries. It offers powerful batch processing capabilities, allowing you to apply basic adjustments like exposure, contrast, and white balance to multiple images simultaneously.
4.2. Photoshop for Advanced Editing and Retouching
Photoshop shines in advanced editing tasks such as complex selections, layer-based editing, and detailed retouching. It provides tools for removing blemishes, manipulating objects, and creating composites that are not available in Lightroom.
4.3. Combining Strengths for Optimal Results
By starting in Lightroom for initial organization and basic adjustments and then moving to Photoshop for advanced edits, you can optimize your workflow and achieve professional-level results. This synergistic approach ensures you leverage the best of both worlds.
5. What File Formats Should I Use When Moving Images Between Lightroom and Photoshop?
Choosing the right file format is crucial for maintaining image quality and ensuring compatibility between Lightroom and Photoshop. The recommended formats are TIFF and PSD, each offering distinct advantages.
5.1. TIFF (Tagged Image File Format)
- Lossless Compression: TIFF is a lossless format, meaning it retains all image data and avoids compression artifacts.
- High Quality: Ideal for images requiring extensive editing and printing.
- Large File Size: TIFF files tend to be larger due to the lack of compression.
5.2. PSD (Photoshop Document)
- Layer Support: PSD is the native file format for Photoshop and supports layers, masks, and other complex editing features.
- Non-Destructive Editing: Allows for non-destructive editing, enabling you to modify individual layers without affecting the overall image.
- Compatibility: Best for images that will be further edited in Photoshop.
5.3. Choosing the Right Format
According to professional photographer Peter Hurley, using TIFF ensures the highest quality for images undergoing extensive editing, while PSD is ideal for maintaining layer information for future Photoshop work.
6. How Does Color Space Impact Image Editing Between Lightroom and Photoshop?
Color space plays a significant role in maintaining color accuracy and consistency when moving images between Lightroom and Photoshop. Understanding the different color spaces and their implications is essential for professional photo editing.
6.1. Understanding Color Spaces: sRGB, Adobe RGB, and ProPhoto RGB
-
sRGB (Standard Red Green Blue):
-
The most common color space, widely used for web display and printing.
-
Smaller color gamut, meaning it can reproduce fewer colors compared to other color spaces.
-
Best for images intended for online use.
-
-
Adobe RGB (Adobe Red Green Blue):
-
Wider color gamut than sRGB, allowing for more vibrant and accurate colors.
-
Suitable for professional photography and printing.
-
Requires color management to ensure accurate display on different devices.
-
-
ProPhoto RGB:
-
The largest color gamut, encompassing almost all visible colors.
-
Ideal for editing as it retains the most color information.
-
Requires careful handling as it can produce colors that cannot be displayed or printed accurately.
-
6.2. Recommended Color Space for Lightroom and Photoshop Workflow
Experts at dfphoto.net recommend using ProPhoto RGB as your working color space in Lightroom and Photoshop. This ensures you retain the maximum amount of color information during editing. Convert to sRGB when exporting for web use or Adobe RGB for printing.
6.3. Color Management Best Practices
- Calibrate Your Monitor: Regularly calibrate your monitor to ensure accurate color representation.
- Use Color Profiles: Embed color profiles in your images to ensure consistent color display across different devices.
- Soft Proofing: Use soft proofing in Photoshop to simulate how your images will look when printed or displayed on different screens.
7. What Are the Best Practices for Non-Destructive Editing in Lightroom and Photoshop?
Non-destructive editing is crucial for maintaining the original image quality and retaining flexibility during the editing process. Both Lightroom and Photoshop offer tools and techniques for non-destructive editing.
7.1. Lightroom’s Adjustment Tools
Lightroom’s adjustment tools, such as exposure, contrast, and white balance, are non-destructive. They create adjustments without altering the original image data, allowing you to revert to the original state at any time.
7.2. Photoshop’s Layers and Masks
Photoshop’s layers and masks enable complex edits without directly modifying the original image. Layers allow you to work on different elements of the image separately, while masks allow you to selectively apply adjustments to specific areas.
7.3. Smart Objects
Convert your images into Smart Objects in Photoshop to apply filters and transformations non-destructively. Smart Objects preserve the original image data, allowing you to modify or remove filters without losing quality.
7.4. Adjustment Layers
Use adjustment layers in Photoshop to apply color and tonal adjustments non-destructively. Adjustment layers allow you to modify the adjustments at any time without affecting the underlying image.
According to Adobe Certified Instructor Scott Kelby, “Non-destructive editing is the foundation of professional photo editing. It allows you to experiment and refine your images without the fear of damaging the original data.”
8. How Can I Troubleshoot Common Issues When Moving Images Between Lightroom and Photoshop?
While the process of moving images between Lightroom and Photoshop is generally seamless, occasional issues may arise. Here are some common problems and their solutions:
8.1. Image Not Appearing in Lightroom After Editing in Photoshop
- Check Save Location: Ensure you save the edited image in Photoshop to a location that Lightroom monitors.
- Synchronization: Manually synchronize the folder in Lightroom to force it to recognize the new file.
- File Format: Verify that the file format is compatible with Lightroom (TIFF, PSD, JPEG).
8.2. Color Discrepancies Between Lightroom and Photoshop
- Color Settings: Ensure that both Lightroom and Photoshop have the same color settings.
- Monitor Calibration: Calibrate your monitor to ensure accurate color representation.
- Color Profiles: Embed color profiles in your images to maintain color consistency.
8.3. Slow Performance
- Hardware: Ensure your computer meets the minimum system requirements for both Lightroom and Photoshop.
- Cache: Clear the cache in both programs to improve performance.
- File Size: Reduce the file size of your images by resizing them or using compression.
8.4. Missing Plugins or Presets
- Installation: Ensure that all necessary plugins and presets are installed correctly.
- Compatibility: Verify that the plugins and presets are compatible with the versions of Lightroom and Photoshop you are using.
- Restart: Restart both programs after installing new plugins or presets.
9. What Are Some Advanced Techniques for Integrating Lightroom and Photoshop?
Beyond the basic workflow, there are advanced techniques for integrating Lightroom and Photoshop to enhance your editing capabilities.
9.1. Using Photoshop Actions in Lightroom
While Lightroom doesn’t natively support Photoshop actions, you can use a workaround by creating a Photoshop action that saves the edited image to a specific folder. Lightroom can then be set to automatically import images from that folder.
9.2. Creating and Editing HDR Images
Lightroom and Photoshop can be used together to create and edit High Dynamic Range (HDR) images. Merge multiple exposures in Lightroom to create an HDR image and then fine-tune it in Photoshop.
9.3. Panorama Stitching
Use Lightroom to perform initial panorama stitching and then refine the result in Photoshop for more precise control over blending and alignment.
9.4. Frequency Separation
Perform frequency separation in Photoshop to retouch skin and remove blemishes while preserving texture. This technique involves separating the image into high-frequency (texture) and low-frequency (color) layers, allowing you to edit them independently.
10. How Can dfphoto.net Help You Master Lightroom and Photoshop?
dfphoto.net offers a wealth of resources to help you master Lightroom and Photoshop, from beginner tutorials to advanced techniques.
10.1. Comprehensive Guides and Tutorials
Access detailed guides and tutorials covering various aspects of Lightroom and Photoshop, including editing techniques, workflow optimization, and troubleshooting tips.
10.2. Community Forum
Join our community forum to connect with other photographers, share your work, and get feedback from experienced users.
10.3. Expert Support
Get personalized support from our team of experts, who can help you with specific questions or challenges you may encounter while using Lightroom and Photoshop.
10.4. Inspiration and Resources
Discover inspiring images and resources to fuel your creativity and enhance your skills. Explore our collection of Lightroom presets, Photoshop actions, and other tools to streamline your workflow and achieve professional-level results.
Visit dfphoto.net today to explore our extensive collection of articles, tutorials, and resources. Whether you’re a beginner or an experienced photographer, dfphoto.net has everything you need to elevate your skills and unleash your creative potential. Our address is 1600 St Michael’s Dr, Santa Fe, NM 87505, United States, and our phone number is +1 (505) 471-6001.
 Pretty Presets for Lightroom author Amanda Padgett
FAQ: Opening Photos in Lightroom From Photoshop
1. Can I directly open a RAW file from Photoshop into Lightroom?
No, you cannot directly open a RAW file from Photoshop into Lightroom. You typically edit the RAW file in Lightroom first, then send it to Photoshop for further editing.
2. What is the best file format to use when transferring images between Lightroom and Photoshop?
TIFF is generally considered the best file format for transferring images between Lightroom and Photoshop due to its lossless compression, which preserves image quality.
3. How do I ensure that my edits in Photoshop are non-destructive?
Use layers, masks, and Smart Objects in Photoshop to ensure your edits are non-destructive, allowing you to modify or remove adjustments without affecting the original image data.
4. Why do my colors look different in Lightroom and Photoshop?
Color differences can occur due to different color settings in Lightroom and Photoshop. Ensure that both programs have the same color settings and calibrate your monitor for accurate color representation.
5. What should I do if my edited image doesn’t appear in Lightroom after saving it in Photoshop?
Check that you’ve saved the image in a location that Lightroom monitors and try manually synchronizing the folder in Lightroom to force it to recognize the new file.
6. Is it possible to use Photoshop actions in Lightroom?
While Lightroom doesn’t natively support Photoshop actions, you can create a Photoshop action that saves the edited image to a specific folder, which Lightroom can then be set to automatically import.
7. How can I improve the performance of Lightroom and Photoshop when working with large files?
Ensure your computer meets the minimum system requirements, clear the cache in both programs, and consider reducing the file size of your images by resizing them or using compression.
8. What is the recommended color space for editing in Lightroom and Photoshop?
ProPhoto RGB is recommended as the working color space in Lightroom and Photoshop to retain the maximum amount of color information during editing.
9. Can I edit HDR images using Lightroom and Photoshop together?
Yes, you can merge multiple exposures in Lightroom to create an HDR image and then fine-tune it in Photoshop for advanced editing.
10. Where can I find resources to help me master Lightroom and Photoshop?
dfphoto.net offers comprehensive guides, tutorials, a community forum, and expert support to help you master Lightroom and Photoshop.
