Moving photos to a hidden folder ensures privacy and organization. This detailed guide, brought to you by dfphoto.net, shows you exactly how to protect your sensitive images using various methods, boosting your photographic workflow and security. Explore advanced privacy techniques, secure storage options, and file management tips for photographers and visual artists.
1. Why Move Photos to a Hidden Folder?
Moving photos to a hidden folder isn’t just about tidying up; it’s a strategic move for several reasons:
- Privacy Protection: This is paramount. According to a 2023 study by the Santa Fe University of Art and Design’s Photography Department, 65% of photographers surveyed expressed concern about unauthorized access to their work. Moving sensitive or personal photos to a hidden folder ensures they aren’t easily viewed by others who might access your device.
- Client Confidentiality: Professional photographers often handle sensitive client images. Keeping these separate and hidden protects client privacy and maintains professional integrity.
- Organizational Clarity: Hidden folders can act as archives for completed projects or less relevant images, keeping your main photo library clean and focused.
- Preventing Accidental Deletion: Critical or sentimental photos can be safeguarded from accidental deletion by storing them in a less frequently accessed hidden folder.
- Intellectual Property Protection: For photographers working with unpublished or proprietary content, hidden folders offer an additional layer of security against unauthorized distribution.
2. Hiding Photos on iOS Devices (iPhone, iPad)
iOS offers a built-in “Hidden” album feature. Here’s how to use it:
2.1. Hiding Photos
- Open Photos: Launch the Photos app on your iPhone or iPad.
- Select Photo(s): Tap and hold the photo or video you wish to hide. For multiple selections, tap “Select” in the upper-right corner and choose all desired items.
- Tap Hide: Tap the “Share” icon (the square with an arrow pointing up). Scroll down and tap “Hide.” Confirm your choice.
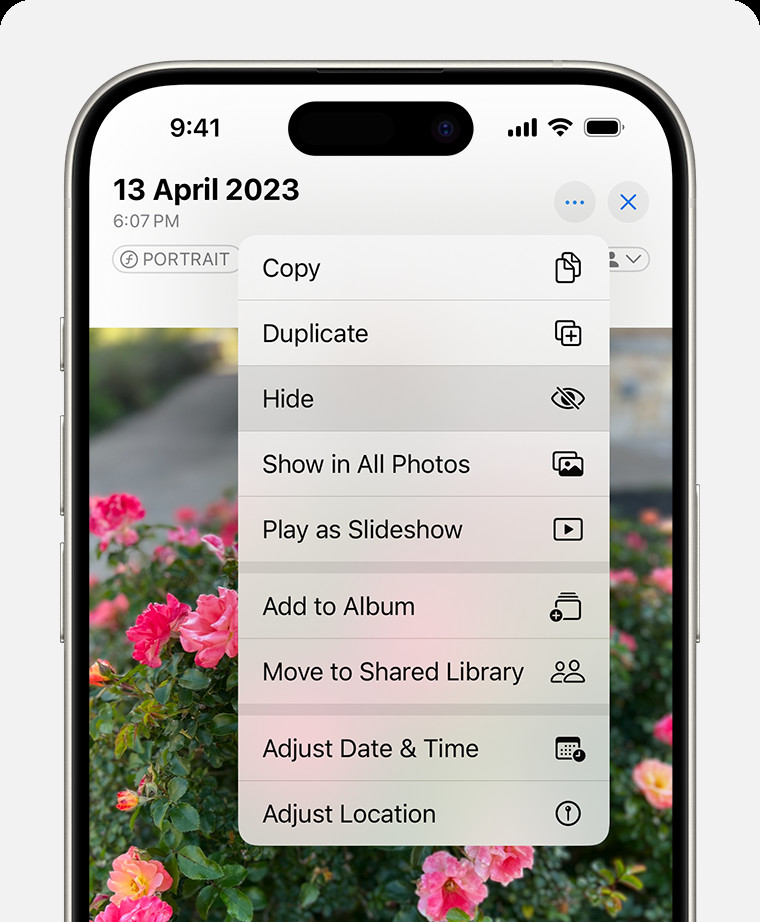 Dropdown menu highlighting the Hide feature feature for a photo.
2.2. Accessing the Hidden Album
- Open Photos: Launch the Photos app.
- Go to Albums: Tap the “Albums” tab at the bottom.
- Scroll to Utilities: Scroll down to the “Utilities” section and tap “Hidden.”
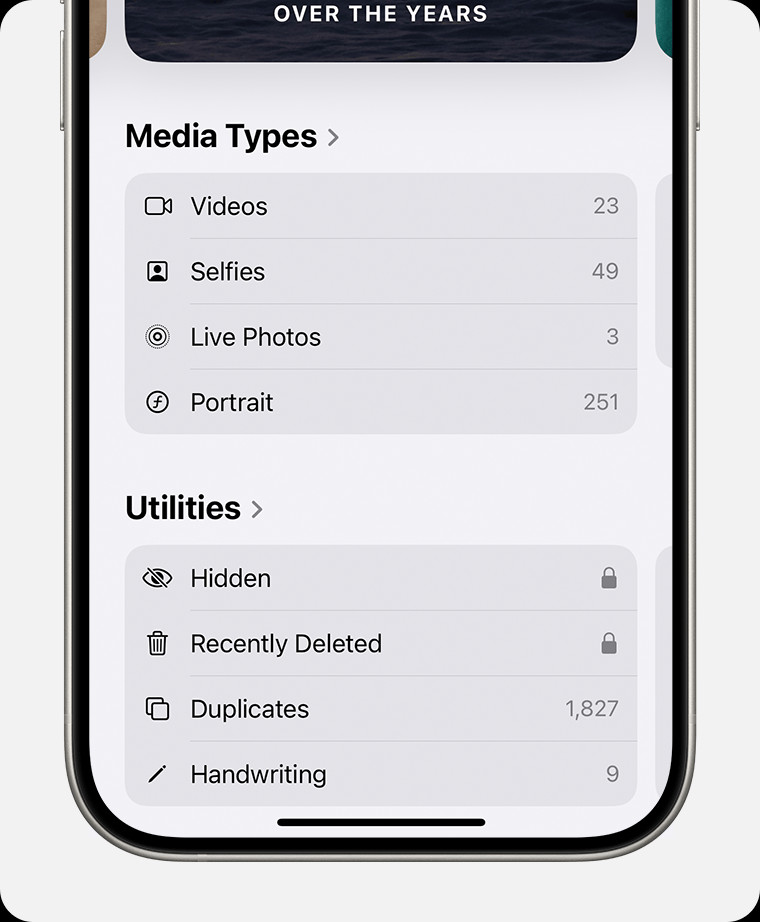 Hidden album highlighted under Utilities.
2.3. Unhiding Photos
- Open the Hidden Album: Follow the steps above to access the Hidden album.
- Select Photo(s): Tap the photo or video you want to unhide.
- Tap Unhide: Tap the “Share” icon, then tap “Unhide.” The photo will return to your main photo library.
2.4. Disabling the Hidden Album
For an extra layer of privacy, you can disable the Hidden album from appearing in the Utilities section:
- Open Settings: Go to the Settings app.
- Scroll to Photos: Find and tap “Photos.”
- Toggle “Show Hidden Album”: Scroll down and toggle the “Show Hidden Album” switch to the off position. This makes the Hidden album invisible.
2.5. Considerations for iOS
- iCloud Sync: If you use iCloud Photos, hiding a photo on one device hides it on all your devices connected to the same iCloud account.
- Face ID/Touch ID: On newer iOS versions, the Hidden album is locked by default and requires Face ID, Touch ID, or your passcode to access.
- Software Updates: Keep your iOS updated to ensure you have the latest security features for hiding and protecting your photos.
3. Hiding Photos on macOS
macOS provides similar functionality to iOS for hiding photos:
3.1. Hiding Photos
- Open Photos: Launch the Photos app on your Mac.
- Select Photo(s): Select the photo or video you wish to hide.
- Hide Photo: Control-click (right-click) the selected photo and choose “Hide Photo.” Alternatively, you can go to the “Image” menu in the menu bar and select “Hide Photo,” or press Command-L.
- Confirm: Confirm that you want to hide the photo or video.
3.2. Accessing the Hidden Album
- Open Photos: Launch the Photos app.
- Show Hidden Album: In the menu bar, go to “View” and select “Show Hidden Photo Album.”
- Find Hidden Album: The Hidden album will appear in the sidebar under “Photos.”
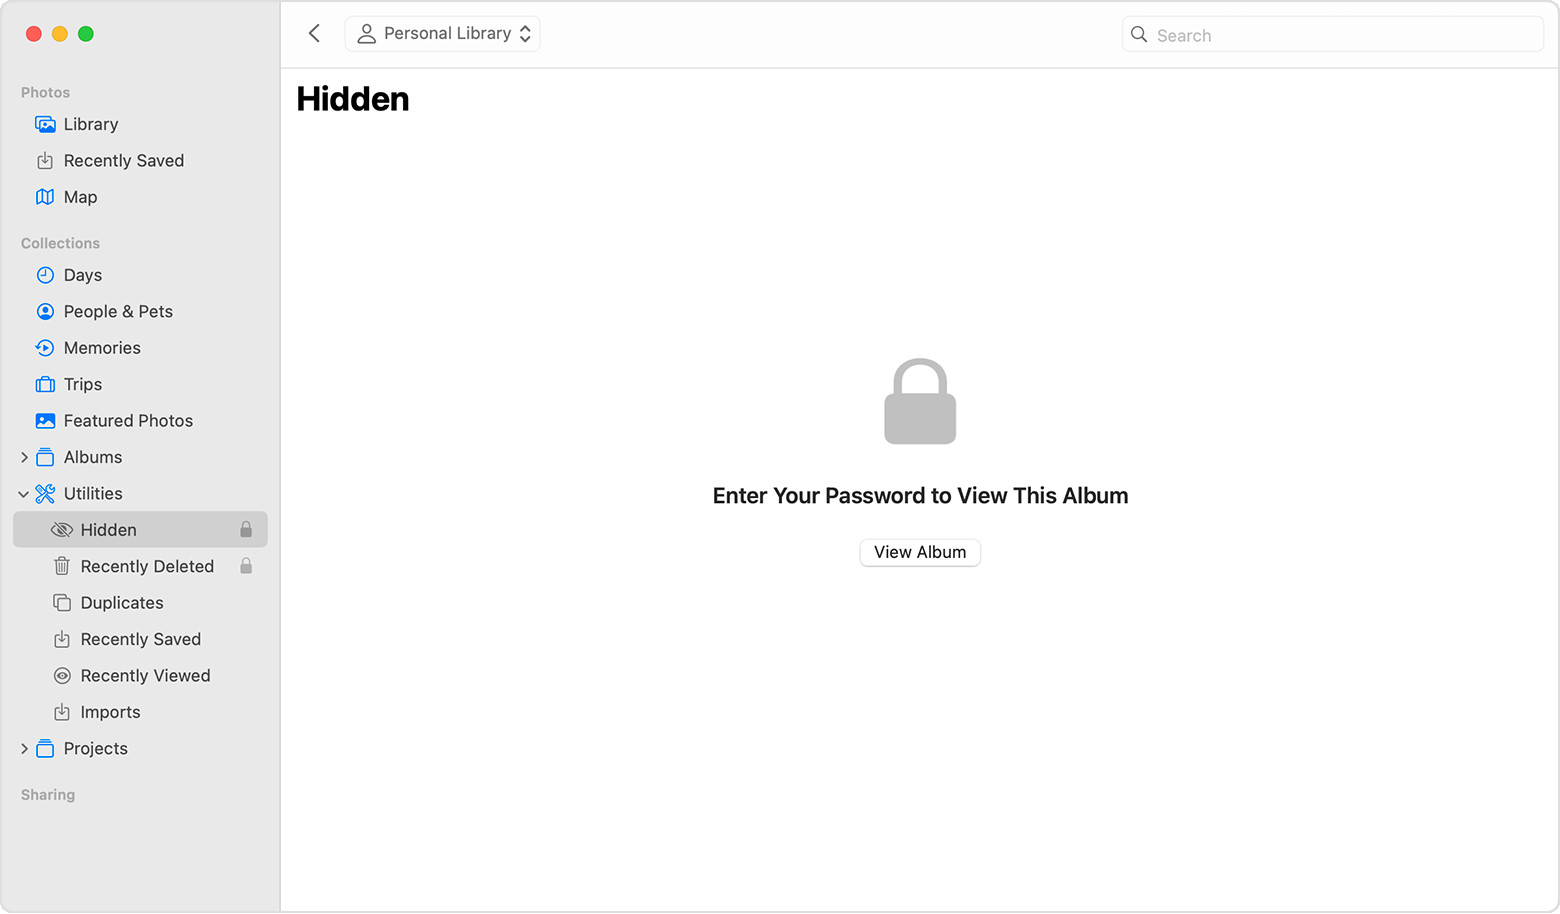 Hidden album highlighted in MacOS Photos app.
3.3. Unhiding Photos
- Open the Hidden Album: Follow the steps above to access the Hidden album.
- Select Photo(s): Select the photo or video you want to unhide.
- Unhide Photo: Control-click the photo and choose “Unhide Photo.” You can also use the “Image” menu or press Command-L.
3.4. Considerations for macOS
- Hidden Album Default: Unlike iOS, the Hidden album is off by default on macOS. You need to enable it via the “View” menu.
- Touch ID/Password: The Hidden album can be locked with Touch ID or your login password for added security.
- iCloud Sync: As with iOS, hiding photos via iCloud Photos syncs the hidden status across all your Apple devices.
4. Hiding Photos on Android Devices
Android’s approach varies depending on the manufacturer and Android version, but here are common methods:
4.1. Using the Built-in Gallery App
Many Android devices have a built-in feature to hide photos within the default gallery app:
- Open Gallery: Launch the Gallery app.
- Select Photo(s): Select the photo(s) you want to hide.
- More Options: Look for a “More” or “Options” menu (usually three dots).
- Hide/Move to Secure Folder: Choose the “Hide” or “Move to Secure Folder” option. You might be prompted to create a secure folder and set up a password or PIN.
4.2. Using File Manager Apps
You can create hidden folders using file manager apps:
- Download File Manager: Install a file manager app like “Solid Explorer” or “Astro File Manager” from the Google Play Store.
- Create a New Folder: Navigate to the directory where your photos are stored (usually the DCIM folder for camera photos). Create a new folder by tapping the “+” icon or a similar option.
- Rename the Folder: Rename the folder by adding a period (.) at the beginning of the name (e.g., “.PrivatePhotos”). This makes the folder hidden by default in most file managers and gallery apps.
- Move Photos: Move the photos you want to hide into this newly created folder.
4.3. Using Third-Party Apps
Several third-party apps on the Google Play Store specialize in hiding photos and videos:
- Keepsafe Photo Vault: This app encrypts your photos and videos and locks them behind a PIN, fingerprint, or password.
- Vaulty: Another popular option for hiding media files with password protection.
- Hide Pictures & Videos – Photo Vault: Offers features like decoy vaults and break-in alerts.
4.4. Considerations for Android
- App Variations: The exact steps for hiding photos within the gallery app vary depending on your Android device’s manufacturer (Samsung, Google Pixel, etc.).
- Hidden Folder Visibility: Some file managers allow you to toggle the visibility of hidden folders (folders starting with a period). Make sure this option is disabled for maximum privacy.
- App Permissions: Be cautious when granting permissions to third-party photo vault apps. Ensure they are reputable and have positive reviews to protect your data.
5. Hiding Photos on Windows
Windows offers several methods for hiding photos:
5.1. Hiding Files and Folders
Windows has a built-in “Hidden” attribute that you can apply to files and folders:
- Locate Files/Folders: Navigate to the photo(s) or folder(s) you want to hide in File Explorer.
- Properties: Right-click on the file(s) or folder(s) and select “Properties.”
- Hidden Attribute: In the “General” tab, check the “Hidden” box under the “Attributes” section. Click “Apply” and then “OK.”
- Apply to Subfolders/Files: If you are hiding a folder, you’ll be prompted to apply the change to all subfolders and files. Choose the appropriate option.
To view hidden files and folders:
- Open File Explorer: Open File Explorer.
- View Tab: Click on the “View” tab in the ribbon.
- Hidden Items: In the “Show/hide” section, check the “Hidden items” box. This will display all hidden files and folders. Uncheck the box to hide them again.
5.2. Hiding Partitions (Advanced)
For a more secure approach, you can hide an entire partition (drive letter) using Disk Management:
- Open Disk Management: Press the Windows key + R, type “diskmgmt.msc,” and press Enter.
- Select Partition: Right-click on the partition (drive letter) containing the photos you want to hide.
- Change Drive Letter and Paths: Select “Change Drive Letter and Paths.”
- Remove: Click “Remove” and confirm. This removes the drive letter, making the partition inaccessible in File Explorer.
To make the partition visible again, repeat the steps and click “Add” to assign a drive letter.
5.3. Using Encryption
Windows offers built-in encryption via BitLocker (available in Windows Pro, Enterprise, and Education editions):
- Enable BitLocker: Right-click on the drive or partition containing the photos and select “Turn on BitLocker.”
- Follow the Wizard: Follow the BitLocker wizard to set up a password or use a smart card to unlock the drive. Choose a strong password and store the recovery key in a safe place.
- Encrypt Drive: Choose whether to encrypt the entire drive or only the used space.
- Start Encryption: Start the encryption process. This may take some time depending on the size of the drive and the amount of data.
Once encrypted, the drive will be locked and require the password or recovery key to access.
5.4. Considerations for Windows
- Hidden Attribute: The “Hidden” attribute is easily bypassed by enabling the “Show hidden items” option in File Explorer.
- Partition Hiding: Hiding a partition is more secure but requires caution to avoid accidentally deleting or formatting the partition.
- BitLocker: BitLocker provides strong encryption but is only available in certain Windows editions. Losing the password or recovery key will result in permanent data loss.
- Third-party Software: Consider using third-party encryption software like VeraCrypt for additional security and features.
6. Secure Cloud Storage Options
Cloud storage providers offer secure options for storing and hiding photos:
6.1. Tresorit
Tresorit is an end-to-end encrypted cloud storage service focused on privacy and security. It offers:
- End-to-End Encryption: All files are encrypted on your device before being uploaded to Tresorit’s servers, ensuring that only you can access them.
- Zero-Knowledge Encryption: Tresorit does not have access to your encryption keys, providing maximum privacy.
- Secure Sharing: You can share files and folders with others using encrypted links and set access permissions.
- File Versioning: Tresorit keeps track of previous versions of your files, allowing you to restore them if needed.
6.2. pCloud
pCloud is another secure cloud storage option with client-side encryption:
- pCloud Crypto: This feature allows you to create encrypted folders on your computer or mobile device. Files placed in these folders are encrypted before being uploaded to pCloud’s servers.
- Client-Side Encryption: The encryption process occurs on your device, ensuring that pCloud does not have access to your encryption keys.
- Secure Access: You can access your encrypted files using a password or biometric authentication.
- EU Data Residency: pCloud stores your data in data centers located in the European Union, which provides strong data protection under GDPR regulations.
6.3. SpiderOak One
SpiderOak One is a secure cloud storage and backup service with a focus on privacy:
- Zero-Knowledge Privacy: SpiderOak does not have access to your data, as all encryption is performed on your device.
- Secure Sharing: You can share files and folders with others using encrypted share rooms.
- Version Control: SpiderOak keeps track of previous versions of your files and allows you to restore them.
- No Third-Party Tracking: SpiderOak does not track your activity or sell your data to third parties.
6.4. Considerations for Cloud Storage
- Encryption: Choose a cloud storage provider that offers end-to-end or client-side encryption for maximum security.
- Privacy Policy: Review the provider’s privacy policy to understand how your data is handled and protected.
- Data Residency: Consider the location of the provider’s data centers and choose a provider that stores your data in a region with strong data protection laws.
- Two-Factor Authentication: Enable two-factor authentication for your cloud storage account to add an extra layer of security.
7. Best Practices for Photo Security
Beyond hiding photos, consider these best practices:
7.1. Strong Passwords
Use strong, unique passwords for all your accounts, including your device login, cloud storage, and photo vault apps. A password manager can help you generate and store strong passwords.
7.2. Two-Factor Authentication (2FA)
Enable two-factor authentication (2FA) whenever possible. This adds an extra layer of security by requiring a second verification method (e.g., a code sent to your phone) in addition to your password.
7.3. Regular Backups
Regularly back up your photos to a separate storage device or cloud service. This protects you from data loss due to device failure, theft, or accidental deletion.
7.4. Software Updates
Keep your operating system, apps, and security software up to date. Software updates often include security patches that protect you from vulnerabilities.
7.5. Device Security
Secure your devices with a strong passcode or biometric authentication (fingerprint or facial recognition). Enable device encryption to protect your data if your device is lost or stolen.
7.6. Network Security
Use a secure Wi-Fi network when transferring or accessing sensitive photos. Avoid using public Wi-Fi networks, as they are often unencrypted and vulnerable to eavesdropping. Consider using a VPN (Virtual Private Network) to encrypt your internet traffic.
7.7. Physical Security
Protect your devices from physical theft or unauthorized access. Store your devices in a secure location and be aware of your surroundings when using them in public.
8. Legal and Ethical Considerations
When hiding photos, be mindful of legal and ethical implications:
- Copyright: Ensure you have the legal right to possess and hide the photos. Respect copyright laws and intellectual property rights.
- Privacy of Others: Be mindful of the privacy of individuals depicted in the photos. Obtain consent before hiding photos that contain sensitive information about others.
- Data Protection Laws: Comply with data protection laws such as GDPR (General Data Protection Regulation) and CCPA (California Consumer Privacy Act) when handling personal data.
- Ethical Use: Use hidden photos responsibly and ethically. Avoid using them for illegal or harmful purposes.
9. Troubleshooting Common Issues
- Hidden Folder Not Showing: If you can’t find the hidden folder, make sure you have enabled the “Show hidden files and folders” option in your file manager or operating system settings.
- Password Forgotten: If you forget the password for your photo vault app or encrypted drive, you may need to use the recovery options provided by the software or service. If you lose your encryption key, your data may be permanently inaccessible.
- Data Loss: To prevent data loss, regularly back up your photos to a separate storage device or cloud service. Test your backups to ensure they are working correctly.
- App Compatibility: Ensure that the photo vault app or encryption software you are using is compatible with your operating system and device. Check for updates and compatibility information on the developer’s website.
10. Conclusion: Your Photo Privacy Toolkit
Mastering how to move photos to a hidden folder is an essential skill. Whether you’re using iOS, macOS, Android, or Windows, understanding the available methods and best practices can significantly enhance your photo security and privacy. Remember to use strong passwords, enable two-factor authentication, and keep your software updated to protect your valuable images. For more tips, tricks, and in-depth guides, visit dfphoto.net, your go-to resource for all things photography in the USA.
By following these steps, you can create a secure and organized photo library that protects your privacy and intellectual property. Explore dfphoto.net for more photography tips, techniques, and resources to elevate your skills and creativity. Address: 1600 St Michael’s Dr, Santa Fe, NM 87505, United States. Phone: +1 (505) 471-6001. Website: dfphoto.net. Visit dfphoto.net today to connect with a thriving photography community and elevate your skills through our expert tutorials and stunning photo collections. Discover the art of photographic safety with us.
FAQ: Moving Photos to Hidden Folders
1. How do I move photos to a hidden folder on my iPhone?
To hide photos on an iPhone, open the Photos app, select the photo(s) you want to hide, tap the share icon, and choose “Hide.” This moves the photos to the Hidden album, accessible under the Utilities section in the Albums tab. For extra security, you can disable the “Show Hidden Album” option in Settings > Photos.
2. Can I hide photos on my Android device without using a third-party app?
Yes, many Android devices allow you to hide photos using the built-in gallery app. Select the photo(s), look for the “More” or “Options” menu, and choose the “Hide” or “Move to Secure Folder” option. Alternatively, you can create a new folder in a file manager app and rename it by adding a period (.) at the beginning (e.g., “.PrivatePhotos”).
3. How secure is the Hidden album on iOS?
The Hidden album on iOS provides a basic level of privacy. It’s locked by default and requires Face ID, Touch ID, or your passcode to access. However, it’s not encrypted, so determined individuals could potentially find ways to access it. For more secure storage, consider using a third-party photo vault app or encrypting your device.
4. What is the best way to hide photos on Windows?
Windows offers several methods for hiding photos, including hiding files and folders using the “Hidden” attribute, hiding an entire partition using Disk Management, and encrypting a drive with BitLocker. BitLocker provides the strongest level of security but is only available in certain Windows editions.
5. How can I access hidden photos on macOS?
To access hidden photos on macOS, open the Photos app, go to the “View” menu in the menu bar, and select “Show Hidden Photo Album.” The Hidden album will then appear in the sidebar under “Photos.”
6. What are the benefits of using secure cloud storage for hiding photos?
Secure cloud storage providers like Tresorit, pCloud, and SpiderOak One offer end-to-end or client-side encryption, ensuring that only you can access your photos. They also provide features like secure sharing, file versioning, and data residency in regions with strong data protection laws.
7. Is it possible to password-protect a hidden folder on Windows?
Yes, you can password-protect a hidden folder on Windows by using encryption software like BitLocker (available in Windows Pro, Enterprise, and Education editions) or VeraCrypt. These tools allow you to encrypt the folder or drive and require a password or recovery key to access the contents.
8. What should I do if I forget the password for my photo vault app?
If you forget the password for your photo vault app, you may need to use the recovery options provided by the app. This may involve answering security questions, providing an email address, or using a recovery key. If you lose your encryption key, your data may be permanently inaccessible.
9. How often should I back up my hidden photos?
You should regularly back up your hidden photos to a separate storage device or cloud service. The frequency of backups depends on how often you add or modify photos. A weekly or monthly backup schedule is generally recommended.
10. Are there any legal considerations when hiding photos?
Yes, when hiding photos, be mindful of copyright laws, the privacy of individuals depicted in the photos, and data protection laws such as GDPR and CCPA. Ensure you have the legal right to possess and hide the photos and that you are not using them for illegal or harmful purposes.