Moving photos to a folder on your iPhone is simple, and dfphoto.net is here to guide you through it; this article provides a comprehensive guide on how to organize your photos into folders on your iPhone, making it easier to manage your memories. Discover tips and tricks for efficient photo management and optimization with digital photography, stock images, and visual storytelling.
1. Understanding Photo Management on iPhone
The iPhone’s Photos app is more than just a place to store your pictures; it’s a powerful tool for organization and creativity. But before diving into the how-to, let’s grasp the basics of how your iPhone handles photos.
1.1. Default Photo Storage
By default, all photos and videos you capture with your iPhone camera or save from other sources are stored in the “Recents” album. This album displays all your media in chronological order, making it easy to scroll through your entire collection.
1.2. Albums vs. Folders: What’s the Difference?
While the Photos app uses the term “Albums,” it’s important to understand that these aren’t the same as folders on your computer. Albums are more like playlists; they’re collections of photos and videos that can exist in multiple albums without duplicating the storage space. According to insights from the Santa Fe University of Art and Design’s Photography Department, understanding this distinction is crucial for efficient photo management on iOS.
1.3. The Role of iCloud Photos
If you use iCloud Photos, your entire photo library is stored in the cloud and synced across all your devices. This means any changes you make on your iPhone, such as adding photos to an album, will be reflected on your iPad and Mac as well.
2. Why Organize Photos into Albums?
Organizing your photos into albums offers numerous benefits, making it easier to find, share, and enjoy your memories.
2.1. Easier Navigation and Search
Instead of scrolling through thousands of photos in the “Recents” album, you can quickly find specific photos by navigating to the relevant album. For example, you can create albums for “Vacation Photos,” “Family Events,” or “Pet Pictures.”
2.2. Simplified Sharing
Sharing a collection of photos is much easier when they’re already organized into an album. You can quickly share an entire album with friends and family via iCloud, Messages, or email.
2.3. Creative Projects
Albums make it easy to create slideshows, photo books, and other creative projects. By organizing your photos into albums, you can quickly select the images you want to include in your project.
3. Creating New Albums on Your iPhone
Now, let’s get to the practical steps of creating new albums on your iPhone.
3.1. Step-by-Step Guide
- Open the Photos app on your iPhone.
- Tap the Albums tab at the bottom of the screen.
- Tap the + button in the upper-left corner.
- Choose New Album.
- Enter a name for your album (e.g., “Summer Vacation 2024”).
- Tap Save.
- Select the photos and videos you want to add to the album.
- Tap Done.
3.2. Using Smart Albums
Smart Albums automatically organize photos based on criteria you set, such as date, location, or keywords.
- Open the Photos app.
- Tap Albums.
- Tap the + button.
- Choose New Smart Album.
- Give your Smart Album a name.
- Set the criteria for the album (e.g., “Photos taken in Santa Fe”).
- Tap Done.
3.3. Album Naming Conventions
Choose clear and descriptive names for your albums to make them easy to identify. Consider using a consistent naming convention, such as “Year-Month-Event” (e.g., “2024-07-Summer Vacation”).
4. Adding Photos to Existing Albums
Once you’ve created your albums, you’ll want to add photos to them. Here’s how:
4.1. Adding Photos from the Library
- Open the Photos app.
- Tap the Library tab.
- Select the photos and videos you want to add to an album.
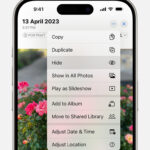
- Tap the Share button (the square with an arrow pointing up).
- Scroll down and tap Add to Album.
- Choose the album you want to add the photos to.
4.2. Adding Photos Directly from an Album
- Open the Photos app.
- Tap the Albums tab.
- Select the album you want to add photos to.
- Tap the More button (three dots in a circle).
- Tap Add Photos.
- Select the photos and videos you want to add.
- Tap Done.
4.3. Adding Photos from the Camera
You can also add photos to an album immediately after taking them:
- Open the Camera app.
- Take a photo or video.
- Tap the thumbnail of the photo in the lower-left corner.
- Tap the Share button.
- Tap Add to Album.
- Choose the album you want to add the photo to.
The “Add” button is easily found after the last photo in the album’s photo grid.
5. Moving Photos Between Albums
While you can’t “move” photos in the traditional sense (since they can exist in multiple albums), you can add them to a new album and then remove them from the original album if desired.
5.1. Adding to a New Album
Follow the steps in Section 4 to add the photos to the new album.
5.2. Removing from the Original Album
- Open the album you want to remove photos from.
- Tap Select in the upper-right corner.
- Select the photos you want to remove.
- Tap the Trash icon in the lower-right corner.
- Choose Remove from Album.
5.3. Understanding the Impact of iCloud Photos
If you’re using iCloud Photos, removing a photo from an album on one device will remove it from that album on all your devices. However, the photo will still remain in your library unless you choose to delete it entirely.
6. Deleting Photos from Albums and Your Library
It’s important to understand the difference between removing a photo from an album and deleting it from your library.
6.1. Removing from an Album
As mentioned earlier, removing a photo from an album only removes it from that specific collection. The photo remains in your library and other albums.
- Open the album you want to remove photos from.
- Tap Select.
- Select the photos you want to remove.
- Tap the Trash icon.
- Choose Remove from Album.
6.2. Deleting from Your Library
Deleting a photo from your library removes it from all albums and your entire iCloud Photos library.
- Open the Photos app.
- Tap the Library tab.
- Select the photos you want to delete.
- Tap the Trash icon.
- Choose Delete.
6.3. Recovering Deleted Photos
Deleted photos are moved to the “Recently Deleted” album, where they remain for 30 days before being permanently deleted. You can recover deleted photos from this album:
- Open the Photos app.
- Tap the Albums tab.
- Scroll down and tap Recently Deleted.
- Select the photos you want to recover.
- Tap Recover.
Accessing the Photos app on your iPhone is the first step to managing your photo albums.
7. Searching Within Albums
The Photos app makes it easy to find specific photos within an album.
7.1. Using the Search Bar
- Open the album you want to search in.
- Swipe down to reveal the search bar at the top of the screen.
- Enter your search term (e.g., “beach,” “birthday,” “dog”).
- The Photos app will display photos that match your search term.
7.2. Searching by Location, Date, or Keywords
You can also search for photos based on location, date, or keywords:
- Open the album you want to search in.
- Tap the More button (three dots).
- Tap Search.
- Enter your search criteria.
7.3. Leveraging AI-Powered Search
The Photos app uses AI to identify objects, scenes, and people in your photos, making it easier to find what you’re looking for. For example, you can search for “sunset,” “mountains,” or “smiling faces.”
The “More” button gives you access to the search feature.
8. Best Practices for iPhone Photo Management
To keep your photo library organized and manageable, follow these best practices:
8.1. Regular Organization
Set aside time each week or month to organize your photos into albums. This will prevent your library from becoming overwhelming.
8.2. Delete Unnecessary Photos
Be ruthless about deleting duplicate, blurry, or otherwise unwanted photos. This will free up storage space on your iPhone and iCloud.
8.3. Use Smart Albums
Take advantage of Smart Albums to automatically organize photos based on criteria you set.
8.4. Backup Your Photos
Regularly back up your photos to iCloud, a computer, or an external hard drive to prevent data loss.
8.5. Consider Third-Party Apps
Explore third-party photo management apps like Google Photos or Adobe Lightroom Mobile, which offer additional features and organizational tools.
9. Advanced Tips and Tricks
Ready to take your iPhone photo management skills to the next level? Here are some advanced tips and tricks:
9.1. Creating Nested Albums
While the Photos app doesn’t directly support nested albums (albums within albums), you can create a similar effect by using naming conventions. For example, you could create albums named “2024 – Vacation” and “2024 – Vacation – Beach” to create a hierarchy.
9.2. Using Keywords and Captions
Add keywords and captions to your photos to make them easier to find in searches. You can add keywords in the Photos app by tapping the Info button (the “i” in a circle) and adding tags in the “Add a Caption” field.
9.3. Hiding Photos
If you have photos you want to keep private but don’t want to delete, you can hide them:
- Select the photos you want to hide.
- Tap the Share button.
- Scroll down and tap Hide.
Hidden photos are moved to the “Hidden” album, which is only visible if you enable it in the Photos settings.
9.4. Sharing Albums with iCloud
You can share albums with friends and family using iCloud Shared Albums:
- Open the album you want to share.
- Tap the People icon.
- Tap Share Album.
- Invite people to the album via email or Messages.
9.5. Editing Photos Directly in the Photos App
The Photos app offers a range of editing tools, allowing you to enhance your photos without leaving the app. You can adjust exposure, contrast, color, and more.
10. Troubleshooting Common Issues
Encountering problems while managing your photos on your iPhone? Here are some solutions to common issues:
10.1. Photos Not Syncing with iCloud
If your photos aren’t syncing with iCloud, make sure you’re signed in to iCloud on your iPhone and that iCloud Photos is enabled in the settings. Also, check your iCloud storage to ensure you have enough space.
10.2. Photos Missing from Albums
If photos are missing from an album, make sure you haven’t accidentally deleted them or removed them from the album. Also, check the “Recently Deleted” album to see if they’re there.
10.3. Photos Not Showing Up in Search
If photos aren’t showing up in search, make sure you’ve entered the correct search term and that the photos have been indexed by the Photos app.
10.4. Slow Performance
If the Photos app is running slowly, try closing other apps and restarting your iPhone. Also, make sure you have enough free storage space on your device.
11. How dfphoto.net Can Help
At dfphoto.net, we’re passionate about helping you capture and preserve your memories. Here’s how we can assist you with your iPhone photography:
- In-Depth Tutorials: We offer detailed tutorials on iPhone photography techniques, including composition, lighting, and editing.
- Gear Recommendations: Our expert reviews and buying guides will help you choose the best iPhone accessories, such as lenses, tripods, and lighting equipment.
- Inspiration and Ideas: Explore our galleries of stunning iPhone photos for inspiration and ideas for your own photography projects.
- Community Forum: Connect with other iPhone photographers in our community forum, where you can share your work, ask questions, and get feedback.
- Photo Editing Tips: Learn how to enhance your iPhone photos using the built-in editing tools and third-party apps.
Visit dfphoto.net today to discover a world of iPhone photography resources and inspiration. Address: 1600 St Michael’s Dr, Santa Fe, NM 87505, United States. Phone: +1 (505) 471-6001. Website: dfphoto.net.
12. The Future of iPhone Photo Management
As technology evolves, iPhone photo management is likely to become even more seamless and intuitive. Here are some trends to watch for:
- Improved AI-Powered Organization: AI will play an increasingly important role in automatically organizing and tagging your photos.
- Enhanced Search Capabilities: Search will become even more powerful, allowing you to find photos based on more specific criteria.
- Augmented Reality (AR) Integration: AR could be used to overlay information on your photos, such as location data, historical facts, or even virtual annotations.
- Cloud-Based Collaboration: Cloud services will make it easier to collaborate on photo projects with friends and family.
- More Advanced Editing Tools: The Photos app will continue to gain more advanced editing tools, rivaling those found in professional photo editing software.
13. Conclusion: Take Control of Your Photo Library
Organizing your photos into albums on your iPhone is a simple yet powerful way to take control of your memories. By following the steps outlined in this guide, you can create a photo library that’s easy to navigate, share, and enjoy.
Remember, photography is more than just taking pictures; it’s about capturing moments and preserving memories. And with a well-organized photo library, you can relive those memories anytime, anywhere.
14. Call to Action
Ready to take your iPhone photography skills to the next level? Visit dfphoto.net today to discover a wealth of resources, tutorials, and inspiration. Explore our in-depth guides on iPhone photography techniques, gear recommendations, and photo editing tips. Join our community forum to connect with other passionate photographers and share your work. Let dfphoto.net be your guide to capturing and preserving your most precious memories.
15. FAQ: How to Move Photos to Folder on iPhone
15.1. Can I create folders within folders in the iPhone Photos app?
No, the iPhone Photos app doesn’t support nested folders. However, you can achieve a similar effect by using a consistent naming convention for your albums (e.g., “2024 – Vacation” and “2024 – Vacation – Beach”).
15.2. How do I move photos from one album to another on my iPhone?
You can’t “move” photos in the traditional sense, as photos can exist in multiple albums. Instead, add the photos to the new album and then remove them from the original album if desired.
15.3. Will deleting a photo from an album delete it from my iPhone library?
No, removing a photo from an album only removes it from that specific collection. The photo will remain in your library and other albums.
15.4. How do I permanently delete photos from my iPhone?
To permanently delete photos, delete them from your library. Then, go to the “Recently Deleted” album and delete them from there as well.
15.5. Can I recover deleted photos from my iPhone?
Yes, deleted photos are moved to the “Recently Deleted” album, where they remain for 30 days before being permanently deleted. You can recover them from this album within that time.
15.6. How do I search for specific photos within an album on my iPhone?
Open the album you want to search in and use the search bar at the top of the screen. You can search by keywords, location, date, or other criteria.
15.7. What are Smart Albums on iPhone?
Smart Albums automatically organize photos based on criteria you set, such as date, location, or keywords.
15.8. How do I share an album with friends and family on my iPhone?
You can share albums using iCloud Shared Albums. Open the album, tap the “People” icon, and invite people to the album via email or Messages.
15.9. How can dfphoto.net help me with iPhone photo management?
dfphoto.net offers in-depth tutorials, gear recommendations, inspiration, a community forum, and photo editing tips to help you master iPhone photography.
15.10. Are there any third-party apps that can help with iPhone photo management?
Yes, consider third-party photo management apps like Google Photos or Adobe Lightroom Mobile, which offer additional features and organizational tools.