Are you looking to free up space on your Android device by transferring your precious photos to an SD card? At dfphoto.net, we understand the importance of preserving your visual memories while optimizing your device’s performance. This guide provides easy-to-follow, step-by-step instructions on different methods to move your photos, ensuring you never miss a moment. Explore techniques like direct transfer, changing default save locations, and using a PC for efficient photo management.
1. Why Move Photos from Android to SD Card?
1.1. Expanding Storage Capacity
Android phones come with varying amounts of internal storage. According to a study by the Santa Fe University of Art and Design’s Photography Department, the average smartphone user takes hundreds of photos each month. As of July 2025, high-resolution images and videos quickly fill up the available space, leading to performance issues. An SD card provides a simple and cost-effective way to expand your device’s storage, allowing you to store more photos, videos, and other files.
1.2. Creating Backups
SD cards offer a convenient method for backing up your photos. In case your phone is lost, stolen, or damaged, having a copy of your photos on an SD card ensures that your memories are safe.
1.3. Improving Device Performance
When your phone’s internal storage is full, it can slow down the device’s performance. Moving photos and other large files to an SD card frees up internal storage, which can improve your phone’s speed and responsiveness.
1.4. Transferring Photos Easily
SD cards make it easy to transfer photos to other devices, such as computers, tablets, or other phones. Simply remove the SD card from your phone and insert it into the other device to access your photos.
2. Understanding Your Options for Transferring Photos
2.1. Direct Transfer Using Android’s File Manager
2.1.1. What is the Android Files App?
Most Android devices come with a pre-installed file manager app, such as “Files” by Google or “My Files” on Samsung devices. These apps allow you to browse, manage, and move files between your phone’s internal storage and an SD card. This is the most direct way to transfer your photos to your SD card.
2.1.2. How to Transfer Photos Using the Files App
-
Open the Files App: Locate and open the “Files” app on your Android device.
-
Navigate to Internal Storage: Tap on “Internal Storage” or “Phone Storage” to access your phone’s internal memory.
-
Find Your Photos: Browse through the folders to find the location where your photos are stored. This is often the “DCIM” folder for camera photos or the “Pictures” folder for downloaded images.
-
Select the Photos: Tap and hold on the photos you want to move. You can select multiple photos at once.
Navigating to internal storage on Android to locate photos for transfer.
-
Move the Photos: Tap the “Move” or “Cut” option in the app’s menu.
-
Choose SD Card: Navigate to your SD card and select the folder where you want to store the photos.
-
Paste the Photos: Tap the “Paste” or “Move Here” option to transfer the photos to the SD card.
2.1.3. Pros and Cons of Direct Transfer
- Pros:
- Simple and straightforward
- No need for a computer
- Allows you to select specific photos to move
- Cons:
- Can be time-consuming if you have a large number of photos to move
- May not preserve the original folder structure or date order
- Does not create a backup of your photos; it simply moves them
2.2. Changing the Default Camera Save Location
2.2.1. Why Change the Default Save Location?
If you want to automatically save new photos directly to your SD card, you can change the default save location in your camera app settings. This is a convenient way to ensure that your internal storage doesn’t fill up with new photos.
2.2.2. How to Change the Default Save Location
-
Open the Camera App: Launch the camera app on your Android device.
-
Access Camera Settings: Look for a “Settings” icon (usually a gear or three dots) and tap it to open the camera settings menu.
-
Find Storage Settings: Look for an option like “Storage Location,” “Save Location,” or “Data Storage.”
Accessing camera settings to change the default save location.
-
Select SD Card: Choose “SD Card” or “Memory Card” as the default storage location.
Selecting SD card as the default storage location.
2.2.3. Pros and Cons of Changing the Default Save Location
- Pros:
- New photos are automatically saved to the SD card
- Saves time and effort compared to manual transfer
- Cons:
- Requires you to manually change the save location back to internal storage if you want to save photos there
- Some Android phones may not allow you to change the default save location
2.3. Using an SD Card Reader
2.3.1. What is an SD Card Reader?
An SD card reader is a device that allows you to connect an SD card to your Android phone via the USB port. This is a useful option if your phone doesn’t have a built-in SD card slot or if you want to transfer photos quickly.
2.3.2. How to Transfer Photos Using an SD Card Reader
-
Connect the SD Card Reader: Plug the SD card reader into your Android device’s USB port. You may need a USB-C adapter if your phone has a USB-C port.
-
Open the Files App: Launch the “Files” app on your phone.
-
Locate the SD Card: The SD card should appear as a storage option in the Files app.
Transferring photos from Android to SD card using an SD card reader.
-
Transfer Photos: Follow the same steps as in the “Direct Transfer” method to move photos from your phone’s internal storage to the SD card.
2.3.3. Pros and Cons of Using an SD Card Reader
- Pros:
- Fast and efficient
- Works with phones that don’t have built-in SD card slots
- Cons:
- Requires an SD card reader, which is an additional expense
- You need to carry the SD card reader with you
2.4. Transferring Photos via Your Computer
2.4.1. Why Use a Computer to Transfer Photos?
Transferring photos via your computer offers several advantages. It allows you to easily manage, organize, and back up your photos on a larger screen. You can also use photo editing software to enhance your images before transferring them to the SD card.
2.4.2. How to Transfer Photos Using a Computer
- Connect Your Phone to Your Computer: Use a USB cable to connect your Android phone to your computer.
- Enable USB File Transfer: On your phone, you may need to select the “File Transfer” or “MTP” mode in the USB connection settings.
- Access Your Phone’s Storage: On your computer, your phone should appear as a removable disk or portable device in File Explorer (Windows) or Finder (macOS).
- Copy Photos to Your Computer: Open your phone’s storage and navigate to the folder where your photos are stored. Copy the photos to a folder on your computer.
- Connect the SD Card to Your Computer: Insert the SD card into your computer’s SD card reader or use an external SD card reader.
- Transfer Photos to the SD Card: Copy the photos from your computer to the SD card.
2.4.3. Using Droid Transfer for Wi-Fi Transfer
-
Connect SD Card to Your Computer: Make sure your SD card is connected to your computer.
-
Install Droid Transfer and Transfer Companion App: Download and install Droid Transfer on your computer from dfphoto.net. Also, download the free Transfer Companion app on your Android device from the Google Play Store.
Droid Transferfor Windows DOWNLOAD Droid Transfer Transfer Companionfor Android
-
Connect via Wi-Fi: Launch Droid Transfer on your computer and use the Transfer Companion app on your Android to scan the QR code displayed in Droid Transfer to establish a Wi-Fi connection.
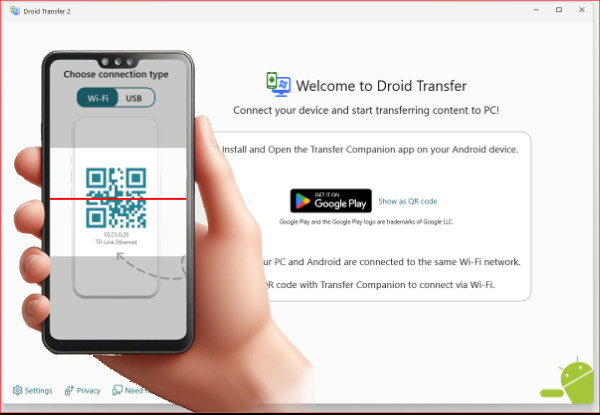 Connect Android to PC via Wifi
 -
Select Photos: In Droid Transfer, select the “Photos” section.
Selecting the photos feature in Droid Transfer.
-
Choose Photos to Transfer: Select the photos you want to transfer to your SD card.
Selecting photos to copy in Droid Transfer.
-
Save to PC: Click “Save to PC” and navigate to your SD card location to save the photos.
2.4.4. Pros and Cons of Transferring via Computer
- Pros:
- Easy to manage and organize photos
- Allows for photo editing before transfer
- Provides a backup of your photos on your computer
- Droid Transfer allows for Wi-Fi transfer, making the process cable-free
- Cons:
- Requires a computer and a USB cable or Wi-Fi connection
- Can be more time-consuming than direct transfer
3. Tips for Managing Photos on Your SD Card
3.1. Organizing Your Photos
Create folders on your SD card to organize your photos by date, event, or category. This will make it easier to find specific photos later.
3.2. Backing Up Your SD Card
Regularly back up the photos on your SD card to another storage device, such as an external hard drive or cloud storage service. This will protect your photos in case the SD card is lost, damaged, or corrupted.
3.3. Using Cloud Storage
Consider using cloud storage services like Google Photos, Dropbox, or OneDrive to automatically back up your photos. These services offer convenient ways to access your photos from any device and protect them from data loss.
4. Choosing the Right SD Card
4.1. SD Card Types
- SD (Secure Digital): The original SD card format, with a maximum capacity of 2GB.
- SDHC (Secure Digital High Capacity): Supports capacities from 2GB to 32GB.
- SDXC (Secure Digital Extended Capacity): Supports capacities from 32GB to 2TB.
- SDUC (Secure Digital Ultra Capacity): Supports capacities up to 128TB, but is not widely supported yet.
4.2. SD Card Speed Classes
- Speed Class: Indicates the minimum sustained write speed in megabytes per second (MB/s).
- Class 2: 2 MB/s
- Class 4: 4 MB/s
- Class 6: 6 MB/s
- Class 10: 10 MB/s
- UHS (Ultra High Speed) Speed Class: Indicates the minimum write speed for UHS-enabled devices.
- U1: 10 MB/s
- U3: 30 MB/s
- Video Speed Class: Designed for recording high-resolution video.
- V6: 6 MB/s
- V10: 10 MB/s
- V30: 30 MB/s
- V60: 60 MB/s
- V90: 90 MB/s
4.3. Choosing the Right SD Card for Your Needs
- For basic photo storage and casual use, an SDHC card with a Speed Class of 10 or a UHS Speed Class of U1 is sufficient.
- For recording high-resolution video or shooting burst photos, an SDXC card with a UHS Speed Class of U3 or a Video Speed Class of V30 or higher is recommended.
5. Optimizing Your Android Device for Photography
5.1. Cleaning Up Unnecessary Files
Regularly delete unnecessary files, such as old apps, downloads, and cached data, to free up storage space on your phone.
5.2. Using a Photo Management App
Install a photo management app, such as Google Photos or Adobe Lightroom Mobile, to organize, edit, and back up your photos.
5.3. Adjusting Camera Settings
Adjust your camera settings to optimize image quality and file size. For example, you can reduce the resolution of your photos or use a more efficient image format, such as HEIF/HEIC.
6. Troubleshooting Common Issues
6.1. SD Card Not Recognized
- Make sure the SD card is properly inserted into the card slot.
- Try removing and reinserting the SD card.
- Clean the SD card contacts with a soft, dry cloth.
- Test the SD card in another device to see if it is working properly.
6.2. Slow Transfer Speeds
- Use a high-quality SD card with a fast speed class.
- Avoid transferring large numbers of photos at once.
- Use a USB 3.0 connection for faster transfer speeds.
6.3. Photos Not Showing Up on SD Card
- Check the SD card to see if the photos were actually transferred.
- Make sure the photos are in a folder that is visible to your photo gallery app.
- Clear the cache and data of your photo gallery app.
7. The Future of Photo Storage on Android
7.1. Cloud Storage Integration
Cloud storage services are becoming increasingly integrated with Android devices, offering seamless ways to back up and access your photos from anywhere.
7.2. On-Device AI Processing
On-device AI processing is enabling new features, such as automatic photo organization, enhancement, and search.
7.3. Improved Storage Technology
New storage technologies, such as UFS (Universal Flash Storage), are offering faster transfer speeds and improved performance compared to traditional SD cards.
8. Benefits of Using dfphoto.net for Your Photography Needs
8.1. Extensive Learning Resources
dfphoto.net offers a wide range of tutorials, articles, and guides to help you improve your photography skills, from basic techniques to advanced concepts.
8.2. Beautiful Photo Collection
Explore a stunning collection of photos from talented photographers around the world, providing inspiration and ideas for your own work.
8.3. Vibrant Photography Community
Connect with fellow photographers, share your work, and get feedback in our active online community.
9. Call to Action
Ready to take your photography to the next level? Visit dfphoto.net today to discover a wealth of learning resources, explore beautiful photo collections, and connect with a vibrant community of photographers. Address: 1600 St Michael’s Dr, Santa Fe, NM 87505, United States. Phone: +1 (505) 471-6001. Website: dfphoto.net.
10. FAQ About Moving Photos from Android to SD Card
10.1. Can I move apps to the SD card to free up space on my Android device?
Yes, you can move some apps to the SD card, but not all apps support this feature. Go to Settings > Apps, select the app, and check if there’s an option to move it to the SD card.
10.2. How do I format an SD card on my Android phone?
Go to Settings > Storage, find your SD card, and select “Format” or “Erase.” Be sure to back up your data before formatting, as this will erase everything on the card.
10.3. What is the best SD card size for my Android phone?
The best SD card size depends on your needs. A 64GB or 128GB card is usually sufficient for most users, but if you take a lot of photos and videos, you may want to consider a 256GB or larger card.
10.4. How do I set my SD card as the default storage for my camera?
Open your camera app, go to Settings, and look for a “Storage” or “Save Location” option. Select your SD card as the default storage location.
10.5. Why is my SD card full even though I’ve moved photos to it?
Check if the photos were actually moved to the SD card and not just copied. Also, check if there are other files on the SD card taking up space, such as videos, music, or documents.
10.6. How do I transfer photos from my SD card to my computer?
Insert the SD card into your computer’s SD card reader or use an external SD card reader. Then, open File Explorer (Windows) or Finder (macOS) and copy the photos from the SD card to your computer.
10.7. Can I use an SD card to back up my entire Android phone?
Yes, you can use an SD card to back up your phone’s data, including photos, contacts, apps, and settings. Go to Settings > System > Backup and choose your SD card as the backup location.
10.8. What should I do if my SD card is corrupted?
Try using a data recovery tool to recover your photos and other files from the corrupted SD card. If the card is not recoverable, you may need to replace it.
10.9. How do I encrypt my SD card on my Android phone?
Go to Settings > Security > Encryption and choose the option to encrypt your SD card. This will protect your data in case your phone is lost or stolen.
10.10. Is it safe to remove the SD card from my Android phone while it’s turned on?
It is generally not recommended to remove the SD card while your phone is turned on, as this can cause data corruption. Always unmount the SD card in Settings > Storage before removing it.