In today’s digital age, we’re constantly accumulating digital files, especially photos and videos. Managing these growing collections can become overwhelming. While Google Photos offers a convenient platform for viewing and basic photo management, Google Drive provides a more robust and versatile solution for organizing and utilizing these assets, particularly when integrated with Digital Asset Management (DAM) systems. If you’re looking to enhance your file management and make your photos more accessible for various workflows, understanding How To Move Google Photos To Google Drive is a crucial step.
This guide will walk you through the essential differences between Google Photos and Google Drive and provide two straightforward methods to transfer your precious memories, ensuring you can efficiently manage and utilize your visual content.
Understanding the Key Differences Between Google Photos and Google Drive
While both Google Photos and Google Drive are Google’s cloud storage services, they cater to distinct needs and functionalities. We’ve previously explored a detailed comparison of Google Drive and Google Photos, but here’s a quick overview of their core differences:
Google Drive is designed as a comprehensive cloud storage solution for all types of files, from documents and spreadsheets to videos and, of course, photos. Moving your photos from Google Photos to Google Drive unlocks several advantages:
- Advanced Search Capabilities: Google Drive excels in file search, allowing you to locate photos not just by date, but also by file type, owner, and even content within documents (if associated).
- Organization and Metadata: Google Drive offers superior organizational tools like folders, labels, and the potential for integration with DAM systems. These systems allow for detailed metadata tagging, version control, and collaborative workflows, far beyond the basic album structure of Google Photos.
- DAM System Integration: For professionals and businesses, connecting a Google Drive digital asset management (DAM) system to your Google Drive significantly expands its capabilities. A DAM system enhances search, organization, collaboration, and distribution of your digital assets, streamlining workflows and maximizing efficiency.
- Backup and Synchronization: Google Drive provides robust backup and offline access features, ensuring your files are synchronized across devices and available even without an internet connection.
Google Photos, on the other hand, is specifically designed for photo and video storage and sharing. While it offers features like automatic backup from mobile devices and basic editing tools, it lacks the advanced organizational and management features of Google Drive, especially when considering professional applications.
Transferring Photos from Google Photos to Google Drive: Step-by-Step Methods
Now, let’s delve into the practical methods for moving your photos. We’ll cover two main approaches: manual download and upload, and using the Google Takeout service.
Method 1: Manual Download and Upload
This method is ideal for transferring a small selection of photos or individual images. It’s a straightforward process but can become time-consuming for large libraries.
1. Access Google Photos: Begin by logging into your Google Photos account. Navigate to Google Photos in your web browser.
2. Select Photos: Locate the photos you wish to transfer. To select a photo, click the circle in the top-left corner of the image thumbnail. A checkmark will appear indicating selection. For selecting a series of consecutive photos, click the first photo, hold down the Shift key, and click the last photo in the sequence.
3. Initiate Download: Once you’ve selected your photos, click the three vertical dots icon (More options) located in the top-right corner of the Google Photos interface.
4. Choose Download: From the dropdown menu, select Download. Alternatively, you can use the keyboard shortcut Shift + D.
5. Specify Download Location: Your browser will prompt you to choose a location on your computer to save the downloaded photos. If you’ve selected multiple photos, they will be downloaded as a ZIP archive. You’ll need to extract the contents of this archive before proceeding to the next step.
6. Access Google Drive: Open Google Drive by navigating to Google Drive in your browser or using the Google Drive desktop application.
7. Upload to Google Drive: To move your photos from your computer to Google Drive, you have two options:
*   **Drag and Drop:** Open the folder containing your downloaded (and unzipped, if applicable) photos on your computer. Drag and drop the folder or selected photo files directly into your Google Drive window in your browser.
*   **Upload via New Menu:** In Google Drive, click the **+ New** button (usually located in the top-left corner). Select either **Folder upload** (if you have a folder of photos) or **File upload** (for individual photos).  Navigate to the location of your photos on your computer and select them for upload.
While simple, this manual method can be inefficient and slow, especially when dealing with large photo and video collections or when you have a slower internet connection. Transferring large video files, in particular, can be a lengthy process.
Method 2: Utilizing Google Takeout Service
For a more efficient and streamlined approach, especially for transferring large volumes of photos, Google Takeout is the recommended service. This method allows you to export your Google Photos directly to Google Drive without the need for manual downloading and uploading of individual files.
1. Access Google Takeout: Open Google Takeout by visiting Google Takeout directly in your browser, or you can find a link to Takeout within your Google Photos settings.
2. Deselect All (Optional but Recommended): By default, Google Takeout selects all Google services for export. If your goal is solely to move Google Photos, it’s advisable to click the Deselect all button to streamline the process and avoid exporting data from other Google services.
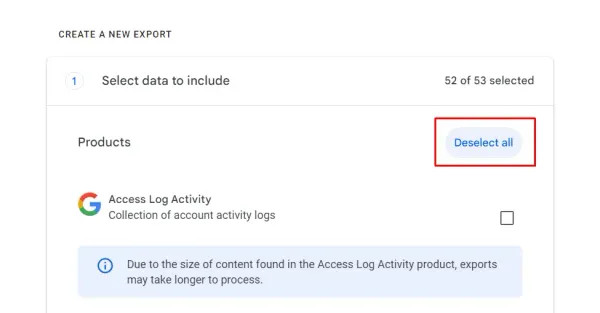 Deselect All option in Google Takeout to choose specific Google services for export
3. Select Google Photos: Scroll down the list of Google services and locate Google Photos. Check the box next to Google Photos to select it for export.
 Selecting Google Photos service in Google Takeout for data export
4. Configure Export Destination: Scroll to the bottom of the page and click the Next step button. In the “Destination” section, choose Add to Drive from the dropdown menu. This specifies that you want to transfer your Google Photos directly to your Google Drive.
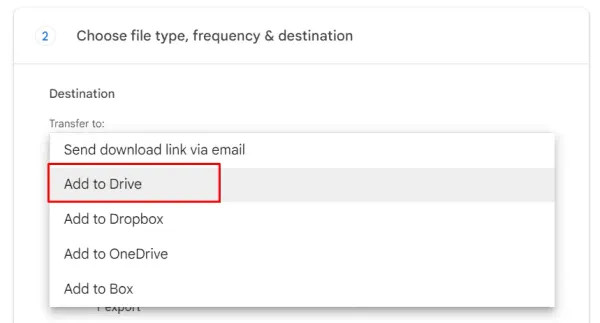 Choosing Google Drive as the destination for exported Google Photos using Google Takeout
5. Customize Export Settings (Optional): You can further customize your export by adjusting settings like:
*   **File type (.zip recommended):**  The default and recommended file type is `.zip`.
*   **Maximum archive size (10 GB default):** If your photo library is large, it will be split into multiple archives. The default maximum size is 10 GB, which is generally suitable. You can adjust this if needed.
*   **Frequency (Export once recommended):** For a one-time transfer, select "Export once." You can also set up scheduled exports if you wish to regularly back up your Google Photos to Google Drive.
6. Create Export: After configuring your settings, click the Create export button at the bottom of the page. Google Takeout will begin processing your request and will display an estimated timeframe for the export to complete. The duration depends on the size of your Google Photos library.
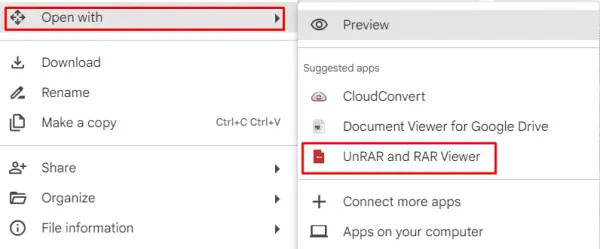
7. Access Photos in Google Drive: Once the export process is finished, you will receive an email notification. Your exported Google Photos archive(s) will be located in the My Drive section of your Google Drive, typically among the most recently modified files. The archive will be named something like “Google Photos.zip”. You can then unzip this archive directly within Google Drive using built-in tools or Workspace add-ons, without needing to download it to your local device.
 Google Drive showing the ZIP archive created by Google Takeout containing exported Google Photos
Using Google Takeout is the most efficient and resource-friendly method for transferring your Google Photos to Google Drive, especially for large collections. It minimizes manual effort and leverages Google’s infrastructure for a faster transfer process.
Efficiently Managing Your Google Drive Storage Post-Transfer
Simply knowing how to upload Google Photos to Google Drive is only the first step. To truly maximize the benefits of Google Drive for your photos, efficient organization is key. Furthermore, for enhanced workflows and professional use, consider integrating a Digital Asset Management (DAM) system like Pics.io with your Google Drive.
A DAM system significantly elevates your ability to manage, search, and utilize your photos and videos. With Pics.io, for example, you can:
- Enrich Metadata: Add comprehensive metadata, including custom fields, to your photos, making them easily searchable and categorized.
- Create Collections: Organize photos into curated collections for projects, events, or specific themes.
- Control Access: Set granular access permissions for users and teams, ensuring secure collaboration.
- Implement Version Control: Track changes and manage different versions of your photos.
- Automate Workflows: Streamline processes like review, approval, and distribution of your visual assets.
Beyond DAM integration, even within standard Google Drive, you can implement organizational strategies. As detailed in our guide on how to organize Google Drive, consider these tips:
- Color-Code Folders: Use color labels to visually categorize folders based on project, client, or photo type.
- Utilize Stars and Labels: Mark important files with stars for quick access and use labels to create logical connections between related files across different folders.
- Establish Priority Workspaces: In Google Workspace, create dedicated workspaces for high-priority projects or frequently accessed photo collections.
- Add File and Folder Descriptions: Provide clear descriptions to folders and key files to enhance searchability and context.
- Regularly Archive or Delete: Periodically archive or delete outdated or irrelevant photos to keep your Google Drive clutter-free and optimized.
Conclusion
Moving your photos from Google Photos to Google Drive is a strategic step towards better organization, enhanced management, and unlocking the potential for professional workflows, especially when combined with a DAM system. Whether you opt for the manual download and upload method for a small number of files or leverage the efficiency of Google Takeout for larger libraries, the process is straightforward.
By implementing effective organizational strategies within Google Drive and considering the power of DAM integration, you can transform your photo collection from a simple archive into a valuable and easily accessible asset for both personal and professional use.
Give Pics.io DAM a try
free 7-day trial
Did you enjoy this article? Give Pics.io a try — or book a demo with us, and we’ll be happy to answer any of your questions.