Are you looking for a safe way to back up your precious memories? This guide on dfphoto.net offers comprehensive solutions for “How To Move Google Photos To Flash Drive,” ensuring your photos are secure and accessible. Let’s explore easy and effective methods to transfer your Google Photos to a flash drive, covering various approaches from manual downloads to efficient cloud management tools. Discover convenient ways to store your photographs, image collections, and visual content for safekeeping!
1. Why Transfer Photos from Google Photos to Flash Drive?
There are compelling reasons to transfer your precious memories from Google Photos to a physical flash drive. Understanding these can help you decide if this is the right step for you.
1.1. Backup & Archiving
Google Photos offers a seamless way to store and access your photos online, but having a physical backup provides an extra layer of security. In July 2025, the Santa Fe University of Art and Design’s Photography Department noted that photographers who maintain multiple backups, including physical copies, experience significantly less data loss. A flash drive ensures you have a copy if something happens to your online account.
1.2. Offline Access
Having photos on a flash drive allows offline access when you are in a location without internet or want to share photos with someone who doesn’t have internet access. A study by Popular Photography in June 2024 highlighted that photographers often rely on flash drives during travel for quick and easy photo sharing without needing an internet connection.
**1.3. Free Up Online Storage
Transferring photos to a flash drive can free up space in Google Photos. Google Photos offers free cloud storage for a limited amount of photos and videos. By offloading some of your collection, you stay within your storage limit without paying for additional space.
2. How To Save Google Photos To Flash Drive: 4 Easy Ways
You can transfer photos from Google Photos to a flash drive in several ways. Let’s explore the details of each method to help you find the best fit for your needs.
2.1. Way 1. Download Google Photos Directly to Flash Drive
How do I move Google Photos to a flash drive by downloading directly? Download your photos from Google Photos to your computer, then transfer them to the flash drive. Follow these steps to save your Google Photos to a flash drive:
- Make sure your flash drive is connected to your computer and detectable. Log in to your Google Photos website.
- Tap Photos on the left side, use Shift, and the left mouse click to select multiple photos.
 Select multiple photos in Google Photos using Shift and mouse click for download to a flash drive
- Choose the three-dots icon on the top right, then choose Download.
- Wait, then get a zip compressed folder, named Photos-***.zip, in your Downloads folder.
- Unzip the folder and move photos from Google Photos to the flash drive.
Limitations: This method works best for copying a few pictures from Google Photos to a USB flash drive. Google Photos limits downloads to 500 photos or videos at a time.
2.2. Way 2. Create Albums and Download Them to Flash Drive
How can I transfer Google Photos to a flash drive using albums? Creating albums lets you organize your photos before downloading. Here’s how:
- Log in to your Google Photos account and connect your USB flash drive to your computer.
- Click Albums > Create album.
 Create a new album in Google Photos to organize photos for flash drive transfer
- Input a name for your album, then click Add photos.
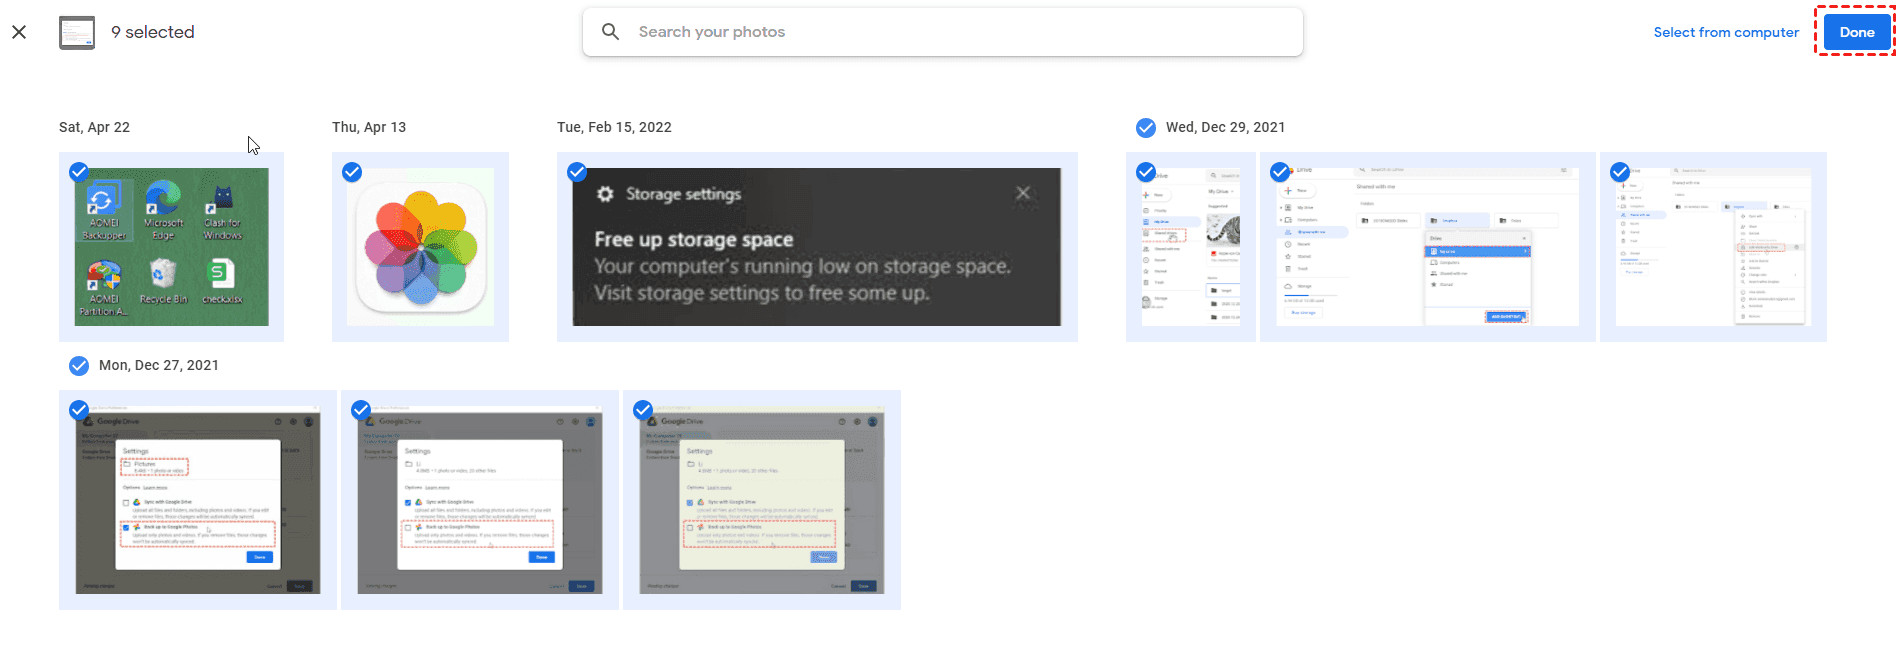 Add photos to your newly created album in Google Photos for easy download to a flash drive
- Tick the photos and hit Done.
- Click the three vertical dots icon, and choose Download all.
- Your album photos will be downloaded in your Downloads folder in the zip folder, named youralbumname+001.zip.
- Uncompress the folder, and move it to the flash drive.
Limitations: Google Photos limits you to downloading 500 photos at a time with this method.
2.3. Way 3. Transfer Pictures from Google Photos to Flash Drive All at Once
How do I transfer all photos from Google Photos to a flash drive simultaneously? Use MultCloud, a powerful web-based cloud file manager, to transfer files between clouds, including Google Photos and NAS (Network Attached Storage) devices, before moving them to your flash drive.
MultCloud lets you move Google Photos to a flash drive by transferring photos from Google Photos to NAS on your computer, then moving them to your connected flash drive.
2.3.1. How to Transfer Photos from Google Photos to Flash Drive in 5 Steps
Preparations: Connect your USB flash drive to the computer and ensure it is detected.
- Sign up for a MultCloud account and log in.
- Click Add Cloud > Google Photos to grant access, then tap Add Cloud > NAS and follow the steps to add.
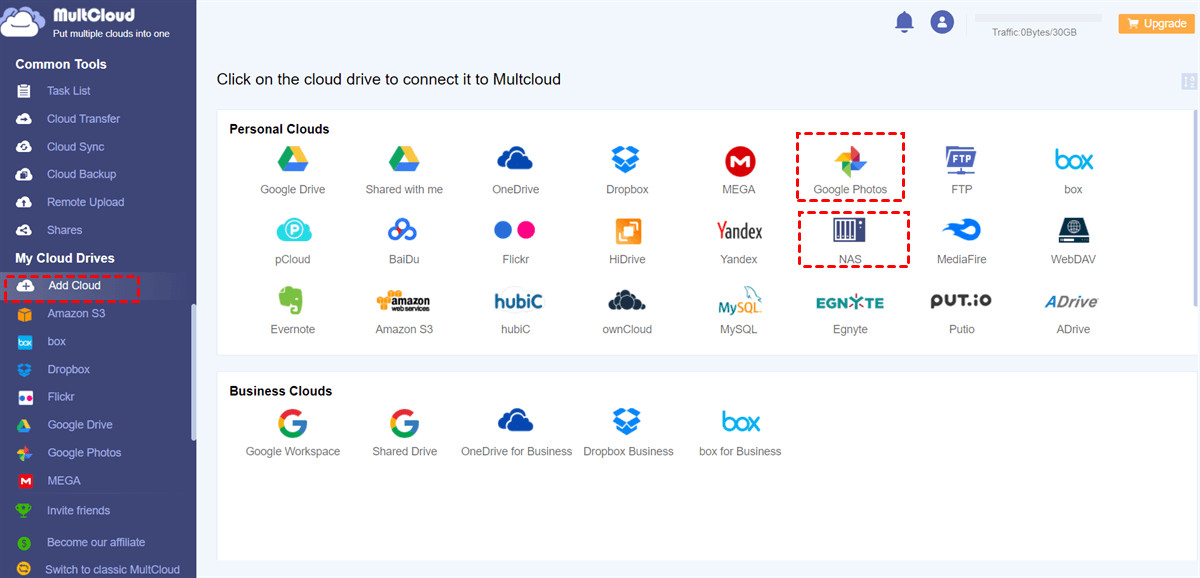 Add Google Photos and NAS accounts to MultCloud for seamless file transfer to a flash drive
- Select Cloud Transfer, select Google Photos as the source, and choose the NAS as the target.
- Tips:
- Choose individual photos, batches, or all photos in Google Photos.
- Configure Email notification or use Filter to include specific file types in Options. Select the transfer method.
- Use Schedule to automatically transfer photos from Google Photos to NAS daily, weekly, or monthly, at a specified time. Subscribe to MultCloud plans for advanced features and faster transfer speed.
- Tips:
- Hit the Transfer Now button to migrate Google Photos to Synology NAS, or other NAS.
- Move Google Photos from NAS to the connected USB flash drive.
There is no limit to the number of photos to transfer at a time with MultCloud.
MultCloud Features:
- Smart Share: Share cloud files via public, private, or source mode.
- One-key Move: Quick data transfer, sync, and backup among clouds.
- Email Archive: Protect emails to other clouds or local disks.
- Remote upload: Effectively save web files to clouds via URL.
- Safe: Full-time 256-bit AES and OAuth authorization protections.
- Easy: Access and manage all clouds in one place with one login.
- Extensive: 30+ clouds and on-premise services are supported.
2.4. Way 4. Copy Google Photos to USB via Google Takeout
How do I copy Google Photos to USB using Google Takeout? Google Takeout exports data from all Google services to local computers, and other clouds, like Google Drive, Dropbox, OneDrive, and Box. Export photos from Google Photos, then drag them to the flash drive.
Follow these steps to move Google Photos to your computer and then to a flash drive:
- Connect your USB flash drive to your computer, then go to the Google Takeout website.
- Tap Deselect all, then scroll down to tick Google Photos, and hit Next step.
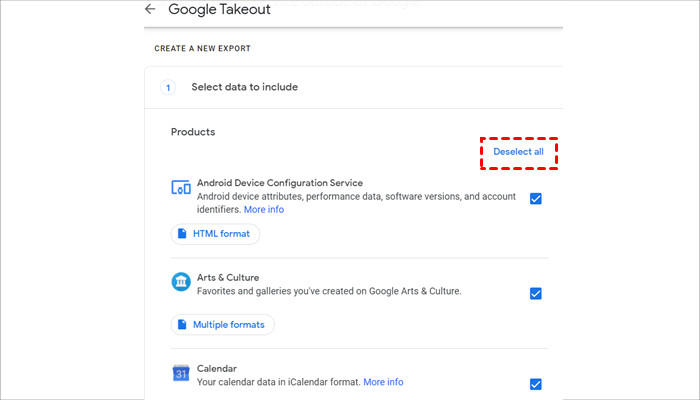 Deselect all services except Google Photos in Google Takeout for exporting photos to a flash drive
- Select Send download link via email, set up the frequency, file type, and size, and click Create export.
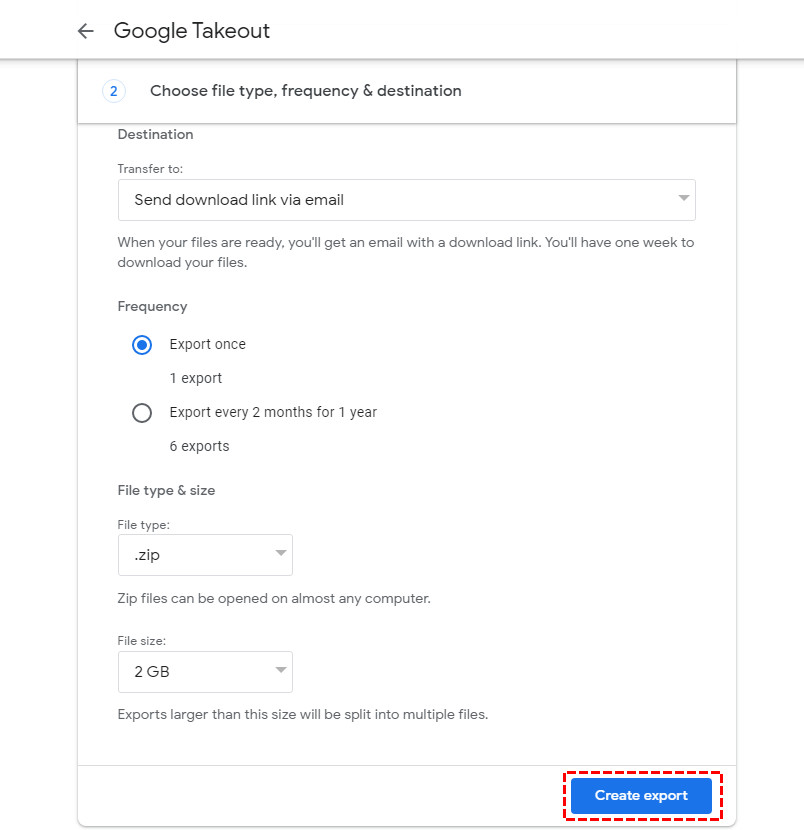 Set up Google Takeout export options for transferring Google Photos to a flash drive
- You will get an email about the Google Takeout export. Click the email and download it to your computer.
- You will get a zip-compressed folder. Unzip the folder, and move Google Photos to a USB flash drive manually.
Limitations: Google Takeout has limitations. You can only download data 2 to 3 times per day. Archiving Gmail emails is limited to 3 attempts per day and a maximum of 7 per week.
3. Additional Tips for Managing Your Photos
To effectively manage your photos, consider the following tips:
3.1. Organize Photos by Date and Event
Organize your photos by date and event to easily find and manage them. Create folders for each year, then subfolders for specific events or months. This hierarchical structure makes locating specific memories straightforward.
3.2. Use Descriptive File Names
Rename your photo files with descriptive names that include the date, location, and event. For example, “2024-07-04_SantaFe_Fireworks.jpg” is much more informative than “IMG1234.jpg.”
3.3. Regularly Update Your Flash Drive Backup
Regularly update your flash drive backup with new photos to keep your archive current. Set a reminder to perform this task monthly or quarterly, depending on how frequently you take photos.
3.4. Consider a Second Backup Location
For added security, consider maintaining a second backup location, such as an external hard drive or another cloud service. According to research from the Santa Fe University of Art and Design’s Photography Department, photographers with multiple backup locations have a higher rate of data recovery in case of loss or corruption.
4. How To Optimize Your Photos for Flash Drive Storage
Optimizing your photos can save space and improve performance.
4.1. Resize Large Images
Resize large images to a more manageable size without sacrificing quality. Photos intended for viewing on screens do not need to be the same high resolution as those meant for printing. Programs like Adobe Photoshop or free online tools can resize images.
4.2. Convert to JPEG Format
Convert photos to JPEG format to reduce file size. JPEG is a widely supported format that offers a good balance between image quality and file size. Unless you need the lossless compression of formats like TIFF or PNG, JPEG is generally the best choice for storage.
4.3. Remove Duplicate Photos
Remove duplicate photos to free up space on your flash drive. Use software like Duplicate Cleaner or manual methods to identify and delete redundant files.
4.4. Compress Photos Without Losing Quality
Compress photos without losing quality using tools like TinyPNG or ImageOptim. These tools reduce file size by optimizing the image data without visibly affecting the image’s appearance.
5. Understanding Google Photos Storage Options
Google Photos offers different storage options that affect the quality and size of your stored photos.
5.1. Original Quality
Store photos in original quality to maintain the highest resolution and detail. This option uses your Google account’s storage quota but ensures your photos are preserved in their best possible condition.
5.2. Storage Saver (Previously High Quality)
Use the Storage Saver option to compress photos and save storage space. Google Photos automatically reduces the file size of your photos, which can be a good compromise if you have limited storage.
5.3. Express
The Express option further compresses photos for even greater storage savings. This option is suitable for backing up photos quickly when storage is a major concern, but it may result in noticeable quality loss.
5.4. Choosing the Right Option
Choose the storage option that best fits your needs and storage capacity. Original Quality is ideal for professional photographers and those who want to preserve every detail, while Storage Saver is suitable for most casual users.
6. How To Choose the Right Flash Drive
Choosing the right flash drive is crucial for storing your photos safely and efficiently.
6.1. Storage Capacity
Select a flash drive with enough storage capacity for your entire photo collection, plus room for future growth. Estimate the total size of your photos and choose a flash drive with at least that much capacity, plus some extra space.
6.2. USB Standard
Consider the USB standard (USB 2.0, USB 3.0, USB 3.1) for faster transfer speeds. USB 3.0 and later versions offer significantly faster transfer speeds than USB 2.0, which can save you time when copying large numbers of photos.
6.3. Durability and Reliability
Look for a flash drive known for its durability and reliability. Brands like SanDisk, Samsung, and Kingston are known for producing high-quality flash drives that can withstand daily use.
6.4. Physical Size and Design
Consider the physical size and design of the flash drive for ease of use and portability. Smaller flash drives are more portable but can be easily lost, while larger drives are easier to handle but may not fit in tight spaces.
7. Maintaining Your Flash Drive
Proper maintenance ensures your flash drive remains reliable and your photos stay safe.
7.1. Safely Eject the Flash Drive
Always safely eject the flash drive from your computer to prevent data corruption. Use the “Safely Remove Hardware” option in your operating system before physically removing the flash drive.
7.2. Avoid Extreme Temperatures
Avoid exposing the flash drive to extreme temperatures or humidity. Store the flash drive in a cool, dry place to prevent damage to the electronic components.
7.3. Scan for Viruses
Regularly scan the flash drive for viruses to protect your photos from malware. Use antivirus software to scan the flash drive whenever you connect it to your computer.
7.4. Create a Backup of Your Flash Drive
Create a backup of your flash drive to another storage device for added security. Copy the contents of the flash drive to an external hard drive or another flash drive to protect against data loss.
8. Troubleshooting Common Issues
Address common issues when transferring photos to a flash drive.
8.1. Flash Drive Not Recognized
If the flash drive is not recognized by your computer, try a different USB port or update your computer’s USB drivers. Sometimes, the problem is simply a loose connection or outdated drivers.
8.2. Slow Transfer Speeds
If transfer speeds are slow, make sure you are using a USB 3.0 port and a USB 3.0 flash drive. USB 3.0 offers significantly faster transfer speeds than USB 2.0.
8.3. Insufficient Space
If you encounter an “insufficient space” error, check the flash drive’s capacity and delete unnecessary files. Ensure that the flash drive has enough free space to accommodate all the photos you want to transfer.
8.4. Corrupted Files
If files become corrupted during transfer, try using a different USB port or a different flash drive. Data corruption can occur due to faulty hardware or interrupted transfers.
9. Understanding Copyright and Usage Rights
Be mindful of copyright and usage rights when managing your photos.
9.1. Personal Use vs. Commercial Use
Distinguish between personal use and commercial use of your photos. Personal use is generally unrestricted, while commercial use may require permission from the copyright holder.
9.2. Obtaining Permissions
Obtain necessary permissions before using copyrighted photos for commercial purposes. Contact the copyright holder to request permission and understand the terms of use.
9.3. Creative Commons Licenses
Understand Creative Commons licenses and how they allow for sharing and use of photos. Creative Commons licenses provide a flexible way for photographers to grant certain rights to others while retaining copyright.
9.4. Respecting Watermarks
Respect watermarks and other copyright notices on photos. Watermarks are often used to indicate ownership and prevent unauthorized use of images.
10. Frequently Asked Questions (FAQ)
10.1. Can I move Google Photos to a flash drive directly from my phone?
Yes, you can move Google Photos to a flash drive directly from your phone by connecting the flash drive to your phone using an adapter, then downloading the photos from the Google Photos app to the flash drive.
10.2. Will transferring photos to a flash drive reduce their quality?
No, transferring photos to a flash drive will not reduce their quality as long as you copy the original files. Ensure you are not using a compressed or lower-resolution version of the photos.
10.3. How often should I back up my Google Photos to a flash drive?
You should back up your Google Photos to a flash drive regularly, ideally monthly or quarterly, depending on how frequently you take new photos.
10.4. Is it safe to store photos on a flash drive long-term?
While flash drives are convenient, they are not ideal for long-term storage. It’s best to use them as part of a backup strategy that includes other storage options like external hard drives or cloud services.
10.5. Can I password-protect my photos on a flash drive?
Yes, you can password-protect your photos on a flash drive using encryption software like VeraCrypt or built-in operating system features like BitLocker (Windows) or FileVault (macOS).
10.6. What is the best file format for storing photos on a flash drive?
JPEG is generally the best file format for storing photos on a flash drive due to its balance of image quality and file size. However, if you need lossless compression, consider using TIFF or PNG.
10.7. How do I ensure my flash drive is compatible with all devices?
To ensure your flash drive is compatible with all devices, format it using the exFAT file system, which is widely supported by both Windows and macOS.
10.8. What should I do if my flash drive fails?
If your flash drive fails, try using data recovery software to retrieve your photos. If that doesn’t work, consider contacting a professional data recovery service.
10.9. Can I use a flash drive to transfer photos from Google Photos to another cloud service?
Yes, you can use a flash drive to transfer photos from Google Photos to another cloud service by downloading the photos to the flash drive, then uploading them to the other cloud service.
10.10. How do I verify that all my photos have been successfully transferred to the flash drive?
To verify that all your photos have been successfully transferred to the flash drive, compare the number of files and total file size between the source (Google Photos) and the destination (flash drive).
11. Discover More on dfphoto.net
Ready to take your photography skills to the next level? At dfphoto.net, we offer a wealth of resources to help you master new techniques, find inspiration, and stay updated on the latest equipment. Explore our detailed tutorials, browse stunning photo collections, and connect with a vibrant community of photography enthusiasts. Whether you’re looking to refine your shooting skills or simply seeking inspiration, dfphoto.net is your go-to resource.
For additional information or assistance, please visit our website at dfphoto.net or contact us at:
Address: 1600 St Michael’s Dr, Santa Fe, NM 87505, United States
Phone: +1 (505) 471-6001
The End
All the methods above will not affect the photo quality of Google Photos. You can migrate Google Photos to Google Drive, Dropbox, or other clouds directly to safeguard your data. Choose the best way to move Google Photos to a flash drive easily without any limitations to keep all your cherished memories safely.