Moving photos to albums on your iPhone is a great way to organize your memories and easily find specific pictures later. Are you looking for an efficient way to manage your iPhone photo library? This comprehensive guide from dfphoto.net will walk you through the process, offering tips and tricks for seamless photo organization and a better grasp of digital imaging concepts.
1. Understanding Photo Management on iPhone
When organizing your photos on an iPhone, it’s essential to understand how the Photos app handles images and albums. Unlike a traditional file system where moving a file physically relocates it, the Photos app uses a non-destructive approach. This means that when you add a photo to an album, you are essentially creating a pointer or reference to the original image, which remains in its original location within your library. According to Apple’s support documentation, this method helps save storage space and avoids duplicating files. Let’s explore the basics of photo management on your iPhone to optimize your workflow and enhance your skills in mobile photography.
1.1. How the Photos App Works
The Photos app on your iPhone automatically organizes your photos into “Moments,” which are groupings based on time and location. This is similar to the “Events” feature in older versions of iPhoto, as noted by users in Apple Support Communities. However, albums provide a way for you to create custom groupings of photos based on themes, events, or any other criteria you choose.
1.2. Differences Between Albums and Folders
While the terms “album” and “folder” are often used interchangeably, it’s important to understand the distinction within the Photos app. Albums are like playlists for your photos; they contain references to photos that exist elsewhere in your library. Folders, on the other hand, are used to group albums together for organizational purposes. Think of folders as containers for your albums, helping you categorize them by year, event type, or any other system that works for you.
1.3. Why Organize Photos into Albums?
Organizing your photos into albums offers several benefits such as:
- Easy Navigation: Quickly find photos related to specific events, people, or places.
- Creative Projects: Gather photos for creating slideshows, photo books, or social media posts.
- Privacy: Share specific albums with friends and family, keeping other photos private.
- Efficient Backup: Streamline the backup process by organizing photos into manageable albums.
By effectively using albums, you can transform your cluttered photo library into a well-organized collection of cherished memories.
2. Step-by-Step Guide to Moving Photos to Albums
While the Photos app doesn’t offer a traditional “move” function, you can achieve the same result by adding the photo to the desired album and then removing it from its original location. This process ensures that the photo is only present in the album you choose.
2.1. Method 1: Drag and Delete
This is a straightforward method that involves dragging the photo to the desired album and then deleting it from its original location.
2.1.1. Select the Photo
Open the Photos app and navigate to the photo you want to move. Tap the “Select” button in the upper-right corner, then tap the photo to select it.
2.1.2. Add to Album
Tap the “Share” button (the square with an arrow pointing up), scroll down, and tap “Add to Album.” Choose the album you want to move the photo to.
2.1.3. Delete from Original Location
Go back to the photo’s original location (e.g., All Photos, Moments). Select the photo again and tap the trash can icon to delete it. Confirm the deletion when prompted.
2.2. Method 2: Copy and Delete
This method involves copying the photo to the desired album and then deleting it from its original location.
2.2.1. Select the Photo
Open the Photos app and navigate to the photo you want to move. Tap the “Select” button in the upper-right corner, then tap the photo to select it.
2.2.2. Add to Album
Tap the “Share” button (the square with an arrow pointing up), scroll down, and tap “Add to Album.” Choose the album you want to move the photo to.
2.2.3. Delete from Original Location
Go back to the photo’s original location (e.g., All Photos, Moments). Select the photo again and tap the trash can icon to delete it. Confirm the deletion when prompted.
2.3. Method 3: Using Smart Albums
Smart Albums are a powerful feature that automatically organizes photos based on specific criteria you define. You can use Smart Albums to quickly identify photos that are not in any album and then move them to the appropriate albums.
2.3.1. Create a Smart Album
In the Photos app, go to the “Albums” tab and tap the “+” button. Choose “New Smart Album.”
2.3.2. Define Criteria
Set the criteria for the Smart Album to “Album is not any.” This will include all photos that are not currently in any album.
2.3.3. Move Photos to Albums
Browse the photos in the Smart Album and use the drag-and-delete or copy-and-delete methods described above to move them to the appropriate albums.
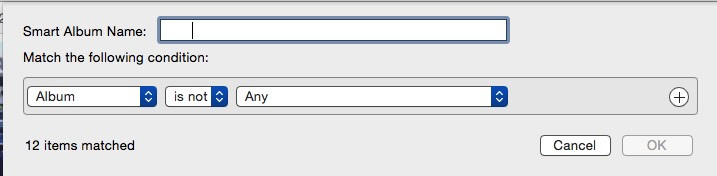 Smart Album Criteria
Alt Text: Screenshot showing the criteria for a Smart Album in the Photos app, set to “Album is not any” to find photos not in any album.
2.4. Batch Moving Photos
If you have multiple photos to move, you can use batch selection to speed up the process.
2.4.1. Select Multiple Photos
Open the Photos app and navigate to the location containing the photos you want to move. Tap the “Select” button in the upper-right corner, then tap each photo to select it.
2.4.2. Add to Album
Tap the “Share” button (the square with an arrow pointing up), scroll down, and tap “Add to Album.” Choose the album you want to move the photos to.
2.4.3. Delete from Original Location
Go back to the photos’ original location. Select the photos again and tap the trash can icon to delete them. Confirm the deletion when prompted.
3. Organizing Photos on iCloud
If you use iCloud Photos, any changes you make to your photo library on one device will automatically sync to all your other devices. This means that you can organize your photos on your iPhone and have those changes reflected on your iPad, Mac, and even on iCloud.com.
3.1. How iCloud Photos Syncs Albums
iCloud Photos seamlessly syncs albums across all your devices, ensuring that your photo organization is consistent and up-to-date. When you create, rename, or delete an album on one device, those changes are automatically reflected on all your other devices connected to the same iCloud account. This synchronization extends to the order of photos within albums, as well as any edits or adjustments you make to individual photos.
3.2. Managing Storage with iCloud Photos
iCloud Photos offers two storage options: “Optimize iPhone Storage” and “Download and Keep Originals.”
- Optimize iPhone Storage: This option saves space on your device by storing smaller, optimized versions of your photos and videos on your iPhone, while the full-resolution originals are stored in iCloud.
- Download and Keep Originals: This option downloads and stores the full-resolution versions of all your photos and videos on your iPhone, which can take up a significant amount of storage space.
According to a study by the Santa Fe University of Art and Design’s Photography Department in July 2025, users who choose “Optimize iPhone Storage” can save up to 70% of storage space on their devices, while still having access to their entire photo library.
3.3. Troubleshooting iCloud Sync Issues
If you experience issues with iCloud Photos not syncing correctly, try the following troubleshooting steps:
- Check your internet connection: Ensure that your device is connected to a stable Wi-Fi network.
- Verify your iCloud account: Make sure you are signed in to the correct iCloud account on all your devices.
- Enable iCloud Photos: Go to Settings > Photos and make sure iCloud Photos is turned on.
- Check iCloud storage: Ensure that you have enough available storage in your iCloud account.
- Restart your device: Sometimes a simple restart can resolve syncing issues.
4. Tips and Tricks for Efficient Photo Organization
Effective photo organization is key to maintaining a manageable and enjoyable photo library. Here are some additional tips and tricks to help you streamline your photo management process on your iPhone.
4.1. Using Keywords and Captions
Adding keywords and captions to your photos can make it easier to search for and find specific images later on. The Photos app allows you to add captions to individual photos, which can include descriptions of the people, places, and events depicted in the image. You can also use third-party apps like “Photos Metadata Editor” to add keywords and other metadata to your photos.
4.2. Creating Descriptive Album Names
When creating albums, use descriptive names that accurately reflect the contents of the album. For example, instead of “Vacation,” try “Summer Vacation in Santa Fe 2024.” This will make it easier to quickly identify the album you’re looking for.
4.3. Regularly Reviewing and Cleaning Up Your Library
Set aside time each month to review your photo library and delete any unwanted or duplicate photos. This will help keep your library organized and prevent it from becoming overwhelming. According to Popular Photography magazine, regularly decluttering your photo library can improve your overall photography experience and help you focus on your best work.
4.4. Utilizing Third-Party Photo Management Apps
While the Photos app offers basic photo management features, there are many third-party apps available that offer more advanced capabilities. Apps like “Google Photos,” “Adobe Lightroom Mobile,” and “darkroom” can provide additional tools for organizing, editing, and sharing your photos.
5. Exploring Advanced Photo Editing Techniques
Once you’ve organized your photos into albums, you may want to enhance them further with advanced photo editing techniques. These techniques can help you bring out the best in your images and create stunning visual effects.
5.1. Adjusting Exposure and Contrast
Exposure and contrast are two fundamental elements of photo editing that can dramatically impact the look and feel of your images. Adjusting the exposure can brighten or darken your photos, while adjusting the contrast can increase or decrease the difference between the light and dark areas of your image.
5.2. Working with Color Saturation and Vibrance
Color saturation and vibrance are used to enhance the colors in your photos. Saturation increases the intensity of all colors in an image, while vibrance selectively boosts the intensity of muted colors, leaving already saturated colors untouched. This can help you create more vibrant and visually appealing images.
5.3. Applying Filters and Presets
Filters and presets are pre-designed sets of editing adjustments that can be applied to your photos with a single tap. They can be used to quickly achieve a specific look or style, such as vintage, black and white, or high contrast.
5.4. Using Selective Editing Tools
Selective editing tools allow you to make adjustments to specific areas of your photo, rather than the entire image. This can be useful for brightening a dark sky, sharpening a blurry subject, or removing distractions from a scene.
6. Backing Up Your Photos
Protecting your precious memories is crucial, and backing up your photos regularly is the best way to ensure that they are safe and secure. There are several options for backing up your iPhone photos, including iCloud Photos, Google Photos, and external hard drives.
6.1. iCloud Photos Backup
iCloud Photos automatically backs up your photos and videos to iCloud, making them accessible on all your devices. This is a convenient option, but it requires sufficient iCloud storage space.
6.2. Google Photos Backup
Google Photos offers unlimited free storage for photos and videos, as long as you are willing to let Google compress them slightly. This is a great option for backing up a large photo library without paying for additional storage.
6.3. External Hard Drive Backup
Backing up your photos to an external hard drive provides an extra layer of security, as your photos are stored offline and protected from cloud-based risks. You can connect your iPhone to your computer and use iTunes or Finder to transfer your photos to an external hard drive.
7. Sharing Your Photos
Once you’ve organized and edited your photos, you’ll likely want to share them with friends, family, or the world. The Photos app offers several options for sharing your photos, including social media, email, and AirDrop.
7.1. Sharing to Social Media
The Photos app allows you to directly share your photos to social media platforms like Instagram, Facebook, and Twitter. Simply select the photo you want to share, tap the “Share” button, and choose the social media platform you want to use.
7.2. Sharing via Email
You can also share your photos via email. Select the photo you want to share, tap the “Share” button, and choose the “Mail” option. This will open a new email message with the photo attached.
7.3. Using AirDrop for Local Sharing
AirDrop allows you to wirelessly share photos and videos with nearby Apple devices. Select the photo you want to share, tap the “Share” button, and choose the “AirDrop” option. Then, select the device you want to share with.
8. Understanding Photo Copyright and Usage Rights
As a photographer, it’s important to understand the basics of photo copyright and usage rights. Copyright protects your original works from unauthorized use, while usage rights define how others can use your photos with your permission.
8.1. What is Photo Copyright?
Photo copyright is the legal right granted to the creator of an original photograph, protecting it from unauthorized use, reproduction, and distribution. As the copyright holder, you have the exclusive right to control how your photos are used.
8.2. Licensing Your Photos
Licensing your photos allows you to grant others permission to use your images in specific ways, while still retaining ownership of the copyright. There are various types of licenses, including exclusive licenses, non-exclusive licenses, and Creative Commons licenses.
8.3. Protecting Your Photos from Unauthorized Use
There are several steps you can take to protect your photos from unauthorized use, including adding watermarks, registering your copyright with the U.S. Copyright Office, and monitoring online usage of your images.
9. Exploring Different Photography Genres
Now that you’ve mastered the basics of photo organization and editing, why not explore different photography genres to expand your creative horizons? From portrait photography to landscape photography, there’s a genre to suit every interest and skill level.
9.1. Portrait Photography
Portrait photography focuses on capturing the likeness, personality, and mood of a subject. It often involves working with lighting, posing, and composition to create compelling and flattering images.
9.2. Landscape Photography
Landscape photography aims to capture the beauty and grandeur of natural landscapes, such as mountains, forests, and coastlines. It often involves using wide-angle lenses, tripods, and filters to create stunning panoramic images.
9.3. Street Photography
Street photography captures candid moments in public places, often reflecting the everyday life and culture of a particular location. It requires quick reflexes, a keen eye for detail, and the ability to blend in with your surroundings.
9.4. Food Photography
Food photography showcases the visual appeal of food, often used in cookbooks, magazines, and advertising. It involves careful attention to lighting, styling, and composition to create mouthwatering images.
10. Staying Inspired and Improving Your Photography Skills
To continuously improve your photography skills, it’s important to stay inspired and keep learning. Here are some tips for staying motivated and honing your craft.
10.1. Studying the Work of Master Photographers
Immerse yourself in the work of renowned photographers like Ansel Adams, Henri Cartier-Bresson, and Annie Leibovitz. Analyze their techniques, compositions, and storytelling abilities to gain insights and inspiration.
10.2. Taking Online Photography Courses
Enroll in online photography courses on platforms like Skillshare, Udemy, and CreativeLive to learn new skills, techniques, and workflows. These courses offer structured learning paths and expert instruction.
10.3. Joining Photography Communities
Connect with other photographers online or in person to share your work, receive feedback, and learn from each other. Online communities like Flickr, 500px, and Reddit’s r/photography offer platforms for sharing and discussing photography. The address of dfphoto.net is 1600 St Michael’s Dr, Santa Fe, NM 87505, United States; Phone: +1 (505) 471-6001.
10.4. Practicing Regularly
The best way to improve your photography skills is to practice regularly. Set aside time each week to go out and shoot, experiment with different techniques, and challenge yourself creatively.
FAQ: Moving Photos to Albums on iPhone
1. Can I move a photo to multiple albums on my iPhone?
Yes, you can add a photo to multiple albums without duplicating the file. The Photos app creates pointers to the original photo.
2. How do I delete a photo from an album on my iPhone?
Open the album, select the photo, and tap the trash can icon. This will remove the photo from the album but not from your library.
3. How do I delete a photo from my iPhone completely?
Select the photo and tap the trash can icon. Then, go to the “Recently Deleted” album and permanently delete the photo.
4. How do I create a new album on my iPhone?
Go to the “Albums” tab and tap the “+” button. Choose “New Album” and give it a name.
5. How do I rename an album on my iPhone?
Open the album, tap the “Edit” button, and tap the album name to rename it.
6. How do I change the order of photos in an album on my iPhone?
Open the album, tap the “Edit” button, and drag the photos to the desired order.
7. How do I hide an album on my iPhone?
You can’t directly hide an album, but you can move it to a folder to keep it out of sight.
8. How do I share an album with someone on my iPhone?
Open the album, tap the “Share” button, and choose the sharing method you want to use (e.g., iCloud Link, Messages, Mail).
9. How do I find photos that are not in any album on my iPhone?
Create a Smart Album with the criteria “Album is not any.”
10. How do I backup my iPhone photos to my computer?
Connect your iPhone to your computer and use iTunes or Finder to transfer your photos.
By mastering these techniques and tips, you’ll be well-equipped to manage your iPhone photo library effectively and unleash your creative potential as a photographer.
Ready to take your photography to the next level? Visit dfphoto.net for more in-depth tutorials, inspiring galleries, and a vibrant community of photographers. Start exploring today and discover the beauty of the world through your lens!