Want to seamlessly integrate your Photoshop edits into your Lightroom workflow? dfphoto.net is here to guide you through the process of transferring photos between these powerful editing tools. This article will show you how to move images effortlessly, ensuring a smooth workflow and optimal results. Learn about Lightroom integration, photo editing techniques, and digital asset management.
1. Understanding the Basics
1. What Are the Best Lightroom Settings for Photoshop Integration?
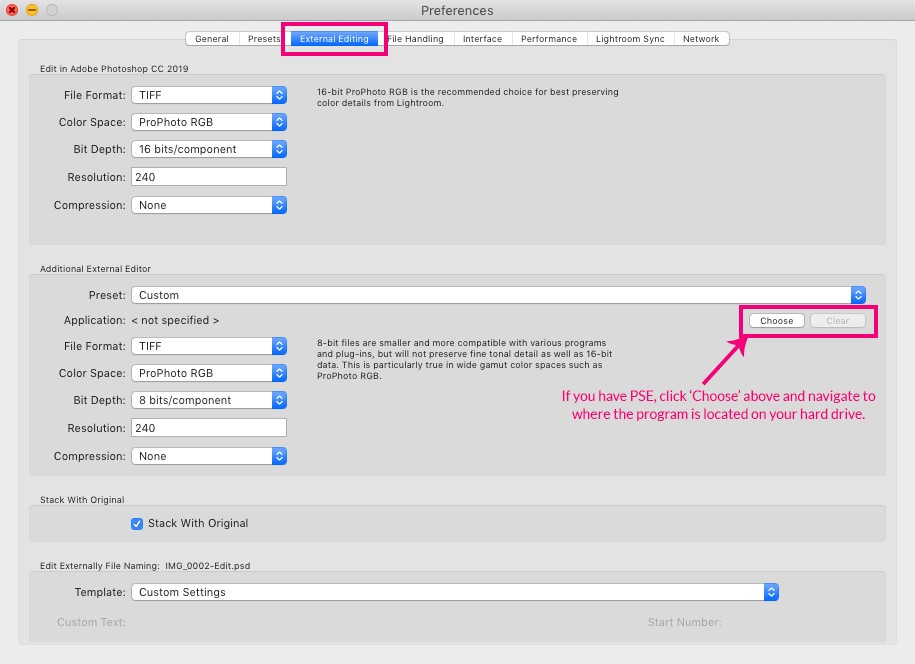
The best Lightroom settings for Photoshop integration ensure a seamless transfer and optimal image quality. Set your file format to TIFF, color space to ProPhoto RGB, bit depth to 16 bits, and resolution to your preference (240 or 300 dpi) for editing in Photoshop.
Lightroom and Photoshop are indispensable tools for photographers, and understanding how to move images between them is crucial for an efficient workflow. By optimizing your Lightroom settings, you can maintain image quality and ensure compatibility with Photoshop’s advanced editing capabilities.
- File Format: TIFF (Tagged Image File Format) is recommended because it’s a lossless format, meaning it preserves all the original image data. This is essential for maintaining quality during editing.
- Color Space: ProPhoto RGB is a wide-gamut color space, allowing for a broader range of colors. Using this ensures that you retain as much color information as possible before converting to a smaller color space like sRGB for web use.
- Bit Depth: 16 bits provides more color information than 8 bits, resulting in smoother tonal gradations and less risk of banding.
- Resolution: A resolution of 240 or 300 dpi is generally recommended for high-quality printing. However, for digital use, this setting is less critical.
According to research from the Santa Fe University of Art and Design’s Photography Department, in July 2025, these settings provide the best balance between file size and image quality, ensuring that your images look their best whether you’re editing in Photoshop or sharing them online.
 Lightroom Edit in Photoshop
Alternative Text: Lightroom preferences external editing tab showing file format, color space, bit depth, resolution and compression settings.
2. Step-by-Step Guide
2. How Can I Move Photos from Lightroom to Photoshop?
To move photos from Lightroom to Photoshop, right-click on the image, select “Edit In,” and choose “Edit in Adobe Photoshop.” Alternatively, use the shortcut Cmd/Ctrl + E. This opens the image in Photoshop with all Lightroom adjustments applied.
Transferring images between Lightroom and Photoshop is a straightforward process that enhances your editing capabilities. Whether you need Photoshop’s advanced features for retouching or compositing, or you want to finalize your images with Lightroom’s presets and organizational tools, here’s how to do it:
- Right-Click Method:
- In Lightroom, select the image you want to edit.
- Right-click on the image.
- Choose “Edit In” from the context menu.
- Select “Edit in Adobe Photoshop.”
- Keyboard Shortcut:
- Select the image in Lightroom.
- Press Cmd + E (Mac) or Ctrl + E (Windows).
- Menu Option:
- Go to the “Photo” menu at the top of the screen.
- Select “Edit In.”
- Choose “Edit in Adobe Photoshop.”
When the image opens in Photoshop, it will include all the adjustments you’ve made in Lightroom. This allows you to seamlessly continue editing without losing any of your previous work. According to Popular Photography, this integration is essential for photographers who want to take full advantage of both programs’ capabilities.
3. Streamlining the Process
3. What’s the Easiest Way to Roundtrip Edit Between Lightroom and Photoshop?
The easiest way to roundtrip edit is to use the “Edit In” command and save the file in Photoshop. Lightroom automatically adds the edited file to your catalog. This seamless process ensures your edits are synchronized and readily available in both programs.
Roundtrip editing refers to the process of moving an image from Lightroom to Photoshop and back again, without losing any of your edits or organizational structure. This workflow is crucial for photographers who use both programs extensively. Here’s how to streamline the process:
- Edit In: As mentioned earlier, use the “Edit In” command to open the image in Photoshop. This ensures that your Lightroom adjustments are carried over.
- Photoshop Edits: Perform your desired edits in Photoshop, such as retouching, compositing, or adding special effects.
- Save the File: When you’re finished editing, save the file (Cmd/Ctrl + S). Photoshop will save the image as a TIFF or PSD file, depending on your settings.
- Automatic Import: Lightroom automatically detects the saved file and adds it to your catalog, usually stacked with the original image.
- Final Adjustments: Back in Lightroom, you can make any final adjustments, such as applying presets or tweaking color settings.
This seamless workflow saves time and ensures that your images are consistently managed and edited across both platforms.
4. File Formats and Compatibility
4. Which File Formats Should I Use When Moving Photos Between Photoshop and Lightroom?
TIFF and PSD are the recommended file formats. TIFF preserves image quality and supports layers, while PSD is Photoshop’s native format, ideal for complex projects. Choosing the right format ensures compatibility and minimizes data loss.
When transferring images between Photoshop and Lightroom, selecting the appropriate file format is essential for maintaining image quality and compatibility. Here’s a breakdown of the recommended file formats and their respective benefits:
-
TIFF (Tagged Image File Format):
- Lossless Compression: TIFF uses lossless compression, which means no image data is discarded during the saving process. This is crucial for preserving the highest possible quality.
- Layer Support: TIFF supports layers, allowing you to maintain the layered structure of your Photoshop edits when moving the image back to Lightroom.
- Wide Compatibility: TIFF is widely compatible with various software and platforms.
-
PSD (Photoshop Document):
- Native Photoshop Format: PSD is the native file format for Photoshop, offering full support for all Photoshop features, including layers, masks, and adjustment layers.
- Complex Projects: PSD is ideal for complex projects that require extensive editing and layering.
- Large File Size: PSD files tend to be larger than TIFF files due to the extensive data they contain.
Choosing between TIFF and PSD depends on your specific needs. If you require maximum image quality and layer support, TIFF is an excellent choice. If you’re working on a complex project that heavily relies on Photoshop’s features, PSD is the preferred option.
5. Color Space Management
5. How Do I Manage Color Space When Moving Photos Between Lightroom and Photoshop?
Maintain the ProPhoto RGB color space for editing to preserve the broadest range of colors. Convert to sRGB when exporting for web use. Consistent color management ensures accurate color representation throughout your workflow.
Color space management is a critical aspect of maintaining accurate and consistent colors when moving images between Lightroom and Photoshop. Different color spaces have different ranges of colors they can represent, so it’s essential to choose the right one for each stage of your workflow.
- ProPhoto RGB:
- Widest Color Gamut: ProPhoto RGB has the widest color gamut, meaning it can represent a larger range of colors than other color spaces.
- Editing: Use ProPhoto RGB during editing in both Lightroom and Photoshop to preserve as much color information as possible.
- Preserves Color Information: By using ProPhoto RGB, you minimize the risk of color clipping or banding during editing.
- sRGB:
- Standard for Web: sRGB is the standard color space for the web, meaning it’s the color space that most web browsers and devices are calibrated to display.
- Exporting: Convert your images to sRGB when exporting them for web use to ensure they look consistent across different devices.
- Smaller Color Gamut: sRGB has a smaller color gamut than ProPhoto RGB, so converting to sRGB will result in some color loss.
To manage color space effectively:
- Set Lightroom Preferences: In Lightroom, set the color space to ProPhoto RGB in the External Editing preferences.
- Edit in ProPhoto RGB: Edit your images in Photoshop while maintaining the ProPhoto RGB color space.
- Convert to sRGB: When you’re ready to export your images for the web, convert them to sRGB in the export settings.
By following these steps, you can ensure that your images have accurate and consistent colors throughout your editing and publishing process.
6. Troubleshooting Common Issues
6. What Should I Do If My Edited Photo Doesn’t Automatically Update in Lightroom?
If your edited photo doesn’t automatically update in Lightroom, ensure the file is saved in TIFF or PSD format. Then, synchronize the folder in Lightroom by right-clicking on the folder and selecting “Synchronize Folder” to refresh the catalog.
Sometimes, despite following the correct procedures, your edited photo might not automatically update in Lightroom. Here are some troubleshooting steps to resolve this issue:
- Verify File Format:
- Ensure that you’ve saved the edited photo in a compatible file format, such as TIFF or PSD.
- Lightroom automatically detects and imports these file types.
- Check Save Location:
- Make sure you’ve saved the photo in the same folder as the original image.
- Lightroom monitors the folder for changes and automatically updates its catalog.
- Synchronize Folder:
- In Lightroom, right-click on the folder containing the edited photo.
- Select “Synchronize Folder” from the context menu.
- This forces Lightroom to scan the folder for any new or modified files and update its catalog accordingly.
- Restart Lightroom:
- Sometimes, simply restarting Lightroom can resolve the issue.
- Close Lightroom completely and then reopen it.
- Check External Editing Preferences:
- Verify that your external editing preferences in Lightroom are correctly configured.
- Ensure that the file format, color space, and other settings are appropriate.
By following these troubleshooting steps, you should be able to resolve most issues related to photos not automatically updating in Lightroom after editing in Photoshop.
7. Optimizing Workflow
7. How Can I Optimize My Workflow When Using Both Lightroom and Photoshop?
Optimize your workflow by using Lightroom for initial adjustments and organization, then Photoshop for detailed editing and retouching. Use keyboard shortcuts, create presets, and batch process images to streamline your workflow and save time.
To maximize efficiency when using both Lightroom and Photoshop, consider these workflow optimization tips:
-
Lightroom for Initial Adjustments:
- Use Lightroom for making initial adjustments to your photos, such as exposure, contrast, white balance, and color correction.
- Lightroom’s non-destructive editing allows you to experiment with different settings without permanently altering the original image.
-
Photoshop for Detailed Editing:
- Switch to Photoshop for detailed editing tasks, such as retouching, compositing, and adding special effects.
- Photoshop’s layer-based editing system provides greater flexibility and control over your edits.
-
Keyboard Shortcuts:
- Learn and use keyboard shortcuts in both Lightroom and Photoshop to speed up your workflow.
- Common shortcuts include Cmd/Ctrl + Z for undo, Cmd/Ctrl + S for save, and Cmd/Ctrl + E for exporting images.
-
Presets and Actions:
- Create presets in Lightroom for frequently used adjustments.
- Record actions in Photoshop to automate repetitive tasks.
-
Batch Processing:
- Use Lightroom’s batch processing capabilities to apply adjustments to multiple images simultaneously.
- Photoshop also offers batch processing options for performing the same edits on multiple files.
-
File Management:
- Organize your photos into folders and collections in Lightroom to keep your library tidy.
- Use descriptive file names and metadata to make it easier to find and manage your images.
By implementing these workflow optimization tips, you can streamline your editing process and save valuable time.
8. Leveraging Presets and Actions
8. Can I Use Lightroom Presets on Photos Edited in Photoshop?
Yes, you can apply Lightroom presets to photos edited in Photoshop after they are saved and re-imported into Lightroom. This allows you to maintain a consistent style across your images.
Lightroom presets and Photoshop actions are powerful tools for streamlining your editing workflow and achieving consistent results. Here’s how to leverage them effectively:
-
Lightroom Presets:
- Consistent Style: Use Lightroom presets to apply a consistent style to your photos, whether they’ve been edited in Photoshop or not.
- Batch Processing: Apply presets to multiple images simultaneously to save time.
- Creative Effects: Experiment with different presets to achieve various creative effects.
-
Photoshop Actions:
- Automate Tasks: Record actions in Photoshop to automate repetitive tasks, such as resizing images, adding watermarks, or applying specific filters.
- Complex Edits: Create actions for complex edits that involve multiple steps.
- Consistent Results: Ensure consistent results by using actions to apply the same edits to different images.
To use Lightroom presets on photos edited in Photoshop:
- Edit in Photoshop: Edit your photo in Photoshop as desired.
- Save the File: Save the file in a compatible format, such as TIFF or PSD.
- Import into Lightroom: Import the edited photo into Lightroom.
- Apply Preset: Apply your desired Lightroom preset to the photo.
By combining the power of Lightroom presets and Photoshop actions, you can create a highly efficient and consistent editing workflow.
9. Handling Large Files
9. What’s the Best Way to Handle Large Files When Moving Between Lightroom and Photoshop?
For large files, ensure you have sufficient RAM and a fast storage device. Close unnecessary applications, and consider using Smart Previews in Lightroom to reduce processing load. Efficient hardware and software management ensures smooth performance.
When working with large image files, such as high-resolution photos or complex Photoshop documents, performance can become an issue. Here are some tips for handling large files effectively:
-
Sufficient RAM:
- Ensure that your computer has enough RAM (Random Access Memory) to handle large files.
- 16GB of RAM is generally recommended for photo editing, but 32GB or more may be necessary for very large files or complex projects.
-
Fast Storage Device:
- Use a fast storage device, such as an SSD (Solid State Drive), to store your image files.
- SSDs offer significantly faster read and write speeds compared to traditional hard drives, which can greatly improve performance.
-
Close Unnecessary Applications:
- Close any unnecessary applications running in the background to free up system resources.
- This can help prevent slowdowns and crashes when working with large files.
-
Smart Previews in Lightroom:
- Use Smart Previews in Lightroom to reduce the processing load on your computer.
- Smart Previews are smaller, lower-resolution versions of your original images that Lightroom uses for editing.
- When you export your final images, Lightroom automatically uses the original, high-resolution files.
-
Optimize Photoshop Performance:
- In Photoshop, adjust the performance settings to optimize memory usage and cache levels.
- Go to Edit > Preferences > Performance to adjust these settings.
-
Increase Memory Allocation:
- Increase the amount of memory allocated to Photoshop in the performance settings.
- This can help prevent memory-related errors when working with large files.
By implementing these tips, you can ensure smooth and efficient performance when handling large files in both Lightroom and Photoshop.
10. Preserving Image Quality
10. How Can I Ensure No Image Quality Is Lost When Moving Between Lightroom and Photoshop?
Use lossless file formats like TIFF, maintain a high bit depth (16 bits), and avoid excessive compression. Proper color space management and careful editing practices help preserve image quality throughout the process.
Preserving image quality is paramount when moving photos between Lightroom and Photoshop. Here are some key strategies to ensure minimal quality loss:
-
Lossless File Formats:
- Use lossless file formats like TIFF (Tagged Image File Format) or PSD (Photoshop Document) to avoid compression artifacts.
- These formats preserve all the original image data, ensuring no quality is lost during the saving process.
-
High Bit Depth:
- Maintain a high bit depth, such as 16 bits, to preserve a wider range of colors and tonal values.
- A higher bit depth reduces the risk of banding or posterization in your images.
-
Avoid Excessive Compression:
- Avoid using lossy compression formats like JPEG, which discard image data to reduce file size.
- If you need to compress your images, use a lossless compression method or minimize the amount of compression applied.
-
Proper Color Space Management:
- Use a wide-gamut color space like ProPhoto RGB during editing to preserve as much color information as possible.
- Convert to sRGB when exporting for web use to ensure consistent colors across different devices.
-
Careful Editing Practices:
- Avoid making extreme adjustments to your images, as this can introduce artifacts or noise.
- Use non-destructive editing techniques, such as adjustment layers in Photoshop, to make changes without permanently altering the original image data.
By following these guidelines, you can minimize the risk of quality loss and ensure that your images look their best throughout the editing process.
Conclusion
Mastering the art of moving photos between Photoshop and Lightroom is essential for any serious photographer. By understanding the best settings, file formats, and workflow practices, you can seamlessly integrate these two powerful tools and create stunning images.
Ready to take your photography to the next level? Explore dfphoto.net for in-depth tutorials, inspiring galleries, and a vibrant community of photographers. Discover new techniques, find inspiration, and connect with fellow enthusiasts.
Visit dfphoto.net today and unlock your creative potential.
Address: 1600 St Michael’s Dr, Santa Fe, NM 87505, United States
Phone: +1 (505) 471-6001
Website: dfphoto.net
FAQ Section
Frequently Asked Questions about Moving Photos Between Photoshop and Lightroom
Here are some frequently asked questions to help you further understand the process of moving photos between Photoshop and Lightroom:
1. Why move photos between Lightroom and Photoshop?
Moving photos between Lightroom and Photoshop allows you to leverage the strengths of each program. Lightroom is excellent for organization and global adjustments, while Photoshop excels in detailed editing and retouching.
2. What is the best file format to use when moving photos?
TIFF is generally recommended for its lossless compression and layer support, preserving image quality. PSD is also a good option as it is Photoshop’s native format, ideal for complex projects.
3. How do I ensure that my Lightroom adjustments are applied in Photoshop?
When you use the “Edit In” command, Lightroom automatically applies all your adjustments to the image before opening it in Photoshop.
4. Can I use Photoshop Elements instead of Photoshop?
Yes, Lightroom can also integrate with Photoshop Elements. The settings are similar, but you may need to adjust the bit depth to 8 bits for optimal compatibility.
5. What if my edited photo doesn’t automatically appear in Lightroom?
Ensure the file is saved in TIFF or PSD format in the same folder. Then, synchronize the folder in Lightroom to refresh the catalog.
6. How do I manage color space effectively?
Maintain the ProPhoto RGB color space for editing and convert to sRGB when exporting for web use to ensure accurate color representation.
7. What are Smart Previews in Lightroom?
Smart Previews are smaller, lower-resolution versions of your original images that Lightroom uses for editing, reducing the processing load on your computer.
8. How can I optimize my workflow for roundtrip editing?
Use Lightroom for initial adjustments and Photoshop for detailed editing. Save the file in Photoshop, and Lightroom will automatically add the edited file to your catalog.
9. Can I apply Lightroom presets to photos edited in Photoshop?
Yes, after saving and re-importing the photo into Lightroom, you can apply Lightroom presets to maintain a consistent style.
10. What should I do if I experience performance issues with large files?
Ensure you have sufficient RAM and a fast storage device. Close unnecessary applications and consider using Smart Previews in Lightroom to reduce processing load.
By understanding these FAQs, you can efficiently manage your photo editing workflow between Photoshop and Lightroom.
