Mounting photos to mat board can elevate your presentation and protect your cherished memories. This guide from dfphoto.net provides a comprehensive, step-by-step approach to mastering this essential skill, ensuring your photos look their best. Explore techniques for professional photo presentation, matting, and visual artistry, transforming your photography into gallery-worthy displays with long-lasting quality.
1. What is a Mat Board and Why Should I Use One?
A mat board is a border placed between a photo and its frame. Using a mat board enhances visual appeal and provides protection.
A mat board, also known as a mount board or photo mat, is more than just a decorative border; it’s a crucial element in preserving and showcasing your photographs or artwork. Here’s a breakdown of why you should consider using one:
- Enhanced Visual Appeal: The mat board acts as a neutral space, preventing the artwork from getting overshadowed by the frame. The white space of the mat visually separates the photo from the frame, making the image stand out. According to insights on visual perception from the Santa Fe University of Art and Design’s Photography Department, a well-chosen mat board can significantly enhance the viewer’s focus on the artwork.
- Professional Presentation: A mat board adds a touch of elegance and professionalism to your display. It communicates that you value your work and have taken the time to present it thoughtfully.
- Protection: Mat boards create a physical barrier between the photograph and the glazing (glass or acrylic) of the frame. This prevents the photograph from sticking to the glazing, which can cause damage over time, especially in humid environments.
- Preservation: Acid-free mat boards are essential for archival purposes. They prevent the acids present in some papers and mounting materials from migrating into the photograph, which can cause discoloration and deterioration over time. Using archival quality materials ensures your photographs will last for generations.
- Spacing and Breathing Room: A mat board provides visual “breathing room” around the image. This helps to prevent the artwork from feeling cramped or overwhelmed by the frame.
- Flexibility: Mat boards come in a variety of colors, textures, and thicknesses, allowing you to customize the presentation to perfectly complement your artwork and décor.
- Depth and Dimension: Mat boards add a sense of depth to the framed piece, drawing the viewer’s eye into the artwork.
- Highlighting Specific Elements: The color and width of the mat board can be chosen to accentuate certain colors or features within the photograph.
- Standardization: Using standard mat board sizes makes it easier to find readily available frames that fit your matted artwork.
- Value Enhancement: A professionally matted and framed photograph instantly looks more valuable and presentable, whether you’re displaying it in your home or selling it to a client.
2. What Tools and Materials Do I Need to Mount Photos to Mat Board?
To mount photos to mat board, gather these items: mat board, photo/artwork, gloves, and self-adhesive, acid-free paper tape.
Before you embark on mounting your photos to a mat board, it’s crucial to gather all the necessary tools and materials. Having everything on hand will streamline the process and ensure a professional-looking result. Here’s a comprehensive list:
- Mat Board: The foundation of your presentation. Ensure it’s acid-free to protect your photo from deterioration over time. Choose a color and thickness that complements your photo. Consider Profile Australia’s range of matboard solutions for a variety of sizes and colors, all made with acid-free, eco-sustainable papers and backed by a lifetime guarantee.
- Photo or Artwork: The star of the show! Make sure it’s clean and free of dust or fingerprints.
- Gloves: Optional, but highly recommended. Wearing gloves, especially cotton or lint-free gloves, will prevent fingerprints and oils from transferring to your photo and the mat board.
- Self-Adhesive, Acid-Free Paper Tape (Hinging Tape): Crucial for attaching the photo to the mat board without causing damage. This tape is designed to be pH neutral and won’t yellow or become brittle over time. Avoid using regular tape, as it can damage your photo.
- Clean Workspace: A clean, flat surface is essential. Cover your work area with a clean cloth or paper to prevent scratches or damage to your photo or mat board.
- Ruler or T-Square: For precise alignment of your photo within the mat board window.
- Pencil: For lightly marking the position of the photo on the back of the mat board.
- Cutting Mat (Optional): If you need to trim your photo or mat board, a cutting mat will protect your work surface.
- Craft Knife or Scalpel (Optional): For trimming photos or mat boards. Use with caution and always with a cutting mat.
- Burnishing Tool (Optional): A bone folder or similar tool can be used to firmly adhere the hinging tape to the mat board.
- Weight (Optional): A clean, flat weight (like a book) can be used to hold the photo in place while the hinging tape sets.
- Soft Brush or Air Blower (Optional): To remove any dust or debris from your photo and mat board.
- Magnifying Glass (Optional): For inspecting the photo and mat board for any imperfections.
Having these tools and materials readily available will make the mounting process smoother, more efficient, and ultimately, more rewarding. Remember, quality materials and careful technique are key to preserving your photographs and creating stunning presentations that will last for years to come.
 Applying tape to the rear top of the photo for mat board mounting
3. How Do I Create a Clean Workspace for Mounting Photos?
Ensure your workspace is clean and free of clutter to prevent damage to your photo or frame. Cover the surface with a cloth or towel.
Creating a clean workspace is paramount before you even think about touching your precious photo or mat board. Imagine working in a dusty, cluttered environment – the risk of scratching your photo, transferring dirt onto the mat board, or accidentally damaging your materials skyrockets. Here’s how to create the ideal clean workspace:
- Clear the Area: Begin by completely clearing your table or work surface. Remove any unnecessary items, tools, or debris. You want a blank canvas to work on.
- Clean the Surface: Thoroughly clean the surface with a mild, non-abrasive cleaner. Dust, crumbs, or sticky residue can easily transfer to your photo or mat board. Ensure the surface is completely dry before proceeding.
- Cover the Surface: Protect your work area by covering it with a clean cloth, towel, or large sheet of paper. This provides a soft, protective barrier that will prevent scratches and absorb any accidental spills. A lint-free cloth is ideal to avoid leaving behind any fibers.
- Good Lighting: Ensure you have ample, well-distributed lighting. This will allow you to see fine details and ensure accurate alignment. Avoid harsh direct sunlight, as it can create glare and affect your perception of colors.
- Designated Area for Tools: Keep your tools organized and within easy reach. A small tray or container can help prevent them from rolling around and potentially scratching your materials.
- Pet-Free Zone: As much as you love your furry friends, keep them away from your workspace. Pet hair and dander can easily contaminate your materials and ruin your project.
- Minimize Distractions: Choose a quiet time and location where you won’t be interrupted. This will help you maintain focus and avoid mistakes.
- Wash Your Hands: Before you begin working, wash your hands thoroughly with soap and water. This will remove any oils or dirt that could transfer to your photo or mat board.
- Regularly Dust: Even with precautions, dust can accumulate. Keep a soft brush or air blower handy to gently remove any dust particles that settle on your work surface or materials.
- Consider Static Electricity: In dry environments, static electricity can attract dust and make it difficult to handle your materials. A humidifier or anti-static spray can help reduce static.
By taking the time to create a clean and organized workspace, you’re setting yourself up for success. You’ll minimize the risk of damage, ensure a professional-looking result, and enjoy a more relaxed and focused mounting experience.
4. How Should I Position My Photo on the Mat Board?
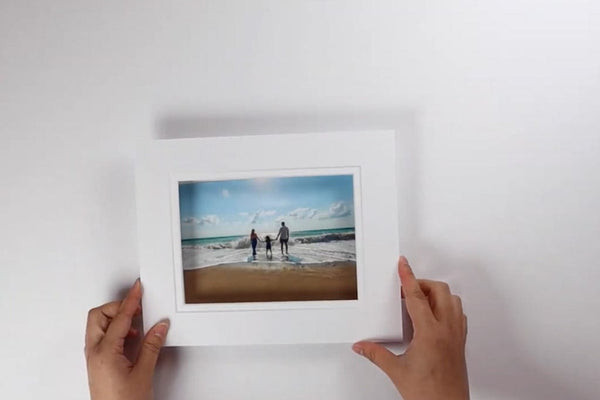
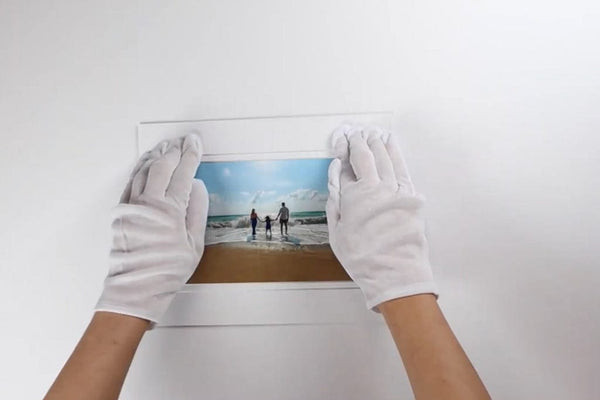
Hold the mat board over the photo to check positioning and fit. Ensure the photo is properly centered and aligned.
Proper positioning is key to a visually appealing and balanced final product. Rushing this step can lead to an off-center image, uneven borders, and an overall unprofessional look. Here’s a detailed guide on how to position your photo perfectly on the mat board:
- Lay Everything Out: Place your photo and mat board on your clean workspace.
- Center the Image: Carefully align the photo within the mat board opening (the “window”). Use a ruler or T-square to ensure the photo is centered both horizontally and vertically. The goal is to have an equal amount of mat board showing on all sides of the photo.
- Consider the “Optical Center”: The true center of the mat board might not always be the most visually pleasing. The “optical center” is slightly above the mathematical center. Experiment by positioning the photo slightly higher to see if it looks more balanced to your eye. This is a subtle adjustment, but it can make a big difference.
- Account for Cropping: If your photo needs to be cropped to fit within the mat board opening, do so before positioning it. Use a cutting mat, ruler, and craft knife for precise cuts.
- Use Light Marks: Once you’re happy with the positioning, use a pencil to lightly mark the corners of the photo on the back of the mat board. These marks will serve as a guide when you attach the photo.
- Check and Double-Check: Before you start taping, take a step back and visually assess the positioning. Does it look balanced? Are the borders even? Is the image centered? It’s always better to double-check before committing.
- Consider the Image Content: The content of your photo can influence the ideal positioning. For example, if your photo has a strong horizontal element (like a landscape), you might want to position it slightly lower in the mat board to emphasize that element.
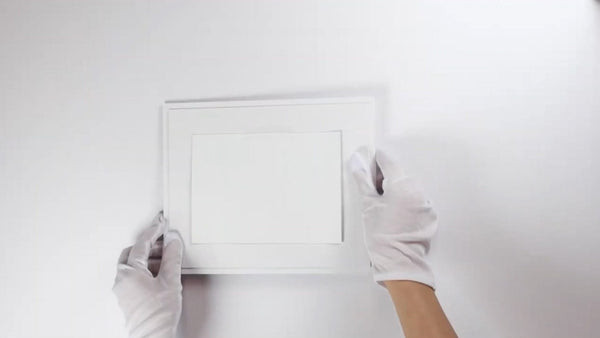
- Test with a Frame (Optional): If you already have the frame you plan to use, place the matted photo inside to see how it looks. This will give you a better sense of the final presentation.
- Think About Viewing Distance: Consider how far away the framed photo will be viewed from. If it will be viewed from a distance, you might want to use a wider mat board to create more visual impact.
- Personal Preference: Ultimately, the best positioning is the one that looks best to you. Trust your eye and don’t be afraid to experiment until you’re happy with the result.
By following these steps, you’ll ensure that your photo is perfectly positioned on the mat board, creating a visually stunning and professional presentation that will showcase your work in the best possible light.
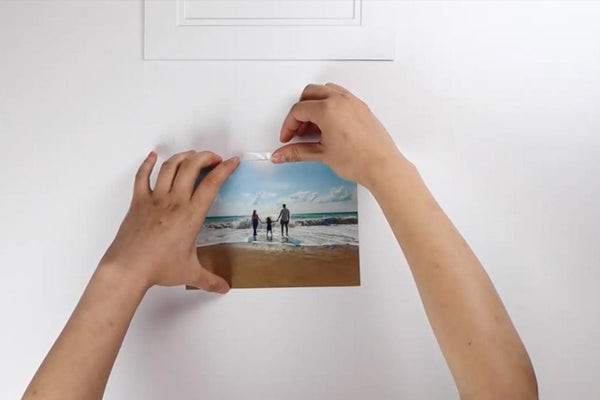
 Aligning a mat board over an image before mounting
5. How Do I Apply Tape to My Photo for Matting?
Place the photo face down and apply acid-free hinging tape to the top edge, leaving a small portion overhanging.
Applying tape correctly is crucial for securely attaching your photo to the mat board without causing damage over time. Here’s a step-by-step guide to ensure a proper and archival-safe application:
- Prepare Your Photo: Place your photo face down on your clean work surface.
- Cut the Tape: Cut one or two strips of acid-free hinging tape, each about 1-2 inches long. The length will depend on the size of your photo.
- Position the Tape: Place the tape strips along the top edge of the back of your photo. Leave a small portion of the tape (about 1/4 inch or 5mm) overhanging the edge. This overhanging portion will be used to attach the photo to the mat board.
- Even Spacing: If using two strips of tape, space them evenly along the top edge. For larger photos, you may need three or more strips for added support.
- Avoid the Center: Do not apply tape to the center of the photo. The hinging method allows the photo to hang freely and expand/contract with changes in humidity, preventing warping.
- Use Acid-Free Tape: This is non-negotiable. Regular tape will eventually yellow, become brittle, and damage your photo. Ensure the tape is specifically labeled as “acid-free” or “archival.”
- Gentle Pressure: Press the tape firmly onto the back of the photo, ensuring good adhesion. Use a burnishing tool (like a bone folder) for even better adhesion, but be gentle to avoid damaging the photo.
- Clean Fingers or Gloves: Handle the tape with clean fingers or wear gloves to prevent transferring oils and fingerprints to the adhesive.
- Avoid Overlapping: Do not overlap the tape strips, as this can create unevenness and potentially damage the photo.
- Consider T-Hinges for Larger Prints: For larger or wider prints, consider using a T-hinge method. This involves creating a “T” shape with the tape, providing a stronger and more flexible attachment. Place one strip of tape vertically along the top edge of the photo, and then place a second strip horizontally across the top of the first strip, forming a “T.”
- Check Alignment: Before attaching the photo to the mat board, double-check that the tape is aligned properly and that the overhanging portion is consistent.
- Avoid Stretching the Tape: When applying the tape, avoid stretching it, as this can cause it to lose its adhesive properties.
- One-Time Application: Once the tape is applied, avoid removing and reapplying it, as this can weaken the adhesive.
- Consult the Pros: If you’re unsure about the best method for taping your photo, consult a professional framer or archivist for advice.
By following these steps, you’ll ensure that your photo is securely attached to the mat board in a way that is both aesthetically pleasing and archivally sound, preserving your memories for years to come.
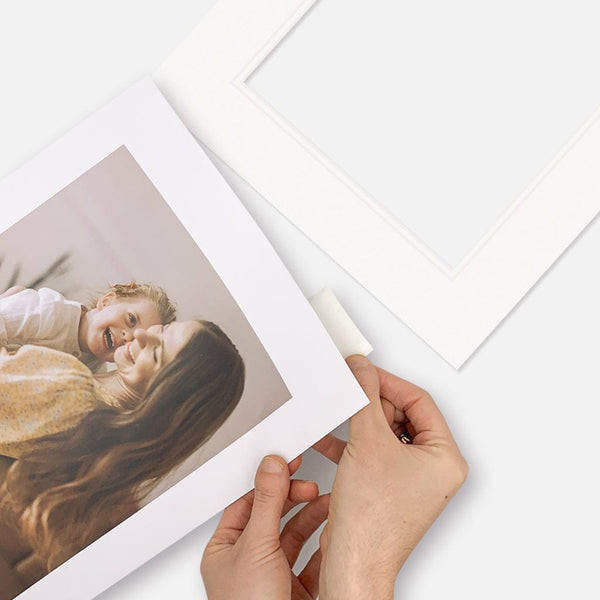 Archival acid-free hinging tape for photo mounting
6. How Do I Attach the Mat Board to the Photo?
Carefully align the mat board over the photo, adhering the tape to the back of the mat board. Apply firm pressure to ensure adhesion.
Attaching the mat board to your photo is a critical step that requires precision and care. A misaligned mat board can ruin the entire presentation, so take your time and follow these steps:
- Prepare Your Materials: Ensure your photo has the hinging tape applied to the top edge, as described in the previous step. Have your mat board ready and your clean workspace clear.
- Align the Mat Board: Carefully position the mat board over the photo, aligning the edges of the mat board window with the edges of the photo. Use the light pencil marks you made earlier as a guide.
- Gentle Placement: Gently lower the mat board onto the photo, allowing the overhanging portion of the hinging tape to make contact with the back of the mat board.
- Precise Alignment: Double-check the alignment before applying any pressure. Ensure the photo is centered and that the borders are even.
- Secure the Tape: Once you’re satisfied with the alignment, gently press the overhanging portion of the hinging tape onto the back of the mat board. Start with light pressure and gradually increase it.
- Burnishing: Use a burnishing tool (like a bone folder) to firmly adhere the tape to the mat board. Apply even pressure to ensure a strong bond.
- Avoid Wrinkles: Be careful not to create any wrinkles or bubbles in the tape. If a wrinkle occurs, gently lift the tape and reapply it.
- Flip and Burnish Again: Flip the mat board over and burnish the tape from the front, applying pressure to the area where the tape is attached. This will help ensure a secure bond.
- Check Alignment Again: After attaching the tape, double-check the alignment one more time. If you notice any misalignment, carefully lift the tape and reposition the mat board.
- Weight (Optional): Place a clean, flat weight (like a book) on top of the mat board to help the tape adhere fully. Leave the weight in place for at least 30 minutes.
- Handle with Care: Once the mat board is attached, handle the matted photo with care. Avoid bending or flexing the mat board, as this could weaken the tape bond.
- Consider the Environment: Attach the mat board in a clean, dry environment to ensure proper adhesion. Avoid attaching the mat board in humid or dusty conditions.
- Professional Advice: If you’re working with valuable or irreplaceable photos, consider seeking professional advice from a framer or archivist.
By following these steps, you’ll successfully attach the mat board to your photo, creating a professional-looking and archivally sound presentation that will protect and showcase your work for years to come.
 Pushing the mat board down firmly over the self-adhesive tape
7. What is the Tab Hinge Method for Mounting Photos?
The tab hinge method involves attaching the photo to the mat board using tabs of acid-free tape at the top edge.
The tab hinge method is a preferred technique for mounting photos to mat boards because it offers a secure yet flexible attachment that allows the photo to hang naturally and prevents damage over time. Here’s a detailed explanation of the tab hinge method:
- What is a Tab Hinge? A tab hinge is created by attaching small tabs of acid-free tape to the top edge of the back of the photo, with a portion of the tape overhanging the edge. These overhanging tabs are then attached to the back of the mat board.
- Why Use a Tab Hinge?
- Allows for Expansion and Contraction: The tab hinge allows the photo to expand and contract with changes in humidity without warping or buckling.
- Prevents Damage: The hinging method avoids adhering the entire photo to the mat board, which can cause damage over time.
- Archival Safe: When using acid-free tape and mat board, the tab hinge method is considered an archival-safe technique that will help preserve your photo for years to come.
- Easy to Reverse: The tab hinge is relatively easy to reverse if you need to remove the photo from the mat board.
- How to Create a Tab Hinge:
- Prepare Your Photo: Place your photo face down on your clean work surface.
- Cut the Tape: Cut one or two strips of acid-free hinging tape, each about 1-2 inches long.
- Position the Tape: Place the tape strips along the top edge of the back of your photo. Leave a small portion of the tape (about 1/4 inch or 5mm) overhanging the edge.
- Even Spacing: If using two strips of tape, space them evenly along the top edge. For larger photos, you may need three or more strips for added support.
- Attach to Mat Board: Carefully align the mat board over the photo and gently press the overhanging portion of the tape onto the back of the mat board.
- Burnish: Use a burnishing tool to firmly adhere the tape to the mat board.
- Variations of the Tab Hinge:
- Single Tab Hinge: Uses a single strip of tape at each attachment point.
- Double Tab Hinge: Uses two strips of tape at each attachment point for added strength.
- T-Hinge: A variation where two strips of tape are used to create a “T” shape. One strip is placed vertically along the top edge of the photo, and the second strip is placed horizontally across the top of the first strip. The T-hinge is often used for larger or heavier prints.
- Tips for Using the Tab Hinge Method:
- Use Acid-Free Materials: Always use acid-free tape and mat board to ensure archival safety.
- Handle with Care: Handle the photo and mat board with clean hands or gloves to prevent transferring oils or dirt.
- Avoid Stretching the Tape: When applying the tape, avoid stretching it, as this can weaken its adhesive properties.
- Proper Alignment: Ensure the photo is properly aligned within the mat board window before attaching the tape.
- Adequate Support: Use enough tabs of tape to provide adequate support for the photo.
- Consult a Professional: If you’re unsure about the best method for hinging your photo, consult a professional framer or archivist.
By using the tab hinge method, you’ll create a secure, flexible, and archivally sound attachment that will protect and showcase your photo for years to come.
8. What is the T-Hinge Method and When Should I Use It?
The T-hinge uses cross-layered tabs of acid-free tape for wider prints, allowing for expansion and contraction without rippling.
The T-hinge method is a variation of the tab hinge technique specifically designed for larger or wider prints. It provides a more robust and flexible attachment that accommodates the natural expansion and contraction of the paper without causing ripples or buckles. Here’s a detailed look at the T-hinge method:
- What is a T-Hinge? A T-hinge is created by using two strips of acid-free tape to form a “T” shape. One strip is placed vertically along the top edge of the back of the photo, and the second strip is placed horizontally across the top of the first strip, partially overlapping it. The overhanging portion of the horizontal tape is then attached to the back of the mat board.
- Why Use a T-Hinge?
- Greater Support for Larger Prints: Larger prints are more susceptible to warping and buckling due to changes in humidity. The T-hinge provides greater support and prevents the print from sagging or detaching from the mat board.
- Allows for Expansion and Contraction: The T-hinge allows the paper to expand and contract freely without putting stress on the attachment points. This prevents ripples and buckles from forming.
- Distributes Stress: The T-shape distributes stress more evenly across the attachment point, reducing the risk of the tape tearing or the paper becoming damaged.
- Archival Safe: When using acid-free tape and mat board, the T-hinge method is considered an archival-safe technique.
- When to Use a T-Hinge:
- Large Prints: Use T-hinges for prints larger than 16×20 inches.
- Wide Prints: Use T-hinges for prints that are significantly wider than they are tall.
- Heavyweight Papers: Use T-hinges for prints on heavyweight papers that are more prone to warping.
- Prints in High-Humidity Environments: Use T-hinges for prints that will be displayed in environments with high humidity levels.
- How to Create a T-Hinge:
- Prepare Your Photo: Place your photo face down on your clean work surface.
- Cut the Tape: Cut two strips of acid-free hinging tape for each T-hinge you plan to create. Each strip should be about 1-2 inches long.
- Position the First Strip: Place the first strip of tape vertically along the top edge of the back of your photo. The tape should be centered at the desired attachment point.
- Position the Second Strip: Place the second strip of tape horizontally across the top of the first strip, forming a “T” shape. The horizontal strip should partially overlap the vertical strip, with a portion of the tape overhanging the edge of the photo.
- Attach to Mat Board: Carefully align the mat board over the photo and gently press the overhanging portion of the horizontal tape onto the back of the mat board.
- Burnish: Use a burnishing tool to firmly adhere the tape to the mat board.
- Spacing T-Hinges: For wider prints, place T-hinges approximately every 8-12 inches along the top edge. For example, for a wider A2 sized print, you might place three T-hinges: one on each side and one in the middle.
- Tips for Using the T-Hinge Method:
- Use Acid-Free Materials: Always use acid-free tape and mat board.
- Adequate Spacing: Ensure the T-hinges are evenly spaced along the top edge of the print.
- Proper Overlap: Make sure the horizontal tape strip overlaps the vertical tape strip sufficiently to create a strong bond.
- Allow for Movement: The T-hinge should allow the print to move slightly.
- Consult a Professional: If you’re unsure about the best method for hinging your photo, consult a professional framer or archivist.
By using the T-hinge method for your larger or wider prints, you’ll ensure a secure, flexible, and archivally sound attachment that will prevent warping and buckling and allow your artwork to be displayed beautifully for years to come.
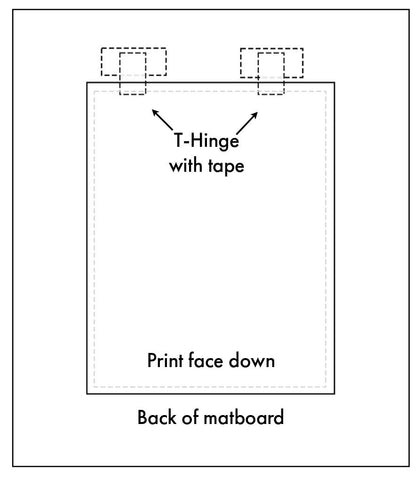 Diagram for T-Hinge for attaching artwork to a window mat
9. What Are Some Additional Tips for Mounting Larger Prints?
For larger prints, use T-hinges, avoid taping the entire top edge, and allow the print to expand and contract naturally.
When working with larger prints, it’s crucial to employ techniques that accommodate their increased size and weight. Here’s a breakdown of additional tips to ensure successful mounting:
- T-Hinges are Your Friend: As mentioned earlier, the T-hinge method is highly recommended for larger prints. It provides a stronger and more flexible attachment that allows the print to expand and contract without causing damage.
- Avoid Taping the Entire Top Edge: Do not apply tape all along the top edge of the print. This will restrict the print’s ability to move and can lead to rippling or buckling. The goal is to allow the print to “breathe.”
- Proper Spacing of Hinges: Space the T-hinges appropriately. A general guideline is to place them every 8-12 inches along the top edge. The exact spacing will depend on the size and weight of the print.
- Use a Backing Board: Consider using a backing board made of acid-free foam core or mat board to provide additional support for the print. The backing board should be slightly larger than the mat board.
- Archival-Quality Materials: Always use archival-quality materials, including acid-free tape, mat board, and backing board.
- Handle with Care: Larger prints are more delicate and prone to damage. Handle them with clean hands or gloves and avoid bending or creasing them.
- Lay Flat: Store larger prints flat to prevent them from warping.
- Consider Professional Framing: For valuable or irreplaceable larger prints, consider having them professionally framed. A professional framer will have the expertise and equipment to properly mount and protect your artwork.
- Weight Distribution: When mounting, ensure the weight of the print is evenly distributed. This will prevent the print from sagging or pulling away from the mat board.
- Environmental Considerations: Be mindful of the environment where the framed print will be displayed. High humidity levels can cause paper to expand, while low humidity levels can cause it to contract.
- Acclimation: Allow the print to acclimate to the environment for several days before mounting it. This will help minimize any potential warping or buckling.
- Test Mounting: Before permanently mounting the print, consider doing a test mounting with a scrap piece of paper to ensure you’re comfortable with the technique.
- Consult a Professional: If you’re unsure about the best method for mounting your larger print, consult a professional framer or archivist.
By following these tips, you’ll be well-equipped to mount your larger prints with confidence, ensuring they are beautifully displayed and protected for years to come.
10. Why Is It Important to Allow the Photo to Hang Naturally?
Allowing the photo to hang naturally prevents rippling and buckling by accommodating expansion and contraction due to temperature changes.
Allowing a photo to hang naturally within the mat board and frame is crucial for its long-term preservation and aesthetic appearance. Restricting its movement can lead to various problems, including rippling, buckling, and even damage to the photograph itself. Here’s why it’s so important:
- Accommodates Expansion and Contraction: Paper, like most materials, expands and contracts with changes in temperature and humidity. If a photo is tightly adhered to a rigid backing, it cannot move freely, and this can cause stress on the paper fibers. Over time, this stress can lead to rippling, buckling, or even tears.
- Prevents Rippling and Buckling: When a photo is allowed to hang naturally, it can expand and contract without being forced into a fixed position. This prevents the formation of unsightly ripples and buckles, ensuring a smooth and professional appearance.
- Reduces Stress on the Photo: By allowing the photo to hang freely, you’re reducing the amount of stress on the paper fibers. This helps to prolong the life of the photograph and prevent it from becoming brittle or damaged.
- Maintains Image Integrity: A photo that is allowed to hang naturally will maintain its original shape and form. This is especially important for photographs with fine details or delicate surfaces.
- Preserves Archival Quality: Archival mounting techniques, such as hinging, are designed to allow for natural movement. These techniques help to preserve the archival quality of the photograph by minimizing the risk of damage over time.
- Easy Removal: If a photo is not completely adhered to the mat board, it can be easily removed for conservation or remounting.
- Professional Presentation: A photo that hangs naturally looks more professional and aesthetically pleasing. It creates a sense of depth and dimension, enhancing the overall viewing experience.
- Avoid Adhesives on the Entire Surface: Never use adhesives to attach the entire back of the photo to the mat board. This completely restricts movement and will inevitably lead to problems.
- Use Hinging Techniques: Employ hinging techniques, such as the tab hinge or T-hinge, to allow the photo to hang freely while still providing secure support.
- Consider the Environment: Be mindful of the environment where the framed photo will be displayed. Fluctuations in temperature and humidity can have a significant impact on the photo’s movement.
By understanding the importance of allowing a photo to hang naturally, you can take steps to ensure its long-term preservation and aesthetic appeal. Using proper mounting techniques and archival-quality materials will help protect your cherished memories for years to come.
 Flipping the mat board and photo over and burnishing more
11. Where Can I Find High-Quality Mat Boards and Framing Supplies?
Explore Profile Australia for mat boards or visit local art supply stores for a variety of framing materials.
Finding high-quality mat boards and framing supplies is crucial for preserving and showcasing your photographs and artwork in the best possible way. Here’s a guide to help you locate the right resources:
- Online Retailers:
- Profile Australia: Profile Australia offers a wide range of mat boards, including full sheets, single white window mat boards, and double-layered mat boards. They are known for their acid-free, eco-sustainable papers and lifetime guarantee.
- Specialized Art Supply Websites: Many online retailers specialize in art and framing supplies, offering a vast selection of mat boards, frames, and accessories.
- Local Art Supply Stores:
- Independent Art Stores: These stores often carry a curated selection of high-quality mat boards and framing supplies. The staff can provide expert advice and personalized service.
- Chain Art Supply Stores: Chain stores like Michaels or Hobby Lobby also offer a range of mat boards and framing supplies, although the quality may vary.
- Professional Framing Shops:
- Custom Framing Shops: These shops offer custom framing services and typically carry a wide selection of mat boards and frames. They can provide expert advice and handle the entire framing process for you.
- Archival Suppliers:
- Specialized Archival Suppliers: These suppliers specialize in archival-quality materials for preserving photographs and artwork. They offer acid-free mat boards, hinging tape, and other supplies that meet the highest standards for conservation.
- Things to Consider When Choosing a Supplier:
- Quality of Materials: Look for acid-free mat boards, hinging tape, and other supplies.
- Selection: Choose a supplier that offers a wide range of mat boards in different colors, textures, and thicknesses.
- Price: Compare prices from different suppliers to find the best value.
- Customer Service: Choose a supplier with a good reputation for customer service.
- Shipping: Consider the shipping costs and delivery times.
- Specific Products to Look For:
- Acid-Free Mat Boards: Essential for preserving your photographs and artwork.
- Archival Hinging Tape: Used to attach the photo to the mat board without causing damage.
- Foam Core Backing Boards: Provide additional support for the print.
- Frames: Choose a frame that complements your photograph and décor.
- UV-Protective Glazing: Protects your photograph from fading and damage caused by UV light.
By exploring these resources and considering these factors, you can find the perfect mat boards and framing supplies to showcase your photographs and artwork in a way that is both beautiful and archivally sound.
12. What Are the Common Mistakes to Avoid When Mounting Photos?
Avoid using non-acid-free materials, applying adhesive to the entire photo, and misaligning the photo on the mat board.
Mounting photos to mat boards can be a rewarding experience, but it’s essential to be aware of common pitfalls that can compromise the quality and longevity of your work. Here’s a breakdown of mistakes to avoid:
- Using Non-Acid-Free Materials: This is the most critical mistake. Acidic materials will eventually cause your photo to yellow, become brittle, and deteriorate. Always use acid-free mat boards, hinging tape, and backing boards.
- Applying Adhesive to the Entire Photo: Never adhere the entire back of the photo to the mat board. This restricts the photo’s ability to expand and contract, leading to rippling, buckling, and potential damage.
- Misaligning the Photo: Take your time to carefully align the photo within the mat board window. A crooked or off-center photo will detract from the overall presentation.
- Using the Wrong Type of Tape: Avoid using masking tape, cellophane tape, or other types of tape that are not specifically designed for archival use. These tapes will yellow, become brittle, and damage your photo.
- Handling the Photo with Dirty Hands: Always handle the photo with clean hands or gloves