Mounting photos on mat board is a crucial skill for any photographer or visual artist, and it’s easier than you think. At dfphoto.net, we offer a comprehensive guide to help you master this technique, ensuring your artwork is displayed beautifully and professionally. Proper mounting not only enhances the visual appeal but also protects your valuable prints.
1. What Is Mat Board And Why Use It For Mounting Photos?
Mat board is a rigid, paper-based material used to frame and protect photographs, prints, and artwork. It provides a border around the image, separating it from the frame and glass. Mat boards serve both aesthetic and functional purposes, enhancing the visual appeal of the artwork while also protecting it from damage.
1.1. What Are The Key Benefits Of Using Mat Board?
Mat boards offer several key benefits, including:
- Protection: Mat boards create a barrier between the artwork and the glass, preventing the print from sticking to the glass due to humidity or condensation. They also provide a buffer against physical damage, such as bending or tearing.
- Aesthetics: Mat boards enhance the visual appeal of the artwork by providing a clean, professional border. They can also be used to complement the colors and style of the artwork, creating a more cohesive and visually pleasing presentation.
- Preservation: Acid-free mat boards protect artwork from acid migration, which can cause discoloration and deterioration over time. Archival-quality mat boards are essential for preserving valuable or sentimental prints.
- Focus: By creating a visual separation between the artwork and the frame, mat boards help to draw the viewer’s eye to the image, enhancing its impact.
1.2. What Different Types Of Mat Boards Are Available?
There are several types of mat boards available, each with its own unique properties and uses:
- Paper Mat Boards: These are the most economical option, made from wood pulp. They are suitable for short-term framing but may contain acids that can damage artwork over time.
- Alpha-Cellulose Mat Boards: Made from purified wood pulp, these mat boards are acid-free and lignin-free, offering better protection than paper mat boards. They are a good choice for general framing purposes.
- Rag Mat Boards: These are the highest quality mat boards, made from 100% cotton fibers. They are acid-free, lignin-free, and buffered to neutralize any remaining acids, providing the best possible protection for valuable artwork.
- Foam Boards: While technically not mat boards, foam boards are often used as backing for framed artwork. They are lightweight, rigid, and provide a smooth surface for mounting.
1.3. How To Choose The Right Mat Board For Your Project?
Choosing the right mat board depends on several factors, including the value of the artwork, the desired aesthetic, and the budget.
- For valuable or sentimental artwork, always choose rag mat boards to ensure long-term preservation.
- For general framing purposes, alpha-cellulose mat boards offer a good balance of protection and affordability.
- Consider the color and texture of the mat board. White or neutral colors are generally the safest choice, as they complement most artwork. However, you can also choose a colored mat board to enhance specific colors or themes in the artwork.
- The thickness of the mat board also affects its appearance and protective qualities. Thicker mat boards provide more visual depth and better protection against physical damage.
2. What Tools And Materials Do You Need To Mount Photos On Mat Board?
Mounting photos on mat board requires a few essential tools and materials to ensure a professional and long-lasting result. Here’s a comprehensive list:
- Mat Board: Choose the appropriate type, color, and thickness based on your artwork and aesthetic preferences.
- Photo or Print: Ensure your photo or print is clean and free of any dust or fingerprints.
- Acid-Free Hinging Tape: This tape is specifically designed for mounting artwork and will not damage the print over time.
- Clean Workspace: A clean, flat surface is essential to avoid any accidental damage or contamination.
- Gloves: Wearing gloves will prevent fingerprints and oils from transferring to the mat board and print.
- Cutting Tools: A mat cutter or sharp utility knife is needed for trimming the mat board and photo.
- Ruler or Straight Edge: This will ensure accurate and straight cuts.
- Pencil: For marking measurements and guidelines.
- Burnishing Tool: A bone folder or similar tool to ensure the tape adheres firmly to the mat board and photo.
- Optional:
- Dry Mounting Tissue: For a more permanent and professional mounting method.
- Dry Mount Press: Required for using dry mounting tissue.
3. Step-By-Step Guide: How to Mount Photos On Mat Board
Follow these steps for a professional and secure mounting job:
3.1. Step 1: Preparing Your Workspace
Before you begin, ensure your workspace is clean and free of any dust, debris, or clutter. Lay down a clean cloth or paper to protect the surface from scratches and stains.
3.2. Step 2: Handling Your Materials
Wearing gloves is crucial to prevent fingerprints and oils from transferring to the mat board and photo. Handle the mat board and photo carefully to avoid any bending or creasing.
3.3. Step 3: Positioning The Photo Or Print
Place your photo or print face down on a clean surface. Position the mat board over the photo to check the alignment and ensure the image fits properly within the window.
3.4. Step 4: Applying The Acid-Free Hinging Tape
Cut one or two tabs of acid-free hinging tape and apply them to the top edge of the photo, leaving a small portion of the tape overhanging the edge. This will allow you to attach the photo to the mat board.
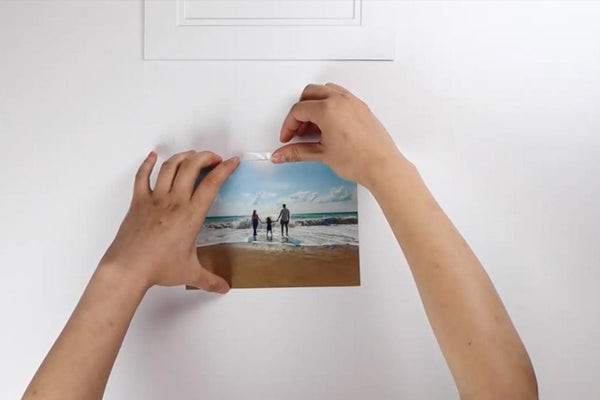 Apply Hinging Tape to top of photo
Applying archival quality hinging tape to the back of a photo ensures secure and acid-free mounting.
3.5. Step 5: Attaching The Mat Board To The Photo
Carefully align the mat board over the photo, ensuring the image is centered within the window. Gently lower the mat board onto the tape, adhering it to the top edge of the photo.
3.6. Step 6: Securing The Attachment
Apply firm pressure to the tape and mat board to ensure a strong bond. Flip the mat board over and use a burnishing tool to rub the tape and further secure the attachment.
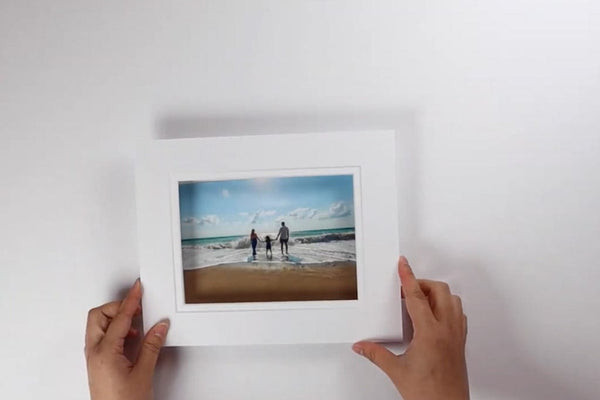 Aligning the matboard to the print
Carefully align the matboard to the print to ensure perfect positioning.
3.7. Step 7: Final Inspection
Inspect the mounted photo for any imperfections or alignment issues. Make any necessary adjustments before framing.
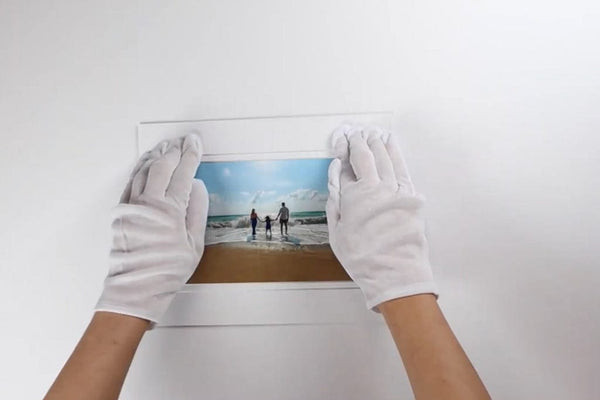 Secure the matboard to the print
Applying firm pressure to secure the matboard ensures the print stays in place.
4. Alternative Mounting Methods: T-Hinge And Dry Mounting
For larger prints or more permanent mounting solutions, consider these alternative methods:
4.1. What Is The T-Hinge Method?
The T-hinge method is ideal for larger prints as it allows for expansion and contraction without causing rippling.
- How To Create A T-Hinge: Create T-hinges by placing two tabs of tape in a T-shape along the top edge of the print. This allows the print to hang naturally inside the frame. For wider prints, space the T-hinges approximately every 20-30cm.
- When To Use T-Hinge: This method is useful for wider prints which might need to expand over time. This will reduce the possibility of damage to the print.
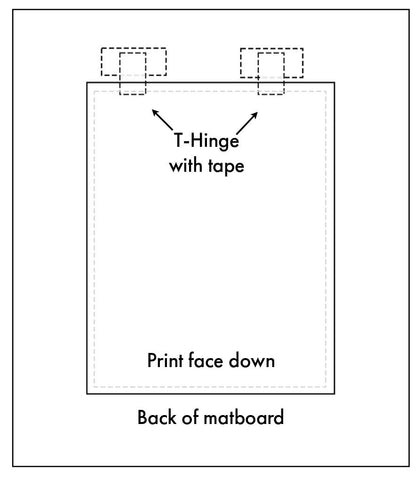 Creating a T-Hinge
Diagram showing the T-Hinge mounting technique for mat boards.
4.2. What Is Dry Mounting?
Dry mounting is a permanent mounting method that uses heat and pressure to adhere the photo to the mat board.
- How To Dry Mount: Place a sheet of dry mounting tissue between the photo and the mat board. Use a dry mount press to apply heat and pressure, bonding the photo to the mat board.
- When To Use Dry Mounting: Dry mounting is best for photos that will be displayed for an extended period and require a perfectly flat surface. However, it is not recommended for valuable or irreplaceable prints as it is a permanent process.
4.3. Advantages And Disadvantages Of Each Method
| Method | Advantages | Disadvantages |
|---|---|---|
| Hinging | Non-permanent, allows for easy removal, suitable for most prints | May not provide a perfectly flat surface for larger prints |
| T-Hinge | Allows for expansion and contraction, prevents rippling in larger prints | Requires careful placement of hinges, may not be suitable for very heavy prints |
| Dry Mounting | Permanent, provides a perfectly flat surface, professional appearance | Permanent, not suitable for valuable prints, requires specialized equipment (dry mount press) |
5. Tips For Achieving Professional Results
Follow these tips to ensure your mounted photos look their best:
5.1. How To Ensure Proper Alignment
Use a ruler and pencil to mark guidelines on the back of the mat board to ensure the photo is perfectly centered. Double-check the alignment before adhering the photo to the mat board.
5.2. How To Avoid Bubbles And Wrinkles
When using dry mounting or applying tape, work from the center outwards to avoid trapping air bubbles. Use a burnishing tool to smooth out any wrinkles or imperfections.
5.3. How To Choose The Right Mat Color
Select a mat color that complements the photo and enhances its visual appeal. White or neutral colors are generally safe choices, but you can also experiment with colored mats to create a specific mood or effect.
5.4. How To Cut Mat Board Accurately
Use a sharp mat cutter and a straight edge to cut the mat board accurately. Practice on scrap pieces to get a feel for the cutter and avoid mistakes on the final piece.
6. Common Mistakes To Avoid When Mounting Photos
Avoid these common mistakes to ensure a professional-looking result:
6.1. Using Acidic Materials
Always use acid-free mat boards, tapes, and mounting tissues to prevent damage to the photo over time.
6.2. Applying Too Much Adhesive
Use only enough adhesive to secure the photo to the mat board. Applying too much adhesive can cause the photo to warp or become damaged.
6.3. Not Wearing Gloves
Always wear gloves when handling the mat board and photo to prevent fingerprints and oils from transferring to the materials.
6.4. Rushing The Process
Take your time and pay attention to detail to ensure a professional-looking result. Rushing the process can lead to mistakes and imperfections.
7. Caring For Your Mounted Photos
Proper care will help preserve your mounted photos for years to come.
7.1. How To Store Mounted Photos
Store mounted photos in a cool, dry place away from direct sunlight. Use archival-quality sleeves or boxes to protect the photos from dust and damage.
7.2. How To Clean Mounted Photos
Use a soft, lint-free cloth to gently dust the surface of the mat board and photo. Avoid using any liquids or harsh chemicals, as they can damage the materials.
7.3. How To Protect Mounted Photos From Damage
Frame mounted photos behind glass or acrylic to protect them from dust, moisture, and physical damage. Consider using UV-protective glass or acrylic to prevent fading and discoloration.
8. The Role Of Mat Board In Photo Presentation
Mat board plays a crucial role in the overall presentation of a photograph, impacting how the image is perceived and appreciated.
8.1. Enhancing Visual Appeal
A well-chosen mat board can enhance the visual appeal of a photograph by providing a clean, professional border that draws the viewer’s eye to the image. The color, texture, and width of the mat board can all be used to complement the artwork and create a more cohesive and visually pleasing presentation.
8.2. Creating Depth And Dimension
Mat boards create depth and dimension by separating the artwork from the frame and glass. This separation adds visual interest and helps to highlight the details of the photograph.
8.3. Providing A Professional Finish
A properly mounted photograph with a high-quality mat board conveys a sense of professionalism and attention to detail. This is especially important for photographers and artists who are looking to showcase their work in galleries, exhibitions, or online portfolios.
8.4. Complying With Industry Standards
Using mat boards is a standard practice in the art and photography industry. Following industry standards ensures that your work is presented in a professional and consistent manner, which can enhance its credibility and value.
9. Where To Find High-Quality Mat Boards And Supplies In Santa Fe, USA
For those located in or near Santa Fe, New Mexico, here are some reputable suppliers for mat boards and mounting supplies:
- Art Supply Stores:
- Artisan: Offers a wide range of art supplies, including mat boards, cutting tools, and adhesives.
- Santa Fe Art Supply: Provides a comprehensive selection of mat boards, framing materials, and art supplies for professionals and hobbyists.
- Framing Shops:
- The Frame Up: Specializes in custom framing services and offers a variety of mat board options.
- Art Resource Group: Provides professional framing services and carries a selection of high-quality mat boards and mounting supplies.
- Online Retailers:
- Amazon: Offers a vast selection of mat boards, hinging tape, and other mounting supplies with convenient shipping options.
- B&H Photo Video: Carries a range of archival-quality mat boards and framing accessories, catering to photographers and artists.
You can also find a wide range of pre-cut photo mats and matboards online with Profile. Whether you’re looking for full, uncut sheets of matboard, standard single white window mat boards or even double-layered matboards, we offer a full range of matboard solutions in all different sizes and colors.
10. Inspiring Examples Of Photos Mounted On Mat Board
Explore these examples to inspire your own mounting projects:
10.1. Black And White Photography
A crisp white mat board can enhance the stark contrast and timeless quality of black and white photographs. The clean border draws the viewer’s eye to the details and nuances of the image.
10.2. Color Photography
A neutral-colored mat board can complement the colors in a vibrant color photograph without overwhelming the image. Consider using a colored mat board to highlight specific hues or create a specific mood.
10.3. Fine Art Prints
A high-quality rag mat board can provide the necessary protection and visual appeal for valuable fine art prints. The archival-quality materials ensure the long-term preservation of the artwork.
10.4. Mixed Media Artwork
Mat boards can also be used to frame and present mixed media artwork, such as collages or assemblages. The mat board provides a clean and professional border that unifies the different elements of the artwork.
FAQ: Frequently Asked Questions About Mounting Photos On Mat Board
1. What is the best type of tape to use for mounting photos on mat board?
Acid-free hinging tape is the best option for mounting photos on mat board because it will not damage the print over time.
2. How do I prevent my photo from warping after mounting it on mat board?
Use a dry mounting method or ensure that the photo is properly adhered to the mat board to prevent warping.
3. Can I use regular tape instead of acid-free tape?
No, regular tape can damage the photo over time due to its acidic content.
4. How do I choose the right size mat board for my photo?
The size of the mat board should be proportional to the size of the photo. A general rule is to have a mat border that is at least 2 inches wide on all sides.
5. What is the purpose of using a mat board for framing photos?
A mat board provides a border around the photo, protecting it from the glass and enhancing its visual appeal.
6. How do I cut a mat board without damaging it?
Use a sharp mat cutter and a straight edge to cut the mat board accurately. Practice on scrap pieces to get a feel for the cutter.
7. What is the T-hinge method for mounting photos?
The T-hinge method involves using two tabs of tape in a T-shape to allow for expansion and contraction of the print.
8. Is dry mounting a permanent method for mounting photos?
Yes, dry mounting is a permanent method that uses heat and pressure to adhere the photo to the mat board.
9. How do I clean a mounted photo?
Use a soft, lint-free cloth to gently dust the surface of the mat board and photo. Avoid using any liquids or harsh chemicals.
10. Where can I buy high-quality mat boards and supplies?
You can find high-quality mat boards and supplies at art supply stores, framing shops, and online retailers like Amazon and B&H Photo Video.
Mounting photos on mat board is a rewarding skill that can elevate the presentation and preservation of your artwork. By following these tips and techniques, you can achieve professional-looking results and showcase your photos in the best possible light.
Ready to take your photography to the next level? Visit dfphoto.net for more expert tips, inspiring galleries, and a vibrant community of photographers. Discover our detailed tutorials, explore stunning photo collections, and connect with fellow photography enthusiasts. Whether you’re seeking inspiration, technical guidance, or simply a place to share your passion, dfphoto.net is your ultimate resource. Join us today and unleash your creative potential Address: 1600 St Michael’s Dr, Santa Fe, NM 87505, United States. Phone: +1 (505) 471-6001. Website: dfphoto.net.
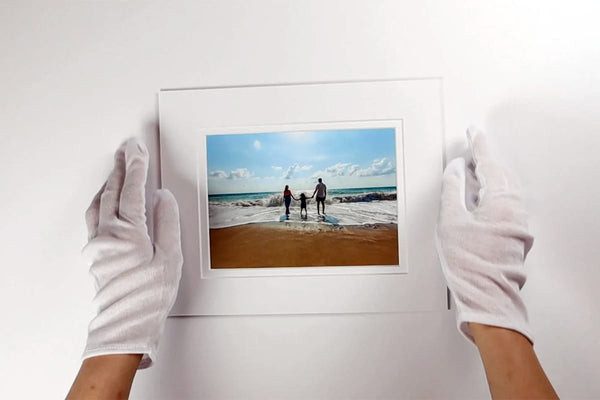 Attaching a matboard to a photo
Insert your print into a matted photo frame after properly mounting it for a professional display.