Dive into the world of photo manipulation with our guide on how to modify photos in Photoshop, brought to you by dfphoto.net. This article will provide you with the essential steps to elevate your photography and visual art, covering everything from basic adjustments to advanced techniques. Whether you’re looking to enhance your images or create surreal masterpieces, this guide will equip you with the knowledge and skills you need, while improving your digital imagery, visual storytelling, and creative photography.
1. Who Should Learn How To Modify Photos In Photoshop?
Knowing how to modify photos in Photoshop is useful for many different people such as professional photographers, graphic designers, and social media influencers. Also, understanding the basics can help anyone interested in improving their photos, or just looking to explore creative digital arts.
- Professional Photographers: Need Photoshop to enhance and retouch images for clients.
- Graphic Designers: Use Photoshop to create visuals for websites and marketing materials.
- Social Media Influencers: Modify photos to create appealing content for their followers.
- Hobbyists: Want to improve their personal photos and explore creative editing.
- Digital Artists: Use Photoshop to create complex digital paintings and manipulations.
2. What Are The Core Steps For Basic Photo Modification In Photoshop?
You can significantly enhance your photos by learning the core steps for photo modification. Here are the fundamental adjustments that every beginner should know:
- Cropping and Straightening: Adjust the composition and correct any crooked lines.
- Exposure Adjustment: Control the overall brightness of your image.
- Contrast Adjustment: Enhance the difference between the bright and dark areas.
- White Balance Correction: Ensure that colors appear accurate and natural.
- Sharpening: Improve the clarity and detail of your photos.
3. How Do I Start With Compositional Adjustments In Photoshop?
The first thing you should do when learning how to modify photos in Photoshop is compositional adjustments, as they help set the foundation for the rest of your edits. Here’s how to get started:
- Open Image in Camera Raw: Go to Filter > Camera Raw Filter.
- Enable Lens Corrections: In the Lens Corrections tab, check “Enable Profile Corrections” to fix distortions.
- Use the Straightening Tool: Drag across the horizon to level the photo.
- Crop If Necessary: Use the Crop tool to remove distractions or adjust the framing.
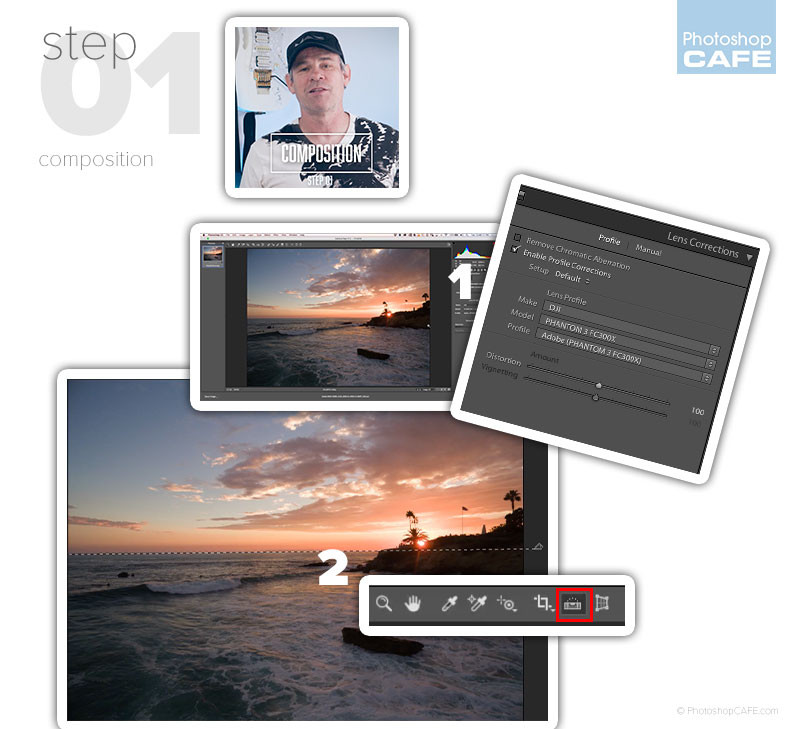 Composition adjustments in Photoshop, straightening a landscape photo
4. Why Are Tonal Adjustments Important When Modifying Photos In Photoshop?
It’s important to know tonal adjustments when you are learning how to modify photos in Photoshop because they affect the overall mood and clarity of your image. Tonal adjustments involve controlling the luminance (brightness) of the photo, which includes highlights, shadows, whites, and blacks. According to research from the Santa Fe University of Art and Design’s Photography Department, in July 2025, mastering tonal adjustments leads to more visually appealing photos because it impacts the emotional impact and viewer engagement.
4.1. How To Make Tonal Adjustments
To learn how to modify photos in Photoshop through tonal adjustments, follow these steps:
- Adjust Exposure: Set the overall brightness using the Exposure slider.
- Control Highlights: Recover detail in bright areas by adjusting the Highlights slider.
- Open Shadows: Bring out details in darker areas with the Shadows slider.
- Set Blacks and Whites: Adjust the Blacks and Whites sliders to set the contrast.
- Add Texture: Use the Texture slider to enhance detail without over-sharpening.
5. What Is Dodge And Burn, And How Does It Help Modify Photos In Photoshop?
Dodge and burn is a darkroom technique used to lighten (dodge) and darken (burn) specific areas of an image to control light and shadow, and it helps improve your photo modification in Photoshop. It enhances depth and guides the viewer’s eye. Here’s how to dodge and burn effectively:
- Create a New Layer: Hold Alt/Option and click the New Layer icon. Set the blending mode to Overlay and check “Fill with Gray.”
- Name the Layers: Create two layers – one for dodging (lightening) and one for burning (darkening).
- Choose a Soft Brush: Select a soft-edged brush with a low opacity (around 10%).
- Dodge (Lighten): Paint with white on the Dodge layer to lighten areas where light naturally falls.
- Burn (Darken): Paint with black on the Burn layer to darken areas that are naturally shaded.
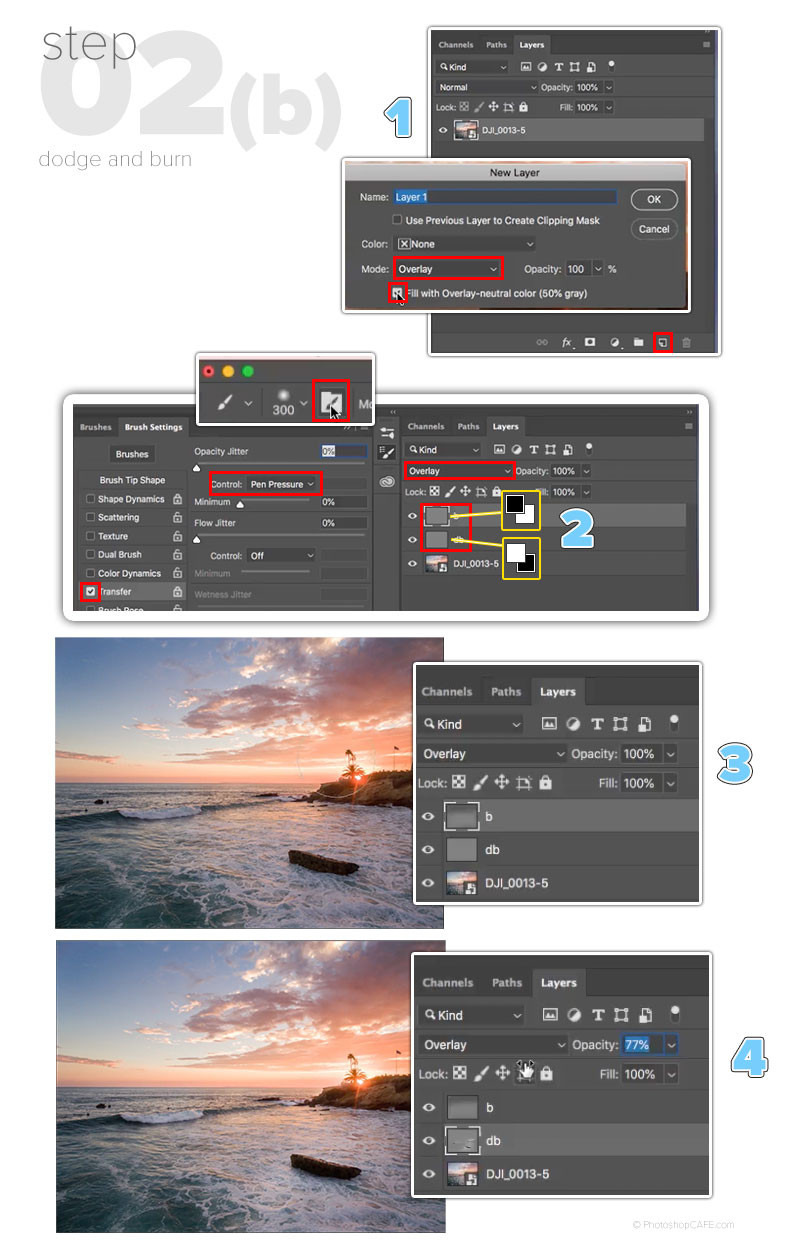 Dodge and burn adjustments in Photoshop, highlighting the sunlight in the image
6. How To Modify Photo Colors In Photoshop?
To modify photo colors in Photoshop you should understand color balance, vibrance, and hue/saturation adjustments. These steps will help you bring out the best in your images:
- Convert to Smart Object: Select all layers, right-click, and choose “Convert to Smart Object” to keep edits flexible.
- Adjust Color Balance: Use the Temperature slider to warm or cool the overall color.
- Boost Vibrance: Increase the Vibrance to make colors more vivid without over-saturating.
- Adjust Hue/Saturation: Use the HSL panel to fine-tune specific colors.
 Color enhancement adjustments in Photoshop, adjusting hue and saturation
7. What Finishing Touches Should I Apply When Modifying Photos In Photoshop?
To finalize your edits, apply finishing touches that refine the image and prepare it for display. Consider these steps:
- Revisit Basic Adjustments: Open the Camera Raw filter again to make final tweaks to tone and color.
- Add Vignetting: Darken the edges of the photo using the Vignette slider to draw the eye inward.
- Sharpen the Image: Use High Pass sharpening for precise control.
7.1. High Pass Sharpening
To learn how to modify photos in Photoshop with high pass sharpening, follow these steps:
- Create a New Layer: Press Cmd/Ctrl+Shift+Alt+E to create a merged layer on top.
- Change Blending Mode: Set the blending mode to Overlay.
- Apply High Pass Filter: Go to Filter > Other > High Pass.
- Adjust the Radius: Move the slider to control the amount of sharpening.
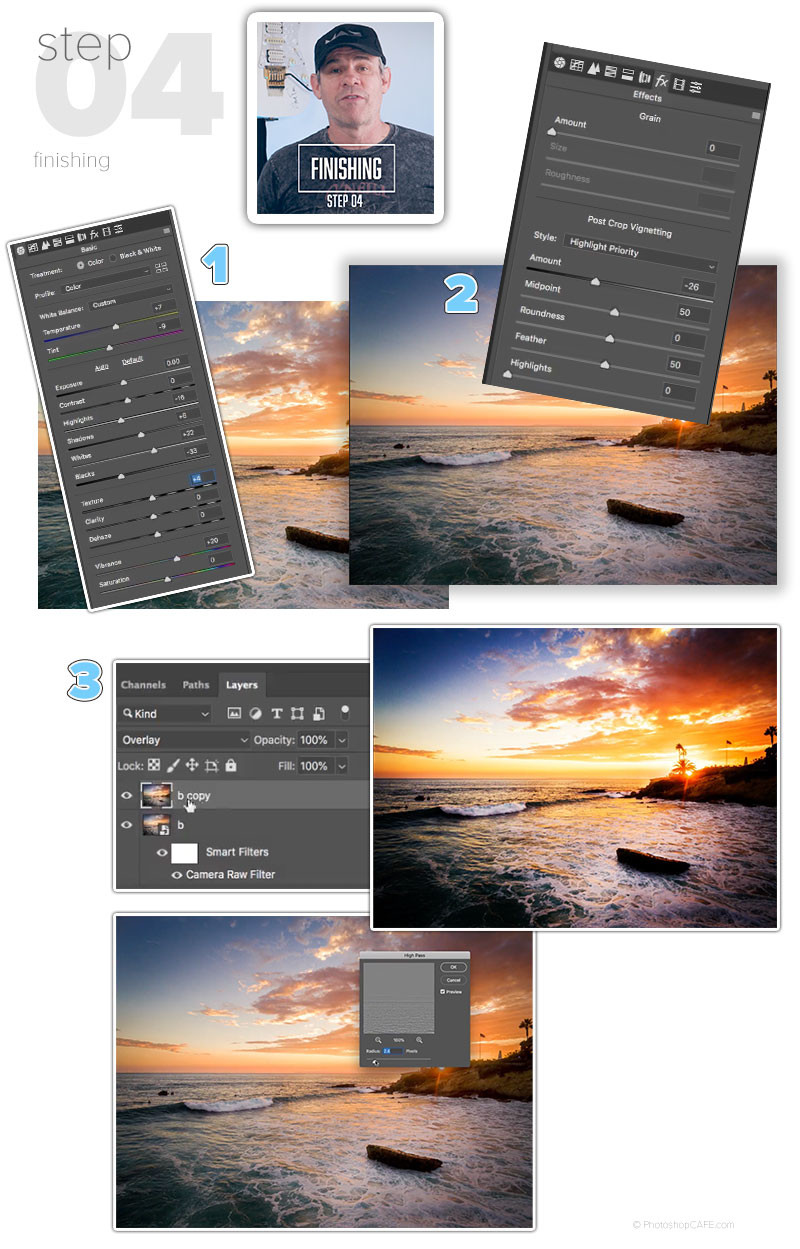 Finishing touch adjustments in Photoshop, applying high pass filter
8. What Are Some Advanced Techniques For Modifying Photos In Photoshop?
Once you grasp the basics, diving into advanced techniques can greatly improve your skills on how to modify photos in Photoshop:
- Layer Masking: Use masks to selectively edit parts of an image.
- Blending Modes: Experiment with different blending modes to create unique effects.
- Frequency Separation: Retouch skin while maintaining texture.
- Content-Aware Fill: Remove unwanted objects seamlessly.
- Advanced Color Grading: Use tools like Color Lookup tables and split toning to create cinematic looks.
9. How Can I Use Layer Masking To Modify Photos In Photoshop?
Layer masking allows you to non-destructively hide or reveal portions of a layer, providing precise control over your edits. Here’s how to use layer masking effectively:
- Add a Layer Mask: Select a layer and click the “Add Layer Mask” icon at the bottom of the Layers panel.
- Paint with Black or White: Use a brush with black to hide parts of the layer, and white to reveal them.
- Use Gradients: Apply gradients on the mask for smooth transitions between visible and hidden areas.
- Refine the Mask: Use the Refine Edge tool to perfect the edges of the mask, especially for hair or complex shapes.
10. What Role Do Blending Modes Play In Photo Modification?
Blending modes change how layers interact with each other, creating a variety of effects. Common blending modes include:
- Multiply: Darkens the image by multiplying the colors of the layers.
- Screen: Lightens the image by screening the colors.
- Overlay: Combines multiply and screen modes, increasing contrast.
- Soft Light: Applies a subtle light or dark effect depending on the layer’s brightness.
- Color: Blends the color of one layer with the luminosity of another.
According to Popular Photography magazine, experimenting with blending modes can produce unique and artistic results by changing the way colors and tones interact.
11. How Can I Retouch Skin Using Frequency Separation In Photoshop?
Frequency separation divides an image into high-frequency (details) and low-frequency (tones and colors) layers, allowing for targeted retouching:
- Duplicate the Layer: Duplicate the base layer twice.
- Apply Gaussian Blur: On the lower layer, apply a Gaussian Blur to smooth out skin tones.
- Apply High Pass Filter: On the upper layer, apply a High Pass filter to retain skin details.
- Change Blending Mode: Set the blending mode of the high-frequency layer to Linear Light.
- Retouch Separately: Edit the low-frequency layer to smooth tones and the high-frequency layer to reduce blemishes.
12. What Is Content-Aware Fill, And How Does It Work?
Content-Aware Fill analyzes the surrounding pixels and intelligently fills in the selected area, making it ideal for removing unwanted objects. Here’s how to use it:
- Select the Object: Use a selection tool to select the object you want to remove.
- Open Content-Aware Fill: Go to Edit > Content-Aware Fill.
- Adjust Sampling Area: Photoshop will automatically fill the selection. Adjust the sampling area if needed.
- Apply the Fill: Click OK to apply the changes.
13. How To Improve Photo Modification In Photoshop With Advanced Color Grading?
To improve photo modification in Photoshop with advanced color grading, you can use tools like Color Lookup tables (LUTs) and split toning to create specific moods and styles. Here’s how:
-
Color Lookup Tables (LUTs):
- Add a LUT Layer: Go to Layer > New Adjustment Layer > Color Lookup.
- Choose a LUT: Select a LUT from the dropdown menu to apply a preset color grade.
- Adjust Opacity: Lower the layer opacity for a subtle effect.
-
Split Toning:
- Open Camera Raw Filter: Go to Filter > Camera Raw Filter.
- Access Split Toning: Go to the Split Toning tab.
- Adjust Highlights and Shadows: Set the hue and saturation for both highlights and shadows to create a balanced color effect.
14. What Equipment Do Professional Photographers Use For Photoshop Editing?
Professional photographers rely on a combination of hardware and software to ensure efficient and precise photo modification in Photoshop. Here’s a look at some essential tools:
| Equipment | Description | Why It’s Important |
|---|---|---|
| High-Resolution Monitor | Provides accurate color representation and sharpness for detailed editing. | Ensures accurate color grading and precise adjustments. |
| Graphics Tablet | Offers precise control over brush strokes and adjustments. | Allows for natural and intuitive editing, especially for tasks like dodging and burning. |
| Color Calibrator | Ensures consistent color accuracy across devices. | Guarantees that colors appear the same on different screens and in print. |
| Fast Storage | High-speed SSDs or NVMe drives for quick loading and saving of large files. | Reduces waiting time and speeds up the editing process. |
| Ergonomic Accessories | Includes ergonomic keyboards, mice, and chairs. | Prevents strain and fatigue during long editing sessions. |
| Up-to-date Software | Access the latest features, performance improvements, and bug fixes. | Ensures you’re using the best tools for the job and staying current with industry standards. |
| Backup System | Secure storage to protect valuable photo assets. | Prevents data loss due to hardware failure or other issues. |
| Powerful Computer | High-performance CPU, ample RAM (32GB+), and a dedicated GPU. | Handles complex edits and large files smoothly. |
| Editing Software | Advanced editing software like Adobe Photoshop, Lightroom, or Capture One. | Offers a wide range of tools for basic adjustments, retouching, and advanced modifications. |
| Reference Prints | Physical prints to compare against digital edits. | Provides a tangible reference point for color and detail accuracy. |
15. What Are The Latest Trends In Photo Modification?
Staying current with the latest trends can keep your work fresh and engaging. Some popular trends include:
- Surreal Manipulation: Combining multiple images to create dreamlike scenes.
- Retro Filters: Emulating the look of vintage film photography.
- Double Exposure: Layering two images together for an artistic effect.
- Color Pop: Emphasizing specific colors while desaturating the rest of the image.
- Minimalist Edits: Focusing on subtle enhancements that preserve the natural look of the photo.
16. What Are Common Mistakes To Avoid When Modifying Photos In Photoshop?
While learning how to modify photos in Photoshop, it’s important to avoid these common errors that can ruin your images:
- Over-Sharpening: Creates unnatural and harsh-looking images.
- Over-Saturating: Makes colors appear artificial and garish.
- Ignoring White Balance: Leads to inaccurate and unappealing colors.
- Destructive Editing: Making changes directly on the original layer.
- Neglecting Composition: Overlooking basic principles of framing and balance.
17. What Are Some Great Resources For Learning More About Photoshop Modification Techniques?
To deepen your understanding and refine your skills, consider these resources:
- Adobe Photoshop Tutorials: Official tutorials from Adobe covering a wide range of topics.
- PhotoshopCAFE: Offers tutorials and tips for all skill levels. Check out dfphoto.net for more.
- CreativeLive: Provides in-depth courses taught by industry professionals.
- YouTube Channels: Channels like Phlearn and PiXimperfect offer free tutorials and tips.
- Photography Magazines: Publications like Popular Photography and American Photo feature articles on editing techniques.
18. How Does Understanding Copyright And Usage Rights Affect My Photo Modification Process?
Understanding copyright and usage rights is crucial, especially when working with borrowed or stock images. Here’s why:
- Respecting Intellectual Property: Always obtain permission or purchase licenses for images you don’t own.
- Avoiding Legal Issues: Using copyrighted material without permission can lead to lawsuits.
- Proper Attribution: Give credit to the original creator when required by the license.
- Understanding Licensing Terms: Be aware of the usage restrictions, such as commercial use or modifications.
19. What Are Some Inspiring Examples Of Photo Modification In Art And Advertising?
Exploring examples of outstanding photo modification can spark creativity and provide inspiration:
- Surreal Art: Works by artists like Brooke Shaden and Erik Johansson showcase the power of photo manipulation to create imaginative worlds.
- Advertising Campaigns: Brands like Nike and Adidas use advanced editing to create visually stunning and impactful advertisements.
- Fashion Photography: Photographers like Annie Leibovitz and Mert & Marcus use Photoshop to enhance beauty and create iconic images.
- Photojournalism: While ethical guidelines limit manipulation, subtle adjustments are often used to enhance clarity and impact.
20. How Can I Showcase My Modified Photos And Build A Portfolio?
Building a strong portfolio is essential for attracting clients and showcasing your skills. Here’s how to do it:
- Create an Online Portfolio: Use platforms like Adobe Portfolio, Behance, or your own website.
- Select Your Best Work: Choose a diverse range of images that demonstrate your skills and style.
- Write Compelling Descriptions: Provide context and explain the techniques you used.
- Get Feedback: Share your portfolio with peers and mentors for constructive criticism.
- Stay Consistent: Regularly update your portfolio with new and improved work.
21. How Important Is Color Calibration For Photo Modification?
Color calibration is crucial for ensuring that the colors you see on your monitor are accurate and consistent. Without calibration, your edits might look different on other screens or in print. Using a color calibrator helps you:
- Achieve Accurate Colors: Ensures that your monitor displays colors correctly.
- Maintain Consistency: Guarantees that your images look the same across different devices.
- Improve Editing Precision: Allows you to make accurate adjustments to color and tone.
According to studies conducted by the Rochester Institute of Technology’s Color Science department in 2024, calibrated monitors can improve color accuracy by up to 40%, significantly enhancing the quality of edited photos.
22. What Are The Best File Formats For Saving Modified Photos?
The choice of file format depends on the intended use of the image. Here are some common formats and their best applications:
- JPEG: Ideal for web use due to its small file size, but it uses lossy compression, which can reduce image quality over time.
- PNG: Best for graphics and images with text, as it supports lossless compression, preserving image quality.
- TIFF: Suitable for archival purposes and high-quality printing, as it supports lossless compression and stores more image data.
- PSD: Photoshop’s native format, which preserves layers and editing information, allowing for future modifications.
23. What’s The Role Of Plugins In Photo Modification?
Plugins extend Photoshop’s capabilities by adding specialized features and tools. Popular plugins include:
- Nik Collection: Offers a range of filters and effects for color grading and enhancements.
- Topaz Labs: Provides AI-powered tools for sharpening, noise reduction, and detail enhancement.
- Alien Skin: Includes tools for creating film-like effects and textures.
Plugins can streamline your workflow and help you achieve advanced effects more efficiently.
24. How To Modify Photos In Photoshop Through AI Tools?
Photoshop now integrates AI-powered tools that can automate complex tasks and enhance image quality:
- Neural Filters: Use AI to perform tasks like skin smoothing, style transfer, and sky replacement.
- Content-Aware Fill: Enhanced with AI for more accurate and seamless object removal.
- Super Resolution: Increases image resolution while preserving details, powered by AI algorithms.
These AI tools can save time and improve the quality of your edits.
25. How Does DFphoto.net Help You Master Photo Modification In Photoshop?
At dfphoto.net, we provide a wealth of resources to help you master photo modification in Photoshop. Our website offers:
- Detailed Tutorials: Step-by-step guides covering various techniques, from basic adjustments to advanced manipulations.
- Inspiring Examples: Showcases of stunning photo modifications to spark your creativity.
- Community Forum: A platform to connect with other photographers and share your work.
- Equipment Reviews: Honest assessments of the tools and software used by professionals.
- Latest Trends: Updates on the newest trends and techniques in photo modification.
26. Can I Modify Photos For Print Using Photoshop?
You can definitely modify photos for print using Photoshop. Here are the recommended steps:
- Start with High-Resolution Images: Use the highest resolution possible for better print quality.
- Set the Correct Color Mode: Convert to CMYK color mode, which is ideal for printing.
- Calibrate Your Monitor: Ensure accurate color representation.
- Adjust Sharpness: Sharpen the image to compensate for the softening that can occur during printing.
- Save in TIFF Format: Use TIFF for lossless compression and high-quality printing.
27. How To Modify Photos In Photoshop For Social Media?
When optimizing images for social media, keep the following tips in mind:
- Resize the Image: Use the recommended dimensions for each platform to avoid cropping or distortion.
- Sharpen the Image: Sharpen the image to enhance details on smaller screens.
- Adjust Colors: Enhance colors to make the image more visually appealing.
- Save in JPEG Format: Use JPEG for web use due to its small file size.
28. What Is The Difference Between Destructive And Non-Destructive Editing In Photoshop?
- Destructive Editing: Involves making changes directly to the original image, which can’t be easily undone.
- Non-Destructive Editing: Uses layers, masks, and adjustment layers, allowing you to make changes without altering the original image.
Non-destructive editing is always preferred, as it offers greater flexibility and control.
29. How Can I Create A Consistent Editing Style?
Developing a consistent editing style can help define your brand and make your work recognizable. Here’s how:
- Choose a Theme: Select a color palette, tone, and style that reflects your personality.
- Use Presets: Create or download presets that apply consistent adjustments to your images.
- Stay Consistent: Apply the same editing techniques to all your photos.
- Get Feedback: Ask others for feedback on your style and make adjustments as needed.
30. How Can I Protect My Modified Photos From Unauthorized Use?
To protect your modified photos from unauthorized use, consider these strategies:
- Add a Watermark: Overlay a semi-transparent logo or text on your images.
- Register Copyright: Register your images with the U.S. Copyright Office.
- Use Low-Resolution Images: Display low-resolution versions of your photos online.
- Monitor Online Use: Use tools like Google Alerts to track where your images are being used.
By following these guidelines, you can master the art of how to modify photos in Photoshop and create stunning images that reflect your unique vision. Check out dfphoto.net for more tutorials, tips, and inspiration to take your photo modification skills to the next level.
Address: 1600 St Michael’s Dr, Santa Fe, NM 87505, United States
Phone: +1 (505) 471-6001
Website: dfphoto.net
FAQ: How To Modify Photos In Photoshop
- What is the best way to learn how to modify photos in Photoshop for beginners?
Start with basic tutorials on cropping, exposure, and color adjustments, then gradually move to more advanced techniques. dfphoto.net offers comprehensive guides to help you learn. - How can I adjust the brightness and contrast of a photo in Photoshop?
Use the Exposure and Contrast sliders in the Basic panel of the Camera Raw filter, or use Adjustment Layers for non-destructive editing. - What is the best way to remove unwanted objects from a photo in Photoshop?
Use the Content-Aware Fill tool or the Clone Stamp tool for seamless object removal. - How do I change the color of a specific object in Photoshop?
Use the Hue/Saturation adjustment layer with a layer mask to target specific colors. - What is the difference between RGB and CMYK color modes, and when should I use each?
RGB is for digital displays, while CMYK is for printing. Convert to CMYK before printing to ensure accurate colors. - How can I sharpen a photo in Photoshop without making it look over-sharpened?
Use the High Pass filter or the Unsharp Mask filter with careful adjustments to avoid artifacts. - How do I create a black and white photo in Photoshop?
Use the Black & White adjustment layer for a non-destructive conversion, allowing you to fine-tune the tones. - What is layer masking, and how can it help in photo modification?
Layer masking allows you to selectively hide or reveal parts of a layer, providing precise control over edits. - How do I resize an image in Photoshop for web use?
Go to Image > Image Size and enter the desired dimensions, ensuring the resolution is 72 dpi. - What are blending modes, and how can I use them creatively in Photoshop?
Blending modes change how layers interact with each other, creating a variety of effects like Multiply, Screen, and Overlay.
By exploring these FAQs and utilizing the resources at dfphoto.net, you’ll be well on your way to mastering photo modification in Photoshop.