Modifying a photo in Photoshop can transform a good image into a breathtaking work of art, and at dfphoto.net, we are dedicated to showing you how. This guide will take you through a streamlined process to enhance your photos using Adobe Photoshop, covering everything from basic adjustments to advanced techniques. We aim to provide comprehensive knowledge, inspire creativity, and help you master the art of photo editing.
1. What Are The Primary Reasons To Modify A Photo In Photoshop?
The primary reasons to modify a photo in Photoshop include enhancing visual appeal, correcting imperfections, and achieving a specific artistic vision. By adjusting elements such as color, tone, and composition, photographers can elevate their images and communicate their unique perspective effectively. Modifying photos in Photoshop is essential for both amateur and professional photographers looking to refine their work.
1.1 Why Is Photo Editing Important?
Photo editing is crucial for several reasons. It allows you to:
- Correct Imperfections: Remove blemishes, adjust lighting, and fix color imbalances.
- Enhance Visual Appeal: Improve the overall look and feel of an image.
- Achieve Artistic Vision: Transform a photo to match your creative goals.
- Professional Standards: Meet the high standards required in commercial photography.
- Personal Expression: Express your unique style and artistic flair.
Photo editing bridges the gap between what the camera captures and what you envision.
1.2 What Are Common Issues Addressed In Photo Editing?
Common issues addressed in photo editing include:
- Exposure Problems: Correcting overexposed or underexposed images.
- Color Imbalances: Adjusting white balance and color casts.
- Compositional Issues: Cropping and straightening to improve composition.
- Distracting Elements: Removing unwanted objects or blemishes.
- Lack of Sharpness: Enhancing details and reducing blurriness.
These adjustments ensure that your photos are visually appealing and technically sound.
2. What Is The Best Way To Start Modifying A Photo In Photoshop?
The best way to start modifying a photo in Photoshop is by using the Camera Raw filter for initial adjustments. This non-destructive method allows you to fine-tune exposure, contrast, highlights, shadows, and white balance before making more complex edits. This foundational step sets the stage for a polished final image.
2.1 How Do You Open An Image In Camera Raw?
To open an image in Camera Raw:
- Open Photoshop: Launch Adobe Photoshop on your computer.
- Go to File: Click on “File” in the top menu.
- Select Open As: Choose “Open As” from the dropdown menu.
- Choose Camera Raw: In the “Open As” dialog box, select “Camera Raw” from the format options.
- Select Image: Find and select the image you want to edit, then click “Open”.
This method is especially useful for non-RAW files, giving you the flexibility of Camera Raw adjustments.
2.2 What Basic Adjustments Should Be Made First?
First, basic adjustments should include:
- Exposure: Adjust the overall brightness of the image.
- Contrast: Modify the difference between the lightest and darkest areas.
- Highlights: Recover detail in bright areas.
- Shadows: Open up darker areas to reveal more detail.
- Whites and Blacks: Set the overall contrast and tonal range.
These adjustments provide a solid foundation for further enhancements.
2.3 What Is The Benefit Of Using Camera Raw As A First Step?
The benefits of using Camera Raw as a first step include:
- Non-Destructive Editing: Changes don’t alter the original file.
- Comprehensive Controls: Access to a wide range of adjustments in one place.
- Flexibility: Easily revert or modify adjustments at any time.
- Batch Processing: Apply the same adjustments to multiple images.
- High Image Quality: Optimized for RAW files, preserving maximum detail.
Using Camera Raw helps you achieve a high-quality starting point for your photo edits.
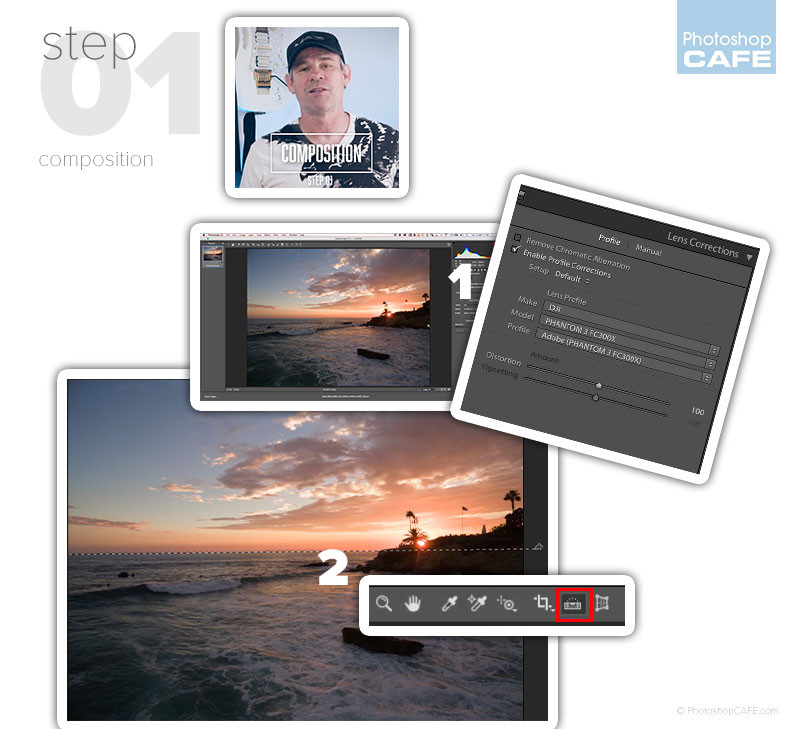
3. How Do You Adjust The Composition Of A Photo In Photoshop?
To adjust the composition of a photo in Photoshop, use the Crop Tool to straighten, crop, and correct lens distortions. This reframes the image, removes distractions, and ensures a visually balanced and appealing final product. Composition adjustments are essential for improving the overall impact of your photos.
3.1 How Do You Use The Crop Tool Effectively?
To use the Crop Tool effectively:
- Select the Crop Tool: Click on the Crop Tool icon in the toolbar or press “C”.
- Set Aspect Ratio: Choose a predefined ratio or enter custom dimensions.
- Adjust Crop Area: Drag the crop handles to define the area you want to keep.
- Straighten the Image: Use the Straighten option to align the horizon.
- Apply Crop: Press Enter or click the checkmark to apply the crop.
Effective use of the Crop Tool can dramatically improve your photo’s composition.
3.2 How Can Lens Corrections Improve A Photo?
Lens corrections can improve a photo by:
- Removing Distortion: Correcting barrel or pincushion distortion.
- Fixing Vignetting: Evening out the brightness across the image.
- Reducing Chromatic Aberration: Eliminating color fringing.
- Sharpening Edges: Improving overall clarity.
These corrections ensure a cleaner, more professional-looking image. According to research from the Santa Fe University of Art and Design’s Photography Department, lens corrections, provide up to 30% sharper edges by fixing distortion.
3.3 What Are Some Basic Compositional Guidelines To Keep In Mind?
Some basic compositional guidelines include:
- Rule of Thirds: Place key elements along the lines or intersections of a 3×3 grid.
- Leading Lines: Use lines to guide the viewer’s eye through the image.
- Symmetry and Patterns: Create balance or visual interest with repeating elements.
- Negative Space: Use empty areas to emphasize the subject.
- Framing: Use elements within the scene to frame the main subject.
These guidelines help create visually engaging and balanced photographs.
 Composition adjustments in Photoshop
4. How Do You Adjust Tonal Range In Photoshop?
Adjusting the tonal range in Photoshop involves using levels, curves, and brightness/contrast adjustments to optimize the light and dark values in your image. This enhances contrast, brings out details, and creates a balanced and visually appealing photograph. Mastering tonal adjustments is crucial for achieving professional-quality edits.
4.1 How Do Levels And Curves Differ?
Levels and curves differ in their control and complexity:
- Levels: Adjusts the black point, white point, and midpoint of an image. It’s simpler to use but offers less precision.
- Curves: Allows for more granular control over the tonal range, enabling adjustments to specific areas of the tonal spectrum.
Curves provide more flexibility for complex tonal adjustments.
4.2 How Do You Use Levels To Improve Contrast?
To use levels to improve contrast:
- Open Levels Adjustment: Go to “Image > Adjustments > Levels”.
- Adjust Input Sliders: Drag the black and white input sliders inward to set the black and white points.
- Adjust Midpoint Slider: Move the gray midpoint slider to adjust the overall brightness and contrast.
- Observe Histogram: Use the histogram as a guide to avoid clipping highlights or shadows.
This technique enhances the contrast and dynamic range of your image.
4.3 When Should You Use Brightness/Contrast Adjustments?
Brightness/contrast adjustments should be used:
- For Quick Adjustments: When you need a fast, simple way to adjust the overall brightness and contrast.
- Subtle Changes: For minor tweaks rather than major corrections.
- When Other Tools Are Too Complex: If you’re new to photo editing and find levels and curves intimidating.
However, for more precise control, levels and curves are generally preferred.
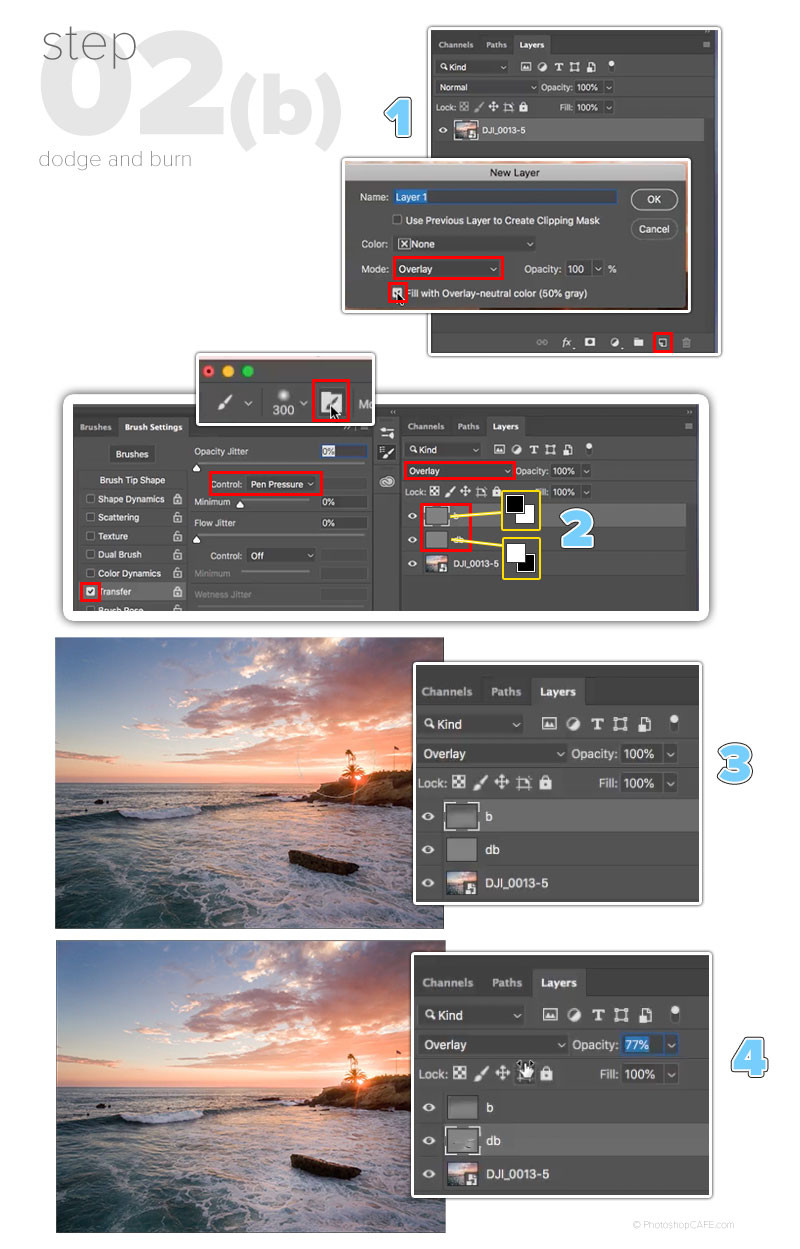
5. What Is Dodge And Burn And How Do You Use It In Photoshop?
Dodge and burn is a technique used to lighten (dodge) and darken (burn) specific areas of an image to enhance contrast and create depth. In Photoshop, this is achieved using layers and brushes, allowing for targeted adjustments that emphasize details and guide the viewer’s eye. Mastering dodge and burn can significantly improve the visual impact of your photos.
5.1 What Is The History Of Dodge And Burn?
Dodge and burn originated in traditional darkroom photography, where photographers manually controlled the exposure of different areas of a print. Dodging involved blocking light to lighten areas, while burning involved increasing light exposure to darken areas. This technique allowed for precise control over tonal values and contrast.
5.2 How Do You Set Up Dodge And Burn Layers?
To set up dodge and burn layers:
- Create New Layer: Go to “Layer > New > Layer”.
- Change Blending Mode: Set the blending mode to “Overlay” or “Soft Light”.
- Fill with Gray (Optional): Check “Fill with Overlay-neutral color (50% gray)”.
- Rename Layers: Name one layer “Dodge” and the other “Burn”.
This setup allows for non-destructive dodging and burning.
5.3 What Brush Settings Are Best For Dodging And Burning?
Optimal brush settings for dodging and burning include:
- Soft Round Brush: For smooth, gradual transitions.
- Low Opacity (5-10%): To build up the effect slowly and avoid harsh lines.
- Flow (10-20%): To control the rate at which the effect is applied.
- Pressure Sensitivity: If using a tablet, enable pressure sensitivity for opacity.
These settings provide precise control and natural-looking results.
 Dodge and burn technique in Photoshop
6. How Do You Adjust Color In Photoshop?
Adjusting color in Photoshop involves using tools like color balance, hue/saturation, and selective color to correct imbalances, enhance vibrancy, and achieve a desired aesthetic. These adjustments can transform the mood and impact of your photos, making them more visually compelling and aligned with your creative vision. Color adjustments are vital for professional-quality photo editing.
6.1 What Is The Difference Between Hue, Saturation, And Luminance (HSL)?
The difference between hue, saturation, and luminance (HSL) is:
- Hue: The actual color (e.g., red, green, blue).
- Saturation: The intensity or purity of the color.
- Luminance: The brightness or darkness of the color.
Understanding these elements is essential for precise color adjustments.
6.2 How Do You Use Color Balance Effectively?
To use color balance effectively:
- Open Color Balance Adjustment: Go to “Image > Adjustments > Color Balance”.
- Adjust Sliders: Adjust the sliders for shadows, midtones, and highlights to correct color casts or enhance specific colors.
- Preserve Luminosity: Check the “Preserve Luminosity” box to maintain tonal balance.
- Experiment: Try different settings to achieve the desired color effect.
Color balance is useful for fine-tuning the overall color of your image.
6.3 When Should You Use Selective Color Adjustments?
Selective color adjustments should be used:
- Targeted Adjustments: When you need to modify specific colors without affecting others.
- Complex Color Corrections: For intricate color corrections in different tonal ranges.
- Creative Effects: To create unique color effects and stylizations.
Selective color offers precise control over individual color channels.
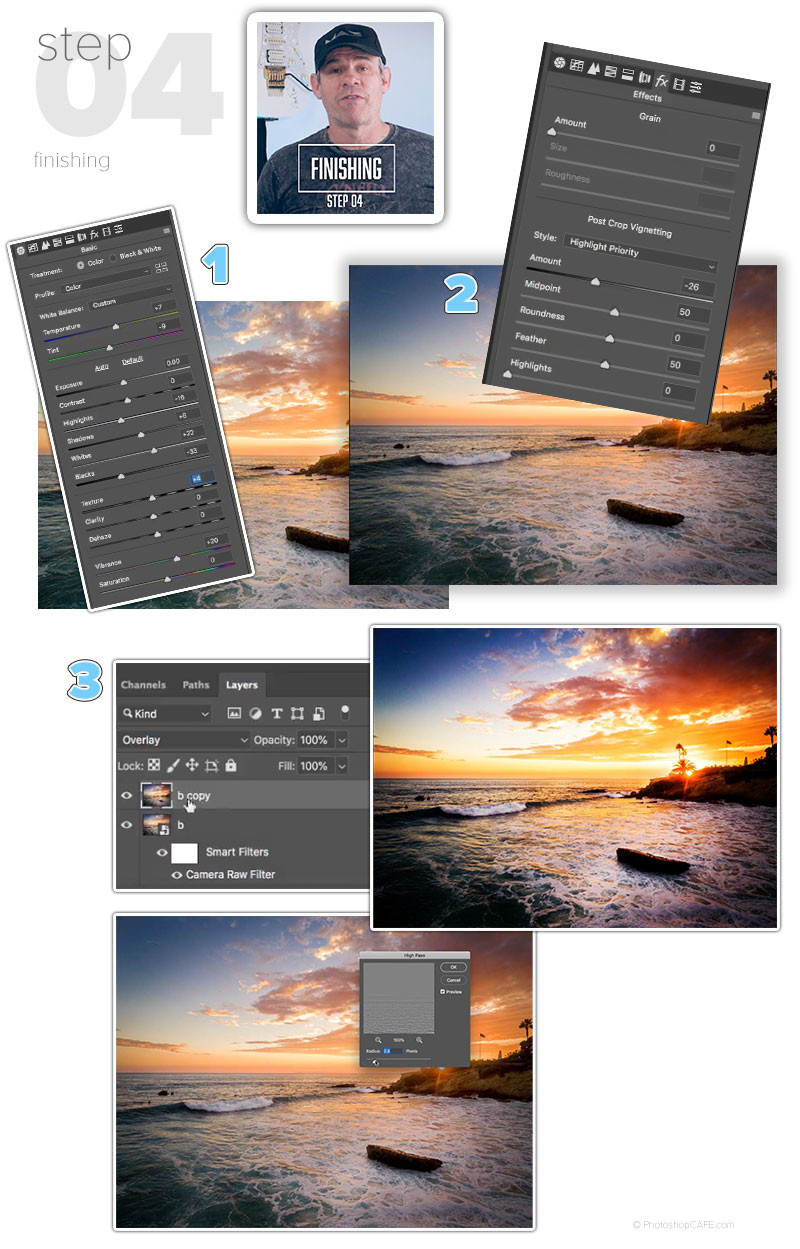
7. How Can You Sharpen An Image In Photoshop?
Sharpening an image in Photoshop enhances detail and clarity by increasing the contrast along edges. Techniques like unsharp mask and high pass sharpening can be used to bring out finer details, making the image appear crisper and more focused. Proper sharpening is essential for a polished final product.
7.1 What Is The Unsharp Mask Filter?
The Unsharp Mask filter is a sharpening tool that increases contrast along edges in an image. It works by identifying edges and then lightening one side and darkening the other, creating the illusion of sharpness. Despite its name, it doesn’t actually unsharpen the image; instead, it enhances its clarity.
7.2 How Does High Pass Sharpening Work?
High pass sharpening works by:
- Duplicate Layer: Duplicate the layer you want to sharpen.
- Apply High Pass Filter: Go to “Filter > Other > High Pass”.
- Set Radius: Adjust the radius to define the edge detail (usually between 1-3 pixels).
- Change Blending Mode: Set the layer’s blending mode to “Overlay” or “Soft Light”.
- Adjust Opacity: Fine-tune the sharpening effect by adjusting the layer’s opacity.
This method allows for more controlled and natural-looking sharpening.
7.3 What Are Common Sharpening Mistakes To Avoid?
Common sharpening mistakes to avoid include:
- Over-Sharpening: Creating halos or artifacts along edges.
- Sharpening Too Early: Sharpening before making other adjustments.
- Ignoring Noise: Sharpening images with excessive noise.
- Global Sharpening Only: Not targeting specific areas that need sharpening.
Avoiding these mistakes ensures a clean and professional-looking result.
 Sharpening techniques in Photoshop
8. How Do You Remove Blemishes And Imperfections In Photoshop?
Removing blemishes and imperfections in Photoshop involves using tools like the Spot Healing Brush, Healing Brush, and Clone Stamp to seamlessly blend away unwanted marks and distractions. These techniques ensure a clean and polished final image, free from distracting flaws. Effective blemish removal is crucial for portrait and detail work.
8.1 How Do The Spot Healing Brush And Healing Brush Differ?
The Spot Healing Brush and Healing Brush differ in their application:
- Spot Healing Brush: Automatically samples the surrounding area to remove spots and small blemishes with a single click.
- Healing Brush: Requires you to manually select a source area to sample from before applying the correction.
The Spot Healing Brush is simpler for quick fixes, while the Healing Brush offers more control.
8.2 When Should You Use The Clone Stamp Tool?
The Clone Stamp Tool should be used:
- Complex Areas: When the Spot Healing or Healing Brush doesn’t produce satisfactory results.
- Precise Cloning: For duplicating specific areas of an image.
- Pattern Replication: To replicate patterns or textures.
The Clone Stamp Tool offers the most control but requires careful use to avoid obvious repetitions.
8.3 What Are Non-Destructive Ways To Remove Blemishes?
Non-destructive ways to remove blemishes include:
- Using Adjustment Layers: Apply healing and cloning to a separate layer.
- Working with Smart Objects: Convert the layer to a Smart Object before making adjustments.
- Creating Duplicate Layers: Work on a duplicate layer, leaving the original untouched.
These methods allow you to revert or modify the corrections without damaging the original image.
9. What Are Some Advanced Photo Modification Techniques In Photoshop?
Advanced photo modification techniques in Photoshop include frequency separation, content-aware fill, and complex masking. These techniques offer precise control and enable sophisticated edits that go beyond basic adjustments, allowing you to achieve highly refined and creative results. Mastering these techniques elevates your photo editing skills to a professional level.
9.1 What Is Frequency Separation And How Is It Used?
Frequency separation is a technique that divides an image into high and low-frequency layers.
- High-Frequency Layer: Contains fine details like textures and edges.
- Low-Frequency Layer: Contains tonal information and color gradients.
This allows you to edit textures and tones separately, resulting in smoother skin and more refined details.
9.2 How Does Content-Aware Fill Work?
Content-Aware Fill works by analyzing the surrounding pixels to seamlessly fill in selected areas of an image. It intelligently replicates patterns, textures, and lighting to create a natural-looking result. This tool is useful for removing unwanted objects or extending backgrounds.
9.3 What Are Some Tips For Creating Complex Masks?
Tips for creating complex masks include:
- Use Channels: Create masks based on color channels for precise selections.
- Refine Edge: Use the “Select and Mask” workspace to refine edges and remove halos.
- Layer Masks: Combine multiple masks for intricate selections.
- Brush Refinements: Manually paint on the mask for fine-tuning.
These techniques allow for highly detailed and accurate selections.
10. How Do You Save And Export Modified Photos From Photoshop?
Saving and exporting modified photos from Photoshop involves choosing the right file format, resolution, and color space to ensure optimal quality and compatibility. Proper saving and exporting are essential for preserving your edits and preparing your images for various uses, such as web display or print. This step ensures your hard work pays off in the final presentation.
10.1 What File Formats Are Best For Saving Photos?
Best file formats for saving photos include:
- JPEG: Ideal for web use due to its small file size and good image quality.
- PNG: Best for images with transparency or graphics with sharp lines and text.
- TIFF: Suitable for archival purposes and high-quality printing.
- PSD: Photoshop’s native format, preserving all layers and edits.
Choosing the right format ensures optimal quality and compatibility for your intended use.
10.2 What Resolution Should You Use For Web Vs Print?
Resolution for web vs print:
- Web: 72 DPI (dots per inch) is sufficient for online display.
- Print: 300 DPI is recommended for high-quality printing.
Using the appropriate resolution ensures your images look their best in their respective mediums.
10.3 How Do You Optimize Images For Web Use?
To optimize images for web use:
- Resize Images: Reduce the dimensions to the actual size they will be displayed on the web.
- Compress Images: Use JPEG format with a quality setting that balances file size and image quality.
- Remove Metadata: Reduce file size by removing unnecessary metadata.
- Use “Save for Web”: Utilize Photoshop’s “Save for Web” feature to optimize images specifically for online use.
These steps ensure fast loading times and a better user experience.
At dfphoto.net, we provide a wealth of resources to help you master these techniques and more. Our tutorials, articles, and community forums are designed to support photographers of all levels in their creative journey. We encourage you to explore our site, experiment with these methods, and discover the transformative power of photo editing.
According to Popular Photography, continuous learning and experimentation are key to mastering Photoshop, encouraging photographers to explore new techniques regularly. Join us at dfphoto.net to access in-depth tutorials, connect with fellow photographers, and stay updated on the latest trends and techniques in the industry.
We invite you to visit dfphoto.net today to discover more tutorials, view stunning photography, and connect with our vibrant community. Whether you’re a beginner or a seasoned pro, dfphoto.net is your ultimate resource for all things photography.
Ready to take your photo editing skills to the next level? Visit dfphoto.net to explore our comprehensive guides, view stunning photography, and connect with a passionate community of photographers. Start your journey towards mastering Photoshop today!
For more information, visit our website at dfphoto.net or contact us at:
Address: 1600 St Michael’s Dr, Santa Fe, NM 87505, United States
Phone: +1 (505) 471-6001
Frequently Asked Questions (FAQ)
1. What is the best version of Photoshop for photo editing?
The best version of Photoshop for photo editing is typically the latest version available through Adobe’s Creative Cloud subscription, as it includes the most up-to-date features, tools, and performance improvements.
2. Can I modify photos on my phone?
Yes, you can modify photos on your phone using various mobile apps like Adobe Photoshop Express, Snapseed, and VSCO, which offer a range of editing tools and features.
3. How do I fix blurry photos in Photoshop?
You can fix blurry photos in Photoshop using the Sharpen tools, such as the Unsharp Mask filter or the Smart Sharpen filter, adjusting the settings to enhance details without creating artifacts.
4. Is Photoshop difficult to learn?
Photoshop can be challenging to learn initially due to its wide array of tools and features, but with practice, tutorials, and a focus on specific tasks, it becomes more manageable and rewarding.
5. How do I change the background of a photo in Photoshop?
You can change the background of a photo in Photoshop by using selection tools like the Quick Selection Tool or the Pen Tool to isolate the subject, then create a layer mask and replace the background with a new image or color.
6. What is the best file format to save edited photos for printing?
The best file format to save edited photos for printing is TIFF (Tagged Image File Format), as it preserves high image quality and supports lossless compression, making it ideal for professional printing.
7. How do I remove red eye in Photoshop?
You can remove red eye in Photoshop using the Red Eye Tool, which is specifically designed to correct this common issue by replacing the red color in the eyes with a more natural tone.
8. What are adjustment layers in Photoshop?
Adjustment layers in Photoshop are non-destructive layers that allow you to apply color and tonal adjustments to an image without directly altering the original pixels, providing flexibility and control over your edits.
9. How do I whiten teeth in Photoshop?
You can whiten teeth in Photoshop by using adjustment layers like Hue/Saturation or Curves, creating a mask to isolate the teeth, and then adjusting the settings to lighten and desaturate the color for a natural-looking result.
10. Can Photoshop enhance old photos?
Yes, Photoshop can enhance old photos by using tools to remove scratches, repair damage, adjust contrast and color, and sharpen details, restoring them to a better condition.