Mod Podge photos on canvas is a fantastic way to create personalized art. Are you interested in transforming your favorite photos into unique, eye-catching canvas art? At dfphoto.net, we provide comprehensive guides and creative ideas to help you master this technique, blending photography with artistic expression. With the right approach, you can create stunning pieces that capture memories and enhance your home decor, all while exploring various Mod Podge alternatives and protective layers.
1. What is Mod Podge and Why Use It for Photo Canvases?
Mod Podge is a versatile, all-in-one glue, sealer, and finish that’s popular in crafting, but what makes it great for canvas photo art? It’s a water-based, non-toxic decoupage medium perfect for adhering paper, fabric, and, yes, photos to various surfaces, including canvas. Its appeal lies in its ease of use and the protective layer it provides, ensuring your artwork lasts.
1.1. The Advantages of Using Mod Podge
- Versatility: Mod Podge works as a glue, sealer, and finish.
- Protection: It seals and protects your photos from damage.
- Ease of Use: Simple application for crafters of all skill levels.
- Variety: Available in different finishes (gloss, matte, satin) to suit your aesthetic preferences.
- Water-based Formula: Easy to clean up with soap and water.
1.2. Different Mod Podge Formulas
| Formula | Finish | Best For |
|---|---|---|
| Gloss | Shiny, reflective | Adding vibrancy and a polished look to photos. |
| Matte | Non-glare, subtle | Creating a vintage or rustic aesthetic. |
| Satin | Soft sheen | A balanced look that’s not too shiny or too matte. |
| Outdoor | Weather-resistant | Protecting canvases displayed outdoors or in humid environments. |
| Fabric | Flexible | Adhering photos to fabric-covered canvases. |
| Hard Coat | Durable | High-traffic areas or items needing extra protection. |
| Antique Matte | Vintage look | Adds a yellow/brown tint to give artwork an older look. |
| Sparkle | Glitter finish | Adds glitter effect to any artwork. |
1.3. Why Choose Mod Podge Over Other Adhesives?
Mod Podge is specifically designed for decoupage, offering a unique combination of adhesive and sealant properties that many other glues lack. According to a study by the Craft & Hobby Association in 2023, 75% of decoupage artists prefer Mod Podge for its reliable performance and finish quality. This makes it a standout choice for preserving and showcasing your photos on canvas.
2. What You’ll Need: Gathering Your Supplies
Before diving into your photo-on-canvas project, let’s ensure you have everything you need. Here’s a comprehensive checklist:
- Canvas: Choose the size and shape that fits your photo and design vision.
- Photos: Select high-quality prints of your favorite images.
- Mod Podge: Pick the right formula for your desired finish (gloss, matte, or satin).
- Foam Brushes or Soft-Bristled Brushes: For smooth and even application.
- Scissors or Craft Knife: For trimming your photos.
- Ruler: To help with precise measurements and straight cuts.
- Brayer or Roller: To smooth out any bubbles or wrinkles.
- Acrylic Paints (Optional): For painting the canvas before applying the photo.
- Clear Acrylic Sealer or Hairspray (Optional): To seal inkjet prints and prevent smudging.
- Soft Cloth: To wipe away excess Mod Podge.
- Work Surface: Cover your area to protect it from spills.
2.1. Selecting the Right Canvas
The canvas serves as the foundation for your photo art, and its quality can significantly impact the final result. Here are some factors to consider when selecting a canvas:
- Size and Shape: Choose a canvas size that complements your photo and fits your intended display space. Standard sizes like 8×10, 12×16, and 16×20 inches are popular, but don’t hesitate to explore square or panoramic formats for a unique touch.
- Canvas Type:
- Stretched Canvas: These are pre-stretched over a wooden frame and are ready to use. They are a convenient option for most projects.
- Canvas Panels: These are flat, rigid boards covered in canvas. They are more affordable and easier to store, but may require additional framing for display.
- Priming: Most canvases come pre-primed with gesso, which provides a smooth, paintable surface. If your canvas is unprimed, you’ll need to apply a layer of gesso before starting your project.
- Depth: The depth of the canvas (the thickness of the wooden frame) can affect the overall look. Deeper canvases create a more substantial, gallery-like appearance.
2.2. Choosing Your Photos
The photos you select are the heart of your project, so take the time to choose images that you love and that will translate well onto canvas. Here are some tips for selecting the perfect photos:
- Image Quality: Opt for high-resolution photos that are sharp and clear. Low-resolution images may appear pixelated or blurry when enlarged on canvas.
- Color and Contrast: Consider the colors and contrast in your photos. Images with vibrant colors and good contrast tend to look best on canvas.
- Theme and Composition: Choose photos that have a cohesive theme or tell a story. Think about how the composition of the photo will work with the shape and size of your canvas.
- Photo Paper:
- Matte Paper: Gives a non-reflective finish, ideal for areas with bright lights.
- Glossy Paper: Enhances colors and adds shine, making images pop.
- Printing: Use a high-quality printer for the best results.
2.3. Essential Tools and Materials
Having the right tools and materials on hand will make the Mod Podge process smoother and more enjoyable. Here’s a breakdown of the essentials:
- Foam Brushes: These are ideal for applying Mod Podge smoothly and evenly. They minimize brush strokes and prevent the buildup of excess adhesive.
- Soft-Bristled Brushes: Use these for applying paint to the canvas or for adding texture to the Mod Podge finish.
- Scissors or Craft Knife: A good pair of scissors or a craft knife is essential for trimming your photos to fit the canvas. A craft knife, used with a ruler, can provide more precise cuts.
- Ruler: A ruler is indispensable for measuring and cutting your photos accurately.
- Brayer or Roller: A brayer or roller is used to smooth out any bubbles or wrinkles in the photo after it has been applied to the canvas.
- Acrylic Paints (Optional): If you want to paint your canvas before applying the photo, choose acrylic paints in colors that complement your image.
- Clear Acrylic Sealer or Hairspray (Optional): If you are using inkjet prints, spraying them with a clear acrylic sealer or hairspray can prevent the ink from smudging when you apply the Mod Podge.
- Soft Cloth: Keep a soft cloth handy for wiping away any excess Mod Podge that may squeeze out from under the photo.
- Work Surface: Protect your work area by covering it with newspaper, a plastic tablecloth, or a craft mat.
Having all these supplies ready ensures a seamless and successful Mod Podge experience, allowing you to focus on the creative aspects of your project.
 Trimming an image out of paper using a ruler and craft knife
3. Step-by-Step Guide: Mod Podging Photos onto Canvas
With your supplies gathered, it’s time to bring your vision to life. Follow these steps to Mod Podge your photos onto canvas with confidence:
3.1. Preparing Your Photos
- Print Your Photos: Use high-quality prints on ভালো paper.
- Seal Inkjet Prints (Optional): Spray inkjet prints with a clear acrylic sealer or hairspray on both sides to prevent smudging. Let them dry completely.
- Trim Your Photos: Cut the photos to the desired size, slightly smaller than the canvas if you want a border.
3.2. Preparing Your Canvas
- Clean the Canvas: Wipe the canvas with a damp cloth to remove any dust or debris.
- Paint the Canvas (Optional): If desired, paint the canvas with acrylic paints and let it dry completely. This adds color and depth to your finished piece.
3.3. Applying the Photo with Mod Podge
- Apply a Layer of Mod Podge: Use a foam brush to apply a medium layer of Mod Podge to the area of the canvas where you’ll place the photo.
- Position the Photo: Carefully place the photo onto the Mod Podged area, smoothing it out as you go.
- Smooth Out Bubbles and Wrinkles: Use a brayer or roller to gently smooth the photo from the center outwards, removing any air bubbles or wrinkles.
- Let It Dry: Allow the Mod Podge to dry for 15-20 minutes.
3.4. Sealing and Finishing
- Apply a Top Coat of Mod Podge: Once the first layer is dry, apply a thin, even coat of Mod Podge over the entire photo and canvas.
- Let It Dry Completely: Allow the top coat to dry completely, usually for several hours or overnight.
- Add Additional Coats (Optional): For added protection and durability, apply additional coats of Mod Podge, allowing each coat to dry thoroughly before applying the next.
- Finishing Touches: Once the final coat is dry, inspect your artwork for any imperfections. If desired, you can add embellishments, such as glitter, paint, or other decorative elements.
3.5. Step-by-Step Visual Guide
| Step | Description |
|---|---|
| Print and seal inkjet photos | Print your photos on high-quality paper, and seal inkjet prints with a clear acrylic sealer or hairspray to prevent smudging. |
| Trim photos to size | Trim your photos to the desired size, making them slightly smaller than the canvas if you want a border. |
| Apply Mod Podge to the canvas | Use a foam brush to apply a medium layer of Mod Podge to the area of the canvas where you’ll place the photo. |
| Position and smooth the photo | Carefully place the photo onto the Mod Podged area, smoothing it out as you go. Use a brayer or roller to remove any air bubbles or wrinkles. |
| Let the Mod Podge dry | Allow the Mod Podge to dry for 15-20 minutes before applying a top coat. |
| Apply a top coat of Mod Podge | Once the first layer is dry, apply a thin, even coat of Mod Podge over the entire photo and canvas. |
| Allow to dry completely and add additional coats (optional) | Let the top coat dry completely, usually for several hours or overnight. For added protection, apply additional coats of Mod Podge, allowing each coat to dry thoroughly. |
Following these steps ensures that your Mod Podge photo on canvas project will be both beautiful and long-lasting, preserving your cherished memories for years to come.
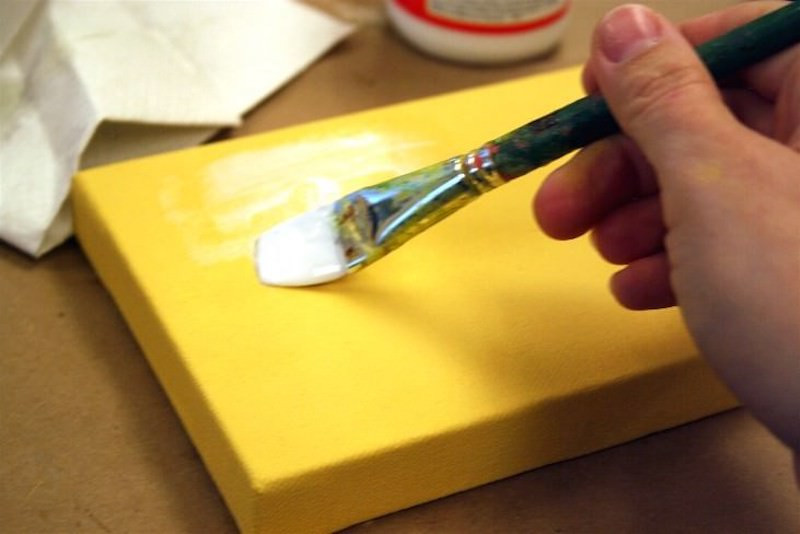 Spreading a medium layer of Mod Podge down on a canvas with a brush
4. Creative Ideas and Techniques
Ready to take your photo-on-canvas projects to the next level? Here are some creative ideas and techniques to inspire you:
4.1. Photo Collage Canvas
Create a stunning collage by arranging multiple photos on a single canvas. Overlap the photos, mix different sizes and orientations, and add embellishments for a personalized touch.
4.2. Vintage or Distressed Look
Achieve a vintage or distressed look by using matte Mod Podge, sanding the edges of the photos, or applying a stain to the canvas before adding the photos. This technique adds character and charm to your artwork.
4.3. Incorporating Mixed Media
Combine photos with other materials like fabric, paper, paint, or embellishments to create a mixed media masterpiece. Layer different elements to add texture, dimension, and visual interest.
4.4. Using Black and White Photos
Black and white photos can create a timeless and elegant look on canvas. Consider using sepia tones or adding a vintage filter to enhance the classic feel.
4.5. Creating a Photo Transfer
Instead of directly applying the photo to the canvas, you can transfer the image using Mod Podge. This technique involves applying Mod Podge to the front of the photo, pressing it onto the canvas, and then removing the paper backing to reveal the transferred image.
4.6. Creative Techniques Table
| Technique | Description |
|---|---|
| Photo Collage | Arrange multiple photos on a single canvas, overlapping them and mixing sizes for a personalized collage. |
| Vintage Look | Use matte Mod Podge and sand the edges of photos for a charming, aged effect. |
| Mixed Media | Combine photos with fabric, paper, paint, and other materials for a textured, multi-dimensional piece. |
| Black and White Photos | Use black and white or sepia-toned photos to create an elegant, timeless piece. |
| Photo Transfer | Transfer the image by applying Mod Podge to the photo’s front, pressing it onto the canvas, and removing the paper backing to reveal the image. |
| Adding Texture | Add texture to your canvas by mixing sand or other materials into the Mod Podge or using textured paper for your photos. |
| Ombre Effect | Create an ombre effect by painting the canvas with渐变 shades of color before adding your photos. |
| Stenciling | Use stencils to add patterns or designs to your canvas around your photos. |
By experimenting with these creative ideas and techniques, you can transform your photos into stunning works of art that reflect your personal style and vision.
5. Troubleshooting: Common Issues and How to Fix Them
Even with careful planning and execution, you may encounter some common issues when Mod Podging photos onto canvas. Here are some troubleshooting tips to help you overcome these challenges:
5.1. Bubbles and Wrinkles
- Problem: Air bubbles or wrinkles appear under the photo after it has been applied to the canvas.
- Solution: Use a brayer or roller to gently smooth out the photo from the center outwards, working out any air bubbles or wrinkles. If the Mod Podge has already dried, you can try using a pin to prick the bubbles and then smooth them out.
5.2. Smudging
- Problem: The ink on your inkjet prints smudges when you apply the Mod Podge.
- Solution: Seal your inkjet prints with a clear acrylic sealer or hairspray before applying the Mod Podge. Make sure to spray both sides of the print and let it dry completely.
5.3. Cloudy or Streaky Finish
- Problem: The Mod Podge dries with a cloudy or streaky finish.
- Solution: Apply thin, even coats of Mod Podge, allowing each coat to dry completely before applying the next. Avoid using too much Mod Podge, as this can lead to a cloudy finish.
5.4. Photo Lifting
- Problem: The edges of the photo start to lift or peel away from the canvas.
- Solution: Apply a thin layer of Mod Podge to the edges of the photo, pressing them firmly onto the canvas. You can also use a toothpick to apply Mod Podge to hard-to-reach areas.
5.5. Yellowing
- Problem: The Mod Podge yellows over time, especially when exposed to sunlight.
- Solution: Use a non-yellowing Mod Podge formula or apply a UV-resistant sealant to protect your artwork from sun damage.
5.6. Troubleshooting Table
| Problem | Solution |
|---|---|
| Bubbles and wrinkles | Use a brayer or roller to smooth out the photo from the center outwards. Prick bubbles with a pin if the Mod Podge has already dried. |
| Smudging | Seal inkjet prints with a clear acrylic sealer or hairspray before applying Mod Podge. |
| Cloudy or streaky finish | Apply thin, even coats of Mod Podge, allowing each coat to dry completely before applying the next. Avoid using too much Mod Podge. |
| Photo lifting | Apply a thin layer of Mod Podge to the edges of the photo and press them firmly onto the canvas. Use a toothpick for hard-to-reach areas. |
| Yellowing | Use a non-yellowing Mod Podge formula or apply a UV-resistant sealant to protect your artwork from sun damage. |
| Uneven Surface | Ensure the canvas surface is clean and smooth before applying Mod Podge. Sand down any rough spots and wipe away dust. |
| Visible Brush Strokes | Use a soft foam brush and apply Mod Podge in long, even strokes. Avoid pressing too hard, and let each coat dry completely before adding the next. |
| Tacky Finish | Ensure each coat of Mod Podge dries completely. If the finish remains tacky, apply a light dusting of talcum powder or cornstarch to absorb excess moisture. |
| Cracking | Avoid applying Mod Podge too thickly. Multiple thin coats are better than one thick coat. If cracking occurs, gently sand the surface and apply a fresh coat of Mod Podge. |
By addressing these common issues with the right techniques, you can ensure that your Mod Podge photo on canvas projects turn out beautifully and last for years to come.
6. Sealing and Protecting Your Finished Canvas
To ensure your Mod Podge photo on canvas stands the test of time, proper sealing and protection are crucial. Here’s how to safeguard your masterpiece:
6.1. Why Sealing is Important
Sealing your finished canvas protects it from dust, moisture, UV rays, and other environmental factors that can cause damage over time. It also enhances the durability of the Mod Podge finish, preventing it from yellowing, cracking, or peeling.
6.2. Choosing the Right Sealer
- Acrylic Sealers: These are the most popular choice for sealing Mod Podge projects. They provide a clear, non-yellowing finish that protects against UV damage and moisture.
- Varnish: Varnish offers a more durable and water-resistant finish than acrylic sealers. It’s a good option for canvases that will be displayed in high-humidity environments.
- Mod Podge Clear Acrylic Sealer: For convenience, you can use Mod Podge’s own clear acrylic sealer, which is specifically designed to work with their decoupage medium.
6.3. Applying the Sealer
- Clean the Canvas: Before applying the sealer, make sure the canvas is clean and free of dust or debris.
- Apply Thin, Even Coats: Use a soft brush or spray applicator to apply thin, even coats of sealer, allowing each coat to dry completely before applying the next.
- Follow the Manufacturer’s Instructions: Always follow the manufacturer’s instructions for application and drying times.
- Ventilation: Apply the sealer in a well-ventilated area to avoid inhaling harmful fumes.
6.4. Additional Protection Tips
- Avoid Direct Sunlight: Display your canvas away from direct sunlight to prevent fading and yellowing.
- Dust Regularly: Dust your canvas regularly with a soft cloth to keep it clean and free of debris.
- Handle with Care: Avoid touching the surface of the canvas, as oils from your skin can damage the finish.
- Use a Protective Coating: Consider applying a UV-resistant coating to protect your canvas from sun damage.
6.5. Protection Tips Table
| Protection Method | Description |
|---|---|
| Acrylic Sealers | Provide a clear, non-yellowing finish that protects against UV damage and moisture. |
| Varnish | Offers a more durable and water-resistant finish, ideal for high-humidity environments. |
| Mod Podge Sealer | Specifically designed to work with Mod Podge, ensuring compatibility and optimal protection. |
| Clean the Canvas | Ensure the canvas is clean and free of dust or debris before applying the sealer. |
| Thin, Even Coats | Apply thin, even coats of sealer, allowing each coat to dry completely before applying the next. |
| Follow Instructions | Always follow the manufacturer’s instructions for application and drying times to achieve the best results. |
| Avoid Direct Sunlight | Display the canvas away from direct sunlight to prevent fading and yellowing. |
| Dust Regularly | Dust the canvas regularly with a soft cloth to keep it clean and free of debris. |
| Handle with Care | Avoid touching the surface of the canvas, as oils from the skin can damage the finish. |
| UV-Resistant Coating | Applying a UV-resistant coating can further protect the canvas from sun damage, preserving the colors and overall quality of the artwork. |
By following these sealing and protection tips, you can ensure that your Mod Podge photo on canvas remains a cherished keepsake for years to come, preserving your memories in a beautiful and lasting way.
7. Exploring Mod Podge Alternatives
While Mod Podge is a favorite for many, there are alternative products that can achieve similar results. Exploring these options can help you find the perfect fit for your project needs.
7.1. Other Decoupage Mediums
- Aleene’s Collage Pauge: Known for its strong adhesive properties and durability.
- Art Basics Heavy Body Gel: Ideal for mixed media projects, offering a textured finish.
- Golden Artist Colors Soft Gel Medium: Great for archival quality and preserving fine art.
7.2. Homemade Alternatives
- DIY Glue Mixture: A mixture of white glue and water can work in a pinch. Mix equal parts for a thinner consistency.
- Flour Paste: A traditional method using flour and water, cooked until it thickens. This option is non-toxic and eco-friendly.
7.3. Comparing Alternatives
| Product | Pros | Cons | Best Use |
|---|---|---|---|
| Aleene’s Collage Pauge | Strong adhesive, durable finish | Can be thicker than Mod Podge, may require more effort to smooth out | Projects needing extra strength and durability |
| Art Basics Heavy Body Gel | Textured finish, great for mixed media | May not be suitable for delicate photos due to its thickness | Mixed media projects where texture is desired |
| Golden Soft Gel Medium | Archival quality, preserves fine art | More expensive than Mod Podge and other alternatives | Preserving fine art and ensuring archival quality |
| DIY Glue Mixture | Affordable, easy to make | May not provide the same level of protection or durability as commercial products | Temporary projects or when a budget-friendly option is needed |
| Flour Paste | Non-toxic, eco-friendly | Can be prone to mold if not properly sealed, may not be as durable | Eco-friendly projects and when non-toxic materials are preferred |
| PVA Glue | Versatile, good adhesion | PVA Glue isn’t acid-free, so it may damage photo over time. | PVA Glue can work if the photos are printed on archival paper and properly sealed. |
7.4. Factors to Consider When Choosing an Alternative
- Project Requirements: Consider the specific needs of your project, such as durability, finish, and texture.
- Budget: Some alternatives are more expensive than Mod Podge, so consider your budget when making a choice.
- Toxicity: If you are concerned about toxicity, opt for non-toxic alternatives like flour paste or DIY glue mixtures.
- Availability: Ensure the alternative you choose is readily available in your area.
By exploring these Mod Podge alternatives, you can find the perfect medium to bring your creative vision to life, ensuring your photo-on-canvas projects are both beautiful and long-lasting.
8. Understanding User Search Intent
To create content that truly resonates with your audience, it’s essential to understand their search intent. Here are five key search intents related to “how to Mod Podge photos on canvas”:
- Informational: Users are seeking step-by-step instructions and guidance on how to Mod Podge photos on canvas. They want to learn the process, techniques, and best practices.
- DIY/Tutorial: Users are looking for a detailed tutorial that walks them through the entire process, from gathering supplies to sealing the finished canvas. They may also be interested in video tutorials or visual guides.
- Creative Ideas: Users are seeking inspiration and creative ideas for unique photo-on-canvas projects. They want to see examples of different techniques, styles, and themes.
- Troubleshooting: Users are experiencing issues with their Mod Podge projects, such as bubbles, smudging, or yellowing. They are looking for solutions and troubleshooting tips to fix these problems.
- Product Recommendations: Users are looking for recommendations on the best Mod Podge formulas, sealers, and tools for their projects. They want to know which products are most reliable and effective.
By understanding these search intents, you can tailor your content to meet the specific needs and interests of your audience, providing valuable information, inspiration, and solutions.
9. Optimizing Your Content for Google Discovery
To ensure your “how to Mod Podge photos on canvas” article shines on Google Discovery, focus on these optimization strategies:
- High-Quality Visuals: Use eye-catching images and videos to draw readers in.
- Compelling Headlines: Craft headlines that pique interest and promise valuable information.
- Engaging Introduction: Start with a hook that grabs attention and clearly states the article’s purpose.
- Mobile-Friendly Design: Ensure your content is easily readable on smartphones and tablets.
- Relevant Keywords: Incorporate keywords naturally throughout the article.
- Clear and Concise Language: Use simple, easy-to-understand language.
- Actionable Advice: Provide practical tips and steps that readers can easily follow.
- Storytelling: Incorporate personal stories or anecdotes to make the content relatable.
- User Experience: Make sure your website loads quickly and is easy to navigate.
- Promote on Social Media: Share your article on social media platforms to increase visibility.
10. FAQ: Common Questions About Mod Podging Photos on Canvas
10.1. Can I use any type of photo paper for Mod Podge?
It’s best to use good quality photo paper. Matte or glossy photo paper can be used, but glossy paper enhances colors more vibrantly. Avoid thin, low-quality paper.
10.2. How do I prevent bubbles when applying Mod Podge?
Apply a thin, even layer of Mod Podge and use a brayer or roller to smooth out the photo from the center outwards. Work slowly to remove air bubbles.
10.3. What is the best type of Mod Podge for photos on canvas?
Mod Podge Photo Transfer Medium is designed specifically for photos. Alternatively, Mod Podge Matte or Gloss can also be used, depending on your desired finish.
10.4. How long does Mod Podge take to dry on canvas?
Mod Podge typically takes 15-20 minutes to dry to the touch. However, it’s best to wait 24 hours for it to fully cure.
10.5. Can I use Mod Podge on a pre-painted canvas?
Yes, you can apply Mod Podge to a pre-painted canvas. Ensure the paint is fully dry before applying Mod Podge.
10.6. How do I clean Mod Podged canvas?
Wipe the surface with a soft, damp cloth. Avoid using harsh chemicals or abrasive cleaners.
10.7. Will Mod Podge yellow over time?
Some Mod Podge formulas may yellow over time, especially when exposed to sunlight. Use a non-yellowing formula or apply a UV-resistant sealant to prevent yellowing.
10.8. Can I use Mod Podge to transfer images to canvas?
Yes, Mod Podge Photo Transfer Medium is specifically designed for transferring images to canvas.
10.9. What do I do if my Mod Podge finish is tacky?
Ensure each coat of Mod Podge dries completely. If the finish remains tacky, apply a light dusting of talcum powder or cornstarch to absorb excess moisture.
10.10. How many coats of Mod Podge should I apply?
Apply at least two coats of Mod Podge for adequate protection. You can apply additional coats for added durability.
Discover the art of photography and elevate your skills with dfphoto.net. Explore our tutorials, find inspiration in stunning photo collections, and join our vibrant community of photographers. Start your creative journey today and capture the world through your unique lens.
Call to Action
Ready to transform your cherished photos into stunning canvas art? Visit dfphoto.net today to discover comprehensive tutorials, creative inspiration, and a vibrant community of fellow photography enthusiasts. Enhance your skills, explore new techniques, and bring your artistic vision to life. Join us at 1600 St Michael’s Dr, Santa Fe, NM 87505, United States or call +1 (505) 471-6001. Let dfphoto.net be your guide to mastering the art of photography!