Mirroring a photo, also known as flipping, is a simple yet powerful technique in photo editing that can dramatically change the perspective and feel of your images. Whether you’re aiming to correct orientation, create artistic effects, or optimize your photos for social media, understanding how to mirror images in paint is a valuable skill. This guide will walk you through the process of mirroring photos, exploring different techniques and applications to enhance your photo editing capabilities.
Understanding the Basics: Mirror vs. Flip
Before diving into the “how-to,” it’s crucial to understand the terms “mirror” and “flip” in the context of image editing. While often used interchangeably, there’s a subtle difference, especially when manipulating selections or objects within an image.
When you flip an image or a selected element, you are essentially turning it over, either horizontally or vertically. Imagine turning a page in a book – that’s flipping. Mirroring, on the other hand, is reflecting the image or selection across an axis, like seeing a reflection in a mirror.
For an entire photo, the visual outcome of flipping and mirroring might appear identical. However, the distinction becomes clear when working with specific parts of an image, such as a selected object or layer.
Let’s explore how to apply both mirror and flip effects to your photos using paint editing software.
Mirroring an Entire Photo: Step-by-Step
Mirroring the entire photo is straightforward and can be achieved in just a few clicks. Here’s how to do it:
-
Open Your Image: Start by opening the photo you wish to mirror in your paint program. Navigate to ‘File’ and then ‘Open’ to select your image.
-
Access the Mirror Function: Locate the ‘Image’ menu in the top toolbar of your paint software. Click on it, and you will find options related to image manipulation, including ‘Mirror’ or ‘Flip’.
-
Choose Mirror Direction: Typically, you’ll have options for ‘Mirror Horizontal’ and ‘Mirror Vertical’.
-
Mirror Horizontal: This option will create a reflection of your image from left to right, as if a mirror is placed vertically in the middle of the photo. Select ‘Mirror’ > ‘Mirror Horizontal’ to apply this effect.
-
Mirror Vertical: This will reflect the image from top to bottom, like a mirror placed horizontally in the center. Choose ‘Mirror’ > ‘Mirror Vertical’ to achieve this.
-
-
Review the Mirrored Image: After selecting your desired mirror direction, your paint program will instantly apply the effect. Take a moment to review the mirrored image and ensure it meets your expectations.
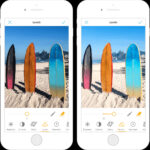
Let’s see an example of horizontal mirroring applied to a landscape photo.
 Landscape photo before horizontal mirroring
After applying ‘Mirror Horizontal’, the image is reflected, changing the orientation of the elements within the frame.
Mirroring a Selection: Focusing on Specific Areas
Sometimes, you might want to mirror only a specific part of your photo. This is particularly useful for correcting minor imbalances or creating unique visual effects. Here’s how to mirror a selection:
-
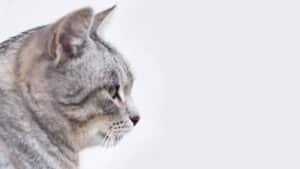
Select the Area: Use a selection tool in your paint program (like a rectangular selection, lasso, or magic wand) to precisely select the area you want to mirror. For instance, let’s select a cat in a photo.
 Selection around a cat in a photo
 -
Apply Mirror to Selection: Once you have your selection, go back to the ‘Image’ menu, then ‘Mirror’, and choose either ‘Mirror Horizontal’ or ‘Mirror Vertical’. The mirroring effect will only be applied to the selected area.
-
Observe the Difference: Flip vs. Mirror on Selection: When you apply ‘Flip Horizontal’ or ‘Mirror Horizontal’ to a selection, you’ll notice a distinct difference. ‘Flip’ will simply turn the selection over within its bounding box, while ‘Mirror’ will reflect it across the selection’s vertical axis.
Let’s compare the results of applying ‘Flip Horizontal’ and ‘Mirror Horizontal’ to our cat selection:
 Result of flipping a selected cat horizontally
As you can see, mirroring a selection provides a different outcome compared to flipping, offering more creative control over specific elements in your photo.
-
Working with Floating Selection: In many paint programs, mirroring a selection often places the mirrored part on a new layer, known as a ‘Floating Selection’. This allows you to independently adjust the mirrored selection. If you want to keep this mirrored selection as a separate layer, you can usually ‘Promote’ or ‘Convert to Layer’ the floating selection. This gives you flexibility to reposition, resize, or further edit the mirrored element without affecting the original image layer.
Practical Uses of Mirroring in Photo Editing
Mirroring isn’t just a technical function; it’s a creative tool with various practical applications:
-
Composition Improvement: Mirroring can help balance the composition of your photos. If an image feels lopsided, horizontally mirroring it might create a more harmonious and visually appealing picture.
-
Social Media Optimization: When creating cover photos or banners for social media, mirroring can be used strategically. For example, if your subject is positioned on one side of the image, mirroring it can prevent key elements from being obscured by profile pictures or interface elements on social platforms.
 Social media cover photo mirrored to avoid profile picture obstruction
 -
Creating Symmetrical Designs: Mirroring is fundamental in creating symmetrical patterns and designs. By mirroring elements and combining them, you can produce intricate and visually striking graphics.
-
Artistic Effects: Experiment with mirroring to generate abstract or surreal effects. Mirroring parts of portraits or landscapes can lead to unexpected and artistic outcomes.
Beyond Mirroring: Quick Guide to Rotating Photos in Paint
While this guide focuses on mirroring, rotation is another essential image manipulation technique often found alongside mirroring in paint programs. Rotating photos allows you to correct orientation or add dynamic angles to your images. Here’s a quick overview of how to rotate photos:
-
90-Degree Rotation: For simple 90-degree rotations (clockwise or counter-clockwise), look for ‘Rotate Right’ or ‘Rotate Left’ options, usually located under the ‘Image’ menu or as quick access buttons in the interface.
 90-degree rotation options in paint software interface
 -
Free Rotation: For more precise rotation angles, use the ‘Free Rotate’ option. This usually allows you to specify the exact angle of rotation. You can typically find this under the ‘Image’ menu, often within a ‘Rotate’ submenu.
 Free rotate options with angle adjustment in paint software
Keep in mind that rotating an image at angles other than 90 degrees may introduce blank areas at the corners, which you might need to crop out afterwards.
 Image rotated freely with added background needing cropping
 -
Rotation via Pick Tool: Some paint programs allow direct rotation using a ‘Pick’ or ‘Move’ tool. By selecting the image with this tool, you can often find rotation handles at the corners, enabling you to drag and rotate the image interactively.
 Rotation handles using pick tool for interactive image rotation
Similar to free rotation, using the pick tool for rotation might require cropping to remove any newly created background areas.
Conclusion
Mastering how to mirror photos in paint, along with understanding rotation techniques, opens up a range of creative possibilities in photo editing. From subtle adjustments to dramatic transformations, these tools allow you to refine your images, improve composition, and express your artistic vision. Experiment with mirroring and rotation in your paint program to discover how these simple yet effective techniques can enhance your photography and design projects.