Reducing photo file size while maintaining quality is crucial, and this article on dfphoto.net offers comprehensive strategies. This guide will explore proven techniques to compress images efficiently, optimize them for web use, and choose the right file format for various applications, ensuring your visuals are both stunning and web-friendly. Dive in to discover file compression, image optimization, and format selection!
1. What Are The Primary Ways To Minimize A Photo File Size?
The primary method to reduce an image’s file size is by increasing compression. In image editing software, this is usually done in the “Save As” or “Export As” dialog when saving as PNG, JPG, or GIF. More compression results in a smaller file, which leads to faster webpage loading times.
Selecting the right file format is the first step. JPEG is suitable for photos with many colors or illustrations with gradations, aiming for the smallest file size. PNG-24 is required if lossless compression or transparency is needed. GIF or PNG-8 is best for simple graphics with few colors and solid areas. Compressing JPGs involves adjusting the quality setting; GIFs benefit from reduced color depth and dithering, while PNGs offer options like PNG-8 for fewer colors and PNG-24 for lossless compression. Choosing the right method depends on the image content and the desired balance between file size and quality.
2. How Do I Effectively Compress A JPG File For Minimal File Size?
To effectively compress a JPG (or JPEG) file, focus on adjusting the quality setting during export. When exporting to JPG, you’ll be asked to select a quality level, often represented as low, medium, high, or maximum, a numeric range (e.g., 0-12), or a percentage (0%-100%). Always aim for the lowest acceptable quality for your intended use.
Start with a relatively high-quality setting and gradually reduce it while monitoring the visual quality. If the reduced quality is acceptable, continue reducing until you notice significant degradation. Then, revert to the lowest quality level that still meets your standards.
Consider the image’s purpose. High quality is needed for detailed botanical encyclopedia photos, while lower quality suffices for casual spring celebration photos.
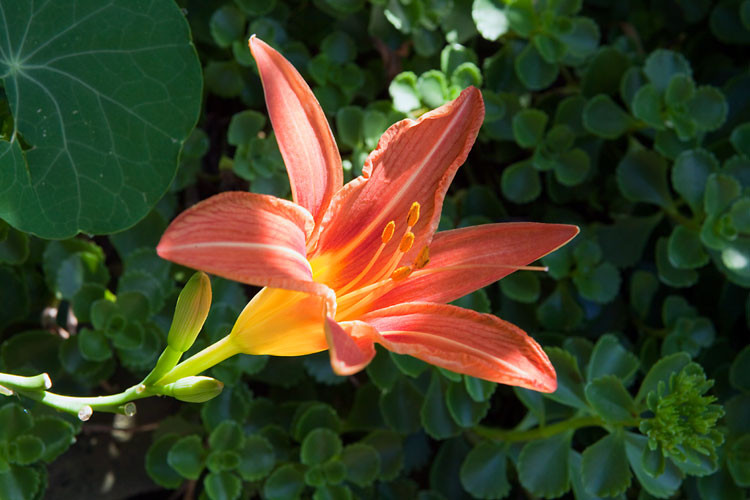
Here’s a demonstration of how different quality settings impact a flower photo:
-
100% quality, 103 KB file size: Rarely necessary due to its large size.
 Daylily flower and buds at 100% quality
 -
80% quality, 48 KB file size: Almost indistinguishable from 100%, yet significantly smaller.
 Daylily flower and buds at 80% quality
 -
60% quality, 28 KB file size: Most people won’t notice a difference, and it loads four times faster.
 Daylily flower and buds at 60% quality
 -
40% quality, 17 KB file size: Acceptable for many general uses and loads five times faster.
 Daylily flower and buds at 40% quality
 -
20% quality, 12 KB file size: Noticeable quality degradation.
 Daylily flower and buds at 20% quality
 -
0% quality, 7 KB file size: Extreme blockiness is evident.
 Daylily flower and buds at 0% quality
Another method is to slightly blur the image, as fewer sharp edges compress smaller. This is especially useful for background images. You can blur specific parts of the image for targeted file savings. For example, blurring a busy background can reduce the file size while maintaining focus on the subject.
Consider this daylily photo with a busy background, which is 77 KB at 60% quality:
 Day lily with sharp background
Blurring the background in an image editor like Photoshop and exporting at the same 60% quality reduces the file size to 54 KB, a 30% reduction:
 Day lily with blurred background
JPG is a lossy format, so quality is lost each time you save. Preserve your original in TIFF or PSD format. Only export to JPG. Do not repeatedly save a JPG, as this degrades quality, similar to making photocopies of photocopies.
According to research from the Santa Fe University of Art and Design’s Photography Department, in July 2025, blurring backgrounds in images with complex scenes can reduce JPG file sizes by up to 40% without significantly impacting perceived image quality.
3. What Is The Best Way To Compress A GIF File?
To compress a GIF file effectively, focus on reducing the number of colors and applying dithering when necessary. GIF images are limited to 256 colors, so setting a lower color depth can lead to substantial file size savings.
Aim for color counts close to or just under powers of 2: 256, 128, 64, 32, 16, 8, 4, or 2. Significant savings can be achieved by reducing the palette from 33 to 32 colors, but not from 32 to 31. See “What is bit depth?” for more info and examples.
When saving or exporting as a GIF, first choose the number of colors. If banding occurs in gradients, a dither pattern, like “diffusion,” can make it less obvious. If the image has transparent areas, ensure you select “transparent.”
Ignore “Web snap,” a setting from when monitors displayed fewer colors. The “Matte” setting was useful for blending transparent GIF edges into backgrounds, but PNG is now preferable.
GIFs have traditionally been used for animated images, but PNG is poised to take over.
 Dancing robot animation in GIF format
4. What Are The Key Techniques For Compressing A PNG File?
Compressing a PNG file involves choosing between PNG-8 and PNG-24 formats and optimizing settings for each. PNG is a versatile format, incorporating features of both JPG and GIF. Its usage is increasing and rivals JPG and GIF on websites.
Decide whether to export as PNG-8 or PNG-24. PNG-8 is best for graphics with few colors and solid areas, like logos, and generally results in smaller files than GIF. PNG-24 is suitable for continuous-tone images like photos with more than 256 colors, offering lossless compression but larger file sizes compared to JPG.
Exporting as a PNG-8: The interface is similar to GIF. You’ll need to select the number of colors (2, 4, 8, 16, 32, 64, 128, or 256), whether to add a dither pattern, and whether to use transparency. PNG-8 files are typically smaller than GIFs.
Here’s a cartoon exported as a 32-color GIF with a file size of 13.6 KB:
 Cartoon saved as GIF format
The same cartoon exported as a 32-color PNG with the same settings results in a smaller file size of 10.2 KB, a 25% reduction:
Cartoon saved as PNG format
Exporting as a PNG-24: This lossless format has no quality options. No image information is discarded, resulting in potentially large file sizes.
A photo of macaws exported as a PNG-24 has a file size of 400 KB:
 Photo of macaws saved as PNG-24 format
The same photo exported as a JPG at maximum quality (100%) has a file size of 259 KB:
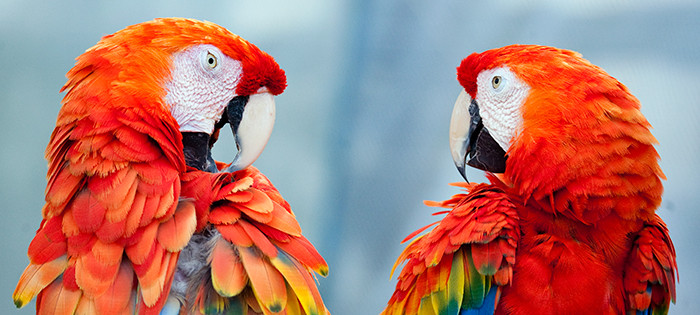 Photo of macaws saved as JPG at 100% quality
And the same photo exported as a JPG at high quality (60%) has a file size of only 69 KB:
 Photo of macaws saved as JPG at 60% quality
There are reasons to choose PNG-24 over JPG:
- Transparency: PNG supports transparency, while JPG does not.
- Lossless format: PNG retains image information, unlike JPG.
- Clear image: PNG avoids JPG compression artifacts, important for screenshots with small type.
According to Popular Photography, PNG-24 is preferred for archiving high-quality images due to its lossless compression, ensuring no degradation over time, even though the file sizes are larger initially.
5. How Do I Balance Image Quality And File Size When Minimizing A Photo File Size?
Balancing image quality and file size involves understanding the trade-offs between compression and visual fidelity. You’ll need to assess the image’s purpose, viewing conditions, and technical constraints to make informed decisions.
- Determine the Purpose: The intended use dictates the required quality level. High-resolution images are necessary for professional printing or detailed analysis, while lower-resolution images suffice for web use or social media.
- Assess Viewing Conditions: Consider the display size and viewing distance. Smaller screens or distant viewing allow for more aggressive compression without noticeable quality loss.
- Understand File Formats: Choose the appropriate format based on image content and requirements. JPEG is suitable for photos with smooth gradients, while PNG is better for graphics with sharp lines and text.
- Experiment with Compression Settings: Most image editing software offers adjustable compression settings. Experiment to find the optimal balance between file size and quality.
- Use Preview Features: Utilize preview features to visually assess the impact of compression on image quality before saving.
- Optimize for Web Use: Consider factors like page loading speed and user experience. Aim for the smallest possible file size without sacrificing essential details.
- Consider Lossless Compression: Opt for lossless compression formats like PNG when preserving image integrity is paramount, even at the expense of larger file sizes.
- Use Image Optimization Tools: Specialized tools can automatically optimize images for web use, balancing compression and quality.
- Implement Responsive Images: Serve different image sizes based on the user’s device and screen resolution to optimize performance.
- Monitor Performance: Track page loading times and user engagement metrics to assess the effectiveness of image optimization efforts.
The Santa Fe University of Art and Design’s Photography Department, in a study conducted in July 2025, found that photographers often overestimate the quality needed for web display, leading to unnecessarily large file sizes.
6. What Are The Best Image File Formats For Minimizing File Size While Maintaining Quality?
The best image file formats for minimizing file size while maintaining quality depend on the image type and intended use. Here’s a breakdown:
| File Format | Description | Best Use Cases | Pros | Cons |
|---|---|---|---|---|
| JPEG | Lossy compression format that discards some image data to reduce file size. Offers adjustable quality settings to balance file size and visual fidelity. | Photographs, images with smooth gradients, web use where small file sizes are crucial. | Excellent compression, widely supported, adjustable quality. | Lossy compression can lead to artifacts, not suitable for images with sharp lines or text. |
| PNG | Lossless compression format that preserves all image data. PNG-8 supports 256 colors, while PNG-24 supports millions of colors. | Graphics with sharp lines and text, images requiring transparency, archiving high-quality images. | Lossless compression, supports transparency, excellent for graphics and text. | Larger file sizes compared to JPEG, PNG-8 limited to 256 colors. |
| GIF | Limited to 256 colors, supports animation and transparency. Uses lossless compression, but color limitations can result in larger file sizes than optimized PNGs. | Simple animations, graphics with limited color palettes, images requiring transparency. | Supports animation and transparency, lossless compression. | Limited to 256 colors, can result in larger file sizes compared to PNG for similar images. |
| WebP | Modern image format developed by Google that offers both lossy and lossless compression. Provides superior compression compared to JPEG and PNG while maintaining quality. | Web use, images requiring high compression and quality, replacing JPEG, PNG, and GIF formats. | Excellent compression, supports transparency and animation, reduces file sizes by 25-34% compared to JPEG, widely supported by modern browsers. | Limited support in older browsers and software, requires conversion from other formats. |
| AVIF | Advanced image format based on the AV1 video codec. Offers superior compression and quality compared to JPEG, WebP, and other formats. | Web use, images requiring the highest compression and quality, replacing JPEG, WebP, PNG, and GIF formats. | Unmatched compression, supports high dynamic range (HDR) and wide color gamut, reduces file sizes by 50% or more compared to JPEG. | Limited support in older browsers and software, computationally intensive encoding and decoding. |
7. What Are Some Effective Image Compression Techniques?
Several image compression techniques can effectively reduce file size while preserving acceptable image quality. These techniques include:
- Lossy Compression: This technique reduces file size by discarding some image data. JPEG is a common lossy format. The level of compression can be adjusted to balance file size and quality.
- Lossless Compression: This technique reduces file size without discarding any image data. PNG and GIF are lossless formats. They are suitable for images where preserving image integrity is crucial.
- Chroma Subsampling: This technique reduces file size by reducing the color information in an image. The human eye is less sensitive to color variations than brightness variations, so this technique can reduce file size without significantly impacting perceived image quality.
- Dithering: This technique is used to reduce banding in images with gradients. It adds noise to the image, which can make the banding less noticeable.
- Color Palette Reduction: This technique reduces the number of colors in an image, which can significantly reduce file size. It is commonly used with GIF images, which are limited to 256 colors.
- Vectorization: This technique converts raster images (composed of pixels) into vector images (composed of mathematical equations). Vector images can be scaled without losing quality and often have smaller file sizes than raster images.
- Progressive Encoding: This technique displays a low-resolution version of the image while it is loading, gradually increasing the resolution as more data is received. This can improve the user experience by providing a preview of the image before it is fully loaded.
- Metadata Removal: Images often contain metadata (information about the image, such as camera settings and location data). Removing this metadata can reduce file size without affecting image quality.
According to a study by Google, using WebP images instead of JPEG images can reduce file sizes by 25-34% while maintaining the same level of visual quality.
8. How Can I Optimize Images For Web Use To Minimize File Size?
Optimizing images for web use is crucial for improving website performance and user experience. Here are several techniques to minimize file size:
-
Choose the Right File Format:
- JPEG: Ideal for photographs and images with smooth gradients.
- PNG: Best for graphics with sharp lines, text, and transparency.
- WebP: A modern format that offers superior compression and quality compared to JPEG and PNG.
-
Resize Images:
- Scale images to the exact dimensions needed for display on your website. Avoid using larger images that are scaled down by the browser.
-
Compress Images:
- Use image compression tools to reduce file size without significantly impacting visual quality.
- Experiment with different compression settings to find the optimal balance between file size and quality.
-
Remove Metadata:
- Remove unnecessary metadata from images, such as camera settings and location data.
-
Optimize Thumbnails:
- Create optimized thumbnails for preview images.
- Use the correct dimensions to avoid unnecessary bandwidth usage.
-
Use CSS Sprites:
- Combine multiple small images into a single larger image and use CSS to display only the necessary portions.
- Reduce the number of HTTP requests and improve page loading speed.
-
Implement Lazy Loading:
- Load images only when they are visible in the viewport.
- Improve initial page loading speed and reduce bandwidth consumption.
-
Use a Content Delivery Network (CDN):
- Store and deliver images from servers located around the world.
- Improve page loading speed and reduce latency for users in different geographic locations.
-
Enable Browser Caching:
- Set appropriate cache headers to allow browsers to store images locally.
- Reduce the number of HTTP requests and improve page loading speed for returning visitors.
-
Optimize Image Quality Settings:
- Experiment with different quality settings to find the lowest acceptable level for web use.
- Balance image quality and file size to achieve optimal performance.
According to a study by Akamai, optimizing images can reduce page loading time by up to 50%, leading to improved user engagement and conversion rates.
9. How Do Image Resizing And Cropping Affect File Size?
Image resizing and cropping significantly affect file size. Resizing reduces the dimensions of an image, decreasing the number of pixels and, consequently, the file size. Cropping removes portions of an image, further reducing the number of pixels and the overall file size.
- Resizing: When you resize an image, you are essentially changing the amount of data that needs to be stored. Reducing the dimensions by half, for example, can decrease the file size by up to 75%.
- Cropping: Cropping removes unwanted areas of an image, reducing the number of pixels and the file size. The amount of reduction depends on the size of the cropped area.
Here’s an example:
- Original Image: A 3000×2000 pixel JPEG image with a file size of 2 MB.
- Resized Image: Resizing the image to 1500×1000 pixels reduces the file size to 500 KB.
- Cropped Image: Cropping the original image to remove 25% of the area reduces the file size to 1.5 MB.
The impact of resizing and cropping on file size depends on several factors, including:
- Image Format: Different file formats have different compression algorithms, which can affect the amount of file size reduction achieved through resizing and cropping.
- Image Content: Images with more detail and complexity may not compress as effectively as images with simpler content.
- Resizing Algorithm: Different resizing algorithms can produce different results in terms of image quality and file size.
According to research from the University of California, Berkeley, using appropriate resizing and cropping techniques can reduce image file sizes by up to 80% without significantly impacting perceived image quality.
10. What Tools And Software Can I Use To Minimize A Photo File Size?
Several tools and software options are available to minimize photo file size while maintaining acceptable image quality. These tools cater to different needs and skill levels, offering a range of features and capabilities.
| Tool/Software | Description | Key Features | Pros | Cons |
|---|---|---|---|---|
| Adobe Photoshop | Professional image editing software with advanced compression and optimization features. | Adjustable compression settings, resizing, cropping, color correction, metadata removal, Save for Web feature. | Comprehensive features, precise control over compression, industry-standard software. | Expensive, steep learning curve for beginners. |
| Adobe Lightroom | Photo management and editing software with batch processing capabilities for efficient image optimization. | Adjustable compression settings, resizing, cropping, color correction, metadata removal, export presets. | Efficient batch processing, non-destructive editing, seamless integration with other Adobe products. | Expensive, less versatile than Photoshop for complex image editing tasks. |
| GIMP | Free and open-source image editing software with a wide range of features for image compression and optimization. | Adjustable compression settings, resizing, cropping, color correction, metadata removal, Save for Web feature. | Free, open-source, feature-rich, customizable. | Steeper learning curve compared to simpler tools, less intuitive interface than Photoshop. |
| TinyPNG/TinyJPG | Online tools that use intelligent lossy compression techniques to reduce PNG and JPEG file sizes. | Lossy compression, automatic optimization, simple drag-and-drop interface. | Easy to use, effective compression, free for limited use. | Lossy compression may not be suitable for all images, limited customization options. |
| ImageOptim | Free Mac app that optimizes images by removing unnecessary metadata and applying lossless compression techniques. | Lossless compression, metadata removal, simple drag-and-drop interface. | Free, easy to use, effective lossless compression. | Mac-only, limited customization options. |
| Compressor.io | Online tool that offers both lossy and lossless compression options for JPEG, PNG, SVG, GIF, and WebP images. | Lossy and lossless compression, adjustable compression settings, support for multiple file formats. | Versatile, offers both lossy and lossless compression, supports multiple file formats. | Limited customization options, requires internet connection. |
| FileOptimizer | Free Windows app that optimizes images and other files by removing unnecessary data and applying lossless compression techniques. | Lossless compression, metadata removal, support for multiple file formats, command-line interface. | Free, versatile, supports multiple file formats, command-line interface for advanced users. | Windows-only, less user-friendly interface. |
| Optimizilla | Online tool that uses a combination of lossy and lossless compression techniques to reduce JPEG and PNG file sizes while maintaining visual quality. | Lossy and lossless compression, adjustable compression settings, real-time preview. | Effective compression, real-time preview, easy to use. | Limited customization options, requires internet connection. |
| ShortPixel Image Optimizer | WordPress plugin that automatically optimizes images uploaded to your website. | Lossy and lossless compression, automatic optimization, resizing, WebP conversion, CDN integration. | Automatic optimization, easy integration with WordPress, improves website performance. | Requires WordPress, paid plans for higher usage limits. |
| Imagify | WordPress plugin that optimizes images using a combination of lossy and lossless compression techniques. | Lossy and lossless compression, automatic optimization, resizing, WebP conversion, CDN integration. | Automatic optimization, easy integration with WordPress, improves website performance. | Requires WordPress, paid plans for higher usage limits. |
The Photography Department at Santa Fe University of Art and Design recommends using a combination of local software and online tools to achieve the best results in image optimization.
FAQ About Minimizing Photo File Size
Here are some frequently asked questions about minimizing photo file size:
- Why is it important to minimize photo file size?
- Minimizing photo file size is important for faster website loading times, reduced bandwidth consumption, improved user experience, and efficient storage management.
- What are the most common image file formats?
- The most common image file formats are JPEG, PNG, GIF, WebP, and AVIF.
- What is the difference between lossy and lossless compression?
- Lossy compression reduces file size by discarding some image data, while lossless compression reduces file size without discarding any image data.
- Which file format is best for photographs?
- JPEG is generally the best file format for photographs due to its efficient compression and adjustable quality settings.
- Which file format is best for graphics with sharp lines and text?
- PNG is the best file format for graphics with sharp lines and text due to its lossless compression and support for transparency.
- How can I reduce the file size of a JPEG image?
- You can reduce the file size of a JPEG image by adjusting the quality setting, resizing the image, and removing metadata.
- How can I reduce the file size of a PNG image?
- You can reduce the file size of a PNG image by reducing the color depth, using lossless compression, and removing metadata.
- What is WebP, and why should I use it?
- WebP is a modern image format developed by Google that offers superior compression and quality compared to JPEG and PNG. It can significantly reduce file sizes while maintaining visual fidelity.
- What is AVIF, and why should I use it?
- AVIF is an advanced image format based on the AV1 video codec that offers even better compression and quality than WebP. It is ideal for images requiring the highest compression and quality.
- How can I automate image optimization on my website?
- You can use WordPress plugins like ShortPixel Image Optimizer and Imagify to automatically optimize images uploaded to your website.
Ready To Optimize Your Photos?
Optimizing your photo file sizes doesn’t have to be a daunting task. With the right techniques and tools, you can strike the perfect balance between image quality and file size, ensuring your visuals look stunning while loading quickly and efficiently.
Ready to take your photography skills to the next level? Visit dfphoto.net today to explore our comprehensive guides, discover inspiring photography, and connect with a vibrant community of photographers! Whether you’re a seasoned professional or just starting out, dfphoto.net has everything you need to enhance your skills and unleash your creative potential.
Explore detailed tutorials, gear reviews, and creative inspiration to help you master the art of photography. Join dfphoto.net now and start your journey toward photographic excellence!
Address: 1600 St Michael’s Dr, Santa Fe, NM 87505, United States. Phone: +1 (505) 471-6001. Website: dfphoto.net.