Ensuring your artwork fits perfectly into a photo frame starts with accurate measurements. Whether you’re framing a cherished photograph, a piece of art, or a certificate, knowing how to measure for the correct photo frame size is the most crucial initial step. If the dimensions are off, the frame, matting, and even the protective cover will be incorrectly sized, leading to frustration and wasted materials. It’s essential to independently verify the size of your artwork, even if the artist or documentation specifies dimensions, to guarantee a flawless fit within your chosen frame.
Understanding Your Ruler: Inches and the Imperial System
Before you start measuring, it’s important to understand how to read a ruler, especially the inch-based system prevalent in the US and other regions. Rulers often feature both imperial (inches) and metric (centimeters, millimeters) units. On the inch side, you’ll notice lines of varying lengths. These lines represent different fractions of an inch.
- Longest lines: Mark full inch increments.
- Second longest lines: Indicate half-inch marks.
- Third longest lines: Represent quarter-inch marks.
- Shorter lines: Further subdivide into eighths and sixteenths of an inch.
When measuring, align your artwork precisely with the smallest increment you can comfortably discern for the most accurate reading. Remember, these measurements will dictate the dimensions of your frame, matting, and acrylic or glass covering. Therefore, precision is key. It is highly recommended to use a rigid measuring tape for artwork, as flexible fabric tapes can introduce inaccuracies.
Metric vs. Imperial: Millimeters, Centimeters, and Inches
While inches are standard in many contexts, particularly in the US framing industry, you might encounter artwork measured in millimeters (mm) or centimeters (cm), both units of the metric system, a globally recognized measurement system.
Key Conversion:
1 inch (in) = 25.4 millimeters (mm) = 2.54 centimeters (cm)
Always be aware of the units being used. If your artwork is measured in metric units, you’ll need to convert them to inches if you are ordering a frame based on inch measurements, which is common for many US-based frame providers like dfphoto.net.
How To Measure Photo Frame Size: At dfphoto.net, inches are our standard unit. If your art is measured in metric units, carefully convert these measurements to inches before using our frame designer to ensure your custom frame is the perfect size.
Step-by-Step Guide to Measuring Your Art for Framing
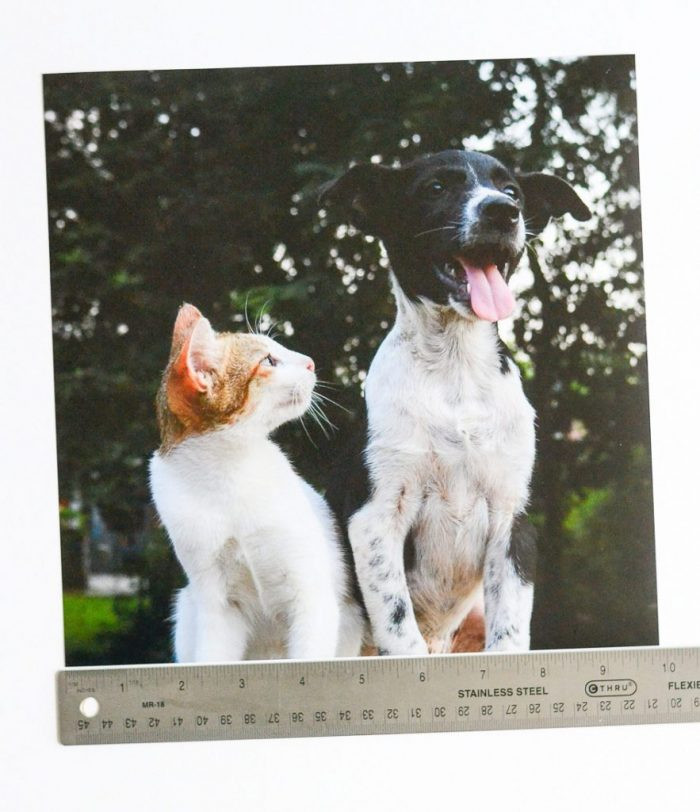 How to measure art
To accurately determine the photo frame size you need, you must first correctly measure your artwork. Here’s how:
- Orientation: Place your artwork in the orientation you intend to display it – either portrait (vertical) or landscape (horizontal).
- Width: Measure the horizontal distance from the leftmost edge to the rightmost edge. This is your artwork’s width.
- Height: Measure the vertical distance from the top edge to the bottom edge. This is your artwork’s height.
- Thickness (Depth): Measure the thickness or depth from the front surface to the back surface.
Understanding Thickness for Frame Choice:
- Artwork thicker than 1/4 inch: If your artwork, such as a stretched canvas, 3D art, or memorabilia, is thicker than 1/4 inch, you will likely need a shadow box frame. These frames are designed to accommodate deeper items.
- Artwork thinner than 1/4 inch: For most photos, prints, and standard artwork thinner than 1/4 inch, a standard picture frame will work perfectly and is generally easier to find and more cost-effective.
How to Measure Photo Frame Size: At Frame It Easy, we offer custom frames suitable for artwork ranging from 5″x5″ to 42″x62″. Our metal picture frames are designed to hold artwork up to 1/4″ thick. This maximum thickness includes any matting. For example, with a single mat, your artwork should not exceed 3/16″ thick, and with a double mat, it should be no more than 1/8″ thick. Our frame spring clips are designed to adjust and securely hold art within these thickness limits.
Our wood picture frames can accommodate artwork up to 1/8″ thick without mats or with a single mat, and up to 1/16″ thick when using two mats. Always consider the combined thickness of your art and matting when selecting a frame.
Portrait vs. Landscape Orientation and Frame Dimensions
Orientation is critical when determining photo frame size. The two primary orientations are:
- Portrait: Vertical orientation.
- Landscape: Horizontal orientation.
Orientation is determined by comparing the width and height measurements of your artwork. The standard convention for denoting frame size is always Width x Height (WxH).
For example, if you measure your artwork and it is 8 inches wide and 10 inches high, the frame size would be described as 8″ x 10″ in portrait orientation.
If the same artwork were to be displayed in landscape orientation, the dimensions would be reversed to 10″ x 8″, with the larger dimension now being the width.
Quick Tip: To remember landscape orientation, think of the 3 L’s: Landscape means the Larger dimension is listed on the Left (as the width).
The orientation of your artwork dictates how the hanging hardware is installed on the frame, ensuring your picture hangs correctly.
 dark wall with gallery wall of black picture frames
Frame Overlap and Border Considerations
It’s important to know that all picture frames include a slight overlap, typically around 1/4 inch on each side. This overlap is essential to hold your artwork securely within the frame.
If your artwork includes a border that you wish to preserve and not have covered by the frame, you have options. Matting is an excellent solution to create a space between the frame edge and your artwork, ensuring the entire image, including any border, is visible.
For a deeper understanding of the necessary 1/4″ overlap in picture framing, you can explore resources detailing custom picture framing overlap.
Sizing Digital Art and Prints
For digital photographs or artworks that you plan to print and frame, the measuring process is slightly different as you’re dealing with digital files rather than physical pieces. However, understanding size and resolution is still crucial for achieving the best framing outcome.
While you don’t physically measure a digital file, the dimensions you choose when printing directly determine the photo frame size you will need. Resolution, measured in DPI (dots per inch), plays a significant role in print quality, especially as you enlarge images.
How to Measure Photo Frame Size: At Frame It Easy, we ensure that digitally uploaded photos are printed at the highest possible DPI for the size you select, maximizing print quality.
However, remember that digital enlargement has limitations. Enlarging a low-resolution image too much will result in a blurry print, especially when viewed up close. (Imagine blowing up a small 4″x6″ photo to billboard size – it might look okay from a distance but will be blurry up close). Our website has built-in safeguards to prevent printing at sizes that would result in unacceptably low quality. This ensures that when you choose a photo frame size based on your print dimensions, the final framed piece looks sharp and professional.
Final Thoughts on Measuring for Photo Frame Size
To summarize, here are key points to remember when measuring for your photo frame size:
- Orientation Matters: Always decide on portrait or landscape orientation before measuring and remember to record dimensions as Width x Height. For landscape, ensure the width measurement is greater; for portrait, the height should be greater.
- Thickness Check: If your artwork is thicker than ¼ inch, consider shadow box frames.
- Ruler Precision: Familiarize yourself with the fractional increments on your ruler and align your artwork carefully for accurate measurements.
- Digital Art DPI: For digital prints, aim for 300+ DPI for high-quality prints at virtually any size.
Measuring for a photo frame might seem simple, but accuracy is paramount. Understanding how to measure photo frame size correctly is the foundation of successful framing. We’ve also provided resources on how to measure existing picture frames if you need to replace one. Avoid the disappointment of an ill-fitting frame by mastering these measuring techniques, and you’ll be well-equipped to beautifully frame your cherished photos and artwork.