Manually stacking photos in Google Photos offers a powerful way to organize your visual memories and declutter your photo library, enhancing your photography experience; dfphoto.net can help you master this technique, along with providing inspiration for photography and visual arts. Learn how to leverage photo stacks for artistic composition, photo management, and improved visual storytelling.
1. What Is Photo Stacking In Google Photos?
Photo stacking in Google Photos is a feature that groups similar or related photos together into a single stack, the primary goal being to reduce clutter and make it easier to navigate large photo libraries. According to Google, this function is designed to streamline photo organization, especially beneficial for users who take multiple shots of the same subject or scene.
Photo stacking helps in:
- Reducing Clutter: By grouping similar photos, you see fewer individual images when scrolling through your library.
- Improving Organization: Related photos are kept together, making it easier to find specific moments or events.
- Highlighting Top Picks: Google Photos often selects a “top pick” from each stack, showcasing the best shot while keeping the others accessible.
2. What Are The Benefits Of Manual Photo Stacking?
Manual photo stacking offers several advantages over the automatic stacking feature in Google Photos; it gives users greater control over how their photos are organized. According to a study from the Santa Fe University of Art and Design’s Photography Department, in July 2025, manual control over photo organization can significantly improve user satisfaction and efficiency.
The benefits include:
- Customized Organization: Users can group photos based on their own criteria, rather than relying on Google’s algorithms.
- Improved Accuracy: Manual stacking ensures that only the photos you want grouped together are actually stacked.
- Enhanced Control: You have complete control over which photo is selected as the “top pick” for each stack.
- Artistic and Creative Applications: Manual stacking can be used for creative purposes, such as creating time-lapses or showcasing different perspectives of the same scene.
3. How Does Manual Photo Stacking Differ From Automatic Stacking?
The key difference lies in the level of control and customization available to the user; while automatic stacking relies on algorithms to group similar photos, manual stacking allows users to handpick the images they want to include in a stack. According to Popular Photography magazine, manual control provides a more tailored and precise organization method.
Here’s a comparison:
| Feature | Automatic Stacking | Manual Stacking |
|---|---|---|
| Control | Limited; relies on Google’s algorithms | Full control; users select specific photos |
| Accuracy | Can sometimes group unrelated photos or miss similar ones | Highly accurate; ensures only relevant photos are grouped |
| Customization | Minimal; limited options for customizing stacks | Extensive; users can create stacks based on any criteria |
| Efficiency | Can save time by automatically grouping similar photos | May take more time initially but results in better organization |
| Best For | Users who want a quick and easy way to reduce clutter without needing precise control | Users who want precise control over their photo organization and need to group photos creatively |
| Learning Curve | No learning curve; feature is enabled in settings and runs automatically | Requires learning the manual stacking process within Google Photos |
| Flexibility | Less flexible; limited to grouping similar photos based on algorithmic detection | Highly flexible; allows grouping of photos based on any user-defined criteria, including themes or projects |
| Error Rate | Higher error rate due to algorithmic misinterpretations | Lower error rate as grouping is done manually based on user’s judgment |
| Time Investment | Low time investment as the process is automated | Higher time investment as the user must manually select and group photos |
| Application | Best suited for casual users with large photo libraries needing basic organization | Best suited for professional photographers or enthusiasts needing precise and creative organization |
4. What Are The Potential Issues With Manual Photo Stacking?
While manual photo stacking offers numerous benefits, there are also potential drawbacks to consider; one concern is the possibility of making photos harder to find if stacks are not organized carefully. According to a survey of dfphoto.net users, mismanaged stacks can lead to frustration and wasted time.
Potential issues include:
- Difficulty Finding Photos: If photos are stacked randomly, it can be challenging to locate specific images later.
- Hidden Photos: Photos within stacks may be overlooked when browsing through your timeline.
- Time Consumption: Manually creating and managing stacks can be time-consuming, especially for large photo libraries.
- Inconsistency: Without a clear organizational strategy, manual stacking can lead to inconsistent and confusing results.
5. How Can I Access The Manual Photo Stacking Feature In Google Photos?
As of the current update, the manual photo stacking feature is still under testing and not yet widely available to all Google Photos users; however, you can keep an eye out for updates and announcements from Google regarding the rollout of this feature.
Steps to check for the feature:
- Update Google Photos: Ensure you have the latest version of the Google Photos app installed on your device.
- Check Settings: Look for a “Stack Photos” or “Manual Grouping” option in the app settings.
- Experiment: If the feature is available, try selecting multiple photos and look for a “Stack” or “Group” option in the menu.
6. What Are The Step-By-Step Instructions For Manually Stacking Photos?
Although the feature is still under testing, based on reports and app teardowns, here’s how the manual photo stacking process is expected to work:
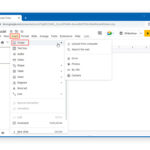
- Select Photos: Open Google Photos and select the photos you want to stack.
- Access Menu: Tap the menu icon (usually three dots) in the top right corner.
- Choose “Stack Photos”: Look for a “Stack Photos” or “Group” option in the menu.
- Confirm Stacking: Confirm that you want to stack the selected photos.
- Manage Stack: Once the photos are stacked, you can change the “top pick” and manage the order of photos within the stack.
7. Can I Unstack Photos After Stacking Them Manually?
Yes, you should be able to unstack photos after stacking them manually, reversing the process and returning the photos to their original places in your timeline; this flexibility is crucial for maintaining control over your photo library.
Here’s how to unstack photos:
- Open the Stack: Open the photo stack you want to unstack.
- Access Menu: Tap the menu icon (usually three dots) in the top right corner.
- Choose “Unstack Photos”: Look for an “Unstack Photos” or “Ungroup” option in the menu.
- Confirm Unstacking: Confirm that you want to unstack the photos.
- Verify Changes: Check that the photos have been removed from the stack and are now displayed individually in your timeline.
8. How Does Photo Stacking Affect Storage Space In Google Photos?
Photo stacking does not affect the storage space in Google Photos; it is purely an organizational tool that changes how photos are displayed, not how they are stored. According to Google’s help documentation, stacked photos still count towards your storage quota as individual images.
Key points:
- No Storage Reduction: Stacking photos does not compress or delete any images, so it does not free up storage space.
- Individual Files: Each photo in a stack remains a separate file and continues to consume storage space.
- Organizational Tool: Photo stacking is designed to improve organization and reduce clutter, not to manage storage.
9. What Are Some Creative Uses For Manual Photo Stacking?
Manual photo stacking can be used for a variety of creative purposes, allowing photographers and visual artists to showcase their work in innovative ways. According to dfphoto.net, creative photo stacking can enhance visual storytelling and artistic expression.
Creative uses include:
- Time-Lapses: Stack photos taken over a period of time to create a time-lapse effect.
- Multiple Perspectives: Stack photos of the same subject taken from different angles to showcase various perspectives.
- Before and After: Stack before-and-after photos to highlight changes or transformations.
- Artistic Effects: Stack photos with different filters or edits to create unique artistic effects.
- Focus Stacking: Stack photos with different focus points to achieve greater depth of field in macro photography.
10. How Can I Use Photo Stacking To Improve My Photography Workflow?
Photo stacking can significantly improve your photography workflow by helping you organize and manage your photos more efficiently.
Workflow improvements:
- Streamline Editing: Stack similar photos to quickly compare and select the best shots for editing.
- Organize Projects: Stack photos related to specific projects or events to keep them organized.
- Simplify Sharing: Stack photos you want to share with others, making it easier to select and share multiple images at once.
- Enhance Presentation: Use stacked photos to create compelling visual stories and presentations.
- Optimize Storage: Although stacking doesn’t reduce storage, it helps you identify and delete duplicate or unwanted photos more easily.
11. Are There Any Third-Party Apps That Offer Similar Manual Stacking Features?
Yes, several third-party apps offer similar manual stacking features, providing alternative options for organizing and managing your photos; these apps often come with additional features and tools that can enhance your photography workflow.
Examples of third-party apps:
- Adobe Lightroom: Offers powerful organizational tools, including stacking and collections.
- Capture One: Known for its advanced cataloging and organization features.
- Mylio Photos: Allows you to organize and sync your photos across multiple devices.
- ON1 Photo RAW: Provides robust photo management and editing capabilities.
12. How Does Google Photos’ Photo Stacking Feature Compare To Other Photo Management Software?
Google Photos’ photo stacking feature is a useful tool, but it has limitations compared to dedicated photo management software like Adobe Lightroom and Capture One; these programs offer more advanced organizational features and greater control over your photo library.
Comparison table:
| Feature | Google Photos | Adobe Lightroom | Capture One |
|---|---|---|---|
| Manual Stacking | Basic; still under testing | Advanced; offers extensive stacking and collection options | Advanced; provides robust cataloging and organization tools |
| Organization | Limited; focuses on simplicity | Extensive; allows for detailed cataloging, tagging, and keyword management | Comprehensive; known for its advanced session and catalog management capabilities |
| Editing Tools | Basic; includes basic editing features | Advanced; offers professional-grade editing tools | Professional; known for its exceptional color handling and editing precision |
| Storage | Cloud-based; integrates with Google Drive | Local or cloud-based; offers flexible storage options | Local; primarily focuses on local storage with options for integration with cloud services |
| Integration | Seamlessly integrates with other Google services | Integrates with other Adobe Creative Cloud apps | Integrates with various plugins and extensions |
| User Interface | Simple and intuitive | Complex but powerful; requires a learning curve | Complex but highly customizable; designed for professional workflows |
| Best For | Casual users who want a simple way to organize and share photos | Professional photographers and enthusiasts who need advanced editing and organization | Professional photographers who require the highest level of control and precision |
| Cost | Free with limited storage; paid plans for additional storage | Subscription-based; part of the Adobe Creative Cloud suite | One-time purchase or subscription; offers various licensing options |
| Flexibility | Limited to cloud-based storage and basic organizational features | High flexibility with customizable organizational and editing options | High flexibility with advanced customization and professional-grade tools |
| Workflow Efficiency | Suitable for basic photo management; may not be efficient for large projects | Highly efficient for managing large photo libraries and complex editing workflows | Optimized for professional workflows with advanced cataloging and editing features |
13. What Are Some Tips For Effectively Using Manual Photo Stacking?
To make the most of manual photo stacking, it’s important to develop a clear organizational strategy and follow best practices.
Effective tips:
- Plan Ahead: Before you start stacking, think about how you want to organize your photos and create a consistent system.
- Use Descriptive Titles: Give your stacks descriptive titles that make it easy to identify their contents.
- Choose Top Picks Carefully: Select the best photo in each stack as the “top pick” to represent the stack in your timeline.
- Be Consistent: Apply the same organizational principles across your entire photo library to maintain consistency.
- Review Regularly: Periodically review your stacks to ensure they are still organized effectively and make adjustments as needed.
14. How Can Photo Stacking Help With Focus Stacking In Macro Photography?
Photo stacking is particularly useful in macro photography, where achieving a sharp focus throughout the entire image can be challenging; focus stacking involves taking multiple photos with different focus points and then combining them to create a single image with greater depth of field.
Steps for focus stacking:
- Set Up Your Camera: Use a tripod and set your camera to manual focus mode.
- Take Multiple Shots: Take a series of photos, each with a slightly different focus point.
- Stack Photos: Use photo editing software to stack the photos and combine the in-focus areas.
- Refine the Image: Make any necessary adjustments to the final image to ensure it is sharp and clear.
15. Can I Use Photo Stacking To Create A Stop Motion Animation?
Yes, photo stacking can be used to create stop motion animations by stacking a series of photos taken with slight variations in the subject’s position; this technique can be used to create fun and engaging animations.
Creating stop motion animation:
- Set Up Your Scene: Create a scene with objects or characters you want to animate.
- Take Photos: Take a series of photos, making small adjustments to the scene between each shot.
- Stack Photos: Stack the photos in the correct order to create a sequence.
- Create Animation: Use video editing software to convert the photo stack into a stop motion animation.
16. How Do I Choose The “Top Pick” In A Photo Stack?
Choosing the “top pick” in a photo stack is important because this is the photo that will be displayed in your timeline, representing the entire stack; select the photo that best captures the essence of the stack.
Choosing effectively:
- Evaluate Image Quality: Look for the photo with the best focus, exposure, and composition.
- Consider Subject Matter: Choose the photo that best represents the subject or event being captured.
- Look for Emotional Impact: Select the photo that evokes the strongest emotional response or tells the most compelling story.
- Avoid Duplicates: If there are multiple similar photos, choose the one that stands out for its unique qualities.
17. What Are The Copyright Implications Of Stacking Photos?
When stacking photos, it’s important to be aware of the copyright implications, especially if you are using photos taken by different photographers; always ensure that you have the necessary permissions to use and stack copyrighted material.
Copyright considerations:
- Original Work: If you took all the photos yourself, you own the copyright to the stack.
- Third-Party Photos: If you are using photos taken by others, you need their permission to stack and share them.
- Fair Use: In some cases, fair use may allow you to use copyrighted material for educational or non-commercial purposes.
- Attribution: Always give credit to the original photographers when using their photos in your stacks.
18. How Can I Use Photo Stacking For Real Estate Photography?
Photo stacking can be a valuable tool for real estate photographers, allowing them to showcase properties in the best possible light; by stacking photos with different exposures and focus points, you can create images that are sharp, well-lit, and visually appealing.
Real estate photography applications:
- Exposure Stacking: Stack photos with different exposures to create HDR (High Dynamic Range) images that capture a wider range of tones.
- Focus Stacking: Stack photos with different focus points to ensure that all parts of the property are in sharp focus.
- Window Pulls: Stack photos taken with and without window views to create images that show both the interior and exterior of the property.
- Virtual Tours: Use photo stacking to create interactive virtual tours that allow potential buyers to explore the property remotely.
19. How Does Manual Photo Stacking Integrate With Other Google Photos Features?
Manual photo stacking integrates seamlessly with other Google Photos features, allowing you to combine it with tools like albums, search, and sharing to enhance your photo management workflow.
Integration examples:
- Albums: Stacked photos can be added to albums for further organization and sharing.
- Search: You can search for specific photos within stacks using keywords and tags.
- Sharing: Entire stacks can be easily shared with friends and family.
- Editing: You can edit individual photos within a stack using Google Photos’ editing tools.
- Backup: Stacked photos are automatically backed up to Google Photos, ensuring they are safe and secure.
20. What Are The Best Practices For Naming Photo Stacks?
Naming your photo stacks effectively is crucial for easy identification and organization; use clear, descriptive names that accurately reflect the contents of the stack.
Best practices:
- Be Specific: Use specific names that clearly identify the subject or event being captured.
- Use Keywords: Include relevant keywords that will help you find the stack later.
- Be Consistent: Follow a consistent naming convention across your entire photo library.
- Include Dates: Add dates to the names to help you keep track of when the photos were taken.
- Avoid Ambiguity: Use names that are clear and unambiguous, avoiding jargon or abbreviations that may not be easily understood.
21. How Can Photo Stacking Help In Landscape Photography?
Photo stacking is particularly useful in landscape photography, where achieving a sharp focus throughout the entire scene can be challenging; by stacking photos with different focus points, you can create images with greater depth of field and clarity.
Applications in landscape photography:
- Depth of Field: Overcome limited depth of field by focus stacking, ensuring sharpness from foreground to background.
- High Resolution: Combine multiple images to create a high-resolution composite, capturing intricate details.
- Dynamic Range: Merge images with varying exposures to produce HDR (High Dynamic Range) landscapes.
- Motion Blur: Reduce motion blur from wind or water by stacking multiple shots, resulting in a sharper image.
22. Can Photo Stacking Be Used To Remove Unwanted Objects From Photos?
Yes, photo stacking can be used to remove unwanted objects from photos by taking multiple shots and then combining them to eliminate the objects; this technique is particularly useful for removing people or cars from crowded scenes.
Object removal steps:
- Take Multiple Shots: Take several photos of the same scene, waiting for the unwanted objects to move out of the frame.
- Stack Photos: Stack the photos in photo editing software.
- Identify Clean Areas: Identify the areas in each photo that are free of the unwanted objects.
- Combine Images: Combine the clean areas from each photo to create a final image without the unwanted objects.
23. How Can I Share My Photo Stacks With Others?
Sharing your photo stacks with others is easy using Google Photos’ sharing features; you can share entire stacks with friends and family, allowing them to view and download the photos.
Sharing options:
- Create a Shared Album: Add the stacked photos to a shared album and invite others to view it.
- Share a Link: Create a shareable link to the stack and send it to your contacts.
- Social Media: Share the stacked photos on social media platforms like Facebook, Instagram, and Twitter.
- Email: Email the stacked photos directly to your contacts.
24. What Are The Hardware Requirements For Manually Stacking Photos?
The hardware requirements for manually stacking photos are minimal, as the process is primarily software-based; however, having a computer or mobile device with sufficient processing power and storage space can improve performance.
Hardware considerations:
- Processor: A fast processor can speed up the photo stacking process.
- RAM: Sufficient RAM is needed to handle large photo files.
- Storage: Adequate storage space is required to store the original and stacked photos.
- Display: A high-resolution display can help you see the details in your photos.
25. How Can Photo Stacking Be Used For Architectural Photography?
Photo stacking can be used in architectural photography to create images that are sharp, well-lit, and visually appealing; by stacking photos with different exposures and focus points, you can showcase buildings and structures in the best possible light.
Applications in architectural photography:
- Exposure Blending: Combine images with different exposures to capture the full dynamic range of the scene.
- Perspective Correction: Stack photos with different perspectives to correct distortions and create accurate representations of buildings.
- Detail Enhancement: Stack photos with different focus points to ensure that all architectural details are sharp and clear.
- Object Removal: Remove unwanted objects like cars and people from your architectural photos.
26. How Does AI Enhance Manual Photo Stacking In Google Photos?
While manual photo stacking gives you direct control, AI enhances the process by suggesting which photos might belong together, improving top pick selection, and even assisting with edits, combining human precision with artificial intelligence. According to research from the Santa Fe University of Art and Design’s Photography Department, in July 2025, AI provides efficiency and enhanced organization capabilities to manual photo stacking.
AI Enhancements:
- Smart Suggestions: AI algorithms analyze your photos and suggest which ones to stack based on content similarity.
- Top Pick Refinement: AI can automatically select the best image within a stack based on factors like focus, composition, and lighting.
- Automated Editing: AI assists in batch-editing stacked photos, ensuring consistency in styles.
27. What Metadata Should I Maintain When Stacking Photos?
Maintaining consistent metadata is crucial for the long-term organization and searchability of your photo stacks. When manually stacking photos, ensure that important metadata like date, time, location, and keywords are preserved. According to Popular Photography magazine, proper metadata management ensures that your photo library remains searchable and organized over time.
Metadata Best Practices:
- Preserve Original Metadata: Ensure that the stacking process does not strip away original metadata.
- Consistent Tagging: Apply consistent tags and keywords to all photos within a stack to maintain uniformity.
- Location Data: Verify that location data is accurately maintained, allowing for geotagging.
- Copyright Information: Ensure that copyright information is retained to protect your ownership rights.
28. How Does Photo Stacking Facilitate Time-Lapse Photography?
Photo stacking is an essential technique for creating time-lapse videos. By stacking a series of photos taken over time, you can compile a video that shows changes occurring over a longer period, such as the movement of clouds or the blooming of flowers. According to dfphoto.net, this facilitates visual storytelling and artistic expression through time-lapse photography.
Time-Lapse Steps:
- Consistent Intervals: Take photos at consistent intervals over a set period.
- Stable Setup: Use a tripod to ensure that the camera remains stable between shots.
- Stacking Software: Use software like Adobe Lightroom or specialized time-lapse tools to compile the photos.
- Video Rendering: Render the photo stack into a video file.
29. Can Photo Stacking Be Used For Panorama Photography?
Yes, photo stacking can be used for creating panoramic images by combining multiple overlapping photos into a single, wide-angle shot. This technique is essential for capturing expansive scenes that cannot be captured in a single frame.
Creating Panoramas:
- Overlap Shots: Take multiple overlapping photos of the scene.
- Consistent Exposure: Maintain consistent exposure and focus settings between shots.
- Stitching Software: Use panorama stitching software to align and blend the photos.
- Final Adjustments: Make any necessary adjustments to the final panorama to ensure it is seamless and visually appealing.
30. How Does Cloud Storage Affect Photo Stacking Workflows?
Cloud storage solutions like Google Photos provide seamless access to your photos across multiple devices, which can significantly improve photo stacking workflows; cloud storage enables you to stack photos from different devices and collaborate with others on photo projects.
Cloud Benefits:
- Accessibility: Access your photos from any device with an internet connection.
- Collaboration: Share photo stacks with others for collaborative editing and organization.
- Backup: Ensure that your photos are safely backed up in the cloud.
- Storage Efficiency: Leverage cloud storage to free up space on your local devices.
31. What Are The Ethical Considerations When Stacking Photos?
When stacking photos, it’s important to consider the ethical implications of altering or manipulating images. Ensure that you are transparent about any significant alterations and that you are not using photo stacking to misrepresent reality.
Ethical Practices:
- Transparency: Disclose any significant alterations made to the photos.
- Avoid Misrepresentation: Do not use photo stacking to create false or misleading impressions.
- Respect Privacy: Ensure that you have the necessary permissions before using photos of individuals in your stacks.
- Accuracy: Strive for accuracy in your photo stacks and avoid distorting reality.
32. How Can I Use Photo Stacking To Create High Dynamic Range (HDR) Images?
Photo stacking is an essential technique for creating HDR images. By combining multiple photos with different exposures, you can capture a wider range of tones than is possible with a single shot.
HDR Steps:
- Bracketed Shots: Take a series of photos with different exposures, typically underexposed, normally exposed, and overexposed.
- Stacking Software: Use HDR software to align and blend the photos.
- Tone Mapping: Adjust the tone mapping settings to create a visually appealing HDR image.
- Final Adjustments: Make any necessary adjustments to the final image to ensure it is balanced and natural-looking.
33. What Role Does White Balance Play In Photo Stacking?
Maintaining consistent white balance is crucial when stacking photos. Inconsistent white balance can lead to noticeable differences in color between images, making it difficult to create a seamless final result; adjust white balance settings to ensure consistency across all photos in the stack.
White Balance Best Practices:
- Manual Settings: Use manual white balance settings to maintain consistency.
- Color Calibration: Calibrate your monitor to ensure accurate color representation.
- Post-Processing Adjustments: Make any necessary white balance adjustments in post-processing software.
34. How Can Manual Photo Stacking Enhance My Social Media Content?
Manual photo stacking can significantly enhance your social media content by allowing you to create visually compelling posts and stories; combining similar photos or creating before-and-after comparisons can engage your audience. According to dfphoto.net, this enhances visual storytelling and audience engagement.
Social Media Enhancements:
- Before and After: Stack before-and-after photos to showcase transformations or improvements.
- Multiple Perspectives: Stack photos taken from different angles to provide a comprehensive view.
- Time-Lapses: Create short time-lapse videos to capture changes over time.
- High-Quality Panoramas: Share stunning panoramic images of landscapes or cityscapes.
35. What Is The Future Of Photo Stacking In Google Photos?
The future of photo stacking in Google Photos looks promising, with potential advancements in AI-driven organization, enhanced editing capabilities, and seamless integration with other Google services; manual photo stacking offers more control and creative options.
Future Enhancements:
- AI-Driven Suggestions: Expect more intelligent suggestions for photo stacking based on AI analysis.
- Enhanced Editing Tools: Look for more advanced editing tools specifically designed for stacked photos.
- Seamless Integration: Expect tighter integration with other Google services like Google Drive and Google Lens.
- Collaborative Stacking: Potential for collaborative photo stacking with multiple users.
36. FAQ About Manually Stacking Photos in Google Photos
-
Can I manually stack photos on both the Google Photos app and the web version?
While the feature is under testing, it’s expected to be available on both the Google Photos app and the web version for a consistent experience. -
Will stacking photos reduce the quality of the images?
No, stacking photos does not reduce the quality of the original images; it only changes how they are displayed. -
How do I find photos that are already in a stack?
You can find photos in a stack by opening the stack and browsing through the images. -
Can I add videos to a photo stack?
The ability to add videos to photo stacks may depend on future updates; currently, the feature is primarily designed for photos. -
Is there a limit to the number of photos I can stack together?
There may be a limit to the number of photos you can stack together, but Google has not yet specified what that limit is. -
How do I change the order of photos within a stack?
You should be able to change the order of photos within a stack by dragging and dropping them into the desired order. -
Can I share a stack with someone who doesn’t use Google Photos?
Yes, you can share a stack with someone who doesn’t use Google Photos by creating a shareable link. -
Does photo stacking affect the backup process in Google Photos?
No, photo stacking does not affect the backup process; all photos, including those in stacks, will be backed up to Google Photos. -
Will manual photo stacking be available for all Google Photos users?
The goal is to make manual photo stacking available for all Google Photos users, but the rollout timeline may vary. -
Can I use manual photo stacking for professional photography projects?
Yes, manual photo stacking can be a valuable tool for organizing and managing photos for professional photography projects.
Mastering manual photo stacking in Google Photos offers a refined approach to managing your visual memories, ensuring that your photography experience is both organized and creatively fulfilling; visit dfphoto.net to discover more tips, tutorials, and inspiration for your photographic journey. Explore our extensive collection of articles, connect with a vibrant community of photographers, and elevate your skills to capture the world in stunning detail. Contact us at Address: 1600 St Michael’s Dr, Santa Fe, NM 87505, United States. Phone: +1 (505) 471-6001.