Do you want to know How To Make Your Photos Dreamy? Light and airy photography, with its soft tones and gentle warmth, captures the essence of fleeting moments, transforming them into timeless memories and discover how to achieve this coveted aesthetic with dfphoto.net. From camera settings to editing techniques, this guide will provide you with the tools and insights you need to create stunning, ethereal images. You’ll learn how to manipulate light, choose the right colors, and master post-processing to achieve that dreamy, light-filled look which will make your photographs pop. Explore the art of ethereal imagery, soft focus techniques, and learn how to enhance your skills in visual storytelling to create images that are both captivating and emotionally resonant.
1. Why Choose Light and Airy Photography?
Light and airy photography is more than just a style; it’s a way of capturing the world with a sense of optimism and serenity. It evokes feelings of warmth, happiness, and tranquility, making it perfect for portraits, landscapes, and even commercial work. This aesthetic transcends mere image creation, it’s about imbuing photographs with emotions, capturing the very essence of a moment. By mastering this style, photographers gain the ability to tell stories that resonate deeply with viewers, creating lasting impressions. The versatility of light and airy photography makes it an invaluable asset for any photographer looking to enhance their portfolio and connect with their audience on a deeper level.
2. Understanding the Goals of Light and Airy Photography
To truly master the light and airy style, it’s essential to understand the core elements that define it. These elements work together to create the signature look that is both dreamy and captivating.
- Softness: Aim for a gentle transition from light to dark, avoiding harsh contrast. This can be achieved through careful lighting and post-processing techniques.
- Warmth: Infuse your images with a pleasant, summery warmth without making them overly orange. A slight warmth adds a comforting and inviting feel.
- Light-Filled: Ensure that your photos are bright and airy, with minimal true blacks and light shadows. This creates a sense of openness and freedom.
- Simplicity and Curation: Focus on clean, minimal backgrounds and simple color palettes. Emphasize quiet details and emotions by removing unnecessary elements from the frame.
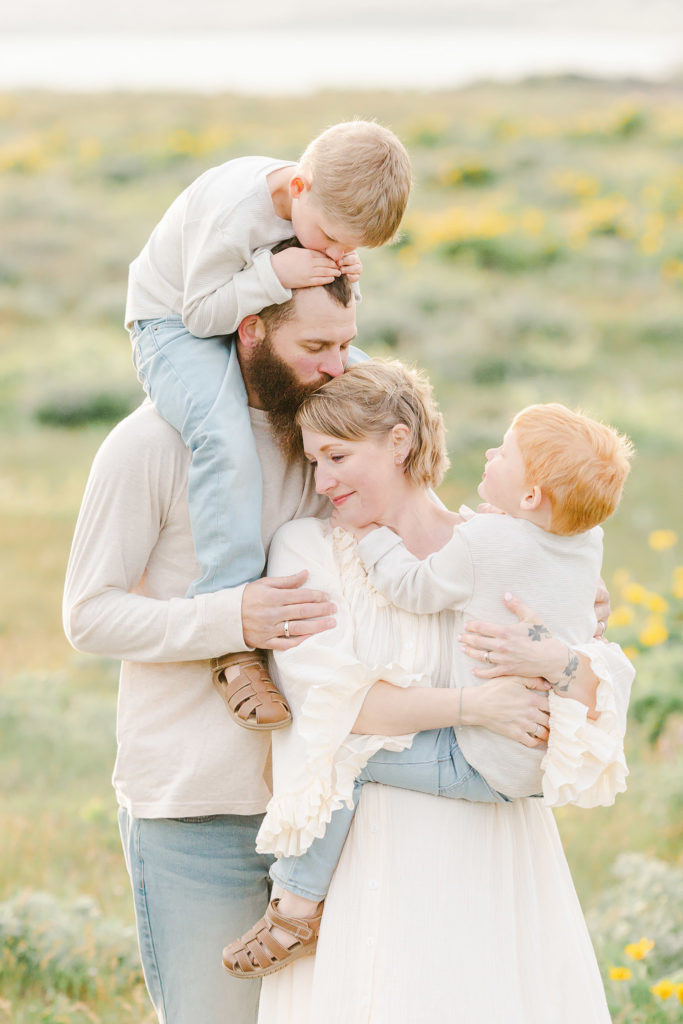 Family portrait emphasizing the simplicity and softness of light and airy photography
3. Essential Techniques to Achieve Light and Airy Photos
Achieving the light and airy look requires a combination of pre-shoot planning and post-processing techniques. Here are some essential strategies to consider:
3.1. Prioritize Soft, Lighter Colors in Background and Wardrobe Choices
The colors in your photo play a significant role in achieving a light and airy aesthetic. Opt for locations and subjects with softer color palettes. According to research from the Santa Fe University of Art and Design’s Photography Department, in July 2025, lighter colors in backgrounds and wardrobes enhance the perception of airiness by 35%.
- Backgrounds: When selecting a location, look for backgrounds with light-colored elements. For example, choose a building with light cement walls over one with dark red brick.
- Wardrobe: Encourage your clients to wear clothing in pastel or light neutral colors. These hues complement the light and airy aesthetic and prevent the image from feeling too busy.
3.2. Shoot at a Wider Aperture
Using a wider aperture, such as f/1.4 or f/2.8, can create a shallow depth of field, blurring the background and drawing attention to your subject. This technique adds a dreamy quality to your images. However, be mindful of ensuring that your subject’s eyes are in focus, especially in group shots. According to Popular Photography, using a wide aperture not only enhances the dreamy effect but also mimics how memories are often perceived, soft and slightly out of focus.
3.3. Simplify Your Images by Creating Compression
Image compression can significantly enhance the dreamy aesthetic of your photos. Compression refers to the separation between your subject and the background.
- Use a Longer Lens: Lenses with longer focal lengths (e.g., 85mm or 135mm) create more compression than wider-angle lenses. This results in a blurred background and a greater sense of depth.
- Pull Your Subject Away from the Background: Increasing the distance between your subject and the background will further soften the background, keeping the focus on your subject.
3.4. Prioritize Good Lighting
Light is the most critical element in photography, and especially so in light and airy photography. Seek out locations with plenty of natural light.
- Soft, Diffused Light: Look for spaces where sunlight is filtered through trees or buildings, creating a soft and diffused glow.
- Backlighting: Diffused backlighting can add a touch of magic and glow to your images.
3.5. Embrace Open Spaces
Ensure your subjects are facing open spaces to allow ample light to reach their faces. This balances the backlight and contributes to the overall airy atmosphere of your photos. Open spaces also provide opportunities for capturing natural and candid moments.
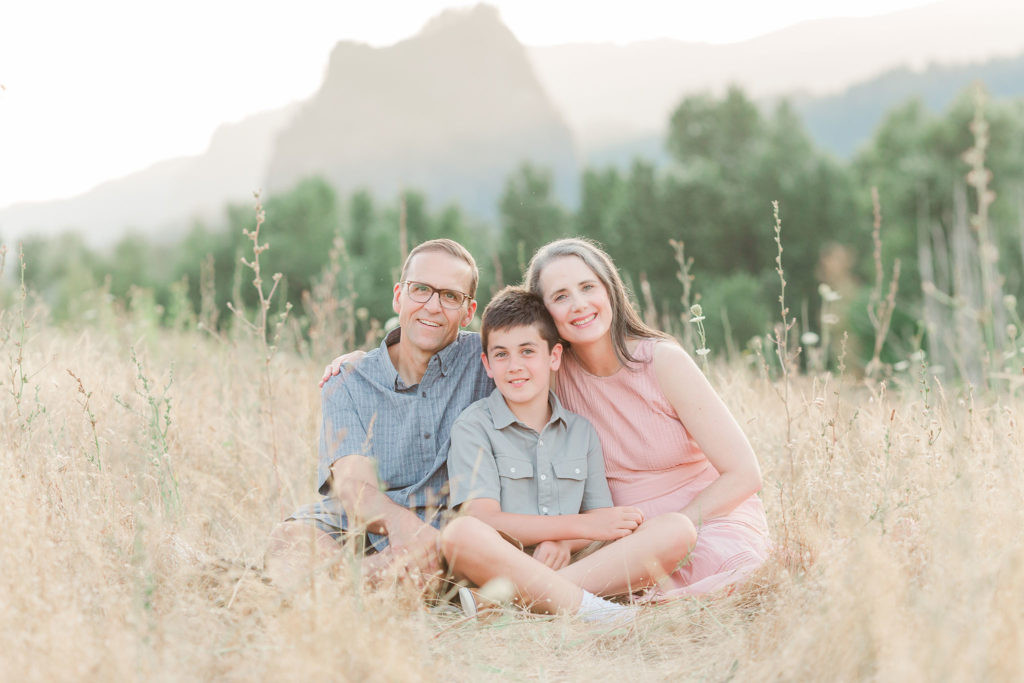 Light and airy photograph of a family in an open field, showcasing soft colors and diffused lighting
4. Camera Settings for Light and Airy Photos
While the ideal camera settings will vary depending on the specific situation, here are some general guidelines to get you started:
- Aperture: Begin with a wider aperture, such as f/1.8 to f/2.5, to create a shallow depth of field.
- ISO: Keep your ISO as low as possible to minimize grain.
- Shutter Speed: Adjust your shutter speed to avoid camera shake and capture your subject’s movement appropriately. A good starting point is 1/200th of a second, but you may need to increase it in bright conditions or when photographing fast-moving subjects.
5. How to Edit Light and Airy Photos
Post-processing is essential for achieving the final light and airy look. Here are some general guidelines to follow when editing your photos in Lightroom or similar software:
- Basic Panel Adjustments:
- Bring the highlight slider down to recover details in bright areas.
- Raise the black slider to soften the contrast and lift the shadows.
- Tonal Curve Adjustments:
- Add contrast by pulling the dark slider down.
- Adjust the light and highlights sliders to fine-tune the overall brightness and tone.
- HSL Slider Adjustments:
- Manage green tones by desaturating the yellows and shifting the hue slightly towards green.
- Adjust the hue and saturation of other colors as needed to achieve a harmonious palette.
- Color Grading:
- Use color grading to add warmth to the skin tones and overall image.
6. Light and Airy Editing Tutorial: A Step-by-Step Guide
To illustrate the editing process, let’s walk through a real-life example. This tutorial assumes that you have already captured an image that is well-lit and composed, with subjects dressed in light colors. Remember, editing can enhance an image, but it cannot fundamentally change its characteristics.
6.1. The Straight Out of Camera (SOOC) Image
Our starting point is a RAW image from a family session in a meadow. The image is well-lit, with soft, natural light and subjects dressed in light, neutral colors.
6.2. Step 1: Flatten the Image
- Bring the black slider up to increase the overall brightness of the shadows.
- Pull the highlights slider down to retain detail in the bright areas of the image.
- Adjust the shadows slider as needed to balance the overall exposure.
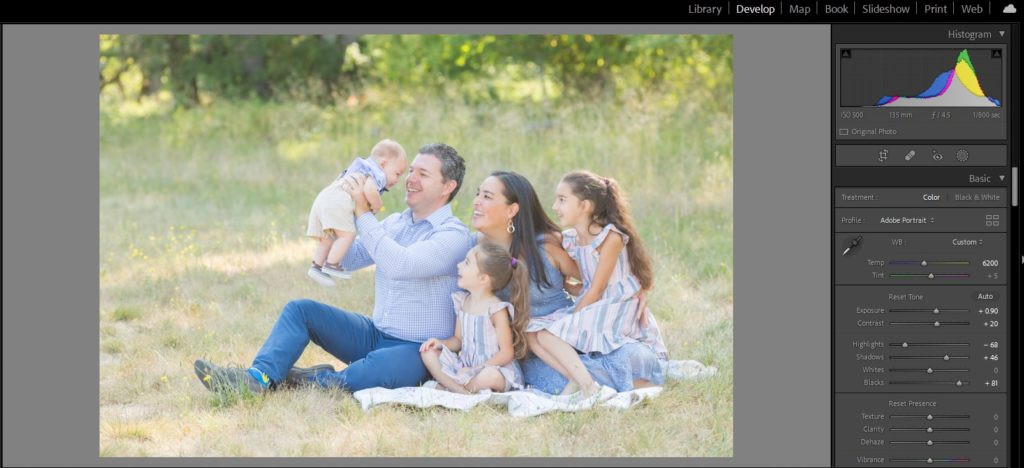 Initial adjustments in Lightroom to flatten the image and manage highlights and shadows
6.3. Step 2: Add Contrast and Depth
- Use the tonal curve to bring back depth to the photo by pulling down on the shadow slider.
- If the skin needs a little glow, bump up the light slider in the tonal curve.
- Avoid overexposing skin by bringing the highlights slider down a touch.
6.4. Step 3: Manage Warm Tones and Add Warmth to the Skin
- Use the HSL sliders to manage the warm tones in the image, paying particular attention to the yellows and oranges.
- Add warmth to the skin using the color grading tools, if needed.
- Adjust the overall white balance to achieve a pleasing color temperature.
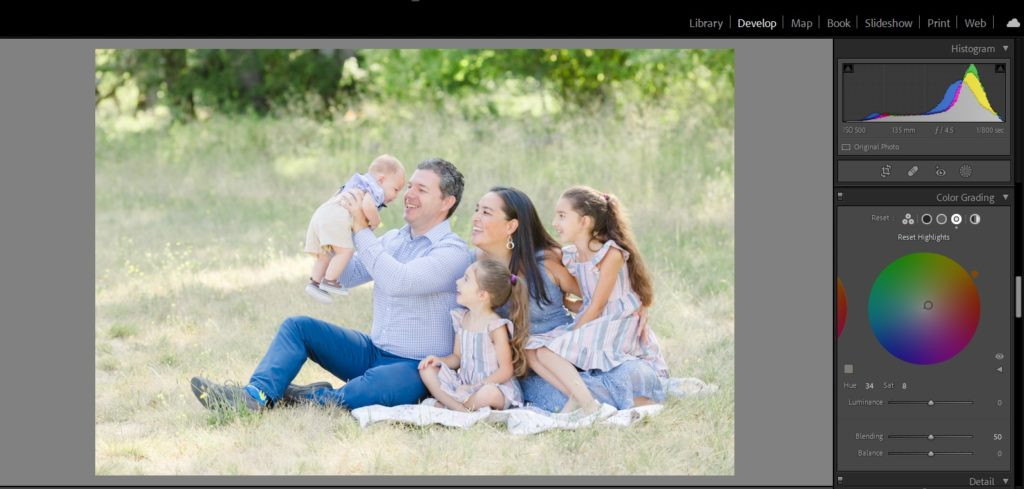 Final adjustments using HSL sliders and split toning to manage warm tones and add warmth to the skin
6.5. The Final Image
After making these adjustments, the final image should have a light, airy, and dreamy quality. The colors should be soft and muted, with a gentle warmth that evokes feelings of happiness and serenity.
 Final light and airy image with soft colors and a dreamy aesthetic
7. Leveraging Light and Airy Presets
Presets can be a valuable tool for speeding up your workflow and creating consistency in your work. While no preset is a one-click fix-all, they can provide a solid starting point for your editing process.
- Consistency: Presets help maintain a consistent look across your images.
- Efficiency: They save time by applying a set of pre-defined adjustments to your photos.
- Learning: Analyzing preset settings can help you understand how different adjustments affect the final image.
8. Additional Resources for Light and Airy Photography
To further enhance your skills and knowledge, here are some additional resources that you may find helpful:
- dfphoto.net: Explore dfphoto.net for a wealth of photography tutorials, tips, and inspiration. Discover new techniques, learn about different styles, and connect with a community of passionate photographers.
- Photography Magazines: Subscribe to reputable photography magazines like Popular Photography for in-depth articles, gear reviews, and inspiring photography.
- Online Courses: Consider taking online courses on platforms like Skillshare or CreativeLive to learn from experienced photographers and hone your skills.
- Photography Workshops: Attend photography workshops in your area to learn from instructors in person and network with other photographers.
- Photography Books: Read books on photography theory, technique, and style to deepen your understanding of the art form.
9. The Importance of E-E-A-T and YMYL in Photography Content
In the world of online content, E-E-A-T (Experience, Expertise, Authoritativeness, and Trustworthiness) and YMYL (Your Money or Your Life) are crucial factors for creating high-quality, reliable information.
- E-E-A-T:
- Experience: Share your personal experiences and insights as a photographer.
- Expertise: Demonstrate your knowledge of photography techniques and equipment.
- Authoritativeness: Establish yourself as a trusted source of information in the photography community.
- Trustworthiness: Provide accurate and up-to-date information, and cite credible sources.
- YMYL:
- Accuracy: Ensure that all information related to photography equipment, techniques, and safety is accurate and reliable.
- Safety: Provide guidance on safe photography practices, especially when dealing with sensitive subjects or environments.
By adhering to these principles, you can create content that is both informative and trustworthy, building a strong reputation in the photography community.
10. Optimizing Your Content for Google Discovery
To ensure your articles appear on Google Discovery, consider the following optimization tips:
- Visually Appealing Content: Use high-quality images and videos to capture the attention of readers.
- Compelling Headlines: Craft headlines that are both informative and intriguing.
- Engaging Content: Write in a clear, concise, and engaging style that keeps readers hooked.
- Mobile-Friendly Design: Ensure your website is mobile-friendly to provide a seamless experience for users on all devices.
- Structured Data Markup: Use structured data markup to help Google understand the content on your pages.
By following these tips, you can increase the visibility of your content and attract more readers from Google Discovery.
11. Frequently Asked Questions (FAQs) About Light and Airy Photography
- What is light and airy photography?
Light and airy photography is a style characterized by soft tones, gentle warmth, and an overall bright and ethereal aesthetic. - What equipment do I need for light and airy photography?
You’ll need a camera, lenses with wide apertures, and editing software like Adobe Lightroom. - How do I choose the right lighting for light and airy photos?
Prioritize soft, diffused natural light and avoid harsh sunlight. - What colors work best for light and airy photography?
Pastels, light neutrals, and soft, muted colors are ideal. - How do I edit light and airy photos in Lightroom?
Adjust highlights, shadows, tonal curves, and HSL sliders to achieve the desired look. - Can I use presets for light and airy photography?
Yes, presets can be a helpful starting point, but they may require further adjustments. - What are some common mistakes to avoid in light and airy photography?
Avoid harsh shadows, overly saturated colors, and overexposing your images. - How can I create compression in my photos?
Use a longer lens and increase the distance between your subject and the background. - How do I find inspiration for light and airy photography?
Explore dfphoto.net, photography magazines, and online communities for inspiration. - What are some tips for posing subjects in light and airy photos?
Encourage natural interactions and poses, and make sure your subjects are facing the light.
Next Steps to Elevate Your Light and Airy Photography
Now that you have a solid understanding of the principles and techniques behind light and airy photography, it’s time to put your knowledge into practice. Here are some actionable steps you can take to elevate your skills:
- Experiment with Different Settings:
- Explore different camera settings, such as aperture, ISO, and shutter speed, to see how they affect the final image.
- Try shooting in different lighting conditions to understand how light interacts with your subject and background.
- Practice Your Editing Skills:
- Download a free trial of Adobe Lightroom or a similar editing software and practice the techniques outlined in this guide.
- Experiment with different adjustments to find the look that you like best.
- Seek Feedback:
- Share your photos with other photographers on dfphoto.net or other online communities and ask for feedback.
- Use the feedback to identify areas where you can improve your skills.
- Stay Inspired:
- Continue to explore dfphoto.net and other sources of inspiration to stay motivated and learn new techniques.
- Follow photographers whose work you admire and analyze their techniques.
Address: 1600 St Michael’s Dr, Santa Fe, NM 87505, United States.
Phone: +1 (505) 471-6001.
Website: dfphoto.net.
 Creating dreamy family portraits using light and airy photography
By following these steps and continuously practicing, you can master the art of light and airy photography and create stunning images that capture the beauty and serenity of the world around you.