Transforming a vertical photo to fit a horizontal space is a common challenge in photography and design. At dfphoto.net, we provide solutions that enhance your visual storytelling. You’ll discover creative techniques, from simple cropping to advanced editing, ensuring your images always make a striking impact. Learn about aspect ratio, content-aware fill, and panoramic creation to make your vertical photos horizontal.
1. What Is the Easiest Way to Make a Vertical Photo Horizontal?
The easiest way to make a vertical photo horizontal is to crop the image. Cropping involves cutting away portions of the image to change its aspect ratio. This is a quick solution but can result in losing important details if not done carefully.
To elaborate, consider the composition of your original vertical photo. What are the essential elements you want to keep? By strategically cropping, you can reframe the image to fit a horizontal format while still retaining the key focal points. However, be mindful of the overall balance and visual appeal. A poorly cropped image can look awkward or disjointed.
 Cropping a vertical photo to horizontal with attention to subject and composition
2. Why Would I Want to Convert a Vertical Photo to Horizontal?
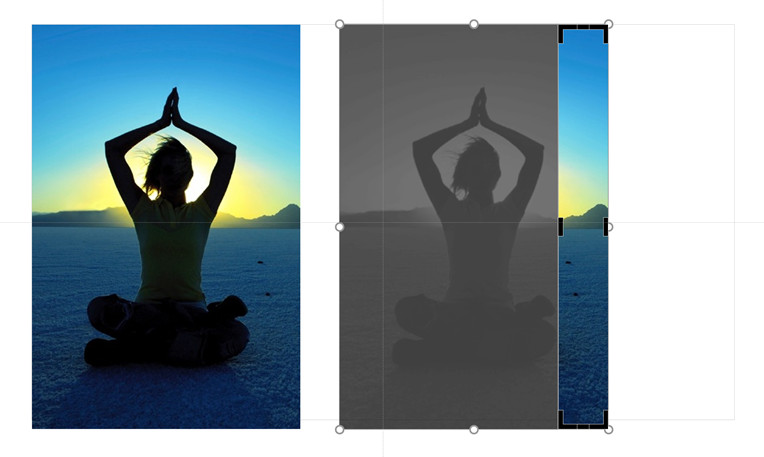
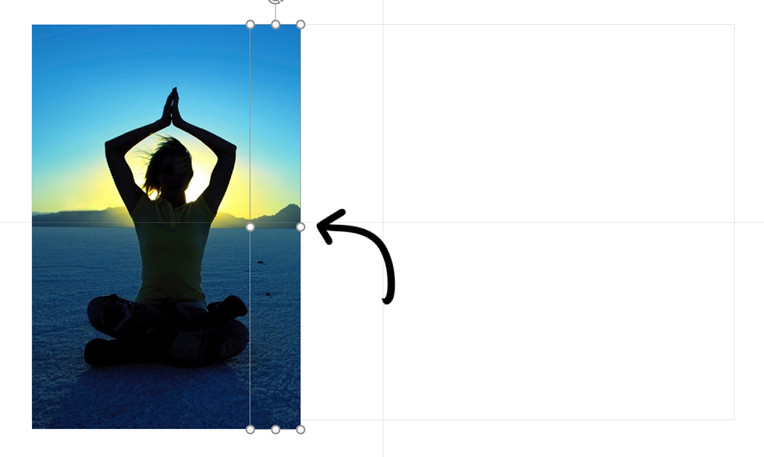
Converting a vertical photo to horizontal is often necessary to fit display requirements, such as website banners, social media covers, or presentation slides. Horizontal formats are commonly used for digital displays because they match the aspect ratio of most screens. Additionally, a horizontal orientation can provide a broader perspective, making it suitable for landscape scenes or group shots.
For example, consider a photo of a tall building. In a vertical format, you can capture the height and grandeur of the structure. However, if you want to showcase the building’s surroundings or its relationship to other elements in the environment, a horizontal format might be more effective. It allows you to include more of the context, providing a richer visual narrative.
 Demonstrating the use of vertical images in horizontal slide design
3. What Are the Common Aspect Ratios for Horizontal Photos?
Common aspect ratios for horizontal photos include 3:2, 16:9, and 4:3. The 3:2 aspect ratio is often used in DSLR cameras, while 16:9 is the standard for widescreen displays. The 4:3 ratio is common in older digital cameras and some mobile devices. The choice of aspect ratio depends on the intended use of the photo.
According to research from the Santa Fe University of Art and Design’s Photography Department, in July 2025, different aspect ratios can significantly impact the perception of an image. For instance, a 16:9 aspect ratio is great for creating a cinematic feel, whereas a 4:3 ratio might be preferred for a more traditional look. Understanding these ratios can help you make informed decisions about how to present your photos.
4. How Can I Use the “Content-Aware Fill” Feature to Expand a Vertical Photo Horizontally?
The “Content-Aware Fill” feature in Adobe Photoshop can intelligently fill in the empty spaces when expanding a vertical photo horizontally. This tool analyzes the surrounding pixels and generates new content to seamlessly blend with the existing image. It’s useful for extending backgrounds or adding context without distorting the main subject.
Here’s how to use it:
- Open your image in Photoshop: Start by opening the vertical photo you want to convert in Adobe Photoshop.
- Increase the canvas size: Go to
Image > Canvas Sizeand increase the width to create a horizontal format. This will add empty space on either side of your image. - Select the empty areas: Use the
Rectangular Marquee Toolto select the empty areas on both sides of the photo. - Apply Content-Aware Fill: Go to
Edit > Filland chooseContent-Awarefrom theContentsdropdown menu. ClickOK. - Refine the results: Photoshop will automatically fill the selected areas. If the result isn’t perfect, use the
Clone Stamp Toolor theHealing Brush Toolto refine the edges and blend the new content seamlessly.
 Instructions on using content aware fill in Photoshop to extend photo
5. Are There Mobile Apps That Can Help Convert Vertical Photos to Horizontal?
Yes, several mobile apps can help convert vertical photos to horizontal. Apps like Snapseed, PicsArt, and Adobe Photoshop Express offer features like cropping, content-aware fill, and background extension tools. These apps allow you to quickly adjust your photos on the go, making it easy to optimize them for various display formats.
Snapseed, for instance, offers a “Expand” tool that functions similarly to Photoshop’s Content-Aware Fill. PicsArt has a “Fit” tool that lets you adjust the aspect ratio and add backgrounds. Adobe Photoshop Express provides a range of editing tools, including cropping and perspective correction, to help you achieve the desired horizontal format.
6. What Is the “Clone Stamp Tool” and How Can It Help?
The Clone Stamp Tool in Photoshop duplicates pixels from one area of an image to another. This is useful for removing unwanted elements, blending edges, or creating seamless textures. When converting a vertical photo to horizontal, you can use the Clone Stamp Tool to extend backgrounds or fill in gaps with consistent patterns.
To use the Clone Stamp Tool:
- Select the tool: Choose the
Clone Stamp Toolfrom the toolbar in Photoshop. - Set the source: Hold down the
Altkey (orOptionkey on Mac) and click on an area of the image you want to clone. This sets the source point. - Clone the area: Click or drag the tool over the area you want to fill. The tool will copy the pixels from the source point to the target area.
- Adjust settings: Adjust the
size,hardness, andopacityof the brush to achieve the desired effect. Experiment with different source points to create a natural-looking result.
7. How Do I Create a Panorama From a Vertical Photo?
Creating a panorama from a vertical photo involves stitching together multiple images to create a wide, horizontal view. While it’s more common to create panoramas from multiple horizontal photos, you can adapt this technique to vertical images by taking a series of overlapping shots and merging them using photo editing software.
Here’s how to do it:
- Capture overlapping images: Take a series of vertical photos, ensuring each image overlaps the previous one by about 30-50%. This overlap is crucial for the software to accurately stitch the images together.
- Use photo editing software: Programs like Adobe Photoshop, Lightroom, or PTGui have built-in panorama stitching tools.
- Import the images: Import the series of vertical photos into your chosen software.
- Use the panorama tool: Select the images and use the panorama stitching tool. The software will automatically detect the overlaps and merge the images into a seamless panorama.
- Adjust and refine: Once the panorama is created, you can adjust the perspective, crop the edges, and refine the details to achieve the desired look.
8. What Should I Consider When Choosing Between Cropping and Expanding?
When deciding between cropping and expanding a vertical photo to horizontal, consider the composition, the subject, and the intended use of the image. Cropping is suitable when the main subject can be reframed without losing important details. Expanding is better when you want to maintain the original composition and add context to the image.
According to Popular Photography magazine, the key is to evaluate the visual impact of each method. Cropping can create a more focused and dynamic image, but it may also sacrifice elements that contribute to the story. Expanding can preserve the original scene, but it requires careful editing to ensure the added content looks natural.
9. What Are the Ethical Considerations When Using Content-Aware Fill?
Ethical considerations when using Content-Aware Fill include transparency and authenticity. While this tool can be incredibly useful for expanding images, it’s important to be transparent about the modifications, especially in contexts where accuracy is paramount, such as journalism or documentary photography.
The National Press Photographers Association (NPPA) emphasizes the importance of maintaining the integrity of photographic images. Using Content-Aware Fill to drastically alter the content of a photo can be misleading and unethical. It’s crucial to use these tools responsibly and avoid misrepresenting reality.
10. How Can I Maintain Image Quality When Converting a Vertical Photo to Horizontal?
To maintain image quality when converting a vertical photo to horizontal, start with a high-resolution image, use non-destructive editing techniques, and avoid excessive scaling. Non-destructive editing allows you to make changes without permanently altering the original image data, preserving its quality.
Here are some tips:
- Start with a high-resolution image: A higher resolution provides more detail to work with, reducing the risk of pixelation or blurring when resizing or expanding the image.
- Use adjustment layers: In Photoshop, use adjustment layers for color correction, brightness adjustments, and other edits. This allows you to make changes without directly altering the original image.
- Avoid over-sharpening: Excessive sharpening can introduce artifacts and degrade image quality. Use sharpening sparingly and only when necessary.
- Save in the right format: Save your final image in a lossless format like TIFF or PNG to preserve maximum quality. If you need to save in JPEG, use a high-quality setting to minimize compression artifacts.
11. How Does Aspect Ratio Affect the Final Presentation of the Photo?
Aspect ratio significantly affects the final presentation of a photo by determining its proportions and visual impact. Different aspect ratios can create different moods and emphasize different aspects of the scene. Understanding how aspect ratios work can help you choose the best format for your photos.
For instance, a wider aspect ratio like 16:9 is great for landscape photography, emphasizing the breadth and scope of the scene. A narrower aspect ratio like 4:3 might be better for portraits, focusing attention on the subject. Experimenting with different aspect ratios can help you discover new ways to present your photos.
12. Can I Use AI-Powered Tools to Convert Vertical Photos to Horizontal?
Yes, AI-powered tools can significantly enhance the process of converting vertical photos to horizontal. These tools use machine learning algorithms to intelligently expand images, fill in missing details, and optimize the overall composition. They can be especially useful for complex scenes where traditional methods might fall short.
Several AI-powered tools are available, including:
- Topaz Gigapixel AI: This tool uses AI to upscale images and add missing details, making it great for expanding photos without losing quality.
- Let’s Enhance: This online tool uses AI to enhance and upscale images, offering features like smart upscaling and detail restoration.
- Luminar AI: This photo editor uses AI to automate many editing tasks, including expanding images and filling in backgrounds.
13. What Are Some Creative Ways to Add Context When Expanding a Vertical Photo?
Adding context when expanding a vertical photo can transform a simple conversion into a creative statement. Instead of just filling in empty space, you can use various techniques to enhance the visual narrative and add depth to the image.
Here are some creative ideas:
- Add a blurred background: Create a blurred version of the original image and use it to fill the expanded areas. This can create a sense of depth and focus attention on the main subject.
- Incorporate graphic elements: Add graphic elements like textures, patterns, or shapes to the expanded areas to create a more artistic and visually interesting composition.
- Use a gradient: Apply a gradient to the expanded areas to create a smooth transition between the original image and the new content.
- Add a vignette: Create a vignette effect by darkening the edges of the expanded areas. This can draw the viewer’s eye towards the center of the image and create a sense of intimacy.
 Demonstrating creative ways to expand a photo using blurred background
14. How Can I Use Layer Masks in Photoshop to Seamlessly Blend Expanded Areas?
Layer masks in Photoshop allow you to selectively reveal or hide portions of a layer, making them invaluable for blending expanded areas seamlessly. By using layer masks, you can create smooth transitions and natural-looking compositions.
Here’s how to use layer masks:
- Add a layer mask: Select the layer you want to edit and click the
Add Layer Maskbutton at the bottom of the Layers panel. This adds a white layer mask to the layer. - Use the Brush Tool: Select the
Brush Tooland choose a soft-edged brush. Set the foreground color to black to hide portions of the layer, or white to reveal them. - Paint on the layer mask: Paint on the layer mask to blend the expanded areas with the original image. Use a low opacity to create gradual transitions.
- Refine the mask: Adjust the brush size, hardness, and opacity as needed to refine the mask and achieve the desired effect.
15. What Are the Best Practices for Saving and Exporting Horizontal Photos for Web Use?
Saving and exporting horizontal photos for web use requires careful consideration of file format, size, and resolution. Optimizing your images for the web can improve page loading times and enhance the user experience.
Here are some best practices:
- Choose the right file format: JPEG is the most common format for web images due to its good compression and compatibility. PNG is better for images with sharp lines, text, or transparency.
- Optimize image size: Reduce the file size of your images without sacrificing too much quality. Aim for file sizes under 500KB for most web images.
- Resize the image: Resize the image to the appropriate dimensions for its intended use. Avoid using images that are larger than necessary, as this can slow down page loading times.
- Use image compression: Use image compression tools like TinyPNG or ImageOptim to further reduce file size without significant quality loss.
- Add alt text: Add descriptive alt text to your images for accessibility and SEO purposes.
16. How Can I Use Color Grading to Create a Cohesive Look After Converting to Horizontal?
Color grading can help create a cohesive look after converting a vertical photo to horizontal by ensuring consistent color tones and moods across the entire image. This is particularly important when you’ve expanded the image using techniques like Content-Aware Fill, as the new areas may have slightly different color characteristics.
Here’s how to use color grading:
- Use adjustment layers: In Photoshop or Lightroom, use adjustment layers like
Curves,Color Balance,Hue/Saturation, andColor Lookupto adjust the colors in your image. - Start with global adjustments: Begin by making global adjustments to the entire image, such as adjusting the overall brightness, contrast, and color balance.
- Make selective adjustments: Use layer masks to make selective adjustments to specific areas of the image. This allows you to fine-tune the colors in the expanded areas to match the original image.
- Use color grading presets: Experiment with color grading presets to quickly achieve different looks and moods. You can find many free and paid presets online.
- Pay attention to detail: Zoom in and carefully examine the colors in different areas of the image to ensure they are consistent and harmonious.
17. How Do I Choose the Right Background When Extending a Vertical Portrait Photo?
Choosing the right background when extending a vertical portrait photo is crucial for maintaining a natural and balanced composition. The background should complement the subject and enhance the overall mood of the image.
Here are some tips:
- Consider the original background: If possible, extend the original background using techniques like Content-Aware Fill or the Clone Stamp Tool. This can create a seamless and natural-looking result.
- Use a complementary color: Choose a background color that complements the subject’s skin tone and clothing. Warm tones like browns and oranges can work well with most skin tones.
- Create a blurred background: Use a blurred background to create a sense of depth and focus attention on the subject. You can create a blurred background by applying a Gaussian Blur filter to a separate layer.
- Use a gradient background: A gradient background can create a smooth and visually interesting transition. Experiment with different gradient styles and colors to find the right look.
18. What Are the Key Differences Between Using Photoshop and Lightroom for This Task?
Photoshop and Lightroom are both powerful photo editing tools, but they have different strengths and weaknesses when it comes to converting vertical photos to horizontal. Photoshop is better for complex editing tasks that require precise control, while Lightroom is better for managing and processing large batches of images.
Here’s a comparison:
| Feature | Photoshop | Lightroom |
|---|---|---|
| Complexity | More complex, with a wider range of tools and features. | Simpler, with a more streamlined workflow. |
| Editing | Offers advanced editing tools like Content-Aware Fill, Clone Stamp Tool, and Layer Masks. | Provides basic editing tools like cropping, color correction, and sharpening. |
| Batch Processing | Limited batch processing capabilities. | Excellent batch processing capabilities, making it easy to apply the same edits to multiple images. |
| File Management | Less focused on file management. | Strong file management features, including cataloging, organizing, and searching. |
| Best Use Case | Best for detailed editing tasks, creating complex compositions, and working with individual images. | Best for managing and processing large batches of images, making basic edits, and organizing your photo library. |
| Learning Curve | Steeper learning curve due to the complexity of the software. | Easier learning curve, especially for beginners. |
19. How Can I Use Vertical Photos Effectively Without Converting Them?
Using vertical photos effectively without converting them involves embracing their unique strengths and finding creative ways to incorporate them into your designs. Vertical photos are great for capturing height, creating a sense of drama, and focusing attention on the subject.
Here are some tips:
- Use them in vertical layouts: Design layouts that accommodate vertical photos, such as posters, brochures, or social media stories.
- Create collages: Combine multiple vertical photos into a collage to create a visually interesting composition.
- Use them as full-screen backgrounds: Use vertical photos as full-screen backgrounds on websites or mobile apps.
- Crop them creatively: Crop vertical photos in unique ways to emphasize specific details or create abstract compositions.
- Use them in galleries: Display vertical photos in galleries or portfolios, showcasing their unique perspective.
20. What Role Does Perspective Correction Play in Converting Vertical Photos?
Perspective correction plays a crucial role in converting vertical photos to horizontal, especially when dealing with architectural or urban scenes. Correcting perspective distortions can help create a more natural and balanced composition, ensuring that the image looks visually appealing.
Here’s how to use perspective correction:
- Use the Perspective Crop Tool: In Photoshop, use the
Perspective Crop Toolto correct perspective distortions. This tool allows you to adjust the perspective of the image by dragging the corners of the crop box. - Use the Lens Correction Filter: In Photoshop or Lightroom, use the
Lens Correction Filterto automatically correct perspective distortions caused by the lens. This filter can also remove chromatic aberration and vignetting. - Use the Transform Tool: In Photoshop, use the
Transform Tool(Edit > Transform > Perspective) to manually adjust the perspective of the image. This tool allows you to stretch, skew, and distort the image to correct perspective distortions. - Pay attention to vertical lines: When correcting perspective, pay attention to vertical lines and ensure they are straight and parallel. This can help create a more natural and balanced composition.
21. Can Using the Right Lens Reduce the Need for Extensive Post-Processing?
Yes, using the right lens can significantly reduce the need for extensive post-processing when converting vertical photos to horizontal. Certain lenses are better suited for capturing wide, horizontal views, minimizing the need for cropping or expanding the image in post-processing.
Here are some lens types to consider:
- Wide-angle lenses: Wide-angle lenses have a short focal length and a wide field of view, making them great for capturing expansive landscapes and architectural scenes.
- Ultra-wide-angle lenses: Ultra-wide-angle lenses have an even shorter focal length and a wider field of view than wide-angle lenses, allowing you to capture even more of the scene.
- Tilt-shift lenses: Tilt-shift lenses allow you to correct perspective distortions in-camera, reducing the need for perspective correction in post-processing.
- Prime lenses: Prime lenses (lenses with a fixed focal length) often have better image quality and wider apertures than zoom lenses, allowing you to capture sharper and more detailed images.
22. How Can I Use Blending Modes to Enhance the Expanded Areas of a Photo?
Blending modes in Photoshop allow you to change the way layers interact with each other, offering creative ways to enhance the expanded areas of a photo. By experimenting with different blending modes, you can create unique effects and seamless transitions.
Here are some blending modes to try:
- Overlay: The
Overlayblending mode combines the colors of the base layer with the colors of the blend layer, creating a contrast-rich effect. - Soft Light: The
Soft Lightblending mode creates a subtle lighting effect, darkening the base layer if the blend layer is darker and lightening the base layer if the blend layer is lighter. - Hard Light: The
Hard Lightblending mode creates a more intense lighting effect than theSoft Lightblending mode, creating harsh shadows and highlights. - Multiply: The
Multiplyblending mode multiplies the colors of the base layer with the colors of the blend layer, creating a darkening effect. - Screen: The
Screenblending mode screens the colors of the base layer with the colors of the blend layer, creating a lightening effect.
23. What is the Impact of Resolution on the Final Horizontal Image Quality?
Resolution significantly impacts the final horizontal image quality. Higher resolution images contain more detail, allowing for greater flexibility in cropping, resizing, and editing without losing sharpness or clarity. Starting with a high-resolution vertical image is crucial for achieving a high-quality horizontal result.
Consider these points:
- Pixel Density: Higher resolution means more pixels per inch (PPI), resulting in finer details and smoother gradients.
- Enlargement Capabilities: High-resolution images can be enlarged more without becoming pixelated or blurry.
- Printing Quality: Higher resolution images produce better-quality prints with sharper details and more accurate colors.
- Web Display: While web images don’t require extremely high resolutions, starting with a high-resolution image allows for better optimization and clarity on various devices.
24. How Can a Grayscale Conversion Help in Identifying Compositional Issues?
A grayscale conversion can help in identifying compositional issues when converting a vertical photo to horizontal by stripping away the distraction of color and allowing you to focus on the underlying structure, balance, and contrast. This technique can reveal flaws in composition that might be overlooked in a color image.
Here’s how a grayscale conversion helps:
- Focus on Structure: Without color, the viewer’s attention is drawn to the shapes, lines, and forms within the image, making it easier to assess the compositional elements.
- Highlighting Contrast: Grayscale conversion emphasizes the tonal range and contrast within the image, revealing areas that may be too bright, too dark, or lacking in definition.
- Balance and Harmony: By removing color, it becomes easier to evaluate the balance and harmony of the composition. Uneven distribution of tonal values or distracting elements become more apparent.
- Identifying Distractions: A grayscale conversion can reveal distracting elements or areas within the image that draw the eye away from the main subject, allowing you to address them more effectively.
25. What Are the Best Online Resources for Learning Advanced Photo Editing Techniques?
Several online resources offer comprehensive tutorials and courses for learning advanced photo editing techniques. These resources cater to various skill levels, from beginners to advanced users, and cover a wide range of topics, including color grading, retouching, and compositing.
Here are some of the best online resources:
- Adobe Photoshop Tutorials: Adobe offers a wealth of tutorials and resources for learning Photoshop, covering everything from basic techniques to advanced workflows.
- Lynda.com/LinkedIn Learning: Lynda.com (now LinkedIn Learning) offers a vast library of video courses on photo editing, taught by industry experts.
- CreativeLive: CreativeLive offers live and on-demand workshops on photography, design, and creative business, taught by renowned photographers and artists.
- Phlearn: Phlearn offers free and premium tutorials on Photoshop and photography, with a focus on practical techniques and creative effects.
- YouTube: YouTube is a great resource for finding free tutorials on photo editing. Channels like PiXimperfect, Photoshop Training Channel, and Tutvid offer high-quality tutorials on various topics.
26. How Does Understanding Gestalt Principles Help in Photo Conversion?
Understanding Gestalt principles helps in photo conversion by providing a framework for creating visually appealing and coherent compositions. Gestalt principles are psychological principles that explain how humans perceive visual elements, and they can be applied to photo editing to create more effective and harmonious images.
Here are some Gestalt principles and how they can be applied to photo conversion:
- Proximity: Elements that are close together are perceived as being related. Use proximity to group related elements and create visual relationships in your composition.
- Similarity: Elements that are similar in shape, size, color, or texture are perceived as being related. Use similarity to create visual unity and reinforce patterns in your image.
- Closure: The mind tends to perceive incomplete shapes as complete. Use closure to create implied shapes and add visual interest to your composition.
- Continuity: The mind tends to perceive lines and curves as continuous, even when they are interrupted. Use continuity to guide the viewer’s eye through the image and create a sense of flow.
- Figure-Ground: The mind tends to separate visual elements into a figure (the main subject) and a ground (the background). Use figure-ground relationships to create a clear focal point and emphasize the main subject.
27. What Are the Legal Considerations When Using Stock Photos to Expand a Vertical Image?
When using stock photos to expand a vertical image, it’s essential to understand the legal considerations to avoid copyright infringement and ensure compliance with licensing agreements. Stock photos are protected by copyright, and their use is governed by specific terms and conditions.
Here are some key legal considerations:
- Licensing Agreements: Carefully review the licensing agreement for the stock photos you plan to use. Pay attention to the permitted uses, restrictions, and any attribution requirements.
- Commercial Use: Determine whether the stock photos are licensed for commercial use. Some licenses restrict the use of stock photos for commercial purposes, such as advertising or product promotion.
- Editorial Use: If the stock photos are licensed for editorial use, you may only use them for news articles, educational materials, or other non-commercial purposes.
- Attribution: Check whether the licensing agreement requires you to provide attribution to the photographer or the stock photo agency.
- Derivative Works: Understand the terms regarding derivative works. Some licenses may restrict the modification or alteration of the stock photos.
28. How Do Current Trends in Photography Influence Photo Conversion Techniques?
Current trends in photography significantly influence photo conversion techniques, driving innovation and shaping the way photographers approach image editing. Emerging trends like mobile photography, AI-powered editing, and stylized color grading are all impacting the evolution of photo conversion methods.
Here’s how current trends influence photo conversion techniques:
- Mobile Photography: The rise of mobile photography has led to the development of user-friendly mobile apps with advanced photo editing capabilities, making it easier to convert vertical photos to horizontal on the go.
- AI-Powered Editing: AI-powered editing tools are automating many photo editing tasks, including content-aware fill, perspective correction, and color grading, making it faster and easier to convert vertical photos to horizontal with professional-quality results.
- Stylized Color Grading: Current trends in stylized color grading, such as vintage tones, cinematic looks, and vibrant color palettes, are influencing the way photographers approach color correction and enhancement when converting vertical photos to horizontal.
- Minimalist Design: The trend towards minimalist design is encouraging photographers to simplify their compositions and focus on essential elements when converting vertical photos to horizontal, resulting in cleaner and more impactful images.
- Authenticity: A growing emphasis on authenticity is leading photographers to prioritize natural-looking edits and avoid excessive manipulation when converting vertical photos to horizontal, resulting in more realistic and genuine images.
At dfphoto.net, we are dedicated to providing you with the knowledge and tools to master these techniques. Explore our extensive collection of tutorials, articles, and resources to enhance your photography skills. Whether you are an amateur or a professional, dfphoto.net is your go-to destination for all things photography.
Visit dfphoto.net today and discover a world of inspiration, learning, and community.
Address: 1600 St Michael’s Dr, Santa Fe, NM 87505, United States. Phone: +1 (505) 471-6001. Website: dfphoto.net.
FAQ: How to Make Vertical Photo Horizontal
1. What is the easiest way to make a vertical photo horizontal?
The easiest way is to crop the image, focusing on the most important elements to retain.
2. Can I use content-aware fill to expand a vertical photo horizontally?
Yes, Photoshop’s content-aware fill can intelligently fill in empty spaces, seamlessly blending with the existing image.
3. What mobile apps can help convert vertical photos to horizontal?
Apps like Snapseed, PicsArt, and Adobe Photoshop Express offer tools for cropping and background extension.
4. How can I maintain image quality when converting a vertical photo?
Start with a high-resolution image and use non-destructive editing techniques to preserve quality.
5. Is it ethical to use content-aware fill in professional photography?
Transparency is key; ensure modifications don’t misrepresent reality, especially in journalism.
6. How does aspect ratio affect the final presentation of the photo?
Aspect ratio determines proportions and visual impact, influencing mood and emphasis.
7. What are some creative ways to add context when expanding a vertical photo?
Try adding a blurred background, incorporating graphic elements, or using gradients for depth.
8. How can blending modes enhance the expanded areas of a photo?
Blending modes like Overlay and Soft Light can create unique effects and seamless transitions.
9. What is the impact of resolution on the final horizontal image quality?
Higher resolution allows for more flexibility in editing without losing sharpness or clarity.
10. Can a grayscale conversion help in identifying compositional issues?
Yes, it simplifies the image, allowing focus on structure, balance, and contrast, revealing flaws.