Making stickers from photos on your iPhone is a fun way to personalize your messages and add a creative touch to your memories. Are you eager to learn how to transform your favorite snapshots into custom stickers right on your iPhone? With dfphoto.net, we’ll show you easy steps to create static and animated stickers, enhancing your digital communication and photo editing projects with unique photo stickers and digital art. You will also learn about photo editing tools and the best iPhone photography tips to enhance your sticker-making experience.
1. What Are The Basic Steps To Make Stickers From Photos On iPhone?
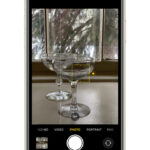
Yes, creating stickers from your photos on your iPhone is straightforward. Open the Photos app, long-press on the subject of your photo to lift it, and then select “Add Sticker”. This will save the sticker to your sticker drawer, ready to be used in Messages, Notes, and other apps.
Making stickers directly on your iPhone is easier than you might think. Let’s break down the basic steps:
-
Open the Photos App: Start by navigating to the Photos app on your iPhone and selecting the photo you wish to turn into a sticker.
-
Identify and Select the Subject: Once you’ve opened your photo, carefully identify the main subject you want to turn into a sticker. This could be a person, an object, or even a pet.
-
Lift the Subject: Here’s where the magic happens. Press and hold your finger on the subject. After a brief moment, your iPhone will recognize the subject and highlight it. Continue holding until you see a white outline appear around the subject, indicating that it has been “lifted” from the background.
-
Add Sticker: After lifting the subject, a menu will appear with options such as “Copy” and “Share.” Look for the “Add Sticker” option and tap it. This action saves the cut-out subject as a sticker to your sticker drawer.
-
Access Your Sticker: The sticker is now ready to use. You can access it from various apps, including Messages, Mail, Notes, and even some third-party apps that support image pasting. When using the iPhone’s onscreen keyboard or Markup tools, you will find your newly created sticker ready to be deployed.
These simple steps open up a world of creative possibilities, allowing you to personalize your digital communications and add a unique flair to your photos and notes.
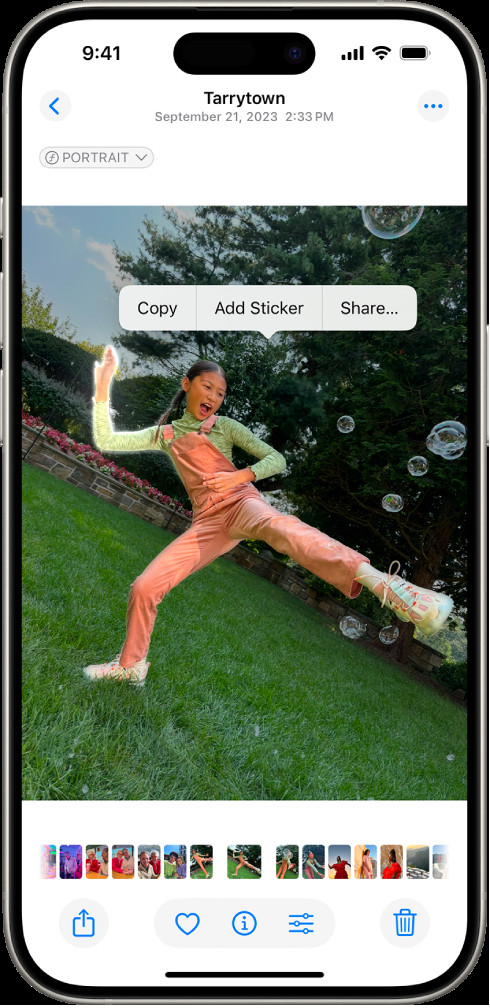 A person holds an iPhone displaying the Photos app. The screen shows a photo with the 'Add Sticker' option highlighted, ready to be selected.
2. Can I Create Animated Stickers From Live Photos?
Yes, you can transform your Live Photos into animated stickers, adding movement and fun to your messages. By following a similar process to creating static stickers, but with a Live Photo, you can create dynamic stickers that bring your chats to life.
Animated stickers can significantly enhance your digital communication by adding a dynamic and engaging element to your messages. Here’s how to create them from your Live Photos:
-
Open the Live Photo: Start by opening the Photos app on your iPhone and navigating to the Live Photo you wish to turn into an animated sticker.
-
Engage the Live Feature: To ensure the animation is captured, make sure the Live Photo feature is active. You can confirm this by looking for the “Live” badge in the top-left corner of the photo. If it’s not active, tap it to turn it on.
-
Lift the Subject with Animation: Touch and hold the main subject of the Live Photo. Instead of just holding, slide your finger up slightly until you see a duplicate image of the subject appear. This action tells your iPhone to capture the animated portion of the Live Photo.
-
Add as a Sticker: After lifting the animated subject, release your finger, and a menu will pop up, similar to when creating static stickers. Select “Add Sticker” from the menu. The iPhone will then save the animated cut-out as a sticker to your sticker drawer.
-
Access and Use Your Animated Sticker: Your new animated sticker is now ready to use. You can access it from the same places as your static stickers—Messages, Mail, Notes, and other compatible apps. When you send the sticker, it will play the animation, bringing a lively element to your conversations.
3. What Effects Can I Add To My Stickers On iPhone?
iPhone lets you add effects like Outline, Comic, and Puffy to your stickers. These effects can further customize your stickers, giving them a unique and playful look.
Adding effects to your stickers can significantly enhance their visual appeal and help them stand out. Here’s a closer look at the effects available and how to apply them:
-
Outline: This effect adds a contrasting border around your sticker, making it pop out from any background. It’s particularly useful for stickers that might blend in with certain colors or patterns.
-
Comic: The Comic effect gives your sticker a cartoonish appearance, with bold lines and flat colors. This can be a fun way to add a lighthearted touch to your messages.
-
Puffy: The Puffy effect adds a subtle 3D effect, making your sticker appear slightly raised or inflated. This can add depth and visual interest to your stickers.
How to Add Effects to Your Stickers
-
Create Your Sticker: Start by creating your sticker using the steps mentioned earlier—either from a static photo or a Live Photo.
-
Access the Sticker Menu: When the sticker appears in your sticker menu (accessible via the iPhone onscreen keyboard or Markup tools), tap on it to select it.
-
Add Effect: After selecting the sticker, look for the “Add Effect” option. Tap on it, and a menu will appear with the available effects—Outline, Comic, and Puffy.
-
Apply the Effect: Simply tap on the effect you want to apply. You can preview how the effect looks on your sticker in real-time.
-
Confirm Your Choice: Once you’re satisfied with the effect, tap “Done” or a similar confirmation button to save the changes.
4. How Do I Delete Stickers I No Longer Need?
Deleting stickers is easy and helps keep your sticker collection organized. Simply go to the sticker menu, long-press the sticker you wish to remove, and select “Remove”.
Here’s a detailed guide on how to remove unwanted stickers from your collection:
-
Access the Photos App and Open a Photo: Begin by opening the Photos app on your iPhone. Choose any photo and tap on it to open it in full screen.
-
Enter Edit Mode: Tap the “Edit” button located in the top-right corner of the screen. This will allow you to make changes to the photo, including adding or removing stickers.
-
Access Markup Tools: In the edit mode, look for the Markup icon. Tap on it to open the Markup tools, which include options for drawing, adding text, and inserting stickers.
-
Open the Sticker Menu: Within the Markup tools, tap the “Add” button (often represented by a plus sign “+”). This will open a menu where you can add various elements to your photo, including stickers. Select “Add Sticker” to view your sticker collection.
-
Select and Remove the Sticker: Touch and hold the sticker you wish to delete. After a moment, a menu will appear with options such as “Edit” and “Remove.” Tap “Remove” to delete the sticker from your collection.
5. Are My Stickers Synced Across All My Apple Devices?
Yes, your stickers sync with iCloud, making them accessible on your iPhone, iPad, Mac, and Apple Vision Pro, provided you are signed in with the same Apple ID. This ensures a seamless sticker experience across all your devices.
iCloud synchronization ensures that any stickers you create on one device are automatically available on your other devices, making your digital life more connected and convenient.
How iCloud Syncing Works
-
Automatic Sync: When you create a sticker on your iPhone, it’s automatically uploaded to iCloud. Similarly, any changes you make to your sticker collection (such as deleting or editing stickers) are also synced.
-
Real-Time Updates: iCloud syncing happens in the background, so you don’t need to manually trigger the process. As long as your devices are connected to the internet and signed in to the same Apple ID, the updates will occur in real-time.
-
Seamless Access: On your other devices (iPad, Mac, and Apple Vision Pro), simply access the sticker menu in any app that supports stickers. You’ll find all the stickers you created on your iPhone, ready to use.
Ensuring iCloud Syncing Is Enabled
To take full advantage of iCloud syncing, ensure that it is enabled on all your devices:
-
iPhone and iPad:
- Open the Settings app.
- Tap on your name at the top to access your Apple ID settings.
- Select “iCloud.”
- Make sure that the “Photos” toggle is switched on. This ensures that your photos, including stickers, are synced with iCloud.
-
Mac:
- Open the System Preferences app.
- Click on “Apple ID.”
- Select “iCloud” in the sidebar.
- Ensure that “Photos” is checked.
-
Apple Vision Pro:
- Navigate to Settings.
- Select “iCloud.”
- Ensure that “Photos” is enabled.
6. What Should I Consider For Making High-Quality Stickers?
To ensure your stickers look their best, start with high-resolution photos, and consider the subject’s contrast and clarity. Editing tools can also help enhance the quality before turning your photo into a sticker.
Achieving high-quality stickers involves several key considerations that can significantly impact the final product. Let’s dive into the details:
-
High-Resolution Photos:
- Why It Matters: The resolution of your photo directly affects the clarity and detail of your sticker. Low-resolution photos can result in blurry or pixelated stickers, especially when the subject is enlarged or viewed up close.
- Best Practices: Always start with the highest resolution photo available. If you’re using your iPhone, ensure that the camera settings are set to capture photos at the highest possible resolution.
-
Subject Contrast and Clarity:
- Why It Matters: The contrast and clarity of your subject determine how well it stands out from the background. A subject with poor contrast may blend in with the background, making it difficult to lift cleanly and resulting in a less defined sticker.
- Best Practices: Choose photos where the subject has clear, defined edges and a good contrast with the background. Avoid photos with harsh shadows or overexposed areas that can obscure details.
-
Editing Tools:
-
Why It Matters: Editing tools can help enhance the quality of your photo before turning it into a sticker. Adjusting brightness, contrast, saturation, and sharpness can improve the overall look of your sticker.
-
Best Practices: Use built-in editing tools or third-party apps to fine-tune your photo. Here are some common adjustments to consider:
- Brightness and Contrast: Adjust these to ensure the subject is well-lit and has a clear separation from the background.
- Saturation: Increase saturation to make colors more vibrant, but be careful not to overdo it, as this can make the sticker look artificial.
- Sharpness: Increase sharpness to enhance the details of the subject. However, avoid over-sharpening, which can create unwanted artifacts.
- Clarity: Adjust clarity to bring out textures and details.
-
-
Background Considerations:
- Why It Matters: The background of your photo can affect how easily the iPhone can lift the subject. Busy or complex backgrounds can sometimes confuse the algorithm, resulting in imperfect cutouts.
- Best Practices: Opt for photos with simple, uncluttered backgrounds. If the background is too complex, consider using editing tools to blur or simplify it before creating the sticker.
-
Lighting Conditions:
- Why It Matters: Good lighting is essential for capturing high-quality photos. Poor lighting can result in dark, noisy, or blurry images, which will negatively impact the quality of your stickers.
- Best Practices: Shoot photos in well-lit environments, preferably with natural light. Avoid harsh direct sunlight, which can create harsh shadows and overexposed areas. If you’re shooting indoors, use artificial lighting to illuminate the subject evenly.
7. Can I Use Third-Party Apps To Make More Advanced Stickers?
Yes, numerous third-party apps offer more advanced sticker-making capabilities. These apps often include features like custom cutouts, text additions, and a wider range of effects.
While the built-in sticker-making feature on the iPhone is convenient and easy to use, third-party apps can offer more advanced capabilities and customization options.
Here are some popular third-party apps for making stickers, along with their key features:
-
Sticker Maker Studio:
-
Key Features: This app allows you to create custom stickers from your photos with precise cutout tools. You can add text, borders, and effects to your stickers. It also supports creating sticker packs for WhatsApp and other messaging apps.
-
Advanced Capabilities:
- Precise Cutout Tools: Offers manual and automatic cutout options for accurate subject isolation.
- Text and Effects: Allows you to add custom text with various fonts and colors, as well as apply a range of effects to enhance your stickers.
- Sticker Pack Creation: Supports creating and exporting sticker packs for popular messaging apps like WhatsApp.
-
-
Bazaart:
-
Key Features: Bazaart is a powerful photo editing app that includes advanced sticker-making tools. It offers magic background removal, allowing you to easily isolate subjects from complex backgrounds.
-
Advanced Capabilities:
- Magic Background Removal: Uses AI to automatically remove backgrounds with high precision.
- Layering and Masking: Supports layering multiple images and applying masks for complex sticker designs.
- Advanced Editing Tools: Offers a wide range of editing tools for fine-tuning colors, shadows, and highlights.
-
-
PicsArt:
-
Key Features: PicsArt is a comprehensive photo editing app with a vast array of tools and features, including sticker creation. It offers freehand crop tools, effects, and text options for creating unique stickers.
-
Advanced Capabilities:
- Freehand Crop Tools: Allows you to draw custom shapes around subjects for precise cutouts.
- Extensive Effects Library: Offers a wide range of filters, effects, and overlays to enhance your stickers.
- Text and Graphics: Provides tools for adding custom text, graphics, and clip art to your stickers.
-
-
LINE Camera:
-
Key Features: LINE Camera is a popular photo editing app with a focus on stickers and decorative elements. It offers a wide range of pre-designed stickers, as well as tools for creating your own custom stickers.
-
Advanced Capabilities:
- Extensive Sticker Library: Offers a vast collection of pre-designed stickers and stamps.
- Custom Sticker Creation: Allows you to create custom stickers from your photos with cutout tools and editing options.
- Real-Time Filters: Provides real-time filters and effects for enhancing your photos before turning them into stickers.
-
8. How Can I Use Stickers To Enhance My Photos?
Stickers can add personality and flair to your photos. Use them to highlight elements, create humorous effects, or add decorative touches, turning ordinary photos into engaging visual stories.
Stickers are not just for messaging—they can also be a fantastic tool for enhancing your photos and creating engaging visual stories. Here are some creative ways to use stickers to elevate your photography:
-
Highlighting Elements:
- Purpose: Use stickers to draw attention to specific elements within your photo, emphasizing their importance or adding a layer of interest.
- How To: Place stickers strategically around key subjects or focal points in your photo. For example, if you have a photo of a flower, you could add stickers of leaves, butterflies, or water droplets to enhance its natural beauty.
-
Creating Humorous Effects:
- Purpose: Inject humor into your photos by adding funny or quirky stickers that create unexpected juxtapositions or tell a lighthearted story.
- How To: Use stickers to add funny faces, speech bubbles, or comical objects to your photos. For example, you could add a pair of oversized sunglasses to a pet or a thought bubble above a person’s head with a funny message.
-
Adding Decorative Touches:
- Purpose: Use stickers to add decorative elements to your photos, enhancing their aesthetic appeal and creating a more visually interesting composition.
- How To: Decorate your photos with stickers of stars, hearts, flowers, or abstract shapes. You can also use stickers to create borders, frames, or patterns around your photos.
-
Personalizing Memories:
- Purpose: Add stickers to your photos to personalize memories and create a unique record of your experiences.
- How To: Use stickers to mark dates, locations, or special events in your photos. For example, you could add a sticker of a calendar to a photo taken on a specific date or a sticker of a landmark to a photo taken in a particular city.
-
Creating Visual Stories:
- Purpose: Use stickers to tell a story or convey a message through your photos, turning ordinary snapshots into engaging visual narratives.
- How To: Combine multiple stickers to create a scene or convey a message. For example, you could create a series of photos with stickers that tell a story about a character’s adventures or convey a message about love, friendship, or inspiration.
9. What Are Some Creative Ideas For Using Custom Stickers?
Custom stickers open up a world of creative possibilities, from personalizing gifts and stationery to decorating digital journals and creating unique marketing materials. Let your imagination guide you.
Custom stickers offer a plethora of creative applications that can add a personal touch to various aspects of your life. Here are some innovative ideas for using custom stickers:
-
Personalizing Gifts:
- Idea: Create custom stickers featuring the recipient’s name, initials, or a special message to add a personal touch to gifts.
- How To: Design stickers that reflect the recipient’s interests or personality. For example, if they love cats, create stickers with cute cat illustrations or their cat’s photo. Apply these stickers to gift boxes, wrapping paper, or even directly onto the gift itself.
-
Decorating Stationery:
- Idea: Use custom stickers to decorate notebooks, journals, planners, and other stationery items, making them more visually appealing and personalized.
- How To: Create stickers with inspirational quotes, doodles, or patterns that you love. Apply these stickers to the covers, pages, or dividers of your stationery items. You can also use stickers to mark important dates or events in your planner.
-
Customizing Digital Journals:
- Idea: Enhance your digital journaling experience by adding custom stickers to your entries, making them more visually engaging and expressive.
- How To: Design stickers that reflect your mood, thoughts, or experiences. For example, if you had a great day, you could add stickers of stars, hearts, or smiley faces to your journal entry. You can also use stickers to highlight key points or add decorative elements to your journal pages.
-
Creating Unique Marketing Materials:
- Idea: Use custom stickers as a creative and cost-effective way to promote your business, brand, or event.
- How To: Design stickers with your logo, slogan, or contact information. Distribute these stickers at events, include them in product packaging, or give them away as promotional items. You can also use stickers to decorate your storefront, office, or vehicle.
-
Personalizing Tech Devices:
- Idea: Add custom stickers to your phone, laptop, tablet, or other tech devices to make them more unique and personalized.
- How To: Create stickers with your favorite designs, quotes, or photos. Apply these stickers to the back of your phone, the lid of your laptop, or the case of your tablet. You can also use stickers to cover up scratches or imperfections on your devices.
10. How Do I Share The Stickers I Create?
Sharing your stickers is a great way to spread creativity. Most apps allow you to copy and paste stickers into messages, emails, and social media posts, letting you share your creations with friends and family.
Sharing the stickers you create is a fantastic way to spread creativity, personalize communications, and connect with others. Here’s how you can share your custom stickers across various platforms:
-
Copy and Paste:
- How To: Most apps that support stickers allow you to copy them from your sticker library and paste them into messages, emails, and social media posts.
- Steps:
- Open the app where you created your stickers (e.g., Photos, Sticker Maker Studio).
- Select the sticker you want to share.
- Look for a “Copy” option (often found in a menu or by long-pressing the sticker).
- Open the app where you want to share the sticker (e.g., Messages, Email, Instagram).
- Paste the sticker into the text field or photo.
-
Sharing via Messaging Apps:
- How To: Many messaging apps have built-in sticker support, allowing you to directly send stickers to your contacts.
- Examples:
- iMessage: Stickers created on your iPhone can be directly sent via iMessage. Simply access your sticker drawer from the keyboard and select the sticker you want to send.
- WhatsApp: Some sticker maker apps allow you to create sticker packs specifically for WhatsApp. Once created, you can add these packs to WhatsApp and send the stickers to your contacts.
- Telegram: Telegram has extensive sticker support. You can upload your custom stickers as a sticker set and share them with others.
-
Posting on Social Media:
- How To: You can share your stickers on social media platforms by including them in your posts or stories.
- Steps:
- Save the sticker as an image file (e.g., PNG or JPEG).
- Open the social media app (e.g., Instagram, Facebook, Twitter).
- Create a new post or story.
- Upload the sticker image along with your text or other media.
-
Emailing Stickers:
- How To: You can send stickers via email by attaching them as image files.
- Steps:
- Save the sticker as an image file.
- Open your email app.
- Create a new email.
- Attach the sticker image to the email.
- Send the email to your desired recipients.
-
Creating Sticker Packs:
- How To: Some apps allow you to create sticker packs that can be easily shared with others.
- Process:
- Use a sticker maker app to create a collection of stickers.
- Organize the stickers into a pack.
- Share the sticker pack file or a link to download it with your friends or followers.
FAQ: Making Stickers From Photos On iPhone
1. Can I use any photo to make a sticker on my iPhone?
Yes, you can use any photo from your Photos app to create a sticker, but high-resolution images with clear subjects tend to produce the best results. Experiment with different photos to see what works best for you.
2. Is there a limit to how many stickers I can create?
There is no known limit to the number of stickers you can create on your iPhone. You can continue adding stickers to your collection as long as you have storage space available on your device and in iCloud.
3. Can I edit a sticker after I’ve created it?
The built-in sticker feature on iPhone offers limited editing capabilities. However, you can use third-party apps like Sticker Maker Studio, Bazaart, or PicsArt to further edit your stickers, adding text, effects, and custom cutouts.
4. Do stickers I create take up a lot of storage space on my iPhone?
Stickers generally don’t take up a significant amount of storage space, especially if they are optimized. However, if you create a large number of stickers or use high-resolution images, they can accumulate over time. Regularly review and delete any unwanted stickers to free up storage space.
5. Can I create stickers from videos on my iPhone?
While the built-in feature focuses on Live Photos for animated stickers, you can use third-party apps to create stickers from video frames. Apps like Bazaart and PicsArt allow you to import video frames and turn them into static stickers.
6. Are the stickers I create private, or can others see them?
The stickers you create are private and only visible to you unless you share them with others. When you send a sticker in a message or post it on social media, it becomes visible to the recipients or your followers, depending on your privacy settings.
7. Can I use stickers I create on my iPhone on other devices, like Android phones?
Stickers created using the built-in iPhone feature are primarily designed for use within the Apple ecosystem. However, you can save your stickers as image files (e.g., PNG) and share them with Android users via messaging apps or social media. They can then use these images as stickers, depending on the app’s capabilities.
8. How do I organize my stickers on my iPhone?
The built-in sticker feature on iPhone doesn’t offer advanced organization options. Stickers are typically displayed in the order they were created. To better organize your stickers, consider using third-party apps that offer features like tagging, folders, and custom sorting options.
9. Can I sell the stickers I create on my iPhone?
Yes, you can sell the stickers you create on your iPhone, but you’ll need to use third-party platforms or marketplaces to do so. Consider using e-commerce platforms like Etsy or Shopify to set up an online store and sell your sticker designs.
10. What are the copyright considerations when making stickers from photos?
When making stickers from photos, it’s essential to consider copyright laws and respect the rights of others. Only use photos that you own or have permission to use. Avoid using copyrighted images or content without proper authorization.
Ready to unleash your creativity? Visit dfphoto.net for more photography tips, editing tools, and inspiration to make your stickers stand out! Join our community of photo enthusiasts in Santa Fe, USA, and start creating today. Contact us at Address: 1600 St Michael’s Dr, Santa Fe, NM 87505, United States, or call +1 (505) 471-6001.