Split screen photos are a fantastic way to showcase multiple perspectives, create before-and-after comparisons, or simply add a creative flair to your visual storytelling and dfphoto.net is here to help. This guide dives deep into the world of split screen photography, offering techniques, tips, and software recommendations to help you master this art form, providing a solution to enhance your photographic abilities. Let’s explore the creative possibilities and technical aspects of creating stunning split screen images using photo editing, image composition, and digital artistry.
User search intent:
- How to create split screen photos on iPhone?
- What is the best software for creating split screen photos?
- Split screen photography ideas and inspiration.
- How to create split screen photos for social media?
- Tips for creating effective split screen compositions.
1. What Exactly are Split Screen Photos and Why Should You Care?
Split screen photos involve dividing a single image frame into two or more distinct sections, each containing a separate photograph or a different perspective of the same subject. Split screen photography is a dynamic approach to visual storytelling that allows you to showcase multiple perspectives, compare and contrast different elements, or simply add a creative twist to your images. According to Popular Photography, split screen images are gaining traction due to their ability to engage viewers and convey complex narratives in a single frame.
1.1. The Power of Juxtaposition
Juxtaposition is at the heart of split screen photography. It’s the art of placing contrasting elements side-by-side to create a visual dialogue.
- Before and After: Show the transformation of a project, a personal journey, or the impact of time.
- Then and Now: Highlight changes over time, like urban development or personal growth.
- Cause and Effect: Illustrate the relationship between actions and their consequences.
- Duality: Explore contrasting themes like light and dark, happiness and sadness, or urban and rural.
- Multiple Perspectives: Offer different viewpoints of the same subject, creating a more complete picture.
1.2. Creative Applications
Beyond simple comparisons, split screen photography opens doors to artistic expression:
- Storytelling: Narrate a sequence of events or present different facets of a story in a single image.
- Abstract Art: Create visually striking compositions by combining seemingly unrelated images.
- Conceptual Photography: Convey abstract ideas or emotions through the juxtaposition of symbolic elements.
- Product Showcases: Highlight different features or variations of a product.
- Social Media Engagement: Capture attention and spark conversations with unique and visually appealing content.
2. What Equipment Do You Need for Split Screen Photography?
The good news is, you don’t need expensive gear to create split screen photos. The most important tool is your creativity. However, here’s a breakdown of helpful equipment:
2.1. Camera:
- Smartphone: Modern smartphones boast impressive camera capabilities, making them perfect for experimenting with split screen photography.
- DSLR/Mirrorless Camera: These offer greater control over settings like aperture, shutter speed, and ISO, allowing for more creative flexibility.
- Point-and-Shoot Camera: A compact and convenient option for capturing high-quality images.
2.2. Tripod:
A tripod is essential for keeping your camera steady, especially when shooting multiple images from the same position. This ensures consistency and makes the editing process much smoother. According to Santa Fe University of Art and Design’s Photography Department, in July 2025, tripods increase the sharpness of photos and offer consistency for split screen creation.
2.3. Photo Editing Software:
This is where the magic happens. You’ll need software that allows you to combine and edit images seamlessly.
- Adobe Photoshop: The industry standard, offering a wide range of tools and features for advanced editing.
- Adobe Lightroom: Excellent for color correction, tone adjustments, and overall image enhancement.
- Canva: A user-friendly option with pre-designed templates and easy-to-use tools.
- GIMP (GNU Image Manipulation Program): A free and open-source alternative to Photoshop.
- মোবাইল অ্যাপ্লিকেশন (Snapseed, PicsArt): Great for editing on the go, with a variety of filters and editing tools.
2.4. Optional Accessories
- Remote Shutter Release: Minimizes camera shake when taking photos on a tripod.
- External Lighting: Provides more control over the lighting in your shots.
- Reflectors: Help bounce light and fill in shadows.
3. How to Plan Your Split Screen Shoot
Before you start snapping photos, it’s important to have a plan. This will save you time and ensure a more cohesive final product.
3.1. Define Your Concept
What story do you want to tell? What message do you want to convey? Start with a clear idea of the purpose of your split screen photo.
3.2. Choose Your Subject
Select a subject that lends itself well to juxtaposition or multiple perspectives. Consider the visual elements and how they will interact within the split frame.
3.3. Sketch Your Composition
Create a rough sketch of how you want to divide the frame and where you want to place your subjects. This will help you visualize the final result and guide your shooting process.
3.4. Plan Your Lighting
Consider the lighting conditions and how they will affect each section of the split screen. Aim for consistent lighting or use contrasting lighting to enhance the juxtaposition.
3.5. Select a Theme
- Matching: Repeat patterns and styles.
- Colors: Choose your colors carefully.
- Locations: Use two locations to tell the story.
3.6. Take Photos
- Portrait: The photos must be level, clear, and well-lit.
- Camera App: The camera should fill the screen.
4. Mastering the Art of Composition
Composition is key to creating visually appealing split screen photos. Here are some tips to keep in mind:
4.1. Rule of Thirds
Divide your frame into nine equal sections using two horizontal and two vertical lines. Place your key subjects along these lines or at their intersections to create a more balanced and engaging composition.
4.2. Leading Lines
Use lines to guide the viewer’s eye through the image and connect the different sections of the split screen.
4.3. Symmetry and Balance
Create a sense of harmony by balancing the visual weight of the different elements in your composition. Symmetry can be particularly effective in split screen photography.
4.4. Negative Space
Use negative space (empty areas) to create contrast and draw attention to your subjects. It can also help separate the different sections of the split screen.
4.5. Color Harmony
Choose colors that complement each other or create a deliberate contrast to enhance the visual impact of your split screen photo.
4.6. Image Orientation
Consider whether to use horizontal or vertical orientation for your project. Both can work well, depending on your images.
5. Step-by-Step Guide: Creating Split Screen Photos in Photoshop
Photoshop offers the most control and flexibility for creating split screen photos. Here’s a step-by-step guide:
- Open Your Images: Open the two or more images you want to combine in Photoshop.
- Create a New Document: Create a new document with the desired dimensions for your split screen photo. Consider the aspect ratios of your images and how you want to divide the frame.
- Drag Images into the New Document: Drag each image into the new document as a separate layer.
- Resize and Position Images: Use the Transform tool (Ctrl+T or Cmd+T) to resize and position each image within the frame. Make sure the images align properly and create a visually appealing composition.
 Resize and Position Images
 - Add Masks (Optional): Use layer masks to blend the edges of the images or create more complex transitions between the sections.
- Add Borders or Dividers (Optional): Use the Rectangle tool or the Line tool to add borders or dividers between the images.
- Adjust Colors and Tones: Use adjustment layers (e.g., Levels, Curves, Color Balance) to fine-tune the colors and tones of each image and ensure a cohesive look.
- Add Text or Graphics (Optional): Add text, logos, or other graphics to enhance the message or add visual interest.
- Save Your Image: Save your split screen photo in the desired format (e.g., JPEG, PNG).
5.1. Combining Images on Mobile
- Download a Photo Editor: Download a photo editor on your phone.
- Choose the Collage Option: Tap the Collage option in your app.
- Select Your Layout: Most apps provide layouts that include split screens.
- Import Photos: Import the photos you would like to include.
- Save the File: Save the file in your desired resolution.
6. Split Screen Photography with iPhone Shortcuts
While apps (like Canva) can put two photos side-by-side, using the Shortcuts app on your iPhone can do the job without requiring you to purchase a third-party app. If you don’t have the Apple Shortcuts app already installed on your iPhone, you can download it for free from the App Store. Here’s how to create a side-by-side photos shortcut:
-
Open the Shortcuts app.
-
Tap the Plus sign to create a shortcut.
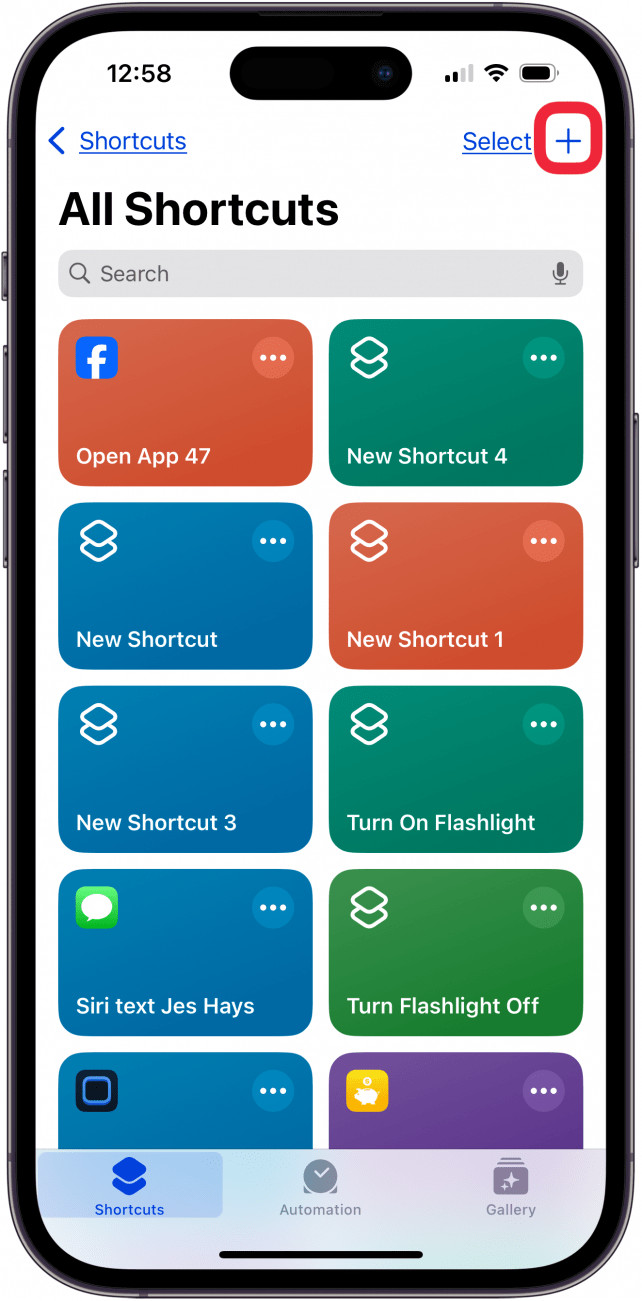 tap plus icon in shortcuts app
 -
Tap the Search Bar at the bottom of the screen. Search for and tap Select Photos.
-
Tap the blue arrow next to Select Photos.
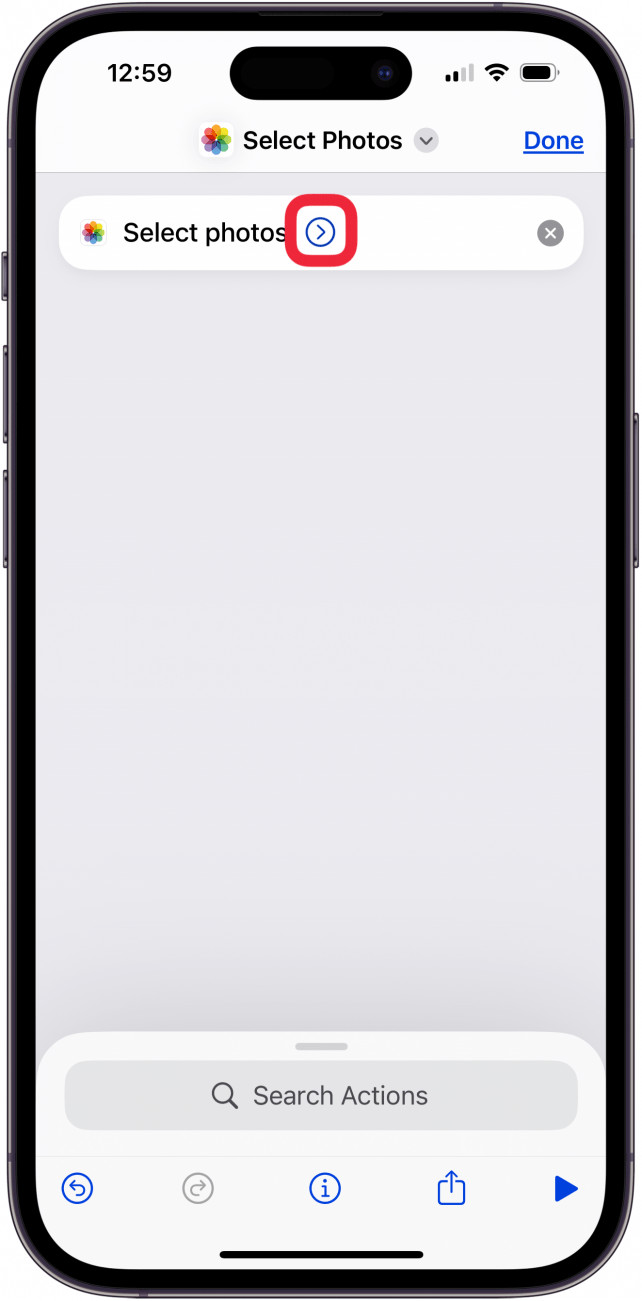 tap blue arrow next to select photos
 -
Toggle on Select Multiple.
-
Search again and tap Combine Images.
 combine images in shortcuts
 -
In the Combined Images section, make sure the mode field is set to Horizontally. If not, tap on Horizontally to change it.
-
Tap on the arrow next to Horizontally to adjust how much space you want between the photos. If you don’t want any spacing, you can skip this step.
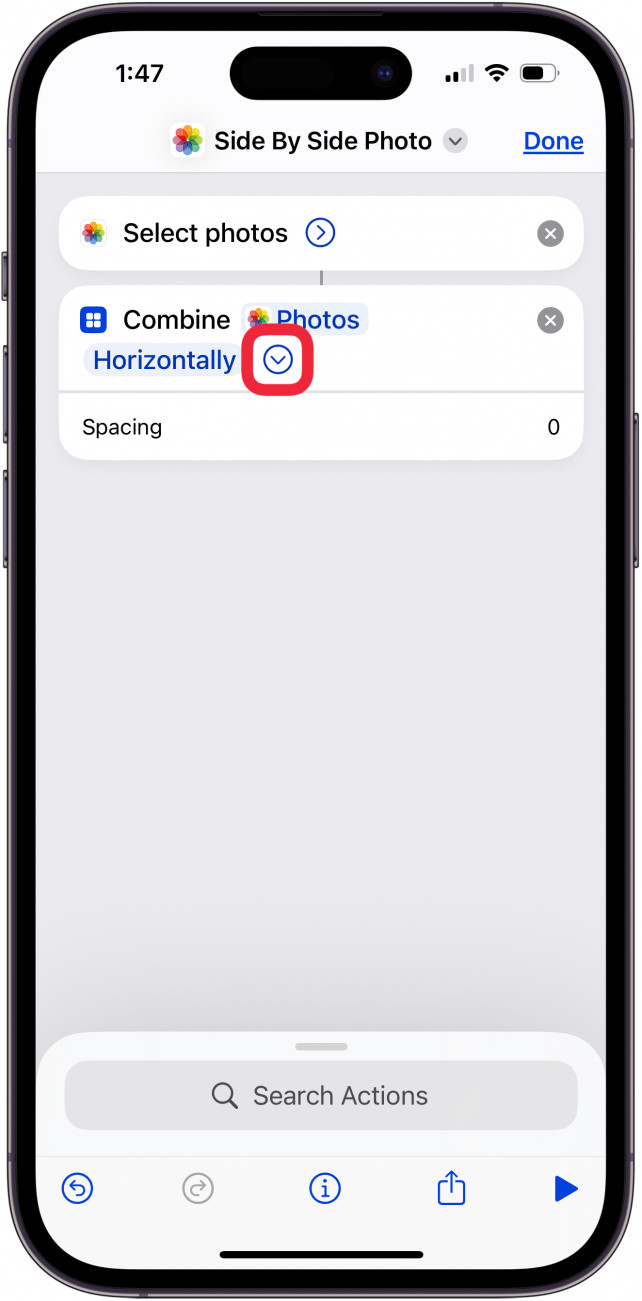 tap blue arrow to change spacing
 -
Search for and tap Save to Photos.
-
Tap Save to Photos at the top of your screen.
-
Tap Rename, then tap the field at the top of the screen to rename your shortcut. In this example I’ve named is Side by Side Photo.
 rename side by side photo iphone shortcut
 -
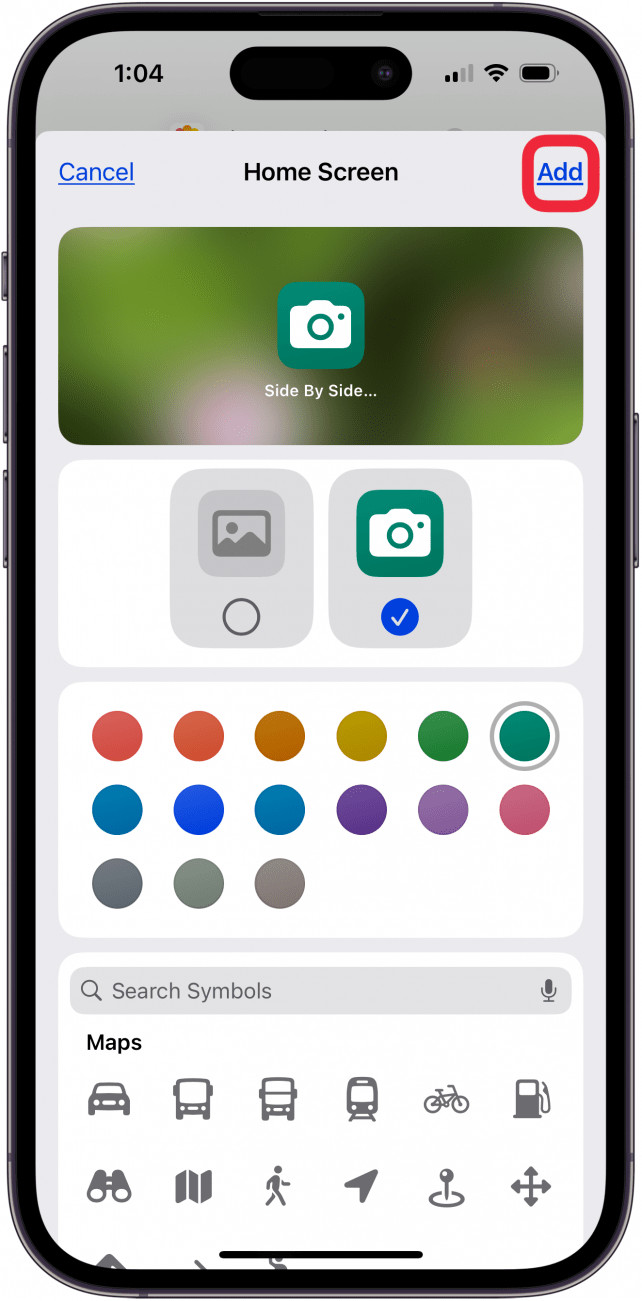
In the same menu, tap Add to Home Screen to make the shortcut available as an icon on the Home Screen.
-
You can customize the icon picture and then tap Add. Your shortcut will then appear on your Home Screen.
Resize and Position Images
Now you’re ready to combine pictures to show a before-and-after photo of yourself, or even a side-by-side photo of a home renovation.
6.1. Use the Shortcut to Put 2 Pictures Side-by-Side on iPhone
Now that you’ve set up a shortcut for combining photos, here’s how to use it to merge two photos together on your iPhone:
Now you’re ready to combine photos on your iPhone for memes, before-and-after shots, and photo collages. If you enjoyed this photos tip, check out our article covering how to set an iPhone camera timer to boost your photography skills.
7. The Magic of Photo Stitching
Photo stitching is the art of seamlessly combining multiple photos to create a larger panoramic or high-resolution image, which you can then use in your split screen creation. This technique is particularly useful for capturing wide landscapes or creating detailed composite images.
7.1. Software Solutions
Several software options are available for photo stitching:
- Adobe Photoshop: Offers powerful stitching capabilities, including automatic alignment and blending.
- PTGui: A dedicated photo stitching software known for its precision and advanced features.
- Microsoft ICE (Image Composite Editor): A free and user-friendly option for creating panoramas.
7.2. Best Practices
- Overlap: Ensure sufficient overlap between images (around 20-30%) to allow the software to accurately align them.
- Consistent Exposure: Maintain consistent exposure settings across all images to avoid noticeable differences in brightness and color.
- Tripod: Use a tripod to keep the camera stable and ensure consistent perspective.
8. Split Screen Video
Split screen isn’t limited to photos. You can also use it to enhance your videos.
8.1. Software Solutions
- Adobe Premiere Pro: An industry standard and great choice for split screen video.
- iMovie: This comes standard on Macs and is a very accessible option for beginners.
8.2. Best Practices
- Plan: Plan the video.
- Sound: Pay attention to sound quality.
- Keep it Simple: Avoid clutter.
9. Ideas and Inspiration for Split Screen Photos
Need some creative inspiration? Here are a few ideas to get you started:
9.1. Nature Photography
- Seasons: Capture the same landscape in different seasons.
- Weather: Show the contrast between a sunny day and a stormy day.
- Close-up vs. Wide Shot: Combine a detailed close-up with a sweeping landscape view.
9.2. Portrait Photography
- Expressions: Capture different emotions on a person’s face.
- Before and After: Show a before-and-after transformation.
- Different Angles: Combine different perspectives of the same person.
9.3. Travel Photography
- City vs. Country: Contrast urban and rural landscapes.
- Day and Night: Show the same location at different times of day.
- Different Cultures: Combine images from different countries or regions.
9.4. Food Photography
- Ingredients vs. Finished Dish: Show the raw ingredients alongside the final product.
- Cooking Process: Capture different stages of the cooking process.
- Different Flavors: Compare and contrast different flavor profiles.
10. Tips for Effective Split Screen Compositions
10.1. Maintain Visual Balance
Ensure that the different sections of your split screen photo are visually balanced. Avoid having one section dominate the others.
10.2. Create a Focal Point
Give the viewer’s eye a clear place to rest by creating a focal point in each section of the split screen.
10.3. Use Complementary Colors
Choose colors that complement each other to create a harmonious and visually appealing composition.
10.4. Tell a Story
Use the split screen format to tell a story or convey a message. The different sections should work together to create a cohesive narrative.
10.5. Experiment with Different Layouts
Don’t be afraid to experiment with different layouts and divisions of the frame. Try different combinations and see what works best for your images.
11. Showcasing Split Screen Photos on Social Media
Split screen photos are perfect for social media. They grab attention and encourage engagement.
11.1. Instagram
- Carousels: Create a carousel post with multiple split screen photos.
- Stories: Use the layout feature to create split screen stories.
- Grid Layout: Design your Instagram grid to incorporate split screen themes.
11.2. Facebook
- Collages: Create a photo collage using the split screen format.
- Cover Photos: Use a split screen photo as your Facebook cover photo.
- Posts: Share individual split screen photos with engaging captions.
11.3. Twitter
- Paired Images: Share two related images side-by-side.
- Threads: Create a thread with multiple split screen photos.
- Visual Commentary: Use split screen photos to comment on current events or trends.
12. Split Screen Photography and Copyright
Copyright protects your creative work, including split screen photos. Here’s what you need to know:
12.1. Ownership
You automatically own the copyright to your split screen photos as soon as you create them.
12.2. Registration
You can register your copyright with the U.S. Copyright Office to gain additional legal protections.
12.3. Usage
You have the right to control how your split screen photos are used. You can grant licenses to others for commercial or non-commercial use.
12.4. Infringement
If someone uses your split screen photos without your permission, you can take legal action to stop the infringement and seek damages.
12.5. Model Release
If your split screen photos include recognizable people, you may need to obtain a model release to use the images for commercial purposes.
13. E-E-A-T and YMYL in Photography
E-E-A-T (Expertise, Experience, Authoritativeness, and Trustworthiness) and YMYL (Your Money or Your Life) are important concepts for online content, especially in fields like photography where accuracy and credibility matter.
13.1. Demonstrating Expertise
- Share Your Knowledge: Provide detailed and accurate information about photography techniques, equipment, and software.
- Cite Reliable Sources: Back up your claims with references to reputable sources, such as photography books, magazines, and academic research.
- Showcase Your Work: Share examples of your own split screen photos to demonstrate your skills and experience.
13.2. Building Authoritativeness
- Get Published: Contribute articles to photography websites or magazines to establish yourself as an authority in the field.
- Get Involved in the Community: Participate in online forums, photography groups, and workshops to share your knowledge and network with other photographers.
- Get Endorsements: Seek endorsements from other photographers or organizations to build your credibility.
13.3. Establishing Trustworthiness
- Be Transparent: Disclose any affiliations or conflicts of interest.
- Be Accurate: Double-check your facts and correct any errors promptly.
- Be Responsive: Respond to comments and questions from your audience in a timely and helpful manner.
14. How to Stay Updated with Photography Trends in the US
To stay ahead in the dynamic world of photography in the US, it’s important to keep up with the latest trends, technologies, and artistic styles. Here’s how:
14.1. Follow Influential Photographers
Keep an eye on the work of renowned American photographers and rising stars. Analyze their techniques, compositions, and subject matter to identify current trends.
14.2. Read Photography Magazines and Blogs
Subscribe to leading photography magazines like Popular Photography, American Photo, and PDN (Photo District News). Also, follow reputable photography blogs and online publications for news, reviews, and tutorials.
14.3. Attend Photography Events and Workshops
Participate in photography festivals, conferences, and workshops in the US. These events offer opportunities to learn from experts, network with other photographers, and discover new trends.
14.4. Join Photography Communities
Join online photography communities and forums to discuss trends, share your work, and get feedback from other photographers.
14.5. Follow Social Media Trends
Pay attention to the types of photos and editing styles that are popular on social media platforms like Instagram, Facebook, and Pinterest.
14.6. Analyze Stock Photography Trends
Monitor the best-selling photos on stock photography websites to identify popular themes, subjects, and styles.
15. Why dfphoto.net Is Your Go-To Resource for Photography
At dfphoto.net, we’re passionate about photography and dedicated to helping you improve your skills and unleash your creative potential. We offer a wealth of resources, including:
- Detailed tutorials: Step-by-step guides on various photography techniques, including split screen photography.
- Inspiring photo galleries: Showcasing the work of talented photographers from around the world.
- Equipment reviews: Honest and unbiased reviews of cameras, lenses, and accessories.
- A vibrant community: Connect with other photographers, share your work, and get feedback.
Address: 1600 St Michael’s Dr, Santa Fe, NM 87505, United States
Phone: +1 (505) 471-6001
Website: dfphoto.net
FAQ
1. What is split screen photography?
Split screen photography involves dividing a single image frame into two or more distinct sections, each containing a separate photograph or a different perspective of the same subject. It’s a creative way to tell stories, compare and contrast elements, or add visual interest to your photos.
2. What equipment do I need for split screen photography?
You can create split screen photos with just a smartphone and photo editing app. However, a DSLR or mirrorless camera, tripod, and software like Adobe Photoshop or GIMP will give you more control and flexibility.
3. How do I plan a split screen shoot?
Start by defining your concept, choosing your subject, sketching your composition, and planning your lighting. This will help you visualize the final result and guide your shooting process.
4. What are some composition tips for split screen photography?
Use the rule of thirds, leading lines, symmetry, negative space, and color harmony to create visually appealing compositions.
5. How do I create split screen photos in Photoshop?
Open your images in Photoshop, create a new document, drag the images into the new document as separate layers, resize and position the images, add masks or borders (optional), adjust colors and tones, and save your image.
6. Can I create split screen photos on my iPhone?
Yes, you can use the Shortcuts app to create a side-by-side photo shortcut. This allows you to quickly combine two photos without needing a third-party app.
7. What is photo stitching and how does it relate to split screen photography?
Photo stitching is the process of combining multiple photos to create a larger panoramic or high-resolution image. You can use photo stitching to create stunning landscapes or detailed composite images for your split screen compositions.
8. What are some ideas for split screen photos?
Try capturing nature scenes in different seasons, contrasting city and country landscapes, showing before-and-after transformations, or comparing different flavors in food photography.
9. How can I showcase split screen photos on social media?
Use carousels on Instagram, create collages on Facebook, or share paired images on Twitter to grab attention and encourage engagement.
10. How does copyright apply to split screen photography?
You automatically own the copyright to your split screen photos as soon as you create them. You have the right to control how your images are used and can take legal action against infringement.
Ready to take your photography to the next level? Visit dfphoto.net today to discover more tutorials, inspiring galleries, and a vibrant community of photographers. Start creating stunning split screen photos that capture attention and tell your unique story!
