Making professional looking photos can seem daunting, but with the right knowledge and techniques, it’s achievable. This guide, brought to you by dfphoto.net, will equip you with the essential steps to elevate your photography, whether you’re using a smartphone or a professional camera. Learn to master lighting, composition, and post-processing to create stunning images that stand out, even on platforms like LinkedIn. With attention to detail and the right resources, exceptional photography is within your grasp.
1. What are the essential steps for prepping a DIY professional headshot shoot?
Preparing for a DIY professional headshot shoot involves careful attention to wardrobe, grooming, and background. According to dfphoto.net, selecting the right clothing involves opting for solid colors and ensuring they are wrinkle-free. According to research from the Santa Fe University of Art and Design’s Photography Department, in July 2025, avoiding busy patterns and logos will prevent distractions in the final image. Hairstyle should be neat and reflective of your everyday professional look. Makeup should be simple and natural, avoiding anything too heavy that might be difficult to edit. Jewelry should be kept minimal, and glasses should be chosen to avoid glare. Finally, skin should be prepped to reduce oiliness for a fresh, matte appearance.
1.1. What are the best clothing choices for professional headshots?
Opt for solid colors to avoid distractions and ensure your clothing is wrinkle-free for a polished appearance. According to Popular Photography, a collared shirt, sweater, or blazer is preferable to casual wear like t-shirts or hoodies, which may appear sloppy. Make sure there is a high contrast between your clothing and the background to make you stand out. For example, a light-toned shirt with a dark blazer works well against a standard off-white wall. Avoid company logos and patterns that may detract from the main subject.
1.2. How should I style my hair for a professional headshot?
Style your hair in a way that mirrors your usual professional look to maintain authenticity. Avoid drastic or unusual haircuts right before your photo shoot. Use hair spray or water to manage stray hairs for a neat appearance. If you have long hair, experiment with different positions, such as having it forward on both sides or back over your shoulder on the side closest to the camera. Clients often prefer their hair back on the nearest side for a cleaner, more polished look.
1.3. What makeup and jewelry are suitable for a professional headshot?
Keep your makeup simple and similar to what you would wear to a business meeting, avoiding heavy or overdone applications. dfphoto.net editors can remove minor blemishes like acne during post-processing, but they cannot remove excessive makeup. Jewelry should also be kept simple to prevent distractions. Complex or large jewelry can detract from the focus on your face.
1.4. How can I minimize glare from glasses in a headshot?
Choose glasses that minimize glare when facing a light source to ensure clear visibility of your eyes. Experiment with different angles and lighting conditions to find the position that reduces glare the most. If glare persists, consider removing your glasses for some photos, especially if you are comfortable without them.
1.5. How should I prepare my skin to avoid looking oily in photos?
Use a dry paper towel to pat down areas prone to oiliness, such as the forehead, nose, cheeks, and chin. Shiny skin can be distracting in a photo, and reducing oiliness beforehand minimizes the need for extensive editing later. If shaving facial hair, do so the night before to avoid razor bumps and irritation on the day of the shoot.
2. How do I find the best home lighting for professional looking photos?
Ideal lighting for professional looking photos at home should be natural, preferably sunlight diffused through clouds or a curtain. According to research from the Santa Fe University of Art and Design’s Photography Department, in July 2025, overhead indoor lights should be avoided due to the yellow tint they cast, which negatively affects skin tone. The best approach involves facing a large window directly, ensuring that the light is even and without harsh shadows. If direct sunlight is unavoidable, it’s best to wait for a time when the light is softer or to use a diffuser to scatter the light.
2.1. What type of lighting is best for a professional headshot?
Natural light is best because it provides a soft, even illumination that enhances skin tones and reduces harsh shadows. Window light is ideal, as it offers a large, diffused light source that can be easily managed. Avoid direct sunlight, which can create harsh shadows and cause squinting. Instead, position yourself near a window with sheer curtains or wait for a cloudy day to diffuse the light naturally.
 DIY professional headshot background tip
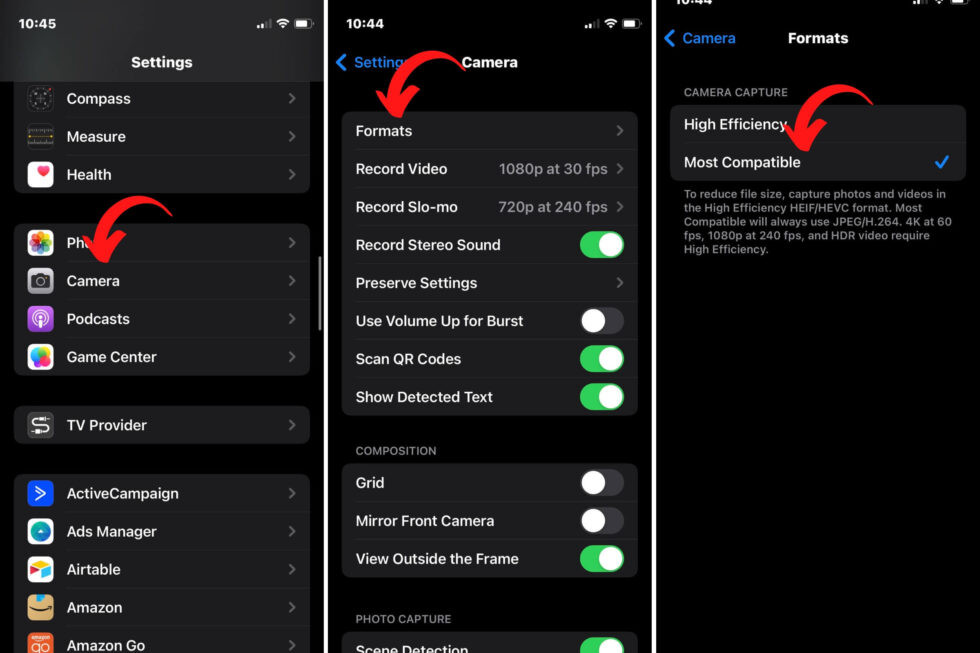
Proper iPhone settings for high-resolution professional headshots at home: Go to “Settings” then “Camera” then “Formats” then select “Most Compatible” to ensure photos are saved as JPGs for optimal quality.
2.2. Why should I avoid overhead lights for professional headshots?
Overhead lights typically cast a yellow hue, altering your skin tone and creating unflattering shadows under your eyes, nose, and mouth. The color balance of indoor electrical lighting is often inconsistent with natural light, resulting in an unprofessional appearance. Always turn off indoor lights when taking headshots to ensure that you’re using only natural light from a window or the outdoors.
2.3. How can I use window light effectively for professional headshots?
Position yourself directly facing a large window to maximize the amount of natural light on your face. If the sun is too bright, use a sheer curtain to diffuse the light and soften shadows. Ensure the light is evenly distributed across your face and body, with minimal distracting shadows. Experiment at different times of the day to find the best lighting conditions, as the intensity and direction of sunlight can vary.
2.4. What if I don’t have access to a window with good lighting?
If window light is not available, consider taking your headshot outdoors in a shaded area. Look for a location that is bright enough but doesn’t expose you to direct sunlight. The shade will provide a soft, even light that is similar to diffused window light. Ensure that the background is not too dark, as this can reduce the overall brightness of the photo.
2.5. How important is the background compared to good lighting?
Good lighting is more crucial than the background when taking a professional headshot. Prioritize standing in a location with optimal lighting on your face and body, even if the background is not ideal. A well-lit photo can be edited to replace the background, but a poorly lit photo cannot be easily fixed. Ensure there is sufficient contrast between your clothing and the background to facilitate background replacement during editing, if necessary.
3. How to enlist the help of someone to take smartphone headshots?
Recruiting someone to take your smartphone headshots yields better results than selfies because the front-facing camera offers higher quality and less distortion. According to dfphoto.net, enlisting a friend, coworker, or spouse to take the photo will provide a more professional look. Ensure the “photographer” understands not to alter the zoom or camera settings and to maintain the natural lens level. It’s also beneficial for them to provide feedback on your poses and expressions, which is difficult to achieve when taking a selfie.
3.1. Why is using the front-facing camera better than taking a selfie?
The front-facing camera on smartphones typically has a higher-quality lens than the selfie camera, resulting in sharper images with less distortion. Selfie cameras often have wide-angle lenses that can distort facial features, making your nose appear larger and your ears look tucked behind your head. Using the front-facing camera allows for a more accurate and professional representation of your appearance.
3.2. What instructions should I give to my smartphone headshot photographer?
Instruct your photographer to take the photo from your eye-level height, tilting the camera slightly downwards for a flattering angle. Ensure they maintain a distance that captures you from the waist up, showing both shoulders and elbows in the frame. Ask them to keep an eye on your hair and collar, ensuring everything looks neat and in place. Emphasize that they should not adjust the zoom level or other camera settings.
3.3. How can I avoid distortion when taking a selfie headshot?
When taking a selfie, hold the camera as far away from your body as possible to minimize distortion. Turn the camera horizontal and ensure the bottom of the photo reaches the middle of your ribs for proper cropping. Tilting the camera downwards slightly can also help reduce distortion. Be aware that selfie photos may not be as high-quality as those taken with the front-facing camera, so consider it a last resort.
3.4. Why is feedback from a photographer important for headshots?
Humans are generally poor at selecting flattering photos of themselves. Feedback from someone else can provide valuable insights into your poses, expressions, and overall appearance in the photo. A candid opinion can help you choose a photo that projects confidence and competence. Recruit someone who is enthusiastic and willing to take multiple photos to ensure you have a variety of options to choose from.
 DIY Professional Headshot at Home Examples
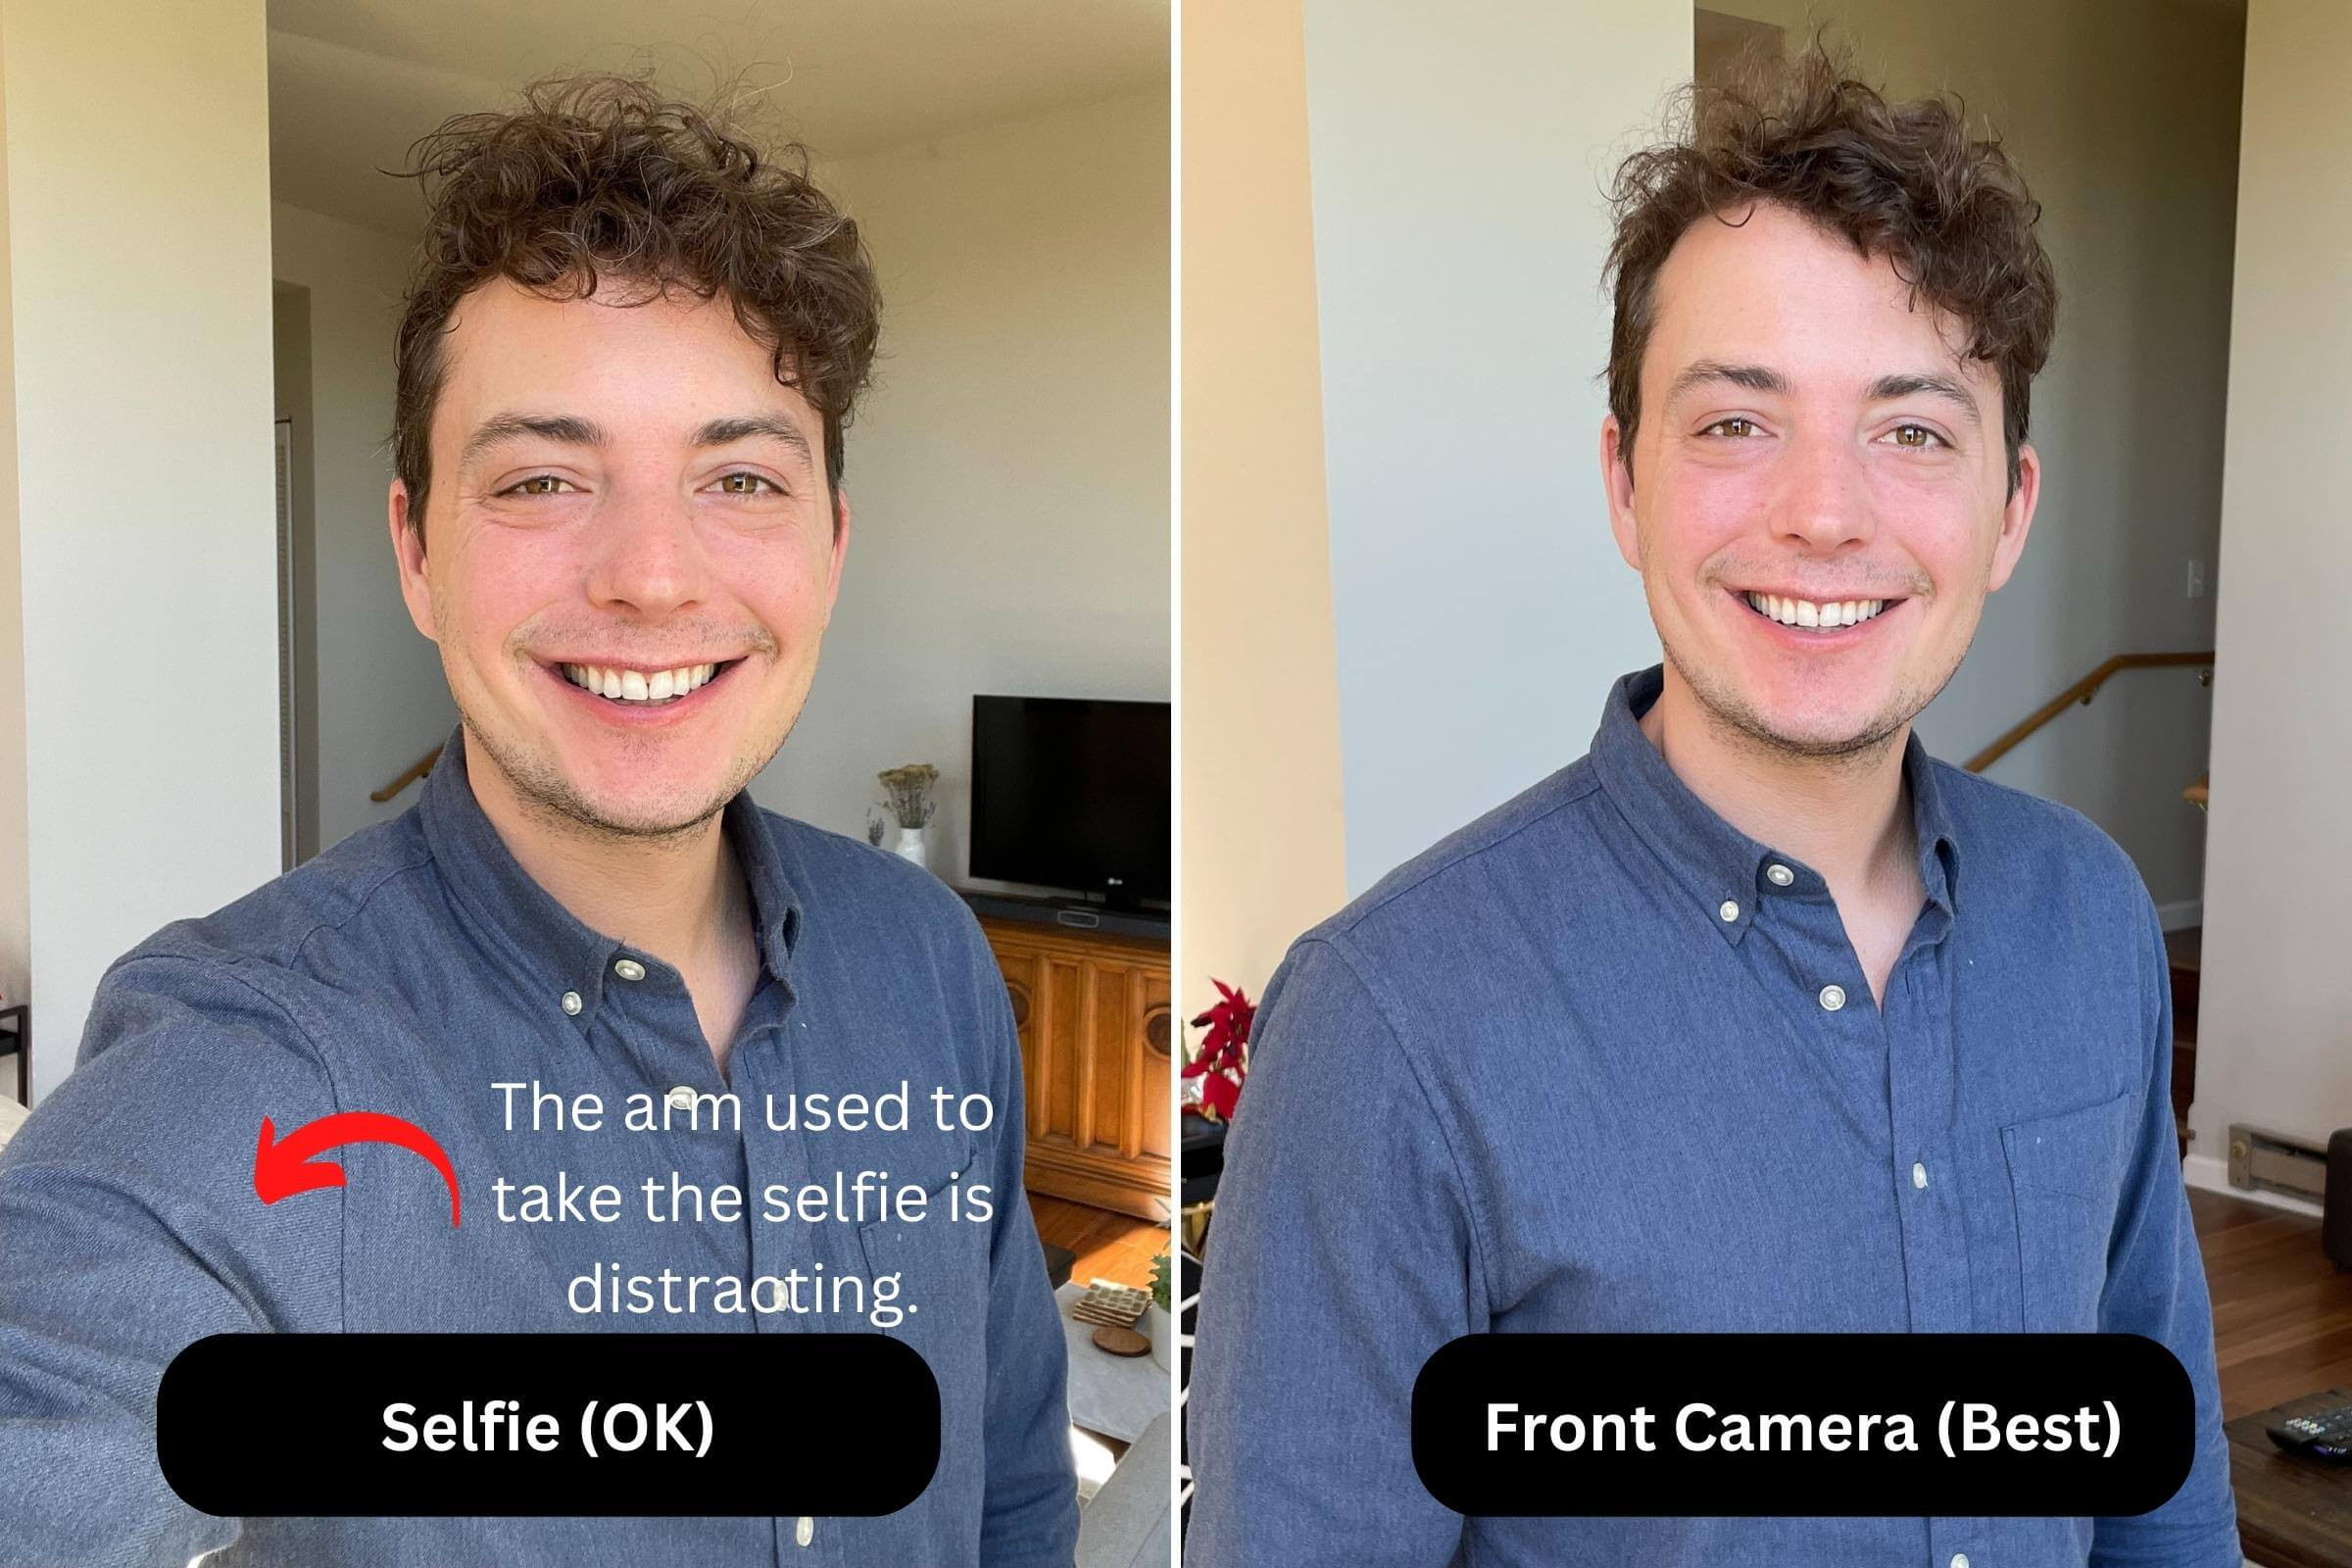
DIY professional headshot examples show the benefits of using the front-facing camera versus the selfie camera, with the former providing better quality and less distortion for professional looking photos.
3.5. What height and angle are ideal for smartphone headshots?
The phone should be held at approximately eye level, or slightly above, to the top of your forehead. Avoid holding the camera too high or too low, as this can create unflattering angles. Tilt the camera slightly downwards, no more than 15 degrees, to prevent distortion of your facial features. Never tilt the camera upwards, as this is generally considered an unflattering angle.
4. What are the best techniques for taking professional photos with an iPhone?
Taking professional looking photos with an iPhone involves several key steps, including setting the correct camera settings, paying attention to crop and composition, and mastering expressions and poses. According to dfphoto.net, make sure the camera lens is clean and avoid using Portrait Mode, which can interfere with the image’s clarity. Leave plenty of space around your shoulders and above your head for flexibility during editing. Experiment with different expressions and poses to find what looks most natural and engaging.
4.1. What camera settings should I use on my iPhone for headshots?
Ensure your iPhone camera settings are optimized for high-quality images. Turn off Portrait Mode or any other mode that blurs the background, as this can reduce the professional look of your headshot. Make sure the camera lens is clean to avoid smudges or blurriness in your photos. Use the regular “photo” settings for the best results.
4.2. How should I crop my iPhone headshots?
Leave ample space on both sides of your photo for your shoulders and at least a couple of inches above the top of your head. This provides flexibility during editing to adjust the composition as needed. Avoid cropping off any part of your body, as it is impossible to add that back later. If someone else is taking your photo, have them capture you from the waist up, ensuring your shoulders and elbows are visible.
 DIY-Professional-Headshot-Distance
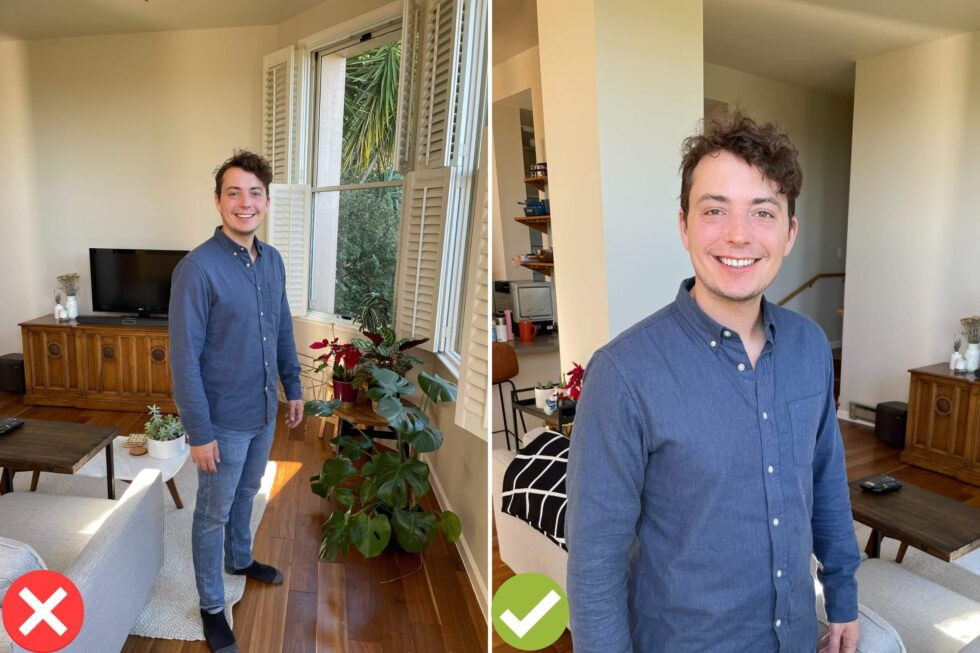
Proper distance for DIY professional headshots involves capturing both shoulders and elbows in the frame, ensuring optimal image quality and flexibility for editing.
4.3. What expressions and poses work best for professional headshots?
Experiment with a variety of expressions, including smiling with teeth, smiling without teeth, and a neutral expression. For smiling photos, think of positive memories to create a genuine smile. For neutral expressions, slightly squint your eyes to avoid a blank stare and convey engagement. Keep your back straight and shoulders back, and lean slightly towards the camera to highlight your features.
4.4. How important is smiling in a professional headshot?
Smiling can make you appear more likable, competent, and influential, according to studies like this one. However, a forced smile can look unnatural, so it’s important to feel relaxed and genuine. If you don’t feel comfortable smiling, a neutral expression with slightly squinted eyes can also convey confidence and engagement. The decision ultimately depends on your personal preference and the image you want to project.
4.5. How many photos should I take during a headshot session?
Take at least 20 photos to ensure you have a variety of options to choose from. Experiment with different poses, locations, and expressions. The more photos you take, the better your chances of capturing one that you truly like and that meets the criteria for a professional headshot. Avoid the temptation to take just one or two photos and quit, as this may limit your chances of finding the perfect shot.
5. What is a checklist for ensuring professional looking photos at home?
A home professional looking photos checklist ensures that you’ve covered all the essential elements for a high-quality headshot. According to dfphoto.net, this includes checking for focus, appropriate mode settings, and proper framing. It’s also crucial to verify that the lighting is even, without harsh shadows or yellow hues, and that your appearance is well-maintained. Finally, confirm that the photo is taken from a flattering angle and that your head is straight.
5.1. Is the photo in focus and free from blurriness?
Check that the photo is sharp and in focus, ensuring that your facial features are clear and well-defined. Blurry photos can appear unprofessional and detract from your overall appearance. If the photo is not in focus, retake it, paying attention to the camera’s focus settings and ensuring that the lens is clean.
5.2. Is the camera NOT in portrait mode or another mode that blurs the photo’s background?
Ensure that you are not using Portrait Mode or any other mode that blurs the background, as this can reduce the professional look of your headshot. The background should be clear enough to provide context but not so sharp that it distracts from the main subject. Use the regular “photo” settings for the best results.
5.3. Are both of your shoulders showing in the photo?
Verify that both of your shoulders are visible in the frame, providing a balanced and professional composition. Cutting off part of your shoulders can make the photo appear awkward or incomplete. Ensure that the photo is taken from the waist up, showing both shoulders and elbows in the frame.
5.4. Is your camera lens clean, or is the photo “smudged”?
Check that the camera lens is clean and free from smudges, dirt, or fingerprints, which can blur the photo and reduce its clarity. Use a soft cloth to gently clean the lens before taking your headshot. A clean lens will ensure that your photos are sharp and professional-looking.
5.5. Are there any electrical lights turned on around you, which may be turning your skin yellow or green?
Ensure that all electrical lights are turned off in the room to avoid a yellow or green tint on your skin. Natural light is best for headshots, as it provides a soft, even illumination that enhances your skin tones. If electrical lights are unavoidable, try to diffuse them or adjust the color balance to minimize the yellow or green cast.
5.6. Are there any shadows on your face, or is the lighting on you even/smooth?
Check that the lighting on your face is even and smooth, without any harsh shadows that can detract from your appearance. Position yourself near a window or in a shaded area to achieve soft, diffused lighting. If shadows are unavoidable, try to minimize them by adjusting your position or using a reflector to bounce light onto your face.
5.7. Do you like your appearance in the photo? (Check that collar, jewelry, and hair are in place.)
Ensure that you are satisfied with your appearance in the photo, checking that your collar, jewelry, and hair are in place and look neat. Make any necessary adjustments to your attire or grooming before taking the photo. Confidence in your appearance will translate into a more confident and professional-looking headshot.
5.8. Is the photo taken from a flattering angle? (From eye or forehead height)
Verify that the photo is taken from a flattering angle, approximately at eye level or slightly above, to the top of your forehead. Avoid taking the photo from too high or too low, as this can distort your facial features and create an unflattering appearance. The angle should be slightly downwards, no more than 15 degrees, to minimize distortion.
5.9. Is your head straight?
Ensure that your head is straight and not tilted to one side, as this can look unprofessional. While a slight tilt can convey friendliness, too much tilt can appear awkward. Keep your head upright and centered in the frame to project confidence and professionalism.
5.10. If wearing glasses, is there minimal glare on your glasses?
If you are wearing glasses, check that there is minimal glare on the lenses, which can obscure your eyes and detract from your appearance. Adjust your position and the lighting to minimize glare. If glare is unavoidable, consider removing your glasses for some photos, especially if you are comfortable without them.
6. How to professionally edit your smartphone photos?
Professionally editing your smartphone photos can transform a DIY headshot into a studio-quality image. HeadShots Inc, via dfphoto.net, offers Virtual Headshot Packages that include verifying photo guidelines, editing for contrast and lighting, retouching to remove blemishes, and background replacement. This service aims to provide a polished, professional look that rivals traditional studio headshots.
6.1. What are the benefits of using a virtual headshot editing service?
Virtual headshot editing services offer numerous benefits, including convenience, cost-effectiveness, and professional results. These services can transform a DIY photo into a polished headshot without the need for a studio visit. Editing services can enhance lighting, remove blemishes, and replace backgrounds, providing a professional look that enhances your online presence.
6.2. How can editing enhance the contrast and lighting of a smartphone headshot?
Editing can significantly improve the contrast and lighting of a smartphone headshot, making it look more professional and polished. Adjusting the contrast can enhance the details in your face and clothing, while optimizing the lighting can create a more flattering and balanced image. Professional editors use advanced techniques to ensure that the lighting is even and the colors are accurate.
 DIY Headshot Taken with Smartphone Before and After Example of Man
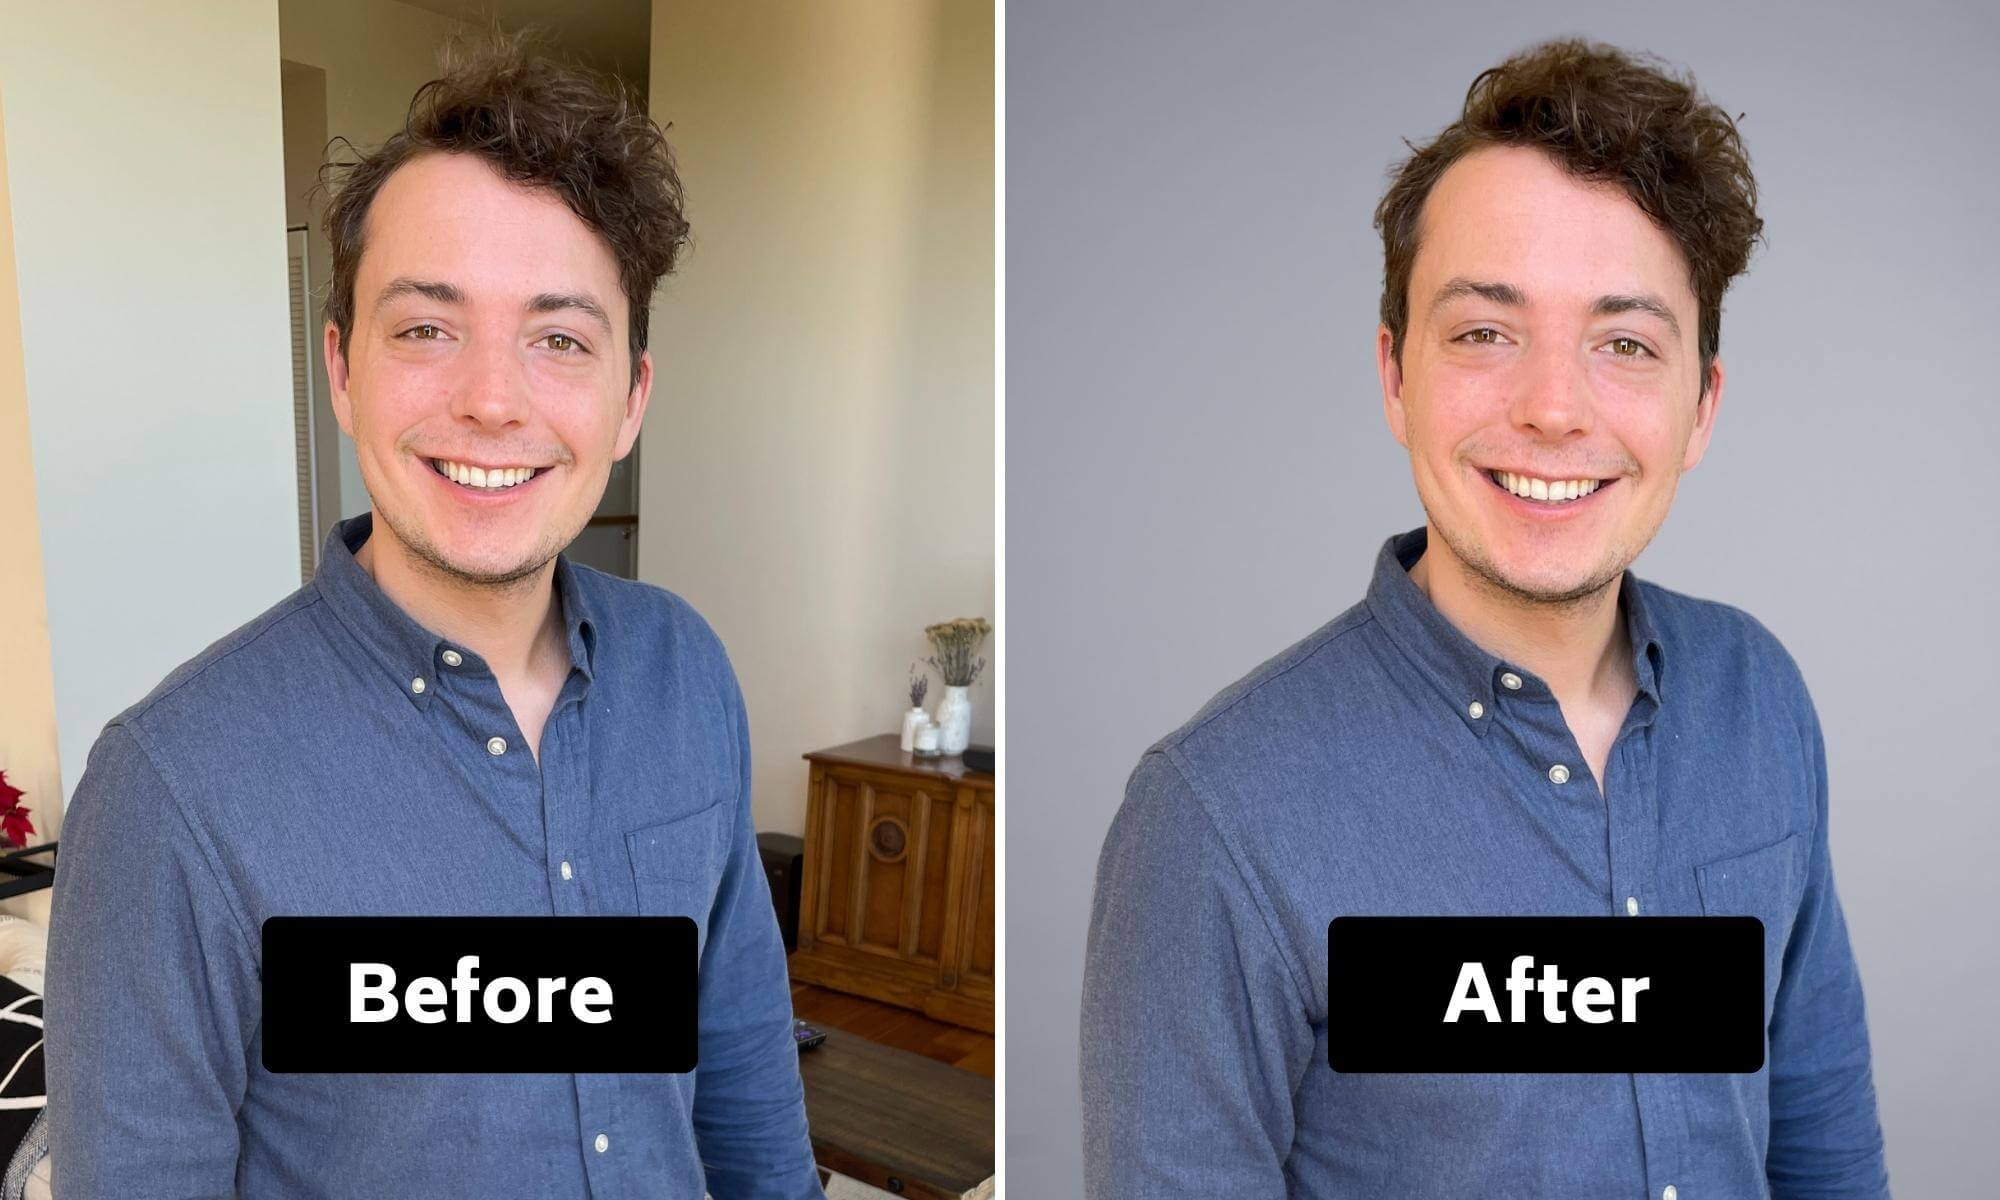
Before and after examples of DIY headshots taken with smartphones, showcasing the transformative effects of professional editing to enhance lighting, remove blemishes, and create a polished look.
6.3. What retouching techniques are used to improve a headshot?
Retouching techniques involve removing distracting elements such as acne, stray hairs, bags under eyes, and yellow teeth. These subtle adjustments can significantly improve your overall appearance in the photo, making you look more confident and professional. Retouching is done by hand to ensure a natural and realistic look, avoiding an overly processed appearance.
6.4. How does background replacement enhance a professional headshot?
Replacing the background can create a clean and professional look that enhances the focus on your face. Virtual headshot services offer a variety of background options, including plain studio backgrounds and blurry city or office scenes, tailored for professional profiles. A clean and uncluttered background can make your headshot stand out and convey a sense of professionalism.
6.5. What is the turnaround time for virtual headshot editing services?
The turnaround time for virtual headshot editing services is typically around three days, allowing for thorough editing and retouching. Some services offer an upgrade to overnight editing for an additional fee. A reasonable turnaround time ensures that the editing is done carefully and accurately, providing the best possible results.
FAQ: How to Make Professional Looking Photos
1. How do I choose the right background for a professional looking photo at home?
Select a background that is simple and non-distracting, such as a plain wall or a blurred office setting. Ensure there is enough contrast between your clothing and the background to make you stand out.
2. What are the best poses for a professional looking headshot?
Stand with your back straight and shoulders back, leaning slightly towards the camera. Avoid tilting your head too much to one side. Experiment with different poses to find what looks most natural and confident.
3. What should I wear for a professional looking photo?
Opt for solid colors and ensure your clothing is wrinkle-free. Avoid busy patterns and logos that can be distracting. Choose clothing that is appropriate for the industry or position you are representing.
4. How can I improve my smile in a professional looking photo?
Think of positive memories to create a genuine smile. Relax your facial muscles and avoid forcing a smile. Experiment with smiling with and without teeth to see what looks best.
5. What type of lighting should I avoid when taking professional looking photos?
Avoid direct sunlight and overhead fluorescent lights, as they can create harsh shadows and unflattering skin tones. Stick to natural, diffused light from a window or shaded outdoor area.
6. How many photos should I take to ensure I get a good professional looking headshot?
Take at least 20 photos, experimenting with different poses, expressions, and angles. The more options you have, the better your chances of capturing a photo that you truly like.
7. How can I minimize shine on my face in a professional looking photo?
Use a dry paper towel to pat down areas prone to oiliness, such as the forehead, nose, and chin. Consider using a mattifying powder to control shine.
8. What should I do with my hair for a professional looking photo?
Style your hair in a way that mirrors your usual professional look. Ensure your hair is neat and tidy, with no stray hairs. Avoid drastic or unusual haircuts right before your photo shoot.
9. Can I use filters on my professional looking photo?
Avoid using filters that significantly alter your appearance. Subtle adjustments to brightness, contrast, and color balance are acceptable, but filters that distort your features or add unnatural effects should be avoided.
10. How can I make my eyes look more engaged in a professional looking photo?
Slightly squint your eyes to avoid a blank stare and convey engagement. Think of something positive or interesting to create a sparkle in your eyes.
Elevate your professional image today with dfphoto.net! Visit our website to discover comprehensive guides, explore stunning photo collections, and connect with a vibrant community of photographers in the USA. Whether you’re seeking expert tips, creative inspiration, or professional editing services, dfphoto.net is your ultimate resource for achieving exceptional photography. Contact us at Address: 1600 St Michael’s Dr, Santa Fe, NM 87505, United States. Phone: +1 (505) 471-6001. Website: dfphoto.net. Start your journey to photography excellence now!